1 ... 3 4 5 6 7
mickpiston
mickpiston New Reader
12/31/20 12:35 p.m.

OK been busy and haven't had much time for the car or updating here.

I ended up heli-coiling the trashed head stud threads, it went fine. Used an old Heli-Coil 5521-7 set my buddy had in his garage.

Made a drill guide from some steel leftover from a Harbor Freight mini-lathe I used at work to build some test equipment.

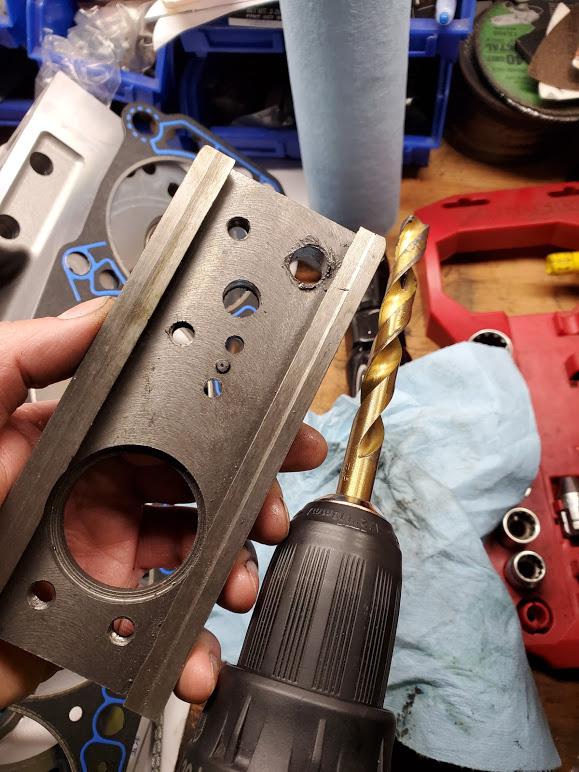
Drilled out the threads with a ton of grease on the bit, and tapped it with a ton of grease. Didn't get much metal shavings in the water jacket.

And threaded in the coil, worked great.

Used alot of thread sealer on the helicoil to make sure it didnt leak.

Didn't take many other pics during reassembly but it went together fine. Took a bunch of time setting the lifter preload, and they sound perfect now that it's running again. Just about burned up my Ryobi drill priming the oil pump haha.

Got it running last night, but have the distributor off a tooth, I ran out of adjustment range advancing it to idle well. Stopped there. 

Of course it was about 28* outside, so lots of fun. I'm trying to flush out the rest of the contanimated coolant now that is stuck in the block. I pulled the thermostat today, and going to run water through it until clear, then refill. New thermostat and gasket and it should be good to go.

When running for a few minutes last night I didn't notice any leaks or weird noises, so I think I'm OK and everything is sealed up well. We'll see this afternoon as I button it up.

Then, hopefully, finally, on to fuel injection after I drive it for a few days and make sure everything is good.

mickpiston
mickpiston New Reader
12/31/20 12:40 p.m.
petey said:

nope once squished a head gasket (conventional) is toast.6.5 inches for a pushrod on a roller cam 5.0 is about 1/4" too long typically as stock is 6.27" ish.ford roller lifters always have those marks on them it seems,so thats kind of a no big deal thing long as you cant feel any edges i'd send em.if youre using head studs,are you torquing the stud or just putting em in finger tight and torquing the nuts?

and that block face surface looks a little chewy.has the block ever been resurfaced that you know of?

I reused the head gasket, it seems fine. Hope I don't regret it, but OK so far.

I reused the pushrods. I read alot online and it seemed to be common length for this exact F303 cam and lifter/rocker setup. The machine shop said the wear pattern on  the valve stems looked like the rockers were riding in the right spot. I'm not too concerned about that. Again, I hope I'm right. I reused the lifters as well, they were all fine I think.

I screwed in the studs finger tight until they bottomed out, then just a tiny turn more so they weren't loose at all. I torqued the nuts on the studs.

I have no clue if the block was resurfaced when the PO built the motor. No idea how many miles were on it.  Will run it as is for now, hope it holds for awhile. I really like the car, so I may begin building, or even buy a crate motor for it ensure reliability in the future, we'll see.

mickpiston
mickpiston New Reader
12/31/20 12:41 p.m.
rustomatic said:

That's a bummer regarding that head stud.  You've reminded me of all the times I've had water pump bolts/studs break in the block on old Fords.  Just like the studs you've mentioned, some touch water--great setup they designed there.  Definitely look into the ARP head stud installation process if you haven't already done so; it's pretty specific regarding which parts to grease and how to go about torquing.  Many have re-used non-metallic head gaskets with success, even under boost . . .

Thanks, I agree. Huge bummer but oh well. I have definitely read the ARP instructions about 20x and followed them to the letter. This head stud thread issue was definitely not an error on my part, I assume it was likely previously damaged or weak threads. How it goes sometimes!

mickpiston
mickpiston New Reader
1/1/21 11:00 p.m.

Well I got it running well and flushed out the cooling system about 5x to get the contaminated water out of there. I put a flush fitting in the heater inlet hose, but by garden hose was frozen so that didn't work out haha. Ended up removing the thermostat and running the car with just water in it, and radiator drain cock open with a bucket under it. Just kept topping off the rad, it seemed to clean out pretty good.

I also had one of my nightmares come true. I've always had this weird fear of hitting the fan blade on a running engine while working on a car, and it finally came true. Holy E36 M3 did I get off lucky. Thank god this car has a plastic fan on it that flexes a bit. I was playing with the distributor timing, and was locking down the clamp bolt. The wrench slipped my hand slid back into the fan. Super lucky the wrench hit first, and the only damage was to my knuckles, but it doesn't feel good. One of the cuts was pretty deep, but my brother in law is a PA and took a look, said it should heal alright. I'm turning off the engine next time I'm dealing with the distributor clamp! Heres the damage.


So I think most of the problems are solved. I'm going to get some driving time on it the next week and make sure everything is good, then hopefully get started on the Sniper system.

mickpiston
mickpiston New Reader
1/21/21 10:42 a.m.

Well it's been awhile, but I figured I would update this thread with the latest for you guys who were following along. 

After we last joined our hero, he had almost sliced his hand off in the fan blades, but had the motor running again.

I had the motor running well, but having weird issues with timing that took a bit to sort out. My timing light kept showing the motor wanting to idle with no less than 30* and ideally 40* base advance. This seemed crazy. SBF are usually set around 12-15*. I started questioning the aftermarket timing pointer and the aftermarket harmonic balancer being accurate. I made a piston stop from an old spark plug and found true TDC on the motor. It was actually about 8* off of the 0 mark on the balancer. I marked my new true TDC, and 10* advance marks beyond that.  The base timing was better, but still way too much, being around 25-30*. Any less than that and the motor would stumble and run extremely rough. This was always checking base timing with the vac advance can removed and the line plugged.

Long story short, another stupid issue. Ended up having a crack in the cap I was using to plug the vac line when disconnecting the vac can. Was ending up with a decent air leak (I couldn't hear with the motor running)  and was compensating for it with timing. Another problem was the PO had the vac advance can connected to full manifold vacuum, which was adding in another 10+* at idle which it didn't need. Switched the advance vacuum to ported, and got it all sorted out. Started and idled and ran fine at about 12-14* base timing.

Here's the aftermarket pointer built into the fuel pump for some reason. I've since removed and blocked the fuel pump as I don't need it with the EFI setup, need to make another pointer.

mickpiston
mickpiston New Reader
1/21/21 10:52 a.m.

Alright, after solving the timing problem, the car was running and driving well. I put some miles on it for a week to make sure the new heads and gaskets were good with no problems.  After the head work and timing change, I could tell the carburetor was definitely not dialed in. I played with it a bit, then figured why waste any effort on tuning this, it's EFI time!

I pulled the carb off, drained the gas tank and got started. I had already ran wiring through the car (from the trunk mounted battery) to the engine bay for the power supply to the throttle body/computer and for the in-tank fuel pump at the back. I was ready to install the in-tank fuel pump which I thought would be quick and easy.

Turns out nothing is quick and easy.

The Holley in-tank fuel pump and sender unit is made to be a drop in replacement for Mustangs/Cougars/Falcons/Comets, etc with the common 16 gallon gas tank that Ford used. I assumed my Falcon had a 16 gallon tank, as most did. Of course it didn't. It had the much less common, couple year only, 14 gallon tank. This tank uses a different sending unit, and is not compatible with the 16 gal version. I found this out when trying to install the new fuel pump/sender under the car. Great.

Finally pulled out the old tank to inspect, and it was clear the locating tabs on the sender/tank are different. The only way the new sender/pump would fit is with the fuel line outlet hitting the trunk floor.

Here are the old 14 gal tank sender and the new 16 gal sender/pump side by side:

Annoying, but gas tanks aren't too expensive.  I order a 16 gallon Falcon tank on ebay, only $80 shipped, score! The 16 gal tank is the same outside dimensions, mounting holes, etc so it should just drop in.

Until this showed up:

Uh...that's not right. No clue what that tank is even for. Returned on ebay, refund, ugh.

Now I'm stuck with this:

I end up finding the right tank that O'reillys can have for me the same day, for $100. Deal! It showed up no problem, and fit perfectly, so all good. I plumbed the fuel line and wiring for the pump, all good.

Working on engine bay wiring:


mickpiston
mickpiston New Reader
1/21/21 11:05 a.m.

I had read lots of tips on installing the Holley Sniper system, and followed that advice. I ran 10Awg wires direct from the battery to power the system. I used the +12V terminal at the starter solenoid that is hot when in the ON and START (cranking) key positions to trigger a relay, which then fed direct battery power to the key switched on wire for the sniper. This should eliminate any noise on the switched wire. I routed the coil - RPM trigger wire separately away from the power supply wires. All of this saved me problems later I think.

I got it fired up easily and it was running well using the tuning wizard. Just enter # cylinders, engine displacement, cam type (I tried Stock/Mild setting and the Street/Strip setting for my kind-of lumpy Ford F303 cam. Definitely ran better using the Stock/Mild cam preset to start with. I'll be dialing in the tune from there), RPM trigger, etc. Super easy. I installed the 02 sensor in the driver side exhaust pipe, a few inches past the header collector. The coolant temp sender is in the intake manifold heater line tower. All this worked well.

On initial startup, it idled very high, about 1800RPM. This is because the idle screw setting was too high, making the IAC valve being way too far open to compensate I think. After letting it warm up over 160F on the temp sensor, I followed the instructions and dropped the idle screw down, setting the IAC % to around 5%. This let the idle control take over correctly, and it has a nice idle at 800RPM.

I had read multiple complaints about problems running the Sniper on SBF motors, since the computer is in the front of the throttle body, and interference from the distributor can affect the EFI computer. This is totally true. It ran fine with the hood open and the air cleaner off, but when I put the metal air cleaner base on, the IAC would go crazy every 30 seconds or so, opening way up and racing the idle before dropping back down. It would go from 5% to 50%. That wouldn't work.

I used some steel to cut a shield for the throttle body between the distributor, mounted to the front 2 studs on the manifold. This seems to have totally solved the problem. With the air cleaner on, no more weird stuff going on. A 20 minute drive last night confirmed it. I smoothed it out and painted it last night, will get it back on and the Monte Carlo bar reinstalled, then get to driving. Once I have the EFI learning updated after some driving, I'll start playing with tuning, then add the Hyperspark distributor and CD box for timing control!

And the control unit mounted on the dash for now:

OK that pretty much brings me up to date. I'll post more after playing around with the EFI system more!

AngryCorvair (Forum Supporter)
AngryCorvair (Forum Supporter) GRM+ Memberand MegaDork
1/21/21 4:13 p.m.

I've heard good things about the Holley Sniper

rustomatic
rustomatic Reader
1/21/21 5:22 p.m.

Good to see that things are working.  So long as that TBI runs steady, the only issues I've heard are basically the same stuff that happens with carbonators on SBFs:  boiling fuel when things get hot.  The spacer you have in there will probably do the trick, so long as it is plastic or wood.  Overall, it should be a drastic improvement over the previous ancient carbonator tech.

mickpiston
mickpiston New Reader
1/21/21 11:03 p.m.

In reply to rustomatic :

Hopefully it will be reliable. I'm very impressed with the install and how well the car runs now. It has a ~1" open bore spacer that is plastic. Much easier to adjust than the old carb. Can't wait to add timing control, should get even better!

rustomatic
rustomatic Reader
1/22/21 4:46 p.m.

Sweet!  I forgot to mention how "easy bolt-ons" tend to drive one to turn Fords into Chevys (factory vs. aftermarket, in other words)--your gas tank fiasco is solid evidence (condolences, by the way).  Have a good drive with that thing this weekend, weather permitting.  Wave to everyone who honks and gives the thumbs-up.  I should take my own advice, by the way.  People react more, or at least as much, to a Falcon than they do to the average Ferrari (if that's a thing).  It's funny and cool, but it's also slightly annoying.  At least yours isn't white, so you won't get that inane Gas Monkey reference yacked at you in every parking lot . . .

mickpiston
mickpiston New Reader
1/25/21 5:04 p.m.

So after getting some miles on the EFI system, I love it. It is a really amazing upgrade. My only real complaint was the stiff and really touchy throttle. Since you are pulling in all 4 barrels at the same time, it is really hard to modulate power well, especially off idle. With a fairly powerful motor and stiff clutch on the street, this was kind of inconvient. I had purchased the progressive throttle linkage but hadn't installed it yet. I put that on this morning, and made the few adjustments to the ECU config recommended by EFI System Pro where I bought the system.

https://www.efisystempro.com/efi-pro-hangout/holley-sniper-efi-instruction/tuning-sniper-progressive-link

I changed my vacuum advance back to the manifold vacuum, since the progressive linkage eliminates the ported vacuum port. Having sorted out my timing issues before this didn't cause any problems, other than a little more advance at idle from the vac can. The engine seems to idle happier this way anyways so no problem. 

Now the throttle is much lighter and easier to modulate, the secondaries open at 48% of the TPS, which works well. I adjusted the Acceleration Enrichment vs TPS map as suggested, and it is really excellent now. Much smoother and more forgiving on the street, with a E36 M3load of power on top if you get into it.

I'll keep driving to get some more learning done on the ECU, then update my base fuel map with the learning offsets, and then smart smoothing it out. I'll probably get the ignition system ordered soon, I should be ready for that in another couple weeks.

For the moment, just going to have fun driving the car. I need to get started on that Moto Guzzi Ambassador project sitting on my lift half taken apart!

mickpiston
mickpiston New Reader
7/12/21 12:23 p.m.

Been reading tons of cool build threads on GRM lately, and realized I haven't updated my Falcon thread recently. I checked, and my last post was in January! Time flies I guess. 

I've been driving the crap out of the car all year so far, and have had a ton of fun with it. No major changes (until recently, I'll to get that). Just some fine tuning on the EFI system.

One day in May, I was running the car pretty hard, and was really giving her the beans on an empty road. All of a sudden the motor died, and I coasted to a stop. Still had all electrical power, cranked, but wouldn't run. Got out and thought I did some major damage based on the puddle underneath.

But that ended up being fuel....alot of it.  Turns out you should really flare the end of a hard fuel line when attaching rubber line to it for high pressure fuel injection. When I really gave it some mustard the pressure blew the rubber line off the hard line!

Oh well, easy fix. I reattached the line and took it easy getting home. Later I flared the hard line and double clamped the rubber line, never had a problem again.

mickpiston
mickpiston New Reader
7/12/21 12:26 p.m.

Some other time in the spring, April maybe, I had it start running like E36 M3 in general. I noticed my AFR readings on the gauge were crazy, just way off from their normal. After a bit of troubleshooting, I was pretty sure it was a failed 02 sensor. A phone call to Holley and they warrantied it, and a new one was on the way. They had recommended in the installation manual to install the sensor at a minimum of 10* angle from horizontal, but recommended about 45* to keep moisture off the tip. Due to space constraints when I drilled a hole in the exhaust and used the clamp on bung, it was probably at 15*. Not sure if this contributed to the failure, but I didn't want to lose another one. I had my buddies shop weld in a new bung at a better angle, and installed the new sensor. Haven't had a problem with that since. I took some good shots underneath the car while it was on his lift, love how clean this thing is!

mickpiston
mickpiston New Reader
7/12/21 12:31 p.m.

Took it to a ton of car shows, meets, Cars & Coffee. Has been a fun year with the car. I have a (almost) 2 year old, and with his car seat in the back he goes with me everywhere, which has been fun. I found and picked up a really nice 57 Chevy 210 for my Dad a few months ago, so we've had fun cruising them together. It was a 90% restoration that was stalled out. All the hard stuff was done, we're finishing it up over the summer. It will probably be shipping back to California this fall for him, but it's stored out here for now and I drive it weekly as well.

Since the car has been running great, done a bunch of bike projects as well. Here's a Royal Enfield Bullet 500 I rebuilt a couple months ago (FOR SALE if anybody's interested!). Still working on my Moto Guzzi Ambassador 750 slowly (tons of new parts sitting in a box, bike is cleaned and ready to reassemble). Also picked up another Harley, a nice Softail Springer that I'm finishing up.

mickpiston
mickpiston New Reader
7/12/21 12:37 p.m.

So about a month ago I finally ordered all the ignition components to finish my EFI upgrade. I was always planning on using timing control with the Sniper, but wanted to have the fuel system really sorted first. I was confident I was at that point, so ignition time.

Heres the old stuff pulled out (For sale!).

Unfortunately I didn't take any great pics of the install or the new parts. I used a Holley Dual-Sync distributor, as it came with a steel gear installed. I really only needed the Holley Hyperspark (cheaper), but it comes with a cast gear. I have a roller cam motor and needed the steel gear to match the cam. It would have been the same price or more to have the gear swapped on the Hyperspark, so I went with the more expensive Dual Sync. 

I used the Holley Sniper ignition coil and CDI box to complete the ignition system. I removed all the old wiring from the old ignition system, and found lots of butchered OEM wiring harness that I pulled out as well. Everything went great, very easy installation. Took it out for it's first test drive........and massive RFI/EMI problems. Such bad interference the ECU was crashing every few minutes. Luckily I limped it back home in between crashes, and started troubleshooting. This is very common on Sniper EFI installs on a SBF motor, with the distributor so close to the ECU in the front of the Sniper throttle body. My little shield that worked before was not going to be sufficient.

Some aluminum foil on the distributor and wires confirmed this. I got 20 minutes of reliable driving out of the car like this, before the fan blew the foil off. It immediately started stalling again. I was definitely fighting interference issues.

mickpiston
mickpiston New Reader
7/12/21 12:41 p.m.

The first thing I wanted to do was get rid of the old Ford 2G alternator setup. I'm not sure what this came off of (not correct from the original Falcon motor, or the car the 5.0 came out of), but I didn't like the potential noise generation of an older alternator with a remote regulator, not to mention the low power output. I needed some real power for this fuel/ignition system to be confident in it.

I found this article that was really awesome, and went for the bolt-in 3G alternator upgrade:

How-to Install a High-Output Ford 3G Alternator into Older Fords

I used a new cheap 3G alternator for mid 90's Mustangs from DB electrical on Amazon ($90) and a Painless 3G alternator wiring kit ($90), also on Amazon. I ripped out all the old alternator/regulator wiring, and fixed some bad splices in the original harness. The 3G just dropped in place, super easy to do. I was now charging at 14V at idle, up from 12.9-13.1V with the old system. Highly recommend upgrade!


mickpiston
mickpiston New Reader
7/12/21 12:50 p.m.

I finished that install on Saturday last weekend. Was hoping I solved the problem, but nope, still interference.

OK on to the next, I boxed in my ECU shield on the sides and top, and I re-routed the spark plug wires towards the front of the motor. 
(disclaimer, I am an absolutely horrific welder. I have a small stick MIG welder and I can stick stuff together. It is not pretty. When I settle on a fix, I will make a new shield out of bent aluminum that is not such an atrocity).

And....still no dice. Need to keep looking.

I realized I have a really less than ideal installation setup for the EFI system, with my battery in the trunk, grounded to the frame at the rear, and 00 wire running up front to the starter solenoid for + distribution. My EFI connections are done with their own 10AWG wire run to terminal blocks on the inner fender for + and -. All my switched connections use relays for direct battery power. This wasn't a problem with just the fuel system, but obviously this is not enough for clean power or signals with the addition of ignition.

I added new grounds from - terminal block to the body/fenderwell, and straight to the intake manifold with 10AWG wire. I also removed my ECU shield and ground off all the paint at the mounting holes, realizing it was probably not grounded well. 

I finished those things last night, and being 10PM, I only ran the car for 5 minutes. However in those 5 minutes it idled perfectly with no stalls or interference on the display. Previously I would have a crash within 2 minutes or so of idling. I'm hoping I've solved the problem, but a good test drive today should tell me much more.

I will keep working on this problem until solved. The timing control is awesome, and when it runs, it really runs well. I also added a CAN splitter cable and a USB cable, so I can plug in my laptop and live tune / stream data, which is really awesome. More tuning to come after working out this issue.

Up next is steering and suspension. The more I drive the car, the more the sloppy steering box bothers me. The suspension is new and fine, as good as early 60's suspension can be. However the original steering box has a massive center dead spot and I'm just sick of it. I'm really thinking about doing some Autocross with the car, and this needs to be changed for sure.

I'm thinking rack & pinion steering conversion, and looking at various suspension upgrades. Hope to jump on that in August and get some racing in September!


mickpiston
mickpiston New Reader
7/15/21 11:44 a.m.

Well took it for a 20+ min drive last night with no problems. I think I sorted the RFI issues. It was mainly due to grounding problems. It is hard to ensure a great ground path with the battery mounted in the trunk.

My + and - terminal blocks in the engine bay have 10AWG wire run direct from the battery. I thought that was sufficient, but I guess not. I ran new 10AWG ground wires from the - terminal block to the fender apron, and to the intake manifold. I also ground all the paint off the mounting stud locations of my ECU shield. These things seem to have knocked down the interference.

Will work on rebuilding my ECU shield to look nice, and further clean up the wiring. 

Back to driving the Falcon and planning steering and suspension!

Shavarsh
Shavarsh Reader
7/15/21 1:51 p.m.

Great posts, filing the alternator article away for future use. Looking forward to what you do next!

wawazat
wawazat Dork
7/15/21 2:21 p.m.

Well done!  I fought similar EMI/RFI issues with the FiTech on my 351C powered '69 Cougar.   It's resolved now but was a challenge for sure.

mickpiston
mickpiston New Reader
7/15/21 3:50 p.m.
Shavarsh said:

Great posts, filing the alternator article away for future use. Looking forward to what you do next!

It was a great article. Really helpful to do an easy 3G upgrade on an SBF.

mickpiston
mickpiston New Reader
7/15/21 3:51 p.m.
wawazat said:

Well done!  I fought similar EMI/RFI issues with the FiTech on my 351C powered '69 Cougar.   It's resolved now but was a challenge for sure.

I know right? That was a pain in the ass to sort out. Lots of trial and error. I really like the Holley EFI system, but it is certainly not plug & play on a small block ford motor. There is alot of work to get it to really run well. Overall, I'm happy with it for the price though. Glad you got it sorted on your Cougar!

jerrysarcastic (Forum Supporter)
jerrysarcastic (Forum Supporter) Reader
7/16/21 1:16 a.m.

Allow me to take a moment to tip my hat at your clever use of factory trim here:

Well played sir.  Chrome does get you home... especially if you are already home.  :)

mickpiston
mickpiston New Reader
7/29/21 6:06 p.m.

In reply to jerrysarcastic (Forum Supporter) :

hahaha sorry I just saw your reply. Awesome! I didn't even notice that in the picture. What else is that chrome for, if not to hang Harbor Freight electric tape on it?

1 ... 3 4 5 6 7

You'll need to log in to post.

Our Preferred Partners
PGj9GdbSmbAeztTwgkVUVGsoFwwa6kfXvzIT2PT3rAcEiqQrkwz7DCaAviJ1bHhd