


In reply to oldtin:
Yeah, I'm really looking forward to it. ![]()
Seeing that picture makes me wish Triumph had retained the power bulge for the TR6. The Michelotti Triumphs certainly were more stylish.

In reply to oldtin:
Yeah, I'm really looking forward to it. ![]()
Seeing that picture makes me wish Triumph had retained the power bulge for the TR6. The Michelotti Triumphs certainly were more stylish.

"Seeing that picture makes me wish Triumph had retained the power bulge for the TR6."
Wouldn't that have been sexy ? ! ? ! ?
Just can't wait to see your TR in paint, especially with those wonderful fenders attached. Hope that it works out this time ! ! !
OK, the summer vacation is over. Time to get back to work on this.
Most of the body shell got delivered to the stripper yesterday. I just need to figure out which primer to use, which means finding out what paint the paint guy uses. I'm sure he won't mind me interrupting his two week vacation. ![]()
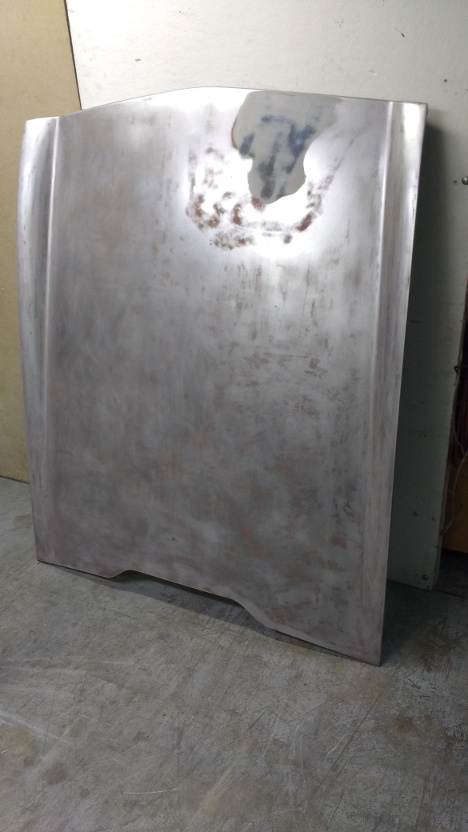
I also experimented with chemical paint strippers for the bonnet. There's the 25 year old can of methyl chloride which I'd rather not use. Home Depot had some more modern stuff that is neither Methyl Chloride nor caustic. I believe it's made by elves, because it seems to be fairly effective for something that is biodegradable. I managed to strip the entire top surface of the bonnet. The bottom will be harder due to all of the support structure.
Forgive me not having pictures, but I have yet to figure out what to do about the PhotoBucket debacle. An unpainted hood is not very exciting anyway.
This is just a test.
Ah, so Amazon Prime Photos does work. You just need to right click and "Copy Image Address", then paste that into the image hotlink.
My Amazon test failed. That's what I was afraid would happen. The link you get from right-clicking the image is for a temporary link, and the official link you can get for sharing doesn't work here. Oh well, time to set up my own hosting site.
I spent 8 hours today stripping the underside of the hood. The chemical stripper that I found at Home Depot (Ready Strip) works well if you put it on thick and wait an hour. As expected, this took longer because of all of the corners and holes. It's mostly done and just needs some detailing work.
The tub/doors/trunk lid should get blasted and primed with epoxy primer next week. It's not going to be cheap, but doing this hood has me convinced there's no way I could strip the entire shell by hand. At least and still have hands.
Let's try Flickr.
So far so good.

If you cover the wet stripper with plastic wrap, it works better and faster.
Two_Tools_In_a_Tent wrote: If you cover the wet stripper with plastic wrap, it works better and faster.
That's a good idea. I know with the old Methyl Chloride stripper, it would sometimes dry out before softening the paint enough. Hopefully I won't have any other paint to strip. Most of the shell should be done tomorrow.
BTW, PhotoBucket can eat a bag of dicks.
I stopped by the shop after work to check the body shell over. Overall, it looks pretty good.
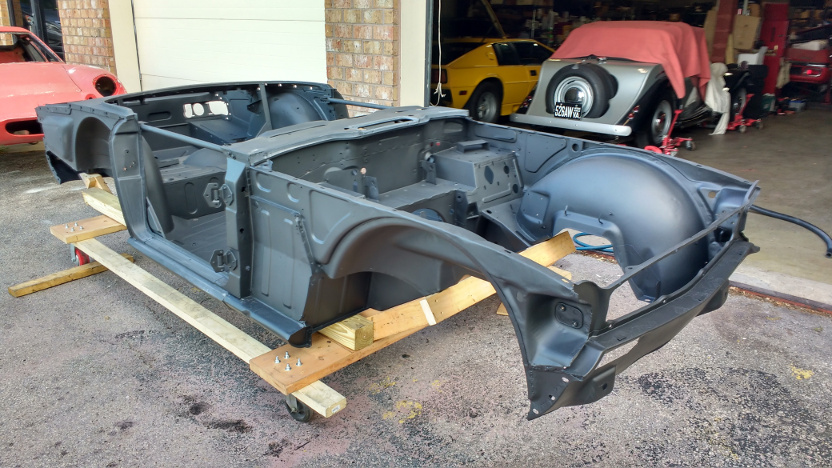
There are some things I'm not completely happy with. It appears the stripper didn't blow the media out of cavities, so about 10% of the primer has sand in it. I've also found more than a few places where the old paint wasn't completely stripped. Also, they didn't blast the insides of the doors, and that's the part that I really wanted blasted. It would have been cheaper and safer to chemical strip the outer skins. For the money, I expected better work. Just blowing the sills, rear valance, and scuttle clear of sand took me two hours. Lesson learned: If you want something done right, do it yourself.
The passenger door sill still needs some of work.
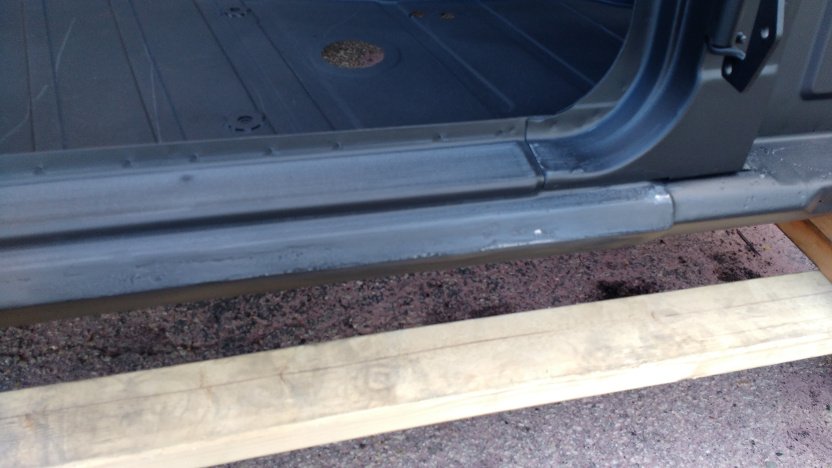
The top has lots of sand in the primer, and it looks like they uncovered some filler and gave up trying to strip it. I can understand that, because softer stuff can take forever to media blast. The bad news is that this sill has been patched (which I had suspected). It's a decent job, so I'll most likely cover the rough spots will filler and move on.
Today was a long day. The media blasting opened up a few pinholes in various places around the tub, so out came the welder and grinder. That wasn't too bad, but sanding down the trunk to smooth out epoxy primer with sand embedded in it was draining. The entire trunk area was sanded, so that's where I started with the seam sealer, working my way to the front of the tub. I'm using Sikaflex 221 for this. The only places I didn't do were inside the engine compartment and anything underneath like the trunk and differential well. The painter can take care of those areas.
I'm debating whether to start laying on some filler tomorrow before dropping the tub off at the painter's shop on Monday.

The emotional highs and lows of this game are hard to convey in words, but I know where you are at!If its your fist rodeo, you are wondering what the hell you were thinking at the start, if its not, you know it will end well if you just keep moving ahead.
NOHOME wrote: The emotional highs and lows of this game are hard to convey in words, but I know where you are at!If its your fist rodeo, you are wondering what the hell you were thinking at the start, if its not, you know it will end well if you just keep moving ahead.
This isn't my first rodeo, but this is only my second total rebuild and my first starting with someone else's completely disassembled mess. The first one took four years. This project is going on three. Yeah, it's the hump that I just need to get over before getting to another batch of fun stuff like making the engine run.
The good news is that I finished sanding down the primer on areas that I will see when this thing is done. So if the painter gets lazy, at least the visible parts will be smooth. Hopefully the tub gets dropped off tomorrow and the next time I see it will be with paint. If it wasn't so humid here, I could conceivably flip the tub over and paint the underside myself.
Progress of sorts. The tub is at the painter's shop. I'm not expecting a quick turnaround, but hopefully it won't languish in storage for weeks.
Meanwhile, I need to start scrounging up parts for making this thing run. Stuff like EFI throttles, a fuel system, etc. The engine has a DCOE Weber manifold on it now, so a DCOE-like throttle body would be the easy option. I also need a fuel tank with a fuel return port. I may try to modify a stock tank, but I'd prefer to have an aluminum tank with baffles and swirl pot already welded internally. The last time I sourced one of these it came from England and ended up costing a bit much. The dollar-to-pound ratio is better now, but the shipping is still pretty outrageous.
It's been a month since the body tub was dropped off at the paint shop. I haven't heard of much progress until today. The painter is almost ready to shoot primer.

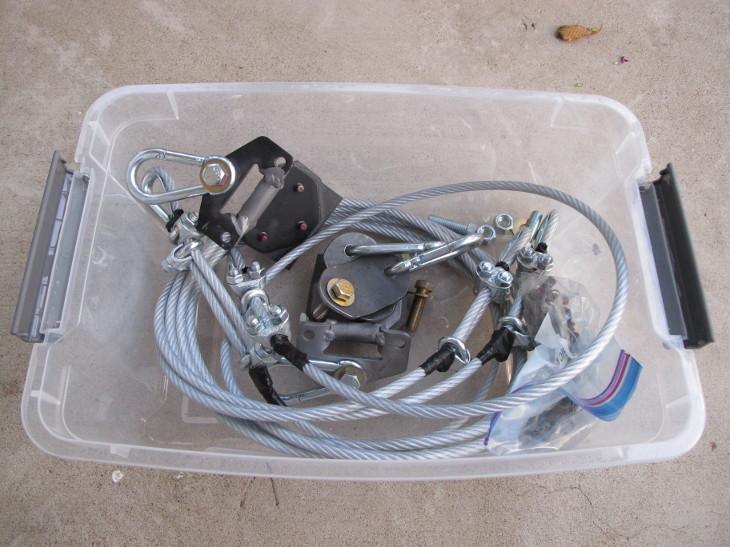
As for myself, I've been working on other cars and the house mostly. The only thing I've accomplished on this project is coming up with a set of lift rings for the body shell that bolt into the seat belt mounts and old door hinges that were welded solid. They only need to lift 300 pounds, so I think it's more than adequate. I'm giving this to the painter tomorrow for lifting the tub. We'll also use this to drop it down on the frame after paint is done.
I stopped by the painter's place today to finally drop off the lift rings. He's pretty busy, but almost has the body ready for the color coat. It's rare that the work someone else does for me far exceeds my expectations, but so far his does. If the paint comes out as nice as the filler and primer, this body will fit right in with the rest of this over-restored TR6. The first cone this car eats is going to cause a cringe, but I'll get over it.
It's not on the frame yet, but it is blue.
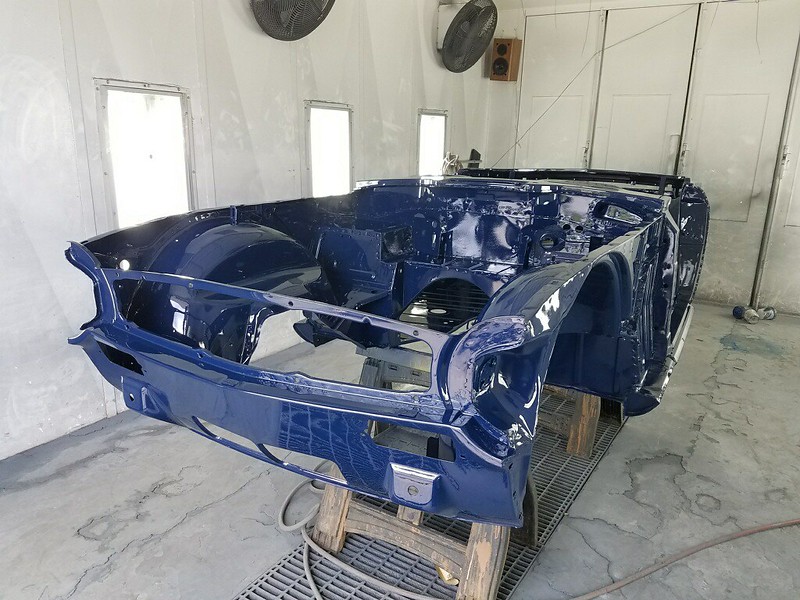

If I can pick it up tomorrow, it may very well join the frame for good.

Looks great! Im shocked by how many external body parts are bolt on. Like quarters. Only other car ive ever seen do that is my wifes old saturn, and pre war cars.
Your painter seems to have done an outstanding job.![]()
Dusterbd13 wrote: Looks great! Im shocked by how many external body parts are bolt on. Like quarters. Only other car ive ever seen do that is my wifes old saturn, and pre war cars.
Yeah, TR6s are a real throwback design. They were obsolete when new. But having all of the wings bolt on makes it easier to repair accident damage. Or more likely rust damage. That rear fender seam is probably the worst rust area on these cars.
I suppose I need to get off of my wallet and order some DCOE throttles and possibly a fuel tank now. I may as well experiment with modifying a stock tank first. It seems easy enough to weld some 3" exhaust tubing around the fuel outlet to act as a swirl pot. An access hole was cut to clean out the tank, so a return pipe could be added through it that would internally dump into the swirl pot.
I've been thinking about how to do the intake. I have a Cannon DCOE intake that sticks out 4.5". The Borla DCOE throttles would add 3.5". That leaves about 5" to the fender arch. If I go with air horns, they would need to be fairly short, and then I'd want to build a cold air box around them. As an alternative, I was thinking about using a 3.5" aluminum tube as a plenum and connect to the throats of the DCOE throttles with short (< 1") 40mm tubes. A flex tube would then connect to a filter mounted in front of the radiator shroud. This would sort of look like the stock petrol injection intake, which I always thought was pretty cool. The primary question is: how important are air horns on the throttles? I could theoretically put air horns inside of the 3.5" tube, but straight tubing with fish mouth cuts would be significantly easier to weld.
It looks like Borla raised the cost of their DCOE throttles by $50, and I need three of them. Also, they do not provide any sort of cold start bypass, but do have MAP ports and idle adjustment screws. I'm most likely going to add ports to the bottom of each intake runner for a cold start manifold, so no big deal.

That is a purty color!

Joe, Color is looking great!
As far as the horns, I would think it a rather good idea as smoothing the transitions will have major flow implications. Probably well worth at least trying to work them in.
Apexcarver said:As far as the horns, I would think it a rather good idea as smoothing the transitions will have major flow implications. Probably well worth at least trying to work them in.
If I get short air horns, I could cut them in half, cut holes in the 3.5" tube using the flange halves on the intake as a guide, and tack weld the air horn bells inside the tube. Then I should be able to weld the air horn flanges back on with everything mounted up to ensure alignment.
I'm pretty happy with the color. It's going to be really tempting to bolt on panels as they come back from the painter, but my plan is to get the car running with just the bare tub to avoid dropping a wrench or worse on fresh paint.

In reply to JoeTR6 :
Welding on air horns is a very bad idea. The whole purpose of air horns is to smooth the transition of air going into the carburetor. Having a weld seam in there will totally destroy air flow.
frenchyd said:In reply to JoeTR6 :
Welding on air horns is a very bad idea. The whole purpose of air horns is to smooth the transition of air going into the carburetor. Having a weld seam in there will totally destroy air flow.
I think you are right. It would be exceedingly difficult to smooth the weld seam, and just making the cut will cause a step in the bell. I may have to go with a base plate matched to the throats and a cover. Jenvey makes a short DCOE throttle that is only 30mm long. Using that would give me more room for an air box and longer air horns to tune the intake. I didn't want to shorten the intake too much for fear of losing low-end torque.
You'll need to log in to post.


