


f6sk wrote: Woot! somebody reads this!
I read this with great interest. Just saying

f6sk wrote: Woot! somebody reads this!
I read this with great interest. Just saying

So that's how magna-fluxing is done. What a cool trick.
Good on you for saving those puppies.

I've also been following this thread along. Excellent job on opening your own no-kill shelter!!

Funny how life gets in the way of your Isuzu build.
Anyway, I'm finally back at it. I went ahead and pulled the motor. I could not access the last few pan bolts without removing the cross member. In order to remove the crossmember, I have to undo the motor mounts, and if I've got the motor mounts off why not pull the whole motor. Besides, getting the timing area motor mount in was going to be impossible - unless I did it this way.
Coming out again
.JPG)
Ah ha! this is the culprit. The oil ring was kinked during the original install. It is fortunate I pulled the head, because of my gasket concerns, and found it. While this is not great, it is useable rather than the total destruction that would have happened if I didn't catch it.
.JPG)
This is a ball hone. Some people call it a dingleberry hone. It has an abrasive in the little balls that is held under a light spring tension as you spin it in the cylinders. These will not "fix" a cylinder, but they are good for deglazing, or knocking off a light rust coat.
.JPG)
Even after the ball hone-ing you can still see the scratches.
.JPG)
.JPG)
I've also been wanting to fix my dipstick tube while I had everything off. But these fixes are a slippery slope.. the "Might as wells" Might as well re-do the exhaust while everything is out of the way. Might as well paint the engine compartment. Might as well make a new turbo manifold if I'm doing the exhaust. Might as well put some coil-overs on the front while everything is apart. etc...

Glad to see you're back at it. What are you going to do about the scratches? Leave em?
I hear you about the fix one thing, then another, then another situation. My car has been apart for so long fixing "just one more thing" for too long as well.

Heh. Welcome to full restoration land. Mine was fix the floorpans. Turned into frame off.
So what DO you do about the scratches? My 350 had similar in a couple of bores when I changed the head gasket. I said Berkley it and put it back together. Now im wondering.

In reply to f6sk:
My buddies and I turned the "Might as wells" into "Miles" as in a guy's name. Last name "Well".
"You know Miles? Miles Well." He's the guy that keeps telling you to go further!
The hardest part is that the reasoning is sound. It actually would be easy to paint the engine bay now. Almost hard to justify not doing it....
But, If I have all the paint stuff out I might as well paint the one fender that is mis-matched. But if I'm doing one fender it won't look right next to the rest of the old paint......

It's a tough call. Just flip a coin.
In reply to Dusterbd13:
The correct answer is bore it oversized and use new pistons/rings etc. It will loose a bit of oil. But, I'm going to run it 'til it blows up and then build up the better/more powerful DOHC motor.
So pretty much the same thing as I am doing. Got it.
Next one will be a tbi lt1 just to mess with people.
f6sk wrote: In reply to Dusterbd13: The correct answer is bore it oversized and use new pistons/rings etc. It will loose a bit of oil. But, I'm going to run it 'til it blows up and then build up the better/more powerful DOHC motor.
At which point, it only makes sense to repaint the engine compartment.
You're welcome.
I'm testing using hylomar on mls head gaskets. It seemed to go well. I coated both sides and let it sit for 10 mins per instructions. It is gummy feeling stuff. They say it never really dries which is supposed to help the seal. Before I sprayed it on the block I put some paper towels in the cylinders. Whatever excess I got cleaned up easily with brake cleaner. 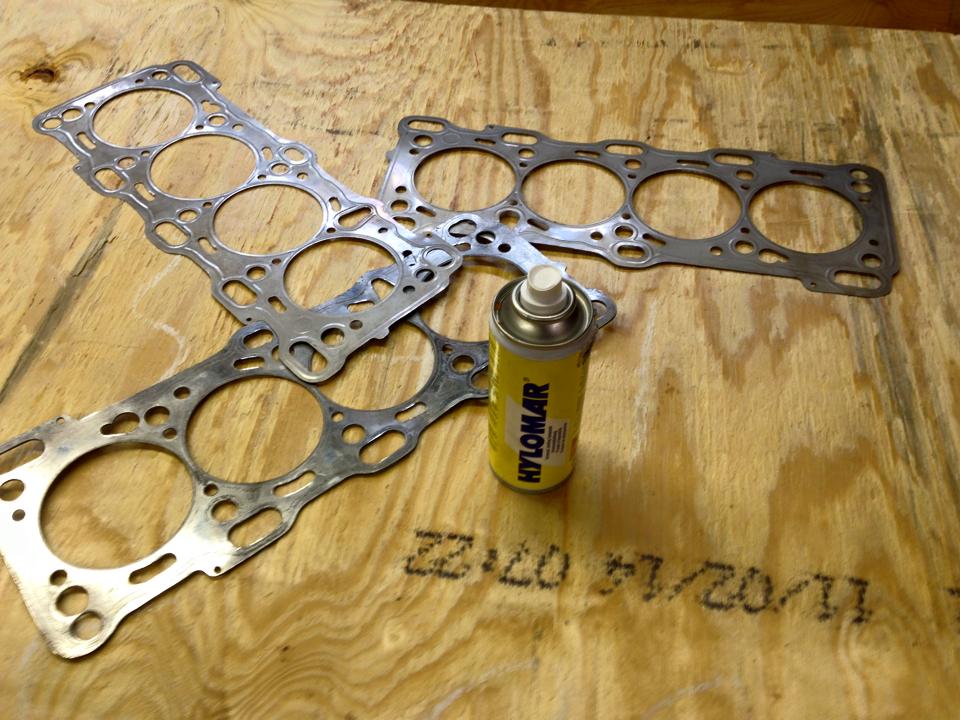

The engine is a pain as always to get on the motor mounts. Once I got it in, it ran like crap. It was lean. Way lean. Like beyond the reading on my wide band lean. Turns out it was the map sensor. If you look closely to the left in the above picture, you'll see the map sensor on the too short vaccum line. That green wire was pulled out just a bit and caused my problem.
With the CV axels out I "Might as well" put some coil overs on, oh and camber plates.

Unfortunately those were too small and I had to re-order a larger pair. The nice thing is that they are not pre-drilled, and I can make them fit my application.
I've got everything back together and it runs! I still have to diagnose a high idle situation.
While I had the CV axels out I thought it would be a good time to install coil-overs and a caber plate. I need the camber plate because I changed the ball joints. The Lotus ball joints were no longer available, so I used stock I-Mark ones. Mistake. They are a bit shorter and therefore mess up my camber. Plus I wanted to lower the car anyway. E-bay Honda coilover kit $60 (and new speakers)
.JPG)
I cut away the upper thingy and the lower spring perch. be careful not to cut into the shock itself - cut away the perch and leave the weld. Avoid high amounts of heat or it will explode.
.JPG)
Test fitting the sleeve. You can see that it much too large to fit over the narrow strut. It even misses the welds I intentionally left in tacked for this purpose.
.JPG)
I needed something to take up the slack, and rest on the welds. The rubber band included in the set will take up the slack, but not rest on the welds. After searching the hardware store I found this pipe coupling.
.JPG)
I needed a shelf to rest the sleeve on and an inside dimension that would fit snugly over the strut.
.JPG)
The I split it in half, one for each side.
.JPG)
Test fit:
.JPG)
.JPG)
Next issue was the sleeve. It was much too long. If I left it in place it would interfere with the strut compression. I marked it and chopped it off at the line.
.JPG)
cut down
.JPG)
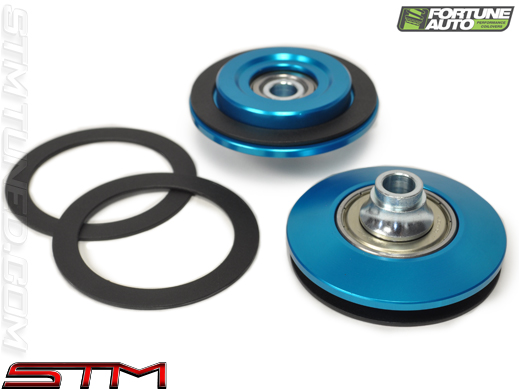
The ebay coilover kit is not intended to work with camber plates. I did not know this. Turns out you have to have a special spring perch with an integrated bearing, as well as a special spacer to keep the perch off the bottom of the camber plate. The bearing allows the assembly to turn when you turn the wheels while the camber plate of course does not move. So I threw away the rubbery spring perches that came with the kit and ordered a set of radial bearing perches by fortune auto through stmTuned.com
.JPG)
Unfortunately their inside diameter was wrong. I needed 18mm. Nothing a little ride in the lathe wouldn't fix.
.JPG)
Note how the camber nipple keeps the perch from bumping into the camber plate.
.JPG)
If you were following along at home and wanted something similar this is the break down
.jpg)
I selected the approximate size o-ring and stuffed it in with a screw driver. This was mandatory so the sleeve wouldn't be floppy at the top. Keeps crap out too.
.JPG)
You can see on the left side where I tack welded the sleeve in place. I don't recommend a lot of welding because the contents are under pressure and may explode. I welded a very small amount and quickly cooled it with water.
Drilling the camber plate.
I tapped it for an 10mm stud, and then decided to use a bolt instead. I wanted the extra bit of support from the flange on the bolt head.
.JPG)
Final assembly:
.JPG)
I put a bit of paint at the bottom to keep the thing from rusting. I have never done this before, so please chime in if I did something wrong before I put this on the car.
Nice work as always. I cant comment on your coil overs because I am learning while I am reading your thread. ![]()

Nice, Im also adding coilovers to my gr-2s with universal camber plates, your pictures are great help. I have a question, doesn't the strut shaft and strut nut turn with the rest of the strut if so shouldn't there be another bearing between the strut nut and the camber plate? all of the coilover set ups ive seen use only one bearing so maybe Im mistaken in my thinking.
upon further inspection I may have made a mistake. I need to rest the plate on the "ledge" of the strut. Right now if I hit a bump there is nothing stopping the strut from shooting through the hood. I'll update the main post when I sort it out.

Instead of o-rings, some folks wrap the strut body with duct tape until the sleeve ~just~ fits. A hefty slathering of silicone keeps it all solid.

Coilovers look great. Same as I was going for with my GR-2's on my Metro.
What's the thickness of the material on your camber plates? I've seen them on the ebay but have the bearings and carriers to make my own.
OK. My mistake. You'll need 2 sleeve/washer/spacers. Possibly 2 different sizes for your specific strut.
The ledge captures the camber plate. (and keeps your struts from shooting through the hood)
.JPG)
This is the original orientation of my spacer. I flipped it over so the camber plate would rest on it and it on the ledge.
.JPG) I may have messed up by drilling my blue perch oversize to match my strut shaft, but I can't foresee any negative outcome from this layout.
I may have messed up by drilling my blue perch oversize to match my strut shaft, but I can't foresee any negative outcome from this layout.
.JPG)
The fix was to use a spacer below the camber plate to rest on the ledge and another smaller spacer (not pictured) to rest on top of the camber plate and receive the nut.
Other designs use a long spacer-nut combo, that allows it to thread and still achieve the stack height.
Anybody picture a problem I might have by allowing my blue perch to float un attached to the camber plate?
VWguyBruce wrote: What's the thickness of the material on your camber plates? I've seen them on the ebay but have the bearings and carriers to make my own.
Thin. I'd say 1/4 inch?


One of my classmates in High School had one just like this. Cool car till he totaled it. When you are in the mountains of East Tennessee. This is a rare thing, especially new for a high school student (his Dad was Dr.)
Flight Service wrote:
I love the impulse. They are so quirky and fun
I got something in the mail

Ohh yeah!! Nice! Just went through the whole thing and all I can say is well done! Really impressive all the way around! Show off the new wheels please?
You'll need to log in to post.


