1 ... 7 8 9 10 11 ... 23
jh36
jh36 Reader
3/12/17 7:07 p.m.

In reply to CrookedRacer: Smart move....Yes. I've broken those and it is very cheap insurance during the rebuild. I'm out of the country for a couple of weeks on biz, but if you don't have the proper bolts by the time I get back, I can strip them off my old motor and mail them to you...if you can wait. I hit a little wall with my 944 too, but mainly due to helping my son finish up his 66 Mustang which he did a fine job on. I'm setting my sites on UTCC and Hyperfest.
Maybe we can motivate each other!!

CrookedRacer
CrookedRacer Reader
3/12/17 7:48 p.m.

I've been reading and re-reading the NASA-PT rulebook like every day. And for quite a while, it felt like it was every day that I was discovering something else in the rules that affects my build. Hopefully it's all under control at this point.

Publishing your points budget and detailed write-ups of modifications isn't always going to help you... for example, Vorshlag's wonderfully detailed and illustrated C4 Corvette TT build may have inspired rules changes in response to the build, as well as protests based on the information that was published. I'm not a professional shop doing the build, but like the Vorshlag team, I'm eager to learn of any mistakes I've made here and now, rather than when a class win is immediately disqualified. I'll be pleasantly surprised if I'm actually competitive anyway.

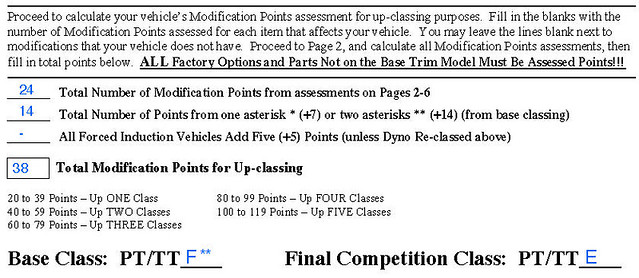
In Performance Tuning, your car is placed in a base class. You can make unlimited "no-points mods" to your car, and you can make modifications that cost points. Up to 19 points, you stay in the class. From 20-39 points, you move up one class. And from 40-59 points, you move up two classes.

The Porsche 944 NA's base class is PTF**. Those two asterisks mean that I get assessed 14 points right off the bat. So to stay in PTF, the budget would be 19-14 = 5 points' worth of mods. Not realistic. To compete in PTE, my points budget is 39-14 = 25 points.

Budget: 25 Points

5 points: Tire composition: Toyo Proxes RR

7 points: Tire width: 245mm width (215 base class + 30mm)

3 points: Exhaust modifications (not including headers)

3 points: modified shocks/struts/dampers

2 points: modified coil springs or torsion bars

2 points: add,replace,remove or modify anti roll bars

2 points: modified brake calipers / brackets / rotors

Total assessed points: 24 Points

No points modifications (that have been done to the car):

Sunroof mechanicals removed

Floor mat removal

Jack and Spare tire removal

a/c system removal

air filter upgrade

alternator relocation

oil systems and coolers other than dry sump

engine rebuild with forged internals of equal weight to BTM

non-BTM fuel lines

wheels, hub modifications (to accommodate brake modifications)

lightweight flywheel

ride height adjustment

shock mount modification

camber/caster plates

brake duct addition or modification

front strut tower bar

steering wheel replacement

mirror addition, and replacement

seat harnesses

driver’s seat

accelerator, brake, and clutch pedal modification

headlamp removal

data acquisition system

dashboard modification

No points modifications (that I’d like to do at some point)

battery replacement/lightweight battery

lexan windows and windshield

ECU reprogramming via chip

exhaust piping / header external wrapping

emergency brake removal

relocated battery

aero hood pins

Points modifications that are possible:
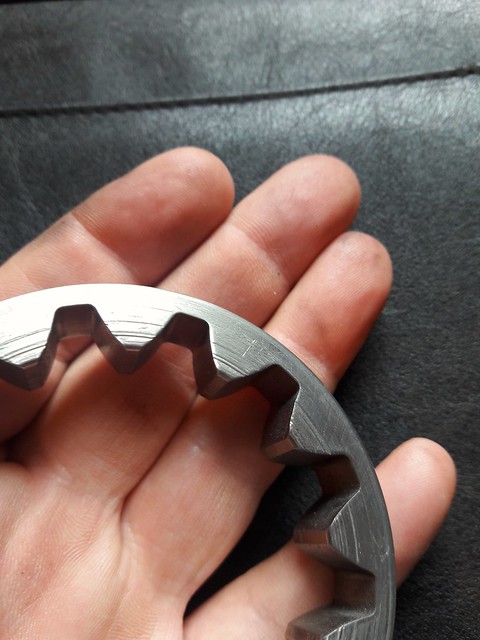
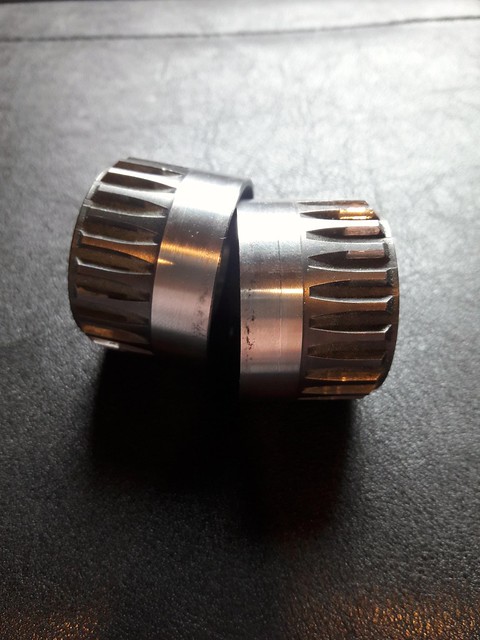
1 point: LSD

1 point: Manual Steering Rack Conversion (including removal of P/S pump and pulley)

CrookedRacer
CrookedRacer Reader
3/14/17 11:00 a.m.

So I made up my mind about what to do with this oil pump. It's going to be fine.

The few little pieces of metal were pretty easily scraped out using the edge of an old drill bit. Even though I was careful, I kind of scratched the spit out of it. A little more polishing and it's reasonably smooth after all. The bottom line is that ALL the FOD is gone.

2017-03-14_11-53-08

I also decided to buy a few Class 12.9 steel screws from Bolt Depot-dot-com. They're far stronger than the stainless ones, and the stock screws are unmarked so they're probably not 12.9 grade. So, again, I've bought myself a little more cheap insurance. They don't need to be stainless anyway, since they'll be bathed in oil at all times.

18 cents apiece, $4.95 shipping. So I got 20 of them so I'd have some for sharing. I just wish there was a Bolt Depot-dot-nearby-store.

The front main seal rides on the drive gear of the oil pump, and tends to make a groove in it over time. The drive gear from my old pump is in better shape than the new one so I'll just use the old one. This picture is after they have both been cleaned up with a scotch-brite pad:

2017-03-14_11-52-54

You can see the new one on the right has a slightly more pronounced groove worn into it by the seal.

jh36
jh36 Reader
3/14/17 11:28 a.m.

In reply to CrookedRacer:

One thing you might want to do, if you haven't already, is contact the PT Liason at NASA MA and give him your logic. The rules are quite interesting. That's what I've done just to make sure I haven't gone down a bad path. You can also use points to shed weight. The Colin Chapman school.

CrookedRacer
CrookedRacer Reader
3/14/17 11:34 a.m.

That sounds like sound advice. I'll let everyone know what I hear back.

Weight is expensive, points-wise. A single point only buys you five pounds. You get 15 pounds per point after that.

jh36
jh36 Reader
3/14/17 11:49 a.m.

My car's previous build sort of naturally landed it going down that road, since it started life as a spec944. However, I am not going to absolutely hang my hat on my build until I have it reviewed. The rules are interesting, as we discussed at Dominion last year. Regardless, looks like we will both be out there and having some fun soon.

jh36
jh36 Reader
3/14/17 6:00 p.m.

If you have not, read section Appendix A carefully, as well as the upclassing section including PTF**.

CrookedRacer
CrookedRacer Reader
3/14/17 7:23 p.m.

Thanks, J!

The upclassing section is pretty much what I've described above... hopefully I didn't miss anything. You and I both get assessed 14 points right off the bat for those pesky asterisks. Who put those there?

My car is a special edition car so I checked the "Yes" box for that on the classification form. The "Celebration Edition" came with nice upholstery, an exclusive paint color, integrated fog lamps, and stiffer springs and shocks. But all of that suspension stuff has been replaced on my car, so I'm taking the points on that anyway.

You'll notice that the 1988 944 NA has a higher base weight than yours. (2844 vs. 2779) That's presumably because of the high-compression pistons in it. Will those pistons add enough horsepower to make up the difference in base weight? I imagine they could: that's only about 4 hp.

Figuring the higher weight into the Appendix A calculations, I'd have to make 176 peak HP to bump me out of PTE. I doubt I'll come anywhere close to that, but we'll see. The engine dyno'ed at just about 140 peak horsepower before the rebuild.

2016-07-23_09-22-51

Will I get 36 horses from fresh OEM rings, a competition valve job (no porting), and a lightweight flywheel? I doubt it. My new tires will also have a bit lower profile and overall diameter than when it was dynoed before, but I don't know if that affects peak HP or just torque.

Edit: Notice that the curves above were generated in 100+ degree ambient air temps... a cooler day is probably good for at least a couple of those horses!

I think I'm safe, as far as bumping due to power/weight ratio. I can't wait to find out, though! :-)

codrus
codrus GRM+ Memberand SuperDork
3/14/17 9:49 p.m.
CrookedRacer wrote: Edit: Notice that the curves above were generated in 100+ degree ambient air temps... a cooler day is probably good for at least a couple of those horses!

Probably not, actually. The dynojet has SAE correction turned on, and that does a pretty good job of managing changes in temperature and altitude for a naturally aspirated car (not so good for a turbo one, though).

CrookedRacer
CrookedRacer Reader
3/15/17 6:58 a.m.

In reply to codrus:

Thanks! That makes sense. And it really illustrates what a noob I am when it comes to tuning.

jh36
jh36 Reader
3/15/17 8:24 a.m.

So I got my preliminary results back. If I understand what you're calculating, I think you have more mid points to spare. I just got the word that my math and logic are sound. So you are at 14 prs at ptf. You get "free" points to get to PTE. That's 6 points. Then before you class out of PTE, you have 39 more points. You also have to do the calculations in appendix a. I will be back in the US on Friday if you want to phone. Of course, I could be completely out to lunch because I haven't slept much lately.

CrookedRacer
CrookedRacer Reader
3/15/17 8:36 a.m.

In reply to jh36: Mind... blown.

Also, I did hear back, and I stand corrected on how much weight one point buys you. 5 pounds is the 1-point threshold and the 2-point threshold is 20 pounds. So that one point could buy me 19 pounds and change below base weight.

docwyte
docwyte Dork
3/15/17 10:17 a.m.

jh36, think you have that wrong. It's 20 points from class to class, so 6 points to the next class due to the penalty, than another 20 points to the next class. So 26 points...

CrookedRacer
CrookedRacer Reader
3/15/17 11:49 a.m.

I hope you meant to say you have "19" more points after getting to PTE. There are no "free" points.

Here is the bottom of page 1 of my Car Classification Form:

class_points_calculations

We're both in the same base class, so I believe your worksheet should look just like this, except the Total Modification Points for Up-classing would ideally be 25 + 14 = 39.

I myself will eventually be using one more point... either for weight savings, or for converting my steering to manual. Not sure yet.

jh36
jh36 Reader
3/16/17 6:15 a.m.

Yes, you are right....we end up in the same spot. I've run several different ways...high hp and high weight, low hp and low weight. I think hp has been a better path to speed than weight savings in a 944 for me, but I will play the cards I'm dealt!

jh36
jh36 Reader
3/16/17 8:38 p.m.

Ok, I'm going to blame my crappy math and logic on being in 7 countries in 9 days. Got it. We are aligned! So, I am going to take another look at my strategy when I get back. I think the tires I was planning (Hoosier R6) will go out the window and I will keep running the Toyo's I've been on for a few years. That gets me back in the safe zone.
So....CrookedRacer, what are planning for your first event? Are you doing Hyperfest?

CrookedRacer
CrookedRacer Reader
3/17/17 8:11 p.m.

We'll see about Hyperfest. I am not making fast progress on this thing. But hopefully my crank scraper shows up in a hurry, as well as my new oil pickup tube. Then I'll be able to at least assemble the short block. I still have to disassemble the cam tower and clean it out too... Lots to do, and very little momentum at the moment. I don't have a clear vision for getting done by May.

Today I got a bunch of stuff in... I got the screws for the oil pump. And now I have 18 spares. :-)

2017-03-17_08-47-38

But I think you can see the deformation of the old screw's socket and the really sharp edges of the super-strong Class 12.9 screws I'll be replacing it with.

I also got some Easy-Outs for the stupid little screws in the belly of the oil pan. There are two socket cap screws that are completely stripped out and I need to get the thing apart to properly clean it. But those two screws are at the bottom of two deep wells so there's no way to get a handle on them.

2017-03-17_09-02-24

I actually tried to modify an oscillating multitool saw bit to fit into that slender tube but it's still too short and it oscillates too far - it hits the plastic and I don't want to break that. That plastic windage tray is a $100+ part.

2017-03-17_08-57-53

I tried to use the tool to make one of the more accessible stripped screws into a flat head screw.

2017-03-17_09-07-36

That actually didn't work so well, even with plenty of clearance, because the tool was so narrow I couldn't get purchase with a flat-head screwdriver. I ended up just grabbing it with some vice grip pliers and turning it. Obviously I can't do that with the two that are sunk into the tray.

2017-03-17_08-50-25

If anyone has advice or best practices for success with Easy-Outs, please share!

CrookedRacer
CrookedRacer Reader
3/18/17 12:11 p.m.

Time out for a friendly pinewood derby contest with my nephews. The whole family made cars. Mine is yellow with graphite accents, named "SmudgeBob Squarepants".

The Model A is my uncle's handiwork, and the purple one beyond is my sister in law's "Tribute Car" in memory of Boomer the terrier.

2017-03-18_12-32-43

Hal
Hal UltraDork
3/18/17 6:59 p.m.
CrookedRacer wrote: If anyone has advice or best practices for success with Easy-Outs, please share!

With that type be careful and go slowly when you go to remove the screw. Use a variable speed drill and very easy on the trigger or you will just strip the hole out larger. I have even used a socket and ratchet on them, just make sure you put plenty of down pressure on them.

CrookedRacer
CrookedRacer Reader
3/18/17 7:41 p.m.

20170318_132412

Uncle Arthur's Model A somehow managed to do 148mph... Now, as i recall, when we used to drive his actual Model A down the highway, we were pretty pleased to reach 40mph. Plus, whenever we hit a bump he couldn't be sure which way his wheels would be turned when we landed. Fortunately the pinewood car stayed in it's own lane and made it to the finish each time.

CrookedRacer
CrookedRacer Reader
3/18/17 8:26 p.m.

After the interminable Cub Scout derby, I tried out the easy-out. First i got my soldering iron hot and tried to heat the screw to weaken the threadlocker. It was too close to the plastic tray so i abandoned that idea. So i started by drilling the hole out. The drill on one end of the easy-out wasn't effective, so I tried to drill it out with a normal twist drill. Unfortunately my drill bit dug in hard and broke off in the screw head.

Crap.

I turned my attention to the other screw. The trick is to drill a hole deep enough (without breaking off your drill bit) that the easy-out doesn't bottom out before gripping the sides of the hole. On the second one, I managed to get it out rather handily.

To get the first one out, I used a Dremel and some stone bits and eventually just ground the entire head away, which freed the tray.

20170318_173616

That leaves me with a boss full of threaded rod.

20170318_174026

CrookedRacer
CrookedRacer Reader
3/19/17 5:39 p.m.

I started to drill out the leftover stud in the aluminum boss you see in that last pic. Unfortunately, (or fortunately) it started to spin clockwise. I stopped as soon as I saw it moving, and grabbed some vice-grips and squeezed the aluminum around it to keep it from spinning further. Then, after I had drilled enough, I was able to extract the remaining piece with the smallest easy-out in the kit.

Yay! Mission accomplished!

I spent another hour just cleaning the pan.

As soon as I get the crank scraper, I'll be able to go ahead and assemble the entire short block!

The oil pump is now fully assembled too. I used Engine Assembly Lube (stay-put alternative to motor oil) for reassembly of the gears, and Permatex Anaerobic Gasket Maker for the housing insert (inexpensive alternative to Loctite 574).

2017-03-19_06-48-53

It was my first legitimate use of my 1/4" drive torque wrench (6 ft-lbs = 72 inch-lbs) for those new M6 screws. I couldn't find any directive in the official Porsche Workshop Manuel (sic) to use threadlocker, so I didn't use any.

However, I'll be ordering some Loctite 263 for those dumb plastic windage tray screws.

CrookedRacer
CrookedRacer Reader
3/19/17 5:57 p.m.

In reply to Hal:

Thanks, the socket and ratchet is how I got it done!

CrookedRacer
CrookedRacer Reader
3/28/17 7:04 a.m.

This weekend saw great progress... relative to the past couple months, that is.

But work is excruciatingly slow as I take the time to ensure I'm not leaving some forceps in the patient or something similarly catastrophic.

I bolted down the crank cradle and everything went swimmingly. I hope I got the sealant everywhere it needed to go. Only the top cradle wouldn't line up perfectly with the block.. There was still a lip there detectable with a fingernail. I tried putting the oil pump on dry before tightening the cradle to see if I could draw it towards the end. But when I took the oil pump off, the ledge was still there.

The manual says "smooth it with an oil stone". I'm like, "What's an oil stone?"

I put on the oil pump anyway. And later I read in the manual that when disassembling your oil pump, you have to heat the area with screws because the oil pump insert screws have loctite on them. GAH! If they were supposed to have loctite on them, why doesn't it say so in the assembly notes?

No matter. It's on there and, to quote Ike from Cars and Cameras, "It'll be fine."

CrookedRacer
CrookedRacer Reader
3/28/17 7:15 a.m.

So the bottom end of the block was done, and I was pretty pleased with myself for finding all the bolts and nuts and pieces and parts.

I turned my attention to building my pistons. I arranged my operating table.

2017-03-26_09-39-28

The rings all gapped within tolerances, except: the first oiling ring I pulled out wanted to overlap itself. I wasn't really going to "gap" the oiling ring, but just out of curiosity I took it out and put it in the bore and it was too big.

2017-03-26_09-11-19

So I took a break, posted my dilemma on Rennlist and posted that link to a couple 944-related facebook groups. Within an hour, I had assurances everything was normal. It was a little tricky, and I agree it would be hard to explain without being there in person, but I got the rings to settle into the groove (as long as they were fairly well centered).

2017-03-26_01-05-06

Crisis averted.

In an hour or three, I got all my pistons assembled without further trouble.

2017-03-26_01-04-45

The connecting rod nuts required an impact wrench to get off... I should have loosened them before building the pistons because afterwards I had to re-align all the rings again.

You can see in this pic the ring compressor I used (Wiseco 100mm) which is a tapered one. It worked great.

1 ... 7 8 9 10 11 ... 23

You'll need to log in to post.

Our Preferred Partners
J6EjLxapnMNyZe3zzO2h0FSIeNzvozmeLCxjP2LaJ0tVDAdJgzHnAdgNNAeiPTwX