1 2 3 4
Fladiver64
Fladiver64 Reader
1/6/19 4:59 p.m.

Well we got started on some re-assembly, first test fit on the engine went well. Here it is looking like it belongs

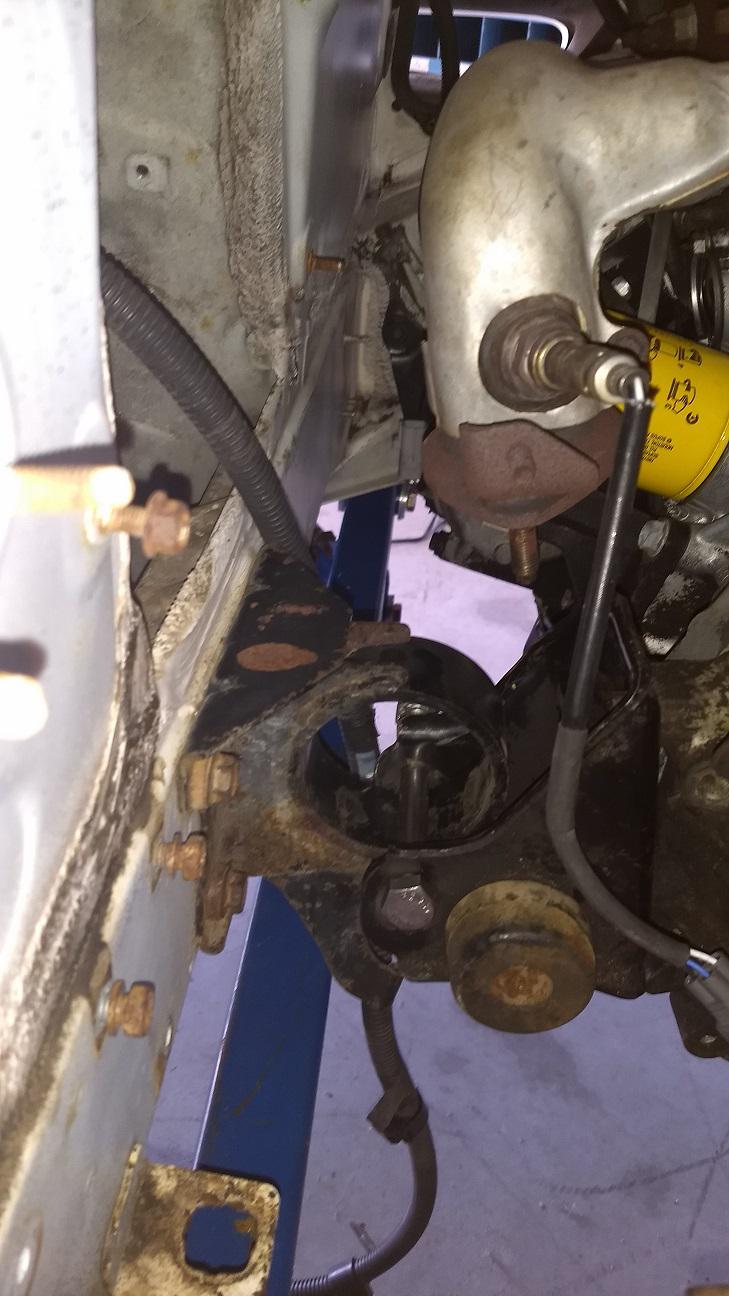
The front motor mount is going to need some help, missing all the important bits in the middle, we may try pouring our own urethane mounts, anyone have dimensions on where the bolt is supposed to be in that circle?

Lastly the mount we need to make, we are planning on a supercharger install in phase two so we are thinking of incorporating an idler pulley and/or a belt tensioner to the motor mount to help with belt routing.


¯\_(ツ)_/¯
¯\_(ツ)_/¯ UberDork
1/7/19 6:35 a.m.

I think that front motor mount is supposed to be centered, from what I can remember.  If you've got a lathe it should be pretty easy to make an insert from scratch.

Fladiver64
Fladiver64 Reader
1/7/19 7:10 a.m.

In reply to ¯\_(ツ)_/¯ :

Your right, I wss looking at the wrong mount on rock auto, so I thought it was offset. I was going to try the pour in poly bushing material

dansxr2
dansxr2 Dork
1/7/19 8:49 a.m.

I have a '91 Turbo swapped MR2, and have a set of poly mount inserts for the front and rea id swap you.  my email is dansxr2@yahoo.com  hit me up.  i see you said you have parts car?

Tyler H
Tyler H GRM+ Memberand UberDork
1/7/19 9:54 a.m.

I've done a couple of these swaps.  I don't read the build section often, but PM me if you get stuck.  Looking good!

Here is a Google Drive share where I did a document dump of all of my pictures and wiring diagrams.  May not help much without context, but it's out there if it helps you.  

MR2 V6 documentation

BTD
BTD Reader
1/7/19 12:18 p.m.
Fladiver64 said:

Lastly the mount we need to make, we are planning on a supercharger install in phase two so we are thinking of incorporating an idler pulley and/or a belt tensioner to the motor mount to help with belt routing.


IMO, this mount is worth just buying from Paul Woods. For $150, you'll save yourself a lot of time and headache re-engineering a part that's already had the homework done. 


http://woodsport.org/joomla/index.php/woodsport-shop

Tyler H
Tyler H GRM+ Memberand UberDork
1/7/19 1:52 p.m.
BTD said:
Fladiver64 said:

Lastly the mount we need to make, we are planning on a supercharger install in phase two so we are thinking of incorporating an idler pulley and/or a belt tensioner to the motor mount to help with belt routing.


IMO, this mount is worth just buying from Paul Woods. For $150, you'll save yourself a lot of time and headache re-engineering a part that's already had the homework done. 


http://woodsport.org/joomla/index.php/woodsport-shop

That's what I used for my swap.

Fladiver64
Fladiver64 Reader
1/16/19 1:24 p.m.

In reply to Tyler H :

Thanks for the shared folder, there is a lot of good information there. I will defiantly be calling when we run into questions or trouble. 

Fladiver64
Fladiver64 Reader
1/16/19 1:36 p.m.

In reply to BTD :

Normally I would agree with you on this but there are two issues to deal with here, the first is the challenge budget so $150 is a big expenditure and the labor and engineering is "free". The second is we are planning on adding an M90 supercharger to the car for the 2020 challenge and we will need to add an idler pulley and or tensioner to the serpentine system and I think part of that is going to have to be incorporated in the motor mount. 

Something like this 

Fladiver64
Fladiver64 Reader
1/20/19 8:33 p.m.

This weekend the boys cut a hole in the hood. They spent about 2 hours measuring and making mock-ups out of cardboard. Then when I asked if they were sure and went to cut on their lines they had me stop and re-measured again.  I didn't get any pictures because I was working on the radiator lines for the V6. This picture I took was of us checking out their work. Great Job, in my opinion, on to more metal work.

​​​​​​​ 


Fladiver64
Fladiver64 Reader
6/3/19 5:53 p.m.

Have neglected to post in a while but work has continued. Lots of boring stuff like blasting all of the suspension components to prep for a rattle can paint job.

We have replaced the drivers side floorboard, with a donated drivers side floor from out donor Solara, cut out and patched the rocker rust with panels from our side of the road washer and dryer metal. We have a fiber glass body kit that is going over the top so the patches were just overlapped, welded in and seam sealed since they are not seen. We did paint the inside of the rockers with some left over eastwood interior frame paint that should keep the rust at bay. Here is the passenger side rear rebuilt with the washer lid as the corner, again this just needs to serve as a mounting point for the fiberglass body kit.

Cole was working on a front air dam to make sure the air flow through the radiator goes out the scoop in the hood. First time he had seen a cleco but got the hang of it fairly quickly. Will install some rivnuts a screws for final installation as the radiator has to come out the bottom.

Indy-Guy
Indy-Guy UberDork
6/3/19 8:23 p.m.

Great to see forward progress on this again.  What's next on the to do list?

Fladiver64
Fladiver64 Reader
6/6/19 8:56 p.m.

OK another day and more progress

First right motor mount built previously but never photographed.

This wieghs 2.2 pounds, made from steel out of the scrap pile, so does this count as 2.2 x scrap steel prices for budget?

Second, I have heard that the 1 MZ in MR2's can have some oil control issues so we wanted to do something about that. The pick up is in the shallow end of the pan and we didnt have room for a full baffle system so we made a pan divider with three swinging windows to hopefully keep the oil where it belongs, we also marked the dipstick with the top of the pan rail to over fill the sump by about a quart.

Third the balance of the suspension components were blasted and rattle canned. Lots of time in the blast cabinet by Zack and Sammy.

Fourth we had an issue with the rear tailing arms, one was bent and the other was cross threaded so when we took it apart the threads were stripped. these can be expensive used, for unknown parts and the racing upgrades are out of budget, so we made this. The black bracket is made from two pieces of angle welded together, this bolts to the upright with poly bushings. then we made up a Heim joint and swedged bar out of Speedway motors clearance rack. Total cost for both sides $89.94, less than used off ebay.

More work by Sammy cleaning engine parts and brake calipers getting prepped for blue paint

then last thing today is we painted to bottom of the car and wheel wells with some free epoxy paint as an undercoating. Yes it was literally pulled out of a dumpster 10 years ago by one of our team members that worked at a prison at the time. This was floor paint they threw away so we used it as undercoating. I did nto get any picture of that but being done we can start with reassemble of the car.

Fladiver64
Fladiver64 Reader
6/15/19 3:19 p.m.

In reply to Indy-Guy :

Progress had not stopped on the project, just my lack of updating the thread. More progress below, this Wednesday we are planning to get teh engine re installed and if we are real lucky may have it on wheels again.


Fladiver64
Fladiver64 Reader
6/15/19 3:42 p.m.

OK next project notes, we pulled the fuel tank as part of the tear down but had not really looked inside. We assumed new fuel pump was in order, but had not thought about the sending unit.  Since we are trying to build more of a dual purpose car gas gauge is important. I posted here to see if anyone had one in a parts stash but no answers so I assumed none to be had, second new if you can find one was $186 so not budget friendly. So build one from parts is the only solution, I used the sending unit from our donor Solara as it seams to have the same ohm range as the MR2, used a stud from and old sending unit I had and rebent the arm. Should show empty fairly accurate, and full at about 3/4 tank so I think we can live with that. The third wire is for the fuel low light which we are not using.

Some color progress, we painted the valve covers, intake manifold, and brake calipers, and springs. Very happy with the outcome.

Sammy was working hard at reassembling the front suspension, trying to remember how it all came apart. Got both sides finished, waiting on brake parts to get here to finish each side. Preview of paint color on car as we sprayed out what was left in gun just to see the color on the car.


Center section re assemble, brake lines, a/c lines and coolant lines run from front to back as well as the gas tank re installed. Only had to take the tank out once to install the brake booster vacuum line we forgot but all in all went well. THe boys are happy to see stuff going back on the car, project is starting to become real again. That middle part of refurbing parts and cleaning things is hard to stay motivated and moving forward. Another couple of days we will be at the CL 90% finished mark.

When we went to install the e brake we realized there are nuts missing from when we replaced the floor. So we need to install a couple to get back on track.

Engine and trans are bolted together, just one hole to drill and tap for mounting bolts. We used the donor Solara flywheel and pressure plate and out MR2 looked like it had a brand new clutch in it when we took it apart so we re used the MR2 clutch and throw out bearing. Hopefully going back in car Wednesday.

Indy-Guy
Indy-Guy UberDork
6/15/19 4:58 p.m.

In reply to Fladiver64 :

That blue looks great! I'm looking forward to seeing this in October.

Fladiver64
Fladiver64 Reader
6/20/19 5:52 p.m.

More progress, we are approaching the CL 90% finished mark, at least stuff is going back on car.

First big Item was engine is back in car, hopefully for last time. we got clutch hooked up and bleed, only one leak to fix. got to put the painted valve covers and intake on, looks great in our humble opinion. We also installed an ebay fuel pump, filter and fuel pressure regulator, forgot to take a picture. Lookd good we will see if it works.

Got a start on our rear suspension, rear trailing arms lok like they will work good, waiting for a couple of parts to make the rear toe rods coming next.


Fladiver64
Fladiver64 Reader
6/20/19 7:18 p.m.

Since I have not done this thought I should post my budget so far, prices incudes shipping cost:

Donor MR2 $400

Donor Solara $300

Radiator Hoses $8.68

Heater Hose $5.91

CV Boots Kit - eBay inner and outer $49.64

Spark plug wire set $23.79

Spark Plugs $18.02

Valve Cover Gaskets $12.02

Oil Pan Gasket $3.34

Front Motor Mount 29.89

Steering Rack Boots $25.33

Rear Ball Joints $45.00

Front Ball joints $27.02

Front Tie Rod ends $61.58

A/C Drier $8.08

A/C Oring Kit $6.67

Complete Bushing Kit $94.60 (not using 3 sets due to suspension mods so will bededucting something from this)

H&R Springs $140

Rear Shocks $45.75

Build new Sway bar End Links Heim Joints and inserts $64

3/4" Steel Tubing for sway bar end links 4lbs @ $.75lb $3.00

Constructed Trailing arms, Heim joints 5/8" LH and RH two sets $59.96

Sweged Steel Tube 18"  2 each total $29.98

Cone Spacers 4 $6.00

Grade 8 bolts $10.60

Fabricated Bracket 2lbs @ .75 $1.50

Rear Toe Rods Turnbuckle $30.30

Threaded Inserts $7.70

Steel Tubing 2 lbs $1.50

Body Kit, used Craigslist $75.00

Black Paint - using Eastwood single stage Paint purchased with $25 off coupons, so $61.97 gallon for Black and $60.99 gallon for Blue. My calculations are cost per ounce as we mix up batches including the activator. These will go up as we move further on the project

Black Currently 8 oz total $7.58

Blue Currently 13 oz Total $12.18

Eastwood Brush able seam sealer .25 Can $7.57

2 partial cans Rustolem Spray paint from shelf FVM at $2 per can $4.00

Oil Pan trap doors, Kit had 4 doors for $33.00 used 3 $24.75

Aluminum Radiator, Used Cl $75.00

Radiator Ducting - free washer sheet metal

Radiator Ducting Rivnuts 20 @ .19 $3.80


Motor Mount 2.2 lbs steel $1.65

Fuel pump eBay $10.98

Fuel Filer eBay $18.79

Fuel Pressure regulator with hose and fittings $32.00

Extra fuel hose FMV off shelf $15

Misc shop expenses to cover things use in shop and not accounted for $10.00

My spreadsheet says this puts me at $ 1810.64 I may have missed something typing everything in but I believe the spreadsheet is accurate if my list is not

Recoup right now is at $567.10 but with the limits for Gastropods my recoup is $101.65

Making net budget $1708.99


Fladiver64
Fladiver64 Reader
7/28/19 9:58 p.m.

OK updates.

Got engine running after ecu issues, will need to modify my original ECU to match the new Key.

Now on to fixing the next set of problems.

Oil light and temperature gauge not working - Fixed turned out to be a pair of swapped wires, yellow with blue stripe vs yellow with green stripe.

Tach - swapped the guts out of the donor V6 into MR2 gauge cluster

Once we filled the transmission with fluid, turns out the axle seals leaked, so we will be installing new ones,

Rear calipers leaked when we reinstalled, so we had to take them back apart to replace the seals. Brakes now reinstalled and bleed just needs a road test.

Hopefully we can get some things finished and ready for first drive this week!


Gingerbeardman
Gingerbeardman Reader
7/28/19 11:21 p.m.
Fladiver64 said:

In reply to GIRTHQUAKE :

Our donor solara appears to have a good radiator, so that's what we will try first. Then I'll go hunting yards.

Solara is basically a convertible Camry, right?

Fladiver64
Fladiver64 Reader
7/29/19 7:42 a.m.

In reply to Gingerbeardman :

Two door Camry

pinchvalve
pinchvalve GRM+ Memberand MegaDork
7/29/19 8:10 a.m.

Every time I am assigned interns, I laugh when they say "here's some help for your department!"  I love helping young minds to learn, but it costs me a lot of time getting people up to speed. 

Robbie
Robbie GRM+ Memberand UltimaDork
7/29/19 8:24 a.m.

Awesome! Super glad you got it running, sorta scary you don't know exactly what fixed it...

Fladiver64
Fladiver64 Reader
8/2/19 8:56 p.m.

IT DRIVES! Sort of. Took the car out for first drive this weekend, some hits and some misses. About par for a car that has been taken completely apart.

The good

Suspension and brakes work well, at least at current speeds.

No overheating issues, max temp was about 150 degrees after about 10 miles of driving.

The bad

Engine is very rough and is throwing misfire codes on all cylinders. I think this is either a vacuum leak or possibly clogged fuel injectors. Did run better at the end of the test than at the beginning but still not good.  Plan is to pull the injectors for a DIY cleaning and check for vacuum leaks.

Clutch is releasing right off floor, I am hoping this is a simple rod adjustment.

Indy-Guy
Indy-Guy UberDork
8/2/19 9:16 p.m.

In reply to Fladiver64 :

Progress.  AWESOME!

I bet the kids (young men & women) are getting a shot of motivation with this milestone.

1 2 3 4

You'll need to log in to post.

Our Preferred Partners
ziONAyRRUAvEQeCJCpejBIPinwTva8eN9ooJkgPUFN59Bw8TG7rUO1nBacDxKAIv