1 ... 14 15 16 17 18 ... 24
wae
wae SuperDork
10/20/19 3:49 p.m.

And a PT Cruiser bracket modified to probably fit.  I need to do something about putting a nut on the hole where the mount bolt will go, but first I want to ensure that this will fit.  My big concern is that if the motor still wants to pull against its mounts, the aluminum bracket will no longer be there as a fuse.

wae
wae SuperDork
10/22/19 10:05 a.m.

Using various straightedges and levels and other measuring tools, I determined that the chassis was basically level side-to-side and was at about a 5-6 degree angle front to back.  Using that data, I pushed the drivetrain around until:

With the engine leveled out, I was able to thread in the trans mount through-bolt as well as the left side through bolt along with the new Moorespeed Performance mount.  For future reference, these are M12 bolts with a thread pitch of 1.75.  Fun fact:  The aluminum adapter plate that I used previously and which appears to be the ad hoc standard for 1gn 2.4 swaps is threaded in SAE patterns.  So be careful of that.  In order to get the motor mounted up square in the engine bay with no torsional pre-load on the side mounts (I think I'm using those words correctly), I set the engine in place, put the Moorespeed mount in, then marked the modified PT mount bracket.  After taking it all apart again, the bracket went onto the drill press where I put a 27/64" hole in it and then threaded it to accept the M12 1.75 bolt.  The bracket isn't all that thick in that spot so there aren't as many threads as I would really like to have.


Once the side-to-side mounting was complete, I moved on to the front-back support.  My solid bobble has seen better days:

So far, every time I have dealt with a broken side mount, I have also had a broken bobble strut.  I do not know if the bobble is breaking which then over-stresses the side mount or vice-versa but that would be a nice bit of information to have.  One thing I am proud of, though it is a minor win, is that the bobble strut rod itself sheared:  My welds were not what broke!  The motor is also in a slightly different position that it was before, so I need to come up with a stand-off for the bottom-side torque strut to keep it from rubbing against the oil pan.  I took a bunch of measurements and have done some thinking on it.  I'll go out today and get some steel bits, a die to thread the new bobble, some bolts and nuts, and then build up some replacements.  I want to put a little bit of give into the mounts and for the bobble, that will be accomplished through some urethane swaybar endlink bushings.  I'm not sure how to do that for the torque strut, though.  Each end is bolted to something pretty solid with spherical bushings so I don't think there's much give.  My thought is to put another endlink bushing between the spherical bushing and the bracket on the engine.  I'm really concerned, though, that having a longer route from the bushing to the mountpoint will make things a bit weak there. 

Longer-term, I would like to take Jon's idea of putting in a steel plate from core to K-member and tie it in to the bellhousing bolts.  Maybe if I utilize the bobble strut bracket on the K-member and the "car" side of the original 1gn front motor mount, I can form something that goes between the two.  Stiffen up the chassis a bit and also give the motor some more support.  That isn't something that I think I'll get completed before Saturday, though.

All of this making engine mount stuff really makes me want to have a metal lathe.

wae
wae UltraDork
10/23/19 7:32 a.m.

I learned something important last night.  Two things actually. 

The first is that if you go through the effort to measure things and make a diagram with all the measurements, don't head off to the store to get parts without that diagram.  Because if you do, you could wind up learning the second lesson.

That second lesson is that, while possible, trying to use a die to turn M10 threads onto a 12mm diameter rod is exceptionally tough when your lathe consists of a vise, elbow grease, and a heaping serving of ignorance.

Those lessons were learned in the process of getting the new solid bobble strut created and taking the time to learn those lessons delayed the end result but didn't prevent it.  After going back to Menards to get the correct tap, heim joint, and associated hardware, I used one of the rods that used to be part of the driver-side window net mounting hardware.  After squaring off the end of the rod, I used a 7/16-20 tap to put threads on both ends.  The heim went on one end and some jam nuts with some swaybar bushings went on the other end.  I also had to use the tap to cut more threads into the through-bolt that connects the heim to the bracket on the K-member since a full-thread bolt is apparently impossible to find in a pinch.  What I forgot to get was two more jam nuts to hold the heim joint in place on the through-bolt, but that's not a big deal.  The (mostly) final product:

Next up was fixing up the strut that connects the K-member to the front left of the motor.  I wanted to keep the rod from rubbing against the oil pan so a bit of a stand-off was needed.  Another issue that has always been there is that the bracket itself was in the way of where the nut needed to go, so I ground out a portion of the bracket to make room.  Previously I had ground down the nut to make it fit, but now that won't be necessary.  Overall, I am not real happy with this.  I'm going to add a polyurethane bushing to this to give it a little bit of give.  But for now:

Almost ready to race!  Or at least perform testing at race speeds?  I need to put the nuts on the bottom end of the bobble strut and add a bushing to the torque strut and then put the coil and air intake back on, re-connect the power steering lines, set the air pressures, and load up - all things that will likely happen on Friday.  They're calling for rain all day on Saturday, so here's hoping we don't get cancelled!

Knurled.
Knurled. GRM+ Memberand MegaDork
10/23/19 9:23 a.m.

...That is gonna break, all hung off like that.  Need a thick spacer instead, to turn the bending force into something that will try to stretch the bolt via leverage.  Bolts work great in tension and badly in bending.

wae
wae UltraDork
10/23/19 9:36 a.m.

In reply to Knurled. :

Yeah, I don't like that either.  I'm going to see how much space I'm left with after adding a bushing up against the bracket and then look around to see what I can put in there.  I thought a bit of steel tube would work well, but I couldn't find anything handy that was 10mm ID. How much does it matter if that spacer is oversized compared to the bolt?

Knurled.
Knurled. GRM+ Memberand MegaDork
10/23/19 10:13 a.m.

In reply to wae :

It be fine.


Heck, slam a socket in there for a test fit...

wae
wae UltraDork
10/24/19 8:08 a.m.

Stopped at the hardware store this morning.  For the m10 side strut bolt, I have a steel spacer to cut down.  I will also weld its seam to hopefully keep it from distorting too much.  For the 7/16 bobble bolt I have a 3/8 pipe nipple that I'll cut down into two spacers, one for each side.  But first I have to take care of the paying work...

wae
wae UltraDork
10/24/19 3:23 p.m.

And some rain in the forecast has caused the event to be postponed.  Bah.  I'm starting to get a little pissed that I haven't had a chance to drive my Indy Sports yet.

wae
wae UltraDork
10/29/19 8:26 a.m.

With Halloween coming up this week, most of my building activity has been costume props for the kids, but between coats of paint on the EVA foam bow for my middle daughter's Artemis costume I was able to get the final mount put together:

Same bolt, but I used the bushings and spacer from an Energy Suspension swaybar bushing kit instead of the jam nuts.  The washers were for a smaller bolt (M8, I think) so I clamped them down on the drill press and bored them out a wee bit.  The bushings went on without too much fight so I didn't hit them with a drill at all.  Rather than cut down and weld the seam on the steel spacer I got at the hardware store, the spacer that came with the endlink fit over the M10 bolt without any fighting, so I shortened it up a bit with the Angry Death Wheel of Doom and Fingertip Removal. 

At this point, every single mounting point on the engine has some sort of flexible bushing in play.  The side mounts have varying levels of urethane and the front-back mounts are using urethane swaybar bushings and Heim joints.  This should give it a little bit of flexibility so that it can move a little bit instead of shearing metal parts.  The engine is also installed in a way that doesn't require hundreds of pounds of force to get the motor mount bolts to line up.  Taking the pre-load off of the motor mounts is probably going to provide 90% of the solution.  I am concerned that by using the steel bracket from the PT instead of the Stratus aluminum one there is a chance that I could damage the block instead of tearing the mount.  I am also concerned that I may not have enough threads from the through-bolt that connects that bracket to the Moorespeed mount.  My hope is that if there is too much stress on that arrangement, the through-bolt will pull its threads out before the bracket bolts do.

All that remains to get the car ready to rock is to tighten the bobble strut nuts, put the coil and air cleaner pipe back on, fill the radiator with coolant - freezing temps are coming, no more Hypercool - and then fiddle with the tire pressures.  I am considering the possibility of taking the motorhome up on Friday to camp out, but with everything else going on, I may just not have time to get it ready to go and will have to just drive up Saturday morning and miss out on the fun.

wae
wae UltraDork
10/30/19 8:53 p.m.

I was almost ready to pull the car out for a little testing but the PT bracket is slightly higher which pushes the power steering hose just far enough out of line to keep it from reaching.  I need about 30 inches of 3/4 hose to be able to route around the new mounts.

Knurled.
Knurled. GRM+ Memberand MegaDork
10/31/19 7:13 p.m.

Just please don't do any rain dances.  It has gone from too cool for comfort to annoyingly cold, and I don't relish the thought of freezing my ass off tomorrow driving down in a car with no weatherstripping and lukewarm heat only to find that the event was canceled at the last minute.


wae
wae UltraDork
11/2/19 1:33 p.m.

I should have done a motor mount dance or something.  Busted the bobble and the torque strut, fixed the bobble, then busted it a second time along with an indestructible axle.
 

Winter project: send axle back to Canada for repair and build new mount structure to tie the core to the k-member and mount along that line.


Knurled.
Knurled. GRM+ Memberand MegaDork
11/2/19 6:06 p.m.

I have a great appreciation for Indy Sport tires.  My Word can your car accelerate!

eastsideTim
eastsideTim UberDork
11/2/19 6:30 p.m.
Knurled. said:

I have a great appreciation for Indy Sport tires.  My Word can your car accelerate!

Finally got a good chance to use them?  Loved them on my car, I can only imagine with all that extra power...


wae, let me know if you want help working out a solution, I could use a break from working on my own projects.


wae
wae UltraDork
11/2/19 8:23 p.m.

It was just sloppy enough to break them out without having to worry about busting the lugs off.  The afternoon would have probably been a little too much for them, honestly.

I will probably take you up on that offer!  I need to come up with something that supports the front of the motor.  I'm thinking that maybe the 1gn stock car-side bracket to attach to the core support and then fab up something that attaches somewhere to the engine.  The bobble needs to be more stout, so maybe another tube that connects to the heim joint on the bottom and a stud on the top.  And then I've got to figure out how to fix up the bracket that tore a bit. 


wae
wae UltraDork
11/3/19 9:57 a.m.

Alex let me crawl over his 2gn since the engine mounting is basically the same in that as it is in an SRT4 and I took a bunch of pictures.  Instead of a front mount on the core support like the 1gn, those have a massive dogbone that runs from the k-member to the front (really the left side) of the engine.  Basically the same thing I'm trying to accomplish with my torque strut, but probably 10x the diameter of probably solid-ish steel and large urethane bushings instead of heim joints. 

I also spent a few hours on the .org looking at the various 2.4 and SRT swaps into 1gns and I am not the first person that's tried to do what I've got set up.  The famed Neongoodies semi-solid bobble strut is almost exactly what I've built:

That reinforces my theory that the bobble strut is failing because other things failed.  I've been trying to wrap my head around where the forces are going to be the greatest and I manage to just confuse myself, more than anything.  Is the greater force coming from the wheels slamming into the course and transmitting that through the suspension to the K-member or is it the inertia of the engine itself as it crashes back to earth?  Or hell, it could be both. 

Scouring the other build threads helped me make a couple discoveries which should drive a new direction.  The first is the realization that there are autocrossers and drag racers using various setups but nobody doing rallycross or rally.  That leads me to believe that the problem isn't just engine torque tearing things; if engine torque is coming in to play at all it is working in concert with the impact forces from Bitzer's yard.  My second realization is that most people are actually using the 1gn front motor mount.  A couple build threads talked about removing it but upon review of the videotape, it doesn't look like they ever actually removed it.

So I have a couple options in front of me:

  1. Remove the structural collar and grind down the 1gn front motor mount to fit and clear the charge pipe
  2. Keep the structural collar and clearance out the space for the 1gn front motor mount to sandwich between it and the block, then also grind it out for charge pip clearance
  3. Keep the structural collar and build a new bracket to attach to the front (really the left side) of the the engine on one end and the core-support side of the 1gn front motor mount on the other end
  4. Try to swap in the 2gn K-member and use the 2gn lower side mount apparatus
  5. Bolt in the 2gn upper torque strut mount on the strut tower and connect that to the upper part of the motor mount bracket on the passenger side (really the front) of the engine
  6. Build a brace that runs from the core to the K-member and come up with some sort of urethane-enabled mount to tie the engine in to that

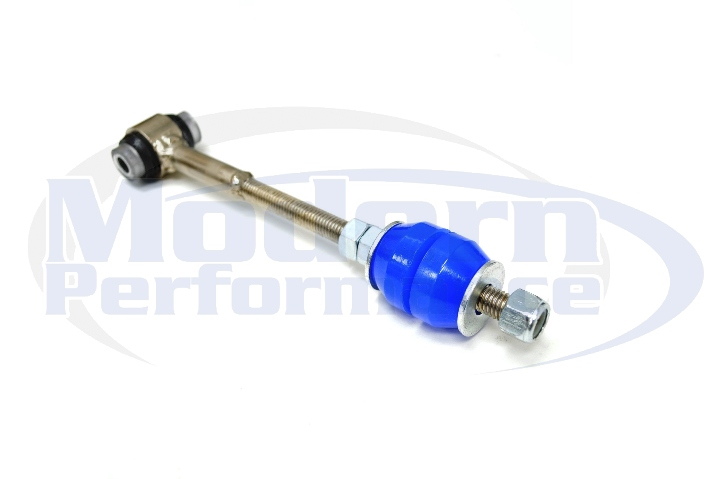
In addition to all of that, I also need a new bobble strut.  The more I think about my steel tubing idea, the more I like it.  I need to weld up the fattire bobble bracket and add some gussets to it.  Slight aside - if you go back a few pages, the part of the fattire bobble bracket system that attaches to the K-member broke on me a while back.  I'm not impressed with the build quality even though I realize I'm putting way more stress on the part than he would have ever anticipated.  A further aside is that when I put the gussets on the bracket, I need to make sure that I think through the fact that I'll want to be able to get a wrench in there to....  oh wait.

Quick thought:  The bobble might stand a better chance if I used a thicker steel tube (maybe a 3/4 DOM thick-wall tube) with female threaded ends.  On the bottom, I would have the heim joint with a jam nut and on the top, I would thread in a stud that was more like an M10 diameter and then weld that in to place along with a very thick washer.  The thicker tube plus that washer would be the shoulder that the lower poly bushing would sit on and the height adjustability would all be done by the threads on the heim joint.  That would make setting the adjustment so much easier than the current arrangement.

Anyway...

Yeah, so what I'm leaning towards is to shave out the parts of the structural collar for the front motor mount to sandwich in there, go with a brand-new mount with a prothane insert, and then also put on a stock 2gn upper torque strut mount on the strut tower and then one of the poly dogbones to go from there to the  engine - if it will fit.  Then I'll also re-build the lower torque strut and re-attach it.  That should give me plenty of support on the engine, especially if I also build up some bracketry to tie the K-member to the core support and then stick a skid plate over the whole thing.

Knurled.
Knurled. GRM+ Memberand MegaDork
11/3/19 10:30 a.m.

The second generation car mounts fail with depressing regularity too, in stock form.  I think Alex has spme upgrades, and we had to unbreak it at one event anyway.

Knurled.
Knurled. GRM+ Memberand MegaDork
11/4/19 10:52 a.m.

You don't have to go super crazy... here are two examples that I picked up today.

And the other.


Note in both cases the attaching brackets are very short and stout, like teapot.  And controlling drivetrain torque this way will have the maximum distance from the engine mount/trans mount axis, which ultimately will reduce the stress on all of them.

wae
wae UltraDork
11/4/19 11:46 a.m.

In reply to Knurled. :

That one on the bottom looks perfect.  The body half of the mount is almost exactly what the 1gn part looks like which would reduce the amount of guessgineering I'd have to do. 

Thanks for that inspiration!

Knurled.
Knurled. GRM+ Memberand MegaDork
11/4/19 6:14 p.m.

In reply to wae :

If you do something like that, you can claim to have engineering inspired by a Prius.  (The top one was a new Versa Note)


That mount setup does look very similar to what VWMS was doing on some of their high-effort front driver cars.

eastsideTim
eastsideTim UberDork
11/4/19 7:48 p.m.

In reply to Knurled. :

Looks like the Prius also has a weight on the mount for some reason, just in a slightly different location than the Neon.

Knurled.
Knurled. GRM+ Memberand MegaDork
11/5/19 4:33 a.m.

In reply to eastsideTim :

A lot of newer cars have damper weights all over the place on subframes, transmissions, differentials, exhaust systems, and even mounted to the struts.  It's some NVH thing where the engineers identified a resonance was occuring somewhere and a damper mass was needed to kill some certain frequency.


I always put them back on because they wouldn't have spent the money to put it there if it was not needed, but for a motorsports application they can be ignored.

wae
wae UltraDork
11/5/19 5:11 a.m.

Somehow, I don't think putting a 5 pound chunk of steel back on the core support is going to do much to reduce the harshness of the ride or the amount of drivetrain noise that invades the cabin in my case :)

It was actually really nice last night to not do anything project-related.  After dinner I had a little bourbon and some Milk Duds - the chocolate and caramel really compliment the taste of the drink and the alcohol does a good job of dissolving the sugar that gets stuck to your teeth - then finished reading a book, and was asleep by about 2030 or so. 

I've got some competing winter projects that I need to figure out.  There are a couple woodworking things I need to do (12-slot cell phone charging station for my Mom & Dad's house, 8ft tall Plinko board for my daughter's school, a couple drawers need to be rebuilt on the motorhome, and maybe a Krazy Ball festival game for my parish), I owe a PT Cruiser engine swap to a friend, the left side rocker on the Miata needs some rust repair, that same car needs the EGR valve cleaned or replaced, I really need to do the wheel bearings and the trans fluid and filter on the motorhome, the seats need to be recovered and heaters need to be installed on the B.U.T.T., and then there's the work on the Neon.  Before I can do any of that, though, I have to make some room at the inn which will start with getting the Focus cut up the rest of the way and disposed of.

When I fell asleep last night, it didn't seem like I had quite that much going on...

Knurled.
Knurled. GRM+ Memberand MegaDork
11/5/19 5:24 a.m.

Do you still have that 2 liter engine, he asked in a small voice?

wae
wae UltraDork
11/5/19 5:45 a.m.

In reply to Knurled. :

I sure do devil


1 ... 14 15 16 17 18 ... 24

You'll need to log in to post.

Our Preferred Partners
AegQGw71z6vRbmOUskjjfeeKPGTzEv9iJ72VzUOfdKwYTW9my2Oohl9jTa2aarnM