1 ... 3 4 5 6
CJ
CJ GRM+ Memberand New Reader
2/25/18 1:07 p.m.

Bought an '81 diesel when in college the second time for $300.  Owner had run up on a median and bent the rear axle.  Junkyard parts got it moving again.  Brother found a NOS turbo setup for $150 and I found a aluminum fuel tank that sat in the spare tire well... and plumbed into the original filler.  Brought the fuel on board total to about 20 gal.  Funny to watch the pump jockeys start looking under the car to see where all that fuel was going.  With the turbo, the car went about as well as the gas version and got 45 - 50 MPG.  I had to make pit stops more often than the car did.  Miss it sometimes. 

Great thread.  Carry on

paranoid_android
paranoid_android UltraDork
3/22/18 10:03 p.m.

No real progress to report.  I've de-rusted and painted all the suspension bits I had taken off the car, so there isn't much more I can do on it with one working arm.

But I did start a thought exercise on my strut housing quandry.  After a mail order mishap made right, I have a pair of KYB strut inserts that will go on the car.  I think they will be better than the Sachs OE ones I ordered initially.  And the KYB's came with a cap that threads into the top of the strut housing to hold the inserts in (the part of the housings I don't have).  Since I had the caps, I could measure the threads to see where to go next.

The caps have male M50x1.5 threads on them.  And I have some 2" OD steel tubing in the garage.  So idea one was to cut the 2" tubing to the correct lenght, cut the corresponding amount off the stock housings and marry the two with intense heat.  After that, source an appropriate tap, cut the threads in the end of the newly welded on tube and be done.  But finding a tap for less than I paid for the car proved to be difficult, not to mention the effort it would take to run a tap that big in by hand.

Idea two was to find some weldable parts that already had the threads I needed cut in them, then weld those things onto the strut tube.  This was easier than I thought.  Google led me to the idea of "bearing lock nuts", and I was able to find some that offered the actual material they were made out of.  So $40 and a couple days of waiting landed me these:

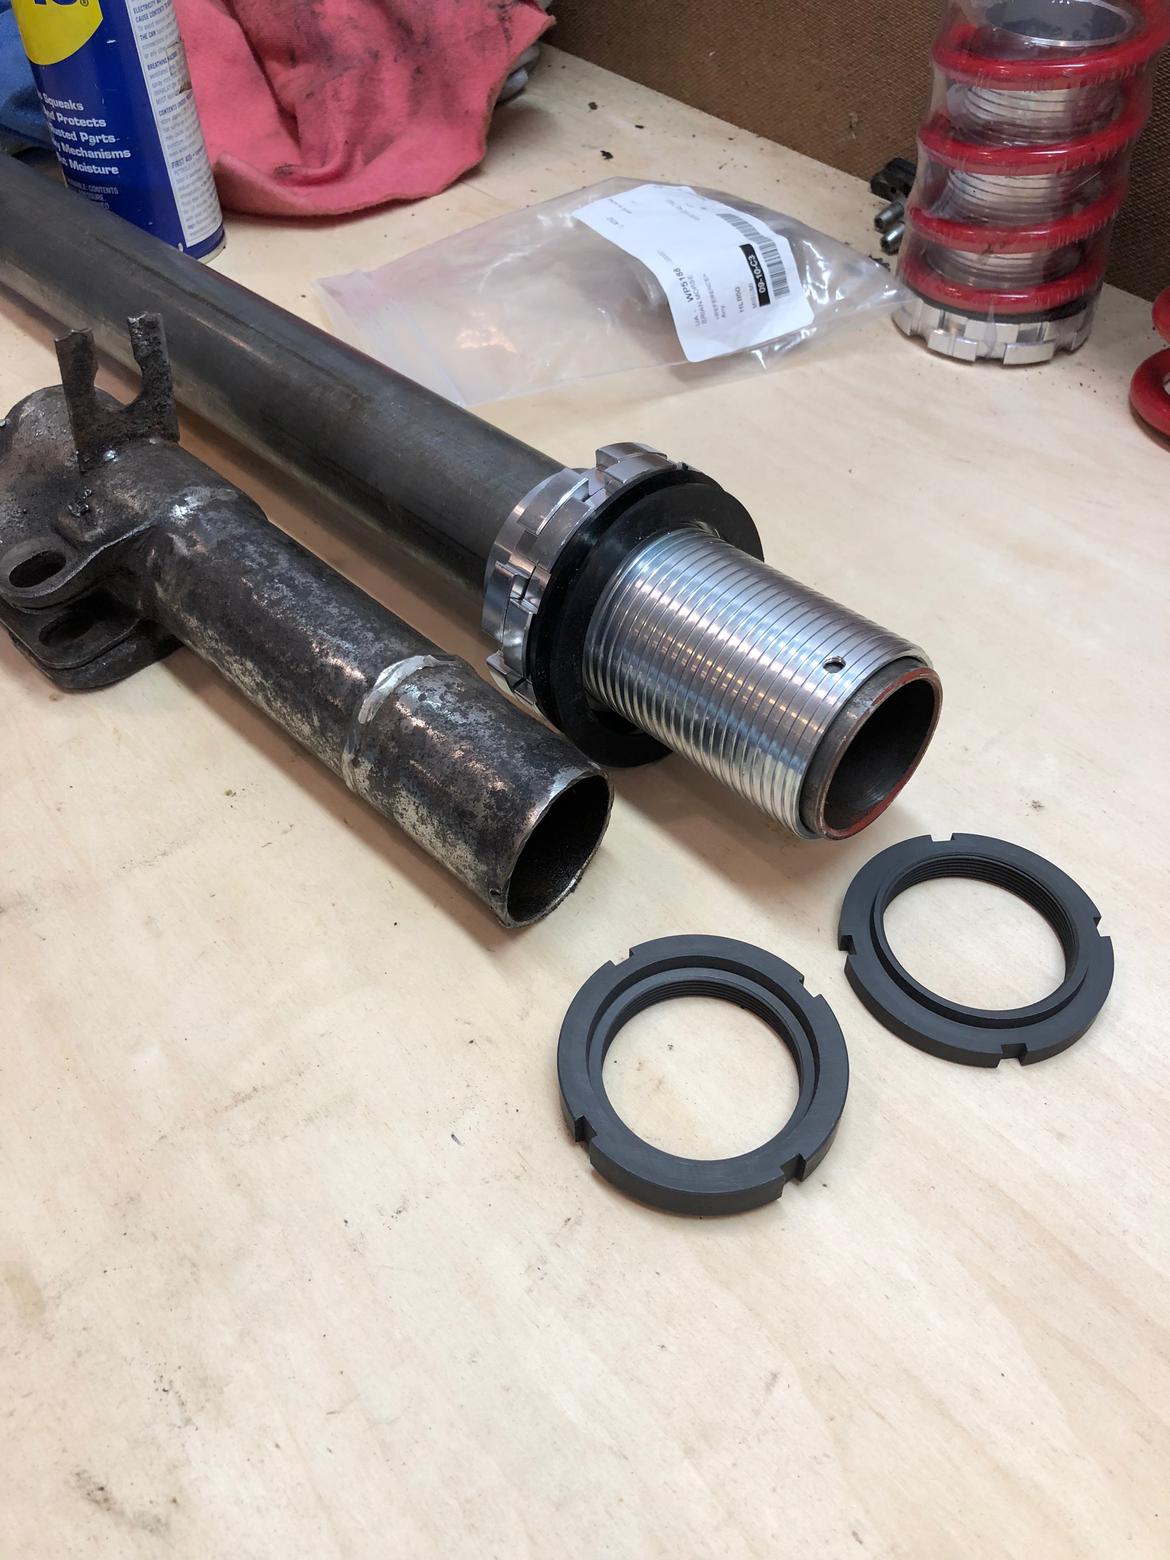
Made out of 1018 Japanese steel with the M50x1.5 threads machined in them.

With some minor fitting, two of them should be able to be welded onto the 2" tubing I have, and then that mess can be welded onto the remains of the stock housings.  Maybe.

The OD of the lock nuts is too big, I knew this when I ordered them.  The major diameter measures at 2.750".  So I kind of figured I would turn the ODs down so the coilover sleeve would fit over the tops of them after they were welded on.  But realistically that doesn't look like it would work well, as the remaining wall thickness would only be about .030".

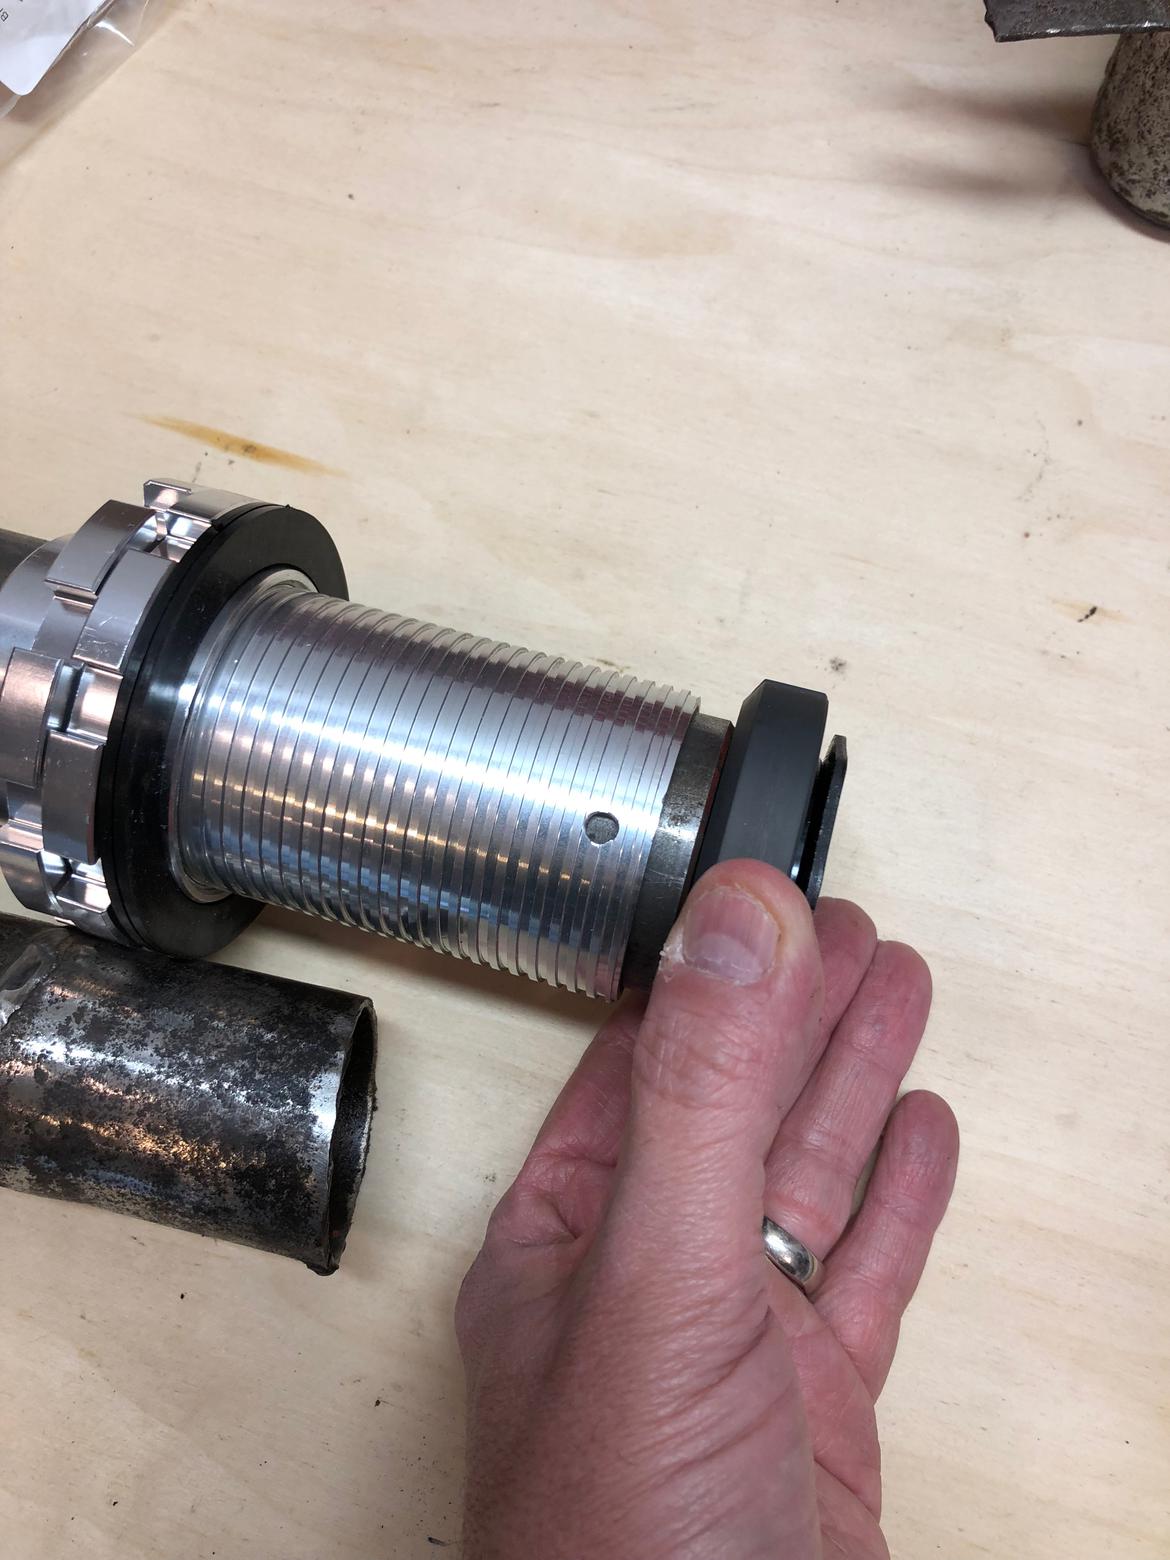
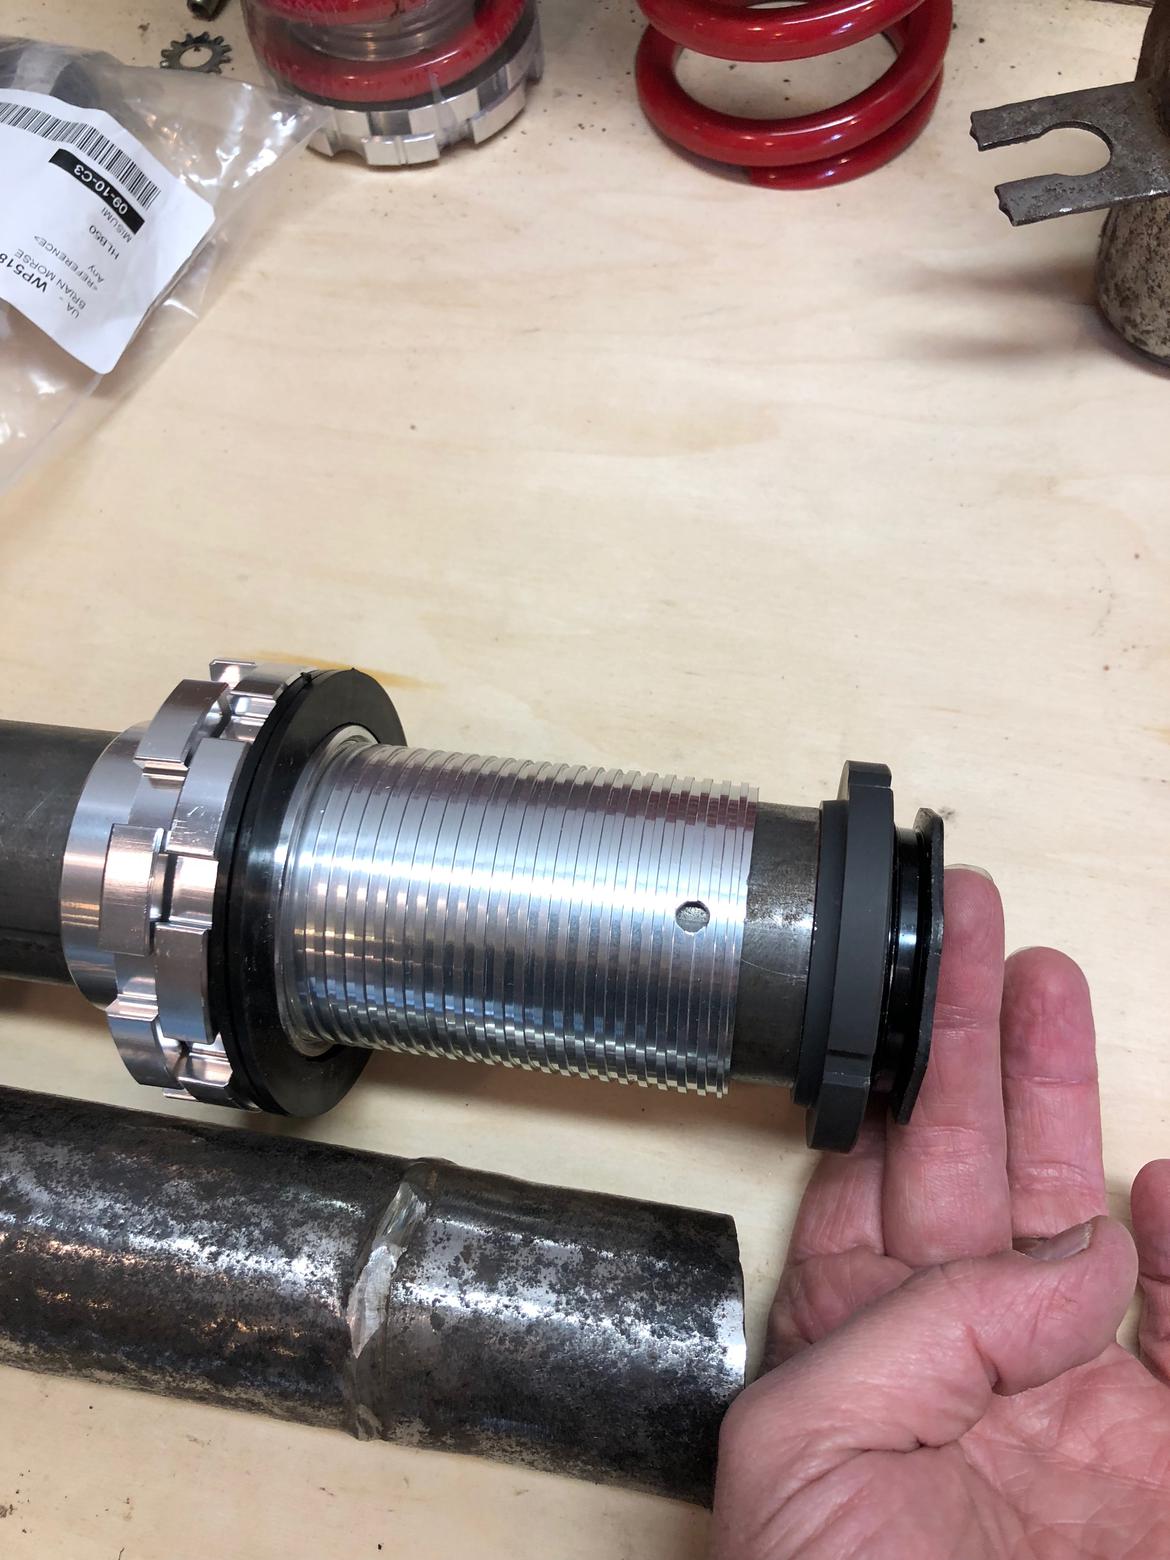
So I'm thinking now the 2" tubing will need to be welded onto the housings, the coilover sleeve slid over the housing and then the lock nut welded on the end.  The springs for the coilovers are 2.5" ID, so the lock nuts would have to be turned down at least that far so the springs can be changed out down the road.  The down side is the coilover sleeves wouldn't be coming off again.

The general idea:

The biggest challenge for this idea so far is finding someone that has a lathe that will turn the lock nuts down for me.  There aren't many shops left in Ann Arbor that do that kind of thing it seems.  At least not that I've found yet.

brad131a4
brad131a4 Reader
3/23/18 12:02 a.m.

Wow that is aaah interesting approach to your problem. I have a couple pair of mk1 struts housings laying around. I could check to see if they have the inner threads. Will pm you if I do. Plus they are in far better looking shape than the one you have pictured. 

paranoid_android
paranoid_android UltraDork
3/23/18 7:14 a.m.

In reply to brad131a4 :

That would be great, thank you!


DeadSkunk
DeadSkunk UberDork
3/23/18 10:18 a.m.

https://grassrootsmotorsports.com/forum/grm/custom-strut-tubes-what-thickness/115701/page1/  

Near the bottom of this there's an interesting bit about using diffenet shock inserts.

DeadSkunk
DeadSkunk UberDork
3/23/18 10:21 a.m.

https://grassrootsmotorsports.com/forum/grm/kyb-spring-rates/45620/page1/  

This one may have some info of use to you about other cars that have threaded strut tubes to cut up and weld. The local pick-n-pull may deserve a visit.

paranoid_android
paranoid_android UltraDork
3/23/18 12:56 p.m.

I’ve been kicking around the idea of rolling my own, but haven’t convinced myself I can do it yet.

And yes, I’ve been hankering to make a trip to a local pick and pull (for a set of mk2 strut housings).  But I fear I wouldn’t be able to accomplish much in my current lame state.

Thisoldrustbucket
Thisoldrustbucket New Reader
5/13/18 7:07 p.m.

In reply to paranoid_android :

I live in Ann Arbor, have you talked to the machine shop near Costco? They did some similar machining for me on their lathe for literally $20. You might want to try them. If they can't then I suggest advanced industries in Chelsea. They made a custom steering knuckle arm for my 65 Scout. They could do any machining you might need including cutting threads. 

paranoid_android
paranoid_android UltraDork
5/29/18 9:42 p.m.

In reply to Thisoldrustbucket :

Thank you for that tip!  Honestly I had no idea they were there, but I will remember that.  There is a little CNC shop on South Industrial by the PTO Thrift Shop I talked to.  They reluctantly agreed to do it for $100 and no promised finish date.  They were very nice, but it was pretty obvious they didn’t want to do it.

But, this whole quandary was solved right after my surgery by a kind soul here that took pity on me and sent me some real, intact, usable strut housings!

For this gesture I am truly thankful!

So I’ll hang on to the coilover sleeves I bought and go back to the stock parts.  Once my lifting restrictions are lifted of course.

paranoid_android
paranoid_android UltraDork
10/9/18 4:50 p.m.

Over the last week I've been trying to regain some momentum on the Rabbit.  It isn't easy to do thanks to life.

But I managed to identify an opportunity for rust repair in the rear lower quarter, and even formed a cardboard plan for fixing much of it.  The parts I thought I could get a welder tip to anyway.

This is the spot cut back to were I had good metal to work with:

The hardest part was figuring out where the metal used to go, because it wasn't there anymore.

I laid the first (lower) patch piece in and went to start tacking it- only to learn my HF auto darkening helment doesn't darken anymore.  That was an unpleasant surprise.  So it became wall art, and instead of ordering new parts from my Amazon list I'll be shopping for a new helmet.

Earlier in the week though I fired up the de-rusting tub of wonder, and got the front strut pieces I have on hand cleaned up and painted.  I had planned on having replacement springs by the weekend, and then fully assembled front struts to install.  But that plan may have to wait.

badwaytolive
badwaytolive Reader
10/10/18 12:18 p.m.

What a mighty rescue mission- thanks for sharing!

damen

xflowgolf
xflowgolf Dork
10/10/18 1:09 p.m.

Sounds like you have it all sorted, but had another contact that may come in handy out your way.  I haven't talked to him in years, but Matt Bushore was a VW rally guy with some machining cabilities who lived in the Ann Arbor region.  You can find contact info on their old race team site http://bentmettle.com  


paranoid_android
paranoid_android UltraDork
10/10/18 8:03 p.m.

:-)

Thank you for the lead xflowgolf!  I’ll definitely get in touch with them.  Their world headquarters address is right on the North side of town, not far from me.

paranoid_android
paranoid_android UltraDork
10/28/18 7:39 p.m.

A little more happened over the last couple weeks.

A package arrived while I was working doubles containing two Klokkerholm panels, branded as Key Parts, ordered from Jegs.

A rear wheel arch “inner” and an “outer.”

Getting metal back to where it needed to be was kind of like playing three dimensional chess.  I needed to know where these panels were going to end up so I could tell where my homemade patch panels needed to cover.

And I didn’t document all that in between berkeleying around, but the that gaping hole pictured above is filled, the inner arch is welded in except for the two bottom-most bits, and the outer is in place.

Now to finish welding all that in (the boring part).  I’ll try to remember to take some pics inside the wheel well next time I’m out there working on it- I have a hard time remembering to take pics as I go blush

bigfranks84
bigfranks84 Reader
10/30/18 10:51 p.m.
paranoid_android said:

.

This is the spot cut back to were I had good metal to work with:


Man, I don't miss that kind of rust. I grew up in Plymouth, MI. So glad to be out of salt land. 

Good luck on the progress,  I love rabbits 


paranoid_android
paranoid_android UltraDork
11/5/18 7:43 a.m.

A little progress was made over the weekend.  The rear wheel arch is all welded in.  After an evening with a grinder, it should be time to plan the body filler stage of this fix.  That will likely end up in a separate post though.

The most exciting part of that experience was something inside the body caught fire while I was welding.  Like properly caught fire.  Please reference the first image above- as I was zapping happily away on the forward portion of the panel, I noticed a brown smudge on the paint.  When I tried to wipe it away, it started growing.  And paint started bubbling.  And holy berkeley where is my fire extinguisher!  (It was in the house, in the basement).

I don’t know what burned as I never saw it before welding.  Some kind of sound deadening material?  Hard to say.

Part two of progress, putting parts together:

Assembled front struts with KYB inserts and Moog springs.

Left to be done are new control arm bushings and ball joints, then front wheel bearings.  Then start putting it back on the car.


¯\_(ツ)_/¯
¯\_(ツ)_/¯ UberDork
11/5/18 7:55 a.m.

Assuming you've got everything removed from the interior on the other side, it was probably seam sealer or sound deadening tar that burned.  Either way I wouldn't worry much about it, maybe just try to get some paint on it if you can see where it was.

paranoid_android
paranoid_android UltraDork
11/5/18 4:30 p.m.

Good call Chris!  I just popped the interior panel to see what happened on the inside:

I guess there was some sort of “pad” in there that ignited.

The tar you speak of I know well.  When it oozes into my workpiece it always reminds me of Venom

paranoid_android
paranoid_android UltraDork
11/9/18 10:57 p.m.

Front suspension progress is moving along.  I reached the point where I need to find a place to press the old wheel bearing races out of the knuckles, and press my new bearings in.  Luckily I have local options that can help me with that, I just need to find time to get them there.

So the way I handle down time is thinking about what to do next.  I really don't like putting things together to find I need to take them apart again to accomplish something else.  This image is what I've been thinking about:

The green line is about where the oil pan on the transmission ends up, and the red line is where the bolt that holds the control arm on goes in.  In order to remove that bolt, I had to drain the transmission and remove the pan.  Pain in the butt.

With this in mind, I've been trying to figure out how to add a lower strut brace to stiffen things up.  The commercially available ones I've seen all say "won't fit auto transmission cars."  Since they all seem to attach under that long bolt, I can see why they won't work.

So, today I started putting together an idea I had, and I'd love to have some feedback on it.

The green arrows show the front mounting points for the control arms.  The idea is to weld the two pieces of angle iron to the spots where they are clamped, then come up with a cross bar that would attach to those two points with a heim joint type deal (drawn in red).

Using something like this...

... where the "pin" fastens to the angle iron, and the other bits thread into the cross bar.

Would it work?  Would it do anything to stiffen things up?  Is anyone still reading this?

I'm obviously not an engineer, so I don't know if it would accomplish the task or not.  Then I'll have to figure out another arrangement for connecting the two rearward control arm mounting points, but that shouldn't be that hard.

Any thoughts would be appreciated wink

VWguyBruce
VWguyBruce Dork
11/10/18 6:47 a.m.

Still reading. Your cause is a noble one. 

I’ve also had VW undercoating catch fire.

Yes, the brace would be effective. Neuspeed used to make stuff similar with other knockoff brands floating around. This guy is still producing them with more bracing. 

https://www.gokraut.com/


DeadSkunk
DeadSkunk PowerDork
11/10/18 7:38 a.m.

As a VW owner, several times over the decades, I find this thread interesting and I'm still reading. Keep it up.

EvanB
EvanB GRM+ Memberand MegaDork
11/10/18 8:05 a.m.

It seems like it would be cheaper and just as effective to weld those two pieces of angle iron on and weld some nuts to the top side of them. Then make a cross bar that bolts onto the angle iron. That would avoid the cost of the rod ends and making a brace that they could thread into. 

The brace could just be square tubing with a plate welded on each end with some holes for the bolts to go through. 

¯\_(ツ)_/¯
¯\_(ツ)_/¯ UberDork
11/10/18 8:12 a.m.

The thing I would worry about, with that sort of brace in a rallycross situation (is that still the plan?) would be bending things if the site you run at is super rough and you nail it with a rock or something.  Other than that, I'd say Evan's idea is good- you don't really need adjustability, just something to tie the two sides together that won't bend.

EvanB
EvanB GRM+ Memberand MegaDork
11/10/18 8:16 a.m.

It would be a good place to attach the rear of a skidplate. 

The michigan rallycross courses are generally super smooth. 

paranoid_android
paranoid_android UltraDork
11/10/18 8:39 a.m.

Thank you all for the input, I really appreciate it!

My kids tell me (often) that I explain things too much.  I was hoping I wasn’t doing that here.

Rallycross is still the plan for this car for sure.  And Evan you are thinking exactly what I was- it could serve as a mounting point for a skid plate (eventually).

I made the decision in my mind that this will be a Gastropod car for the Challenge next year too, so cheaper is gooder.  With that in mind, the nut and bolt approach may be the way to go.

1 ... 3 4 5 6

You'll need to log in to post.

Our Preferred Partners
5ftyeGr91ZKdDtXJcOMl1xUbBp21ztPq6rixKKXX4xaRrPHp2AD9Kwp48EcPADb7