So I got some stuff done lol.
I started working out the turbo turn downs on the hotside. .080"w 304 stainless, and fully purge welded. This is my second time trying to weld stainless steel, so im pretty happy with how it turned out. I think im going to have to cut off the wastegate flange and add a 90° elbow. The waste gate just sits too far forward. After messing with that, I started working on getting the engine fitted up.
It is 4.5" farther back than stock. I did this for weight balance and turbo packaging. Unfortunatley that will mean fabricating a new firewall and trans tunnel. Ill get it hashed out lol. I ordered a bead roller this week.
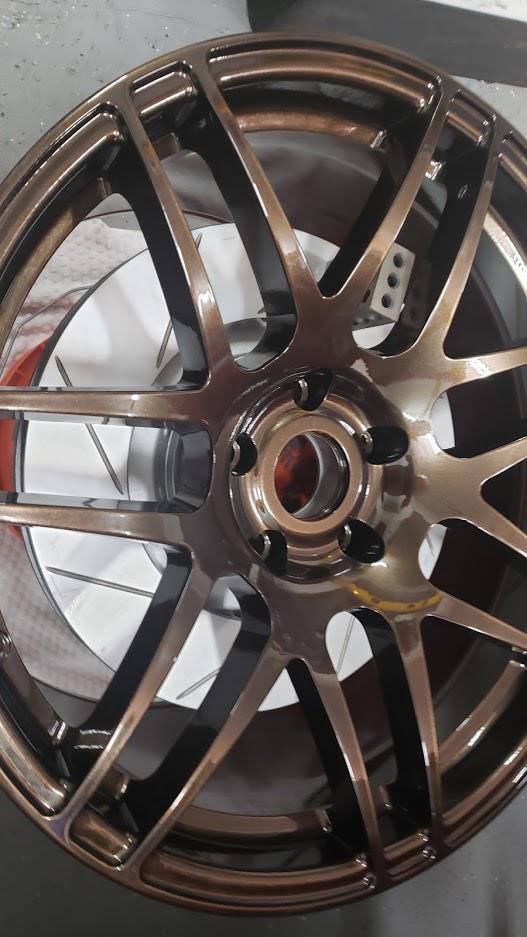
Big ole 14.8" CTS-V brakes are on. These are one piece for now. Theyre actually 2#s lighter than the later 2 piece units. In the future I may mix it up. We will see.


Here is Episode 22: [url]https://youtu.be/Y5yPkuvkgV8[/url]
That brake rotor is huge! Hadn't checked in on this thread in a little while; seems like a lot has happened and it looks good.
In reply to pres589 (djronnebaum) :
Theyre some serious beef. They aren't the lightest im sure, but they are 15" in diameter and will act as a pretty good heatsink. I am planning on running some hard trackdays with the truck and want to be able to run 20-30 minutes without everything going to crap. The truck will be moderatley light for a truck, but thats still pretty heavy for a track vehicle. Lotsa energy. Planning on some serious CFM brake coolers, quality calipers, pads and master cylinders. Planning on a tilt bar style set up right now.
What are the knuckles/spindles and ball joints?
Is that one of those little pony cokes for mixing?
I kid, I kid. Beautiful work, as always
The work here is indeed a beauty! With this in mind, I am looking forward to seeing your plan for supporting your turbos.

In reply to solfly :
The spindles are Wilwood pro Spindles. The hubs are a conversion spindle from BigBrakeupgrade.com
The guy takes a 80s camaro brake rotor and turns it down and stuffs new races in it to fit the ProSpindles stem. Only mod i need to do yet is the turn down the pilot surface a smidge to make that good to go for these CTS-V rotors. He makes Brembo brackets as well.
Ball joints are Mustang II style. 7° Taper K772 style. Theyre the beefed up versions though, not the standard MOOG fare. The upper ball joint has +1" stem for some extra chamber gain. If thats too rowdy, I have .5" and nominal studs I can play with as well.
LCA is a 15.5" arm with 1" of adjustment available.
UCA is a Joes racing style. 9.25" if I recall.
Ive got almost ±100% antidive/prodive adjustment and I have 3° to 10° caster adjustment. Should allow me to play around.
Right now the front end is set at the following for baseline:
Toe: 1/16"
Static Chamber: -1°
Chamber Gain: .9° Chamber Gain per 1° Body roll.
KPI: 11°
Caster: 8°
Antidive: 65%ish
Sway Bar: 500lb/in wheel rate
These are just my starting points. Hopefully i can get it sorted out once its driving. Im a suspension NOOB, so designing my own was probably a bit ambitious lol. At least if I screwed it up I can rip it off and build it again. I have all the dims and PN's documented, so it makes it easier.
In reply to rustomatic :
I am planning on having the turbos engine affixed. The flex couplers are for thermal expansion only. They cant handle much extra stress. That and the hotside is relatively thin valve (.080" 304).
Once both sides are in place, I'll get a balancer, alternator and tensioner and try to figure out my belt routing. Then ill make turbo stands off the face of the engine out of some 1/2" .060w" tubing. Its lightweight stuff, but all triangulated up it will be very sturdy.
The turbos will probably get Vibrant HD clamps welded to them to handles some flex, and i will mount the intercooler in soft rubber bushings to allow some flex.
This is my first turbo system build, but i've been consulting back and forth with a local master of this stuff. Jason Schmuck of Schmuch built. Guys an absolute artist.
Cool, man. Love the planning and dedication to the clean-room level build. I figured you did a bit too much homework to expect thin stainless to hold up turbos, but I also knew you'd do something pretty cool.
There's a pretty helpful thread or two on turbo supports on the Driftworks forum; it's a few years old, but guys dredged up a lot of cool ideas from Indy and F1 stuff, among other sport-oriented builds.

solfly
Dork
9/14/20 12:39 p.m.
thanks for the description on the suspension setup, I'd like to figure out a not $1000+ way to upgrade the front brakes on my C1500.
In reply to rustomatic :
Yeah the .080w stainless was done to keep the weight down. Its high and mounted over the nose. If I can keep the weight off it and brace the wastegates, it *should* have a fighting chance. Everything was full penetration and back purged. Hopefully it holds. If it pops... well... we rip it off and go 304 pipe.
I got the transmission in and mounted. Worked out great! The Domiworks engineering adapter went in relatively drama free. Some minor cutting and she's in.
Everytime I watch your videos it reminds me of E36 M3 I need. I watched this video earlier and then added Clecos and a beadroller to my Christmas list for the wife.

tip
New Reader
9/27/20 10:56 a.m.
This thread is full of win. Sheet metal work looks clean!
Looking forward to seeing this truck on all fours
More parts showing up.
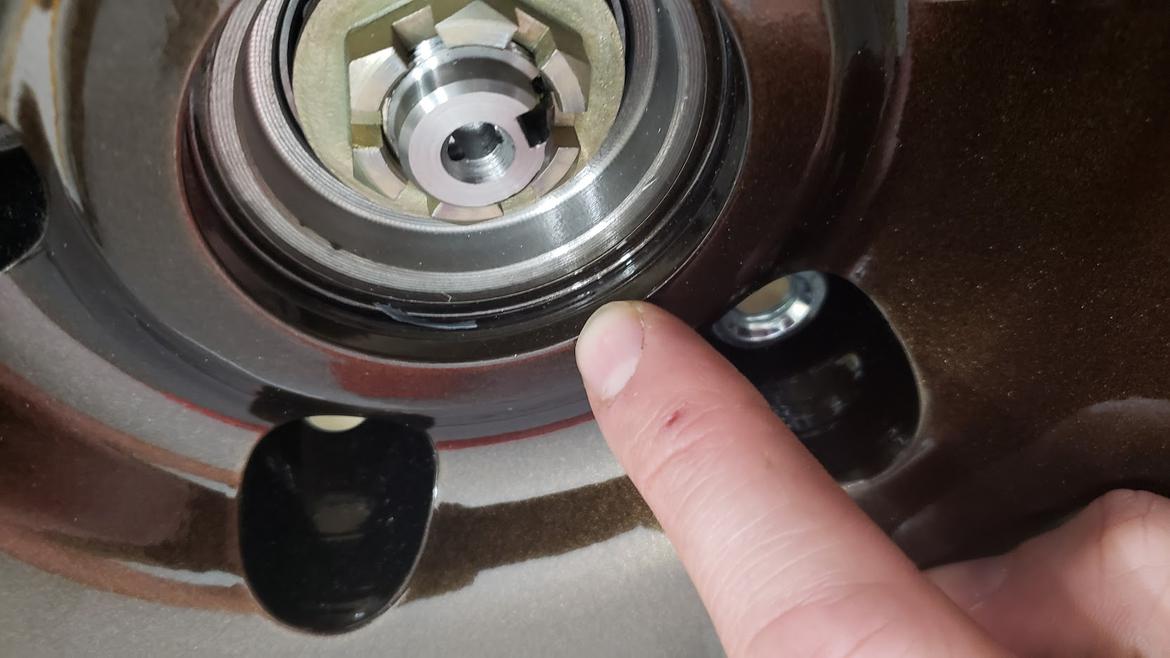
I got two Forgestar F14s. 19x12 +55 Deep Concave. They fit the rear perfect, on the front the hub wont clear the little lip for the center cap retainer. We are gonna fix that right up. Looks like ill have plenty of clearance on the front for CTS V2 brembo caliper.


In reply to solfly :
all of them or just the most recent?
just that last post but they're working now

devina
Reader
10/15/20 9:20 a.m.
Your build looks amazing!!
Can you share some details on your fixture table? Not the table that the frame is resting on... Was that something you made or??
This is bloody awesome. I joined up here to lurk for a bit and learn what I could for my own project. While most of this isn't really applicable to my project, it's nonetheless bloody awesome and an inspiration!
In reply to loudandproud :
Im guessing you'll modify the hub, not the wheel?

JAdams
New Reader
10/15/20 1:21 p.m.
I can't believe I haven't seen this thread before but awesome job man! I love a good GMT400 build. Excited to see how it turns out.
In reply to devina :
Yep I made the table. It was my first project about two years ago. I went out and bought a tig welder and practiced on a folding table and pieces of scrap until i figured it out lol. Then I bought a drill press and got to work.
The frame is 2x2"x3/16"w steel welded up. The plates are 5/8" x 5" wide flat bar on 12" centers. That gives a gap between the slats to slide clamps in. Each plate has 3/4" CNC punch on a 2" spacing. I use these for mounting clamps and fixture blocks.
The plates are welded to 5/8" all thread on the corner of each plate. This allows me to level the plates and raise and lower them up to an 1" each direction. It allows me to use 123 block for gross adjustments, and then i can use the screws to get any height position in between. It works pretty well.
I added hooks and ground tabs on to hold extra stuff. I like it.
Some day when I build a bigger shop im going to build a BIG version of this. Probably will take like $2k in steel... but i wanna do a 6 foot x 12 foot version so i can do large assemblies and put the legs on hydraulic rams so I can raise and lower it from 1' of the ground to 4' off the ground.


