1 2 3 4
tedroach
tedroach New Reader
11/8/17 8:40 a.m.

Sorry to hear about the set back. The good thing about doing it this way is that you will know how it is done. It will make it much easier than putting it back together and finding out there is an issue hiding somewhere. That can be frustrating to find and fix.

Glad to see the progress. I am jealous that you are getting this done so quickly.

atli126
atli126 New Reader
11/8/17 10:22 a.m.

In reply to gearheadE30 :

Alot of the fc rx7 guys on norotors.com use the 94-01 acura integra speedo into the fc gauge cluster. I've did it too and it seems to work well for most of us 

https://www.norotors.com/index.php?topic=199.0

https://www.norotors.com/index.php?topic=6598.0

Good luck and keep up the good work! 

Next will be a lsx swap :P


ggrjr
ggrjr New Reader
11/8/17 11:02 a.m.

In for the duration.


gearheadE30
gearheadE30 HalfDork
11/10/17 10:47 p.m.
tedroach said

Glad to see the progress. I am jealous that you are getting this done so quickly.

It will definitely be going in fits and spurts. The interior stuff is pretty easy and goes quickly; wiring, welding, and bodywork will probably take a lot longer. I have a garage full of projects, so I just bounce between them trying to check things off little by little. The dirt bike racing season ends after this weekend though, so I may be spending more time in the garage after that.

@atli126: that's pretty sweet! I don't know if there are any speedometers out there that match up that perfectly with the 944's speedo, but I suppose it might be possible to remove the cable drive guts and put a motor in there. I doubt the odometer would work, though. It's much more likely that I'll end up with an appropriately-sized VDO gauge of some sort in there.


I did a little more work today. Started cutting down the battery tray to fit, only to find that the late tray is completely different than the early one. I will probably end up making a fresh sheet metal panel rather than using the late tray. It's worse than it looks in the picture.

I pulled the clutch, clutch slave, and the modified brake pedal trying to get to the firewall on the driver's side. I still need to remove the body harness (which is really going to suck) but once that is done, I'll be able to drill out the panel and weld in new sheet metal. Once that's fixed, I can start moving forward with installing clutch and brake hydraulics, which is a major step forward.

I also finished cleaning up the driver's floor pan, and got all of the rotten insulation out. If I had to guess, I'd say I've pulled at least 50 lbs of insulation out so far. It already smells better inside. I started the wiring process by removing everything that isn't stock from the wiring harness, aside from head unit wiring which I will address much later. I think it's all out now, though I do still have two wires to repair that either got pinched or nibbled on and broken. The ECM was still in the car, but all of the ECM wiring is long gone, presumably to the same place the original engine ended up.

Stefan
Stefan GRM+ Memberand MegaDork
11/10/17 11:52 p.m.

Only944.com has a handy firewall brace for the clutch and brake master cylinders:

https://www.only944.com/partscatalog/only/firewallbrace/

Their other products are pretty handy as well, especially the extra brake light, the shifter and shift linkage, sunroof and hatch seals, inner shifter boot, etc.

Good luck on the build.

Recon1342
Recon1342 Reader
11/11/17 2:01 a.m.

Neat!

I don’t speak Porsche, but it sounds like this is a RWD front engine set-up like a corvette? Ought to be a hoot with LS power...

docwyte
docwyte SuperDork
11/11/17 9:51 a.m.

Pretty sure the TPC hydroboost adapter plate will also act as a firewall strengthening plate.  Might be able to kill two birds with one stone...

gearheadE30
gearheadE30 HalfDork
11/11/17 11:33 a.m.

The firewall in my car ends roughly where the border of the rivets is, so unfortunately there isn't really even anything there to mount the MC to anymore. There's literally just a big hole in the firewall behind that panel. If there were any remains there, I think the TPC adapter would do the trick.

Only944 will definitely be getting a bit of my money here soon - I need to come up with a list of everything I actually need from them, but it's a decent amount. I haven't decided if I will use their reinforcement or not though - I can make a nice plate to do the same thing for quite a lot less than $115, and I'm pretty sure that their plate doesn't go far enough to the driver's side of the car to fill the holes in anyway. It's pretty bad.


@Recon1342 - yes, this is a front engine, RWD car with a transaxle similar to the Corvette. I suppose with LS power, I probably just could have bought a cheap Corvette and called it a day....but I like building things and have an unhealthy appreciation of cars from the '80s.

Recon1342
Recon1342 Reader
11/11/17 1:24 p.m.

In reply to gearheadE30 :

I like it! Definitely following along.

irish44j
irish44j UltimaDork
11/11/17 7:53 p.m.

"Someone broke a window in this car at some point in its life - this was behind the passenger rear interior panel"


Both of the 924's I bought had broken glass in the rear interior panels and down in the little "caves" in the rear quarters. Apparently 924/944 hatches are not the strongest design ever.....

ClemCougarSparks
ClemCougarSparks PowerDork
11/12/17 7:29 a.m.

I'm like a moth and the 944 has always been a flame to me.  I'm in to follow along and see this one on track.  I love what you're doing so far!

GCrites80s
GCrites80s New Reader
11/12/17 2:05 p.m.
irish44j said:

"Someone broke a window in this car at some point in its life - this was behind the passenger rear interior panel"


Both of the 924's I bought had broken glass in the rear interior panels and down in the little "caves" in the rear quarters. Apparently 924/944 hatches are not the strongest design ever.....

It's also easy to break the quarter windows while trying to change the rear speakers without ripping the interior vinyl.

gearheadE30
gearheadE30 HalfDork
11/13/17 10:22 a.m.

Interesting comment on the hatch and rear quarter windows. The hatch on this car is probably original, however I would not be surprised if someone tried to install speakers in the back. There is so much hardware missing from this car that it's hard to tell what has been taken apart and what hasn't, but it looks like someone tried to take those panels out before. I will probably also remove them, if only to clean behind them and to make sure the speakers are in passable shape. I want the car to be lighter, but I do like my music.


No more progress at this point, aside from pulling the driver's side fender off to plug the old antenna wiring holes. Early 944s (1983 and 1984) have welded-on nose panels, so it looks like I'll also be drilling out some spot welds there too. I picked up another dirt bike (KTM 450exc) last week, so that has been taking some of my time as I accidentally ended up rewiring part of the bike in my quest to make the brakes work again.... See a trend here? Projects tend to balloon out of control a bit....

docwyte
docwyte SuperDork
11/13/17 12:42 p.m.

The back hatch glass likes to delaminate from the frame.  If/when it does, the hatch will rattle a bunch and won't be water tight anymore.  It's a huge job to reseal it, most glass companies won't do the job.  Search on rennlist, I think a few guys have diy'd it...

gearheadE30
gearheadE30 HalfDork
11/30/17 6:31 a.m.

Total change count after completely removing the interior: $13.44. That is roughly 4 times my previous best immediate return on investment!

That money (and a fair amount more) has gone to only944, Ebay, Pelican, and Rockauto for replacement and upgrade parts. Also working on collecting some new fab tools (namely a bead roller for making a new battery tray). Still no major moves forward on the project itself, as I have been doing as much research as I can to check things now. My plan moving forward is to completely remove the drivetrain, as I have less and less confidence that everything was done to my standards. (example - torque tube concentricity is critical for bearing and clutch life; it's never going to be easier to check than it is now.)  Having the engine out will also allow me to remove the rest of the crumbling insulation from the firewall, and it will be a good opportunity to clean everything.


Anyone have opinions on paint? I obviously have a mismatched fender, and while most of the paint on the car actually looks really good underneath the dust and dirt, the hood is very faded and and driver rear fender needs a lot of bodywork. I don't have the budget to spring for a really nice paint job, and I can probably do a better job myself than having someone else do a cheap quickie job. I'm only trying to make a plan here now, because I'd be able to paint the engine bay with the engine out. Any final exterior paintwork would be done after the car is running.

  • Should I try to match the original color for exterior paint (original paint is Ruby Red Metallic), knowing that probably 50% of the car needs paint, and probably 70% of it needs some kind of attention ? If I don't do this, I'd probably go with either the ubiquitous Guards Red or silver with Martini accents since I've always kind of wanted to do a car up that way.
  • For the engine bay, I've discovered I like working in white engine bays because it's easier to see everything. Do I paint it white? Black? The same as whatever I go with for exterior? I've never had an engine bay that didn't match the exterior before, but for a track-oriented build, white is making a lot of sense to me right now.

Obviously a lot of this comes down to my personal taste, but I'm curious as to what the hive thinks.

DrBoost
DrBoost MegaDork
11/30/17 6:38 a.m.

I think removing the drivetrain to check everything is a good idea, that was my plan too. In fact, I think that was one of the first things I said after you got here haha. I saw a few things that make me realize that it would be a prudent move.  

As far as paint. Do a google search for Jeep Grand Cherokee Patriot Blue. I was considering that color when/if/never I got the car done.

LimitedTimeOnly
LimitedTimeOnly New Reader
11/30/17 9:28 a.m.

One of the things I liked about the car when it was first posted by DrBoost was the Ruby Red Metallic, so I would support repainting it that color - but only because I like it, not because it was the original color. If it isn't appealing to you, you might as well change it.

gearheadE30
gearheadE30 HalfDork
12/9/17 11:44 a.m.

This Patriot Blue? It's a sharp color.

@LimitedTimeOnly - I will have to get some more pictures of the paint once I've cleaned the whole car off. It's not in anywhere near as good of shape as the pictures make it look, though I do actually like the color. I'll dust it off before I make any real decisions.

Making some progress on the car now that some of the dirt bike projects have been wrapped up.

Nicest looking shifter parts I think I've ever seen. Yes, those are thrust bearings on the shift lever.

Got it up in the air and took the rear tires off - unfortunately, the long wheel studs have a shoulder on the bottom that results in the nut bottoming out on the shoulder before the spacer is tight. Not sure quite what this is going to mean yet, but will probably involve either shorter wheel studs or different spacer blocks. The spacers have some damage to them from being rolled quite a ways on a car dolly while loose, so it may be prudent to replace them anyway.

Removing the tires also revealed missing pads in the rear brakes. I will probably end up with new rear rotors as well, considering the poor shape that these are in.

Headers are off and decided I needed a picture:

Engine is almost ready for removal. Hoping to have it out of there later today, if everything goes smoothly. I'll get it bolted to the stand and pull the intake, valve covers, and oil pan to make sure everything looks okay in there. The intake manifold is also missing a few parts that have left it open to the elements. If the dust all over the car is any indication, that probably means the intake needs to be cleaned out as well. Notice the dual oil fills - I need to get rid of the one on the driver's side, as it's taking up some valuable space where the brakes need to go.


When the engine is out, I will remove the front suspension and subframe and essentially get the front end down to a bare frame before reassembling everything. It's such a simple design that I think it will be worthwhile for peace of mind alone.


gearheadE30
gearheadE30 HalfDork
12/10/17 10:25 a.m.

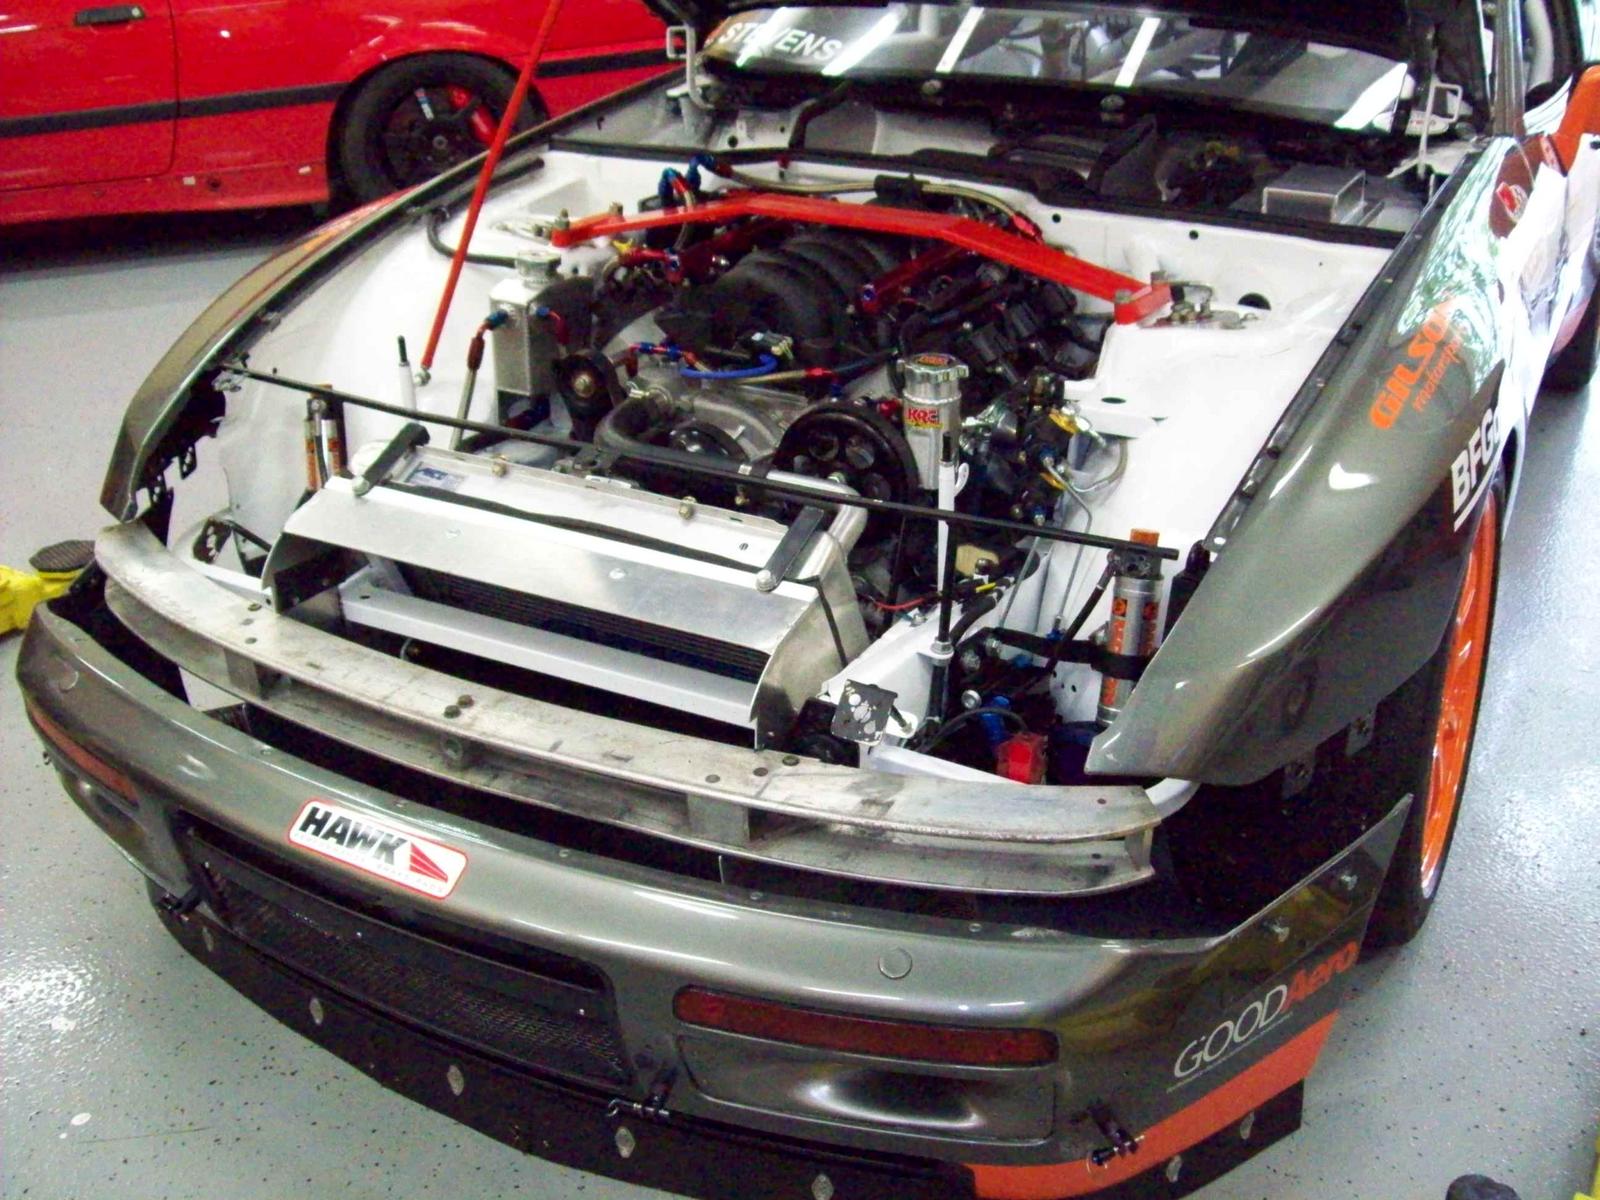
Engine is out! This thing is a hell of a tight fit to try to remove with the bellhousing on it. Found some good things and bad things, but unfortunately most were bad.

The removal issue is caused almost entirely by the hood latch where it sticks out from the header panel. Being a 1984, my 944 has a welded-in panel, unlike all of the post-'84 cars. Oddly enough, 924s also had a bolt in panel, so this design was only used for 2 years. I will be drilling the spot welds and turning mine into a removable panel, as I intend to hide an air filter underneat it. This will necessitate some kind of vent in the header panel, however I haven't decided how I'm going to do that yet. I'd love to do the 924 GTS vents, however that panel has been NLA for a bit apparently. I will also probably switch to Aerocatches for the hood release, as there aren't a whole lot of other elegant ways to run a good intake on these with the factory latch being directly in front of the throttle body. There are dyno charts out there for LSs showing something like a 10 horsepower improvement at the top end even on a 375hp engine just by having a straight intake runner, and that's pretty low hanging fruit in my eyes with the benefit of making engine removal vastly easier.

Bellhousing against firewall (it's using the Quicktime SFI-rated housing):


The engine is turned sideways for maximum clearance to the pulleys. In order to tilt it like this, I had to drop the subframe to get the oil pan to clear. It looks like there's a lot of space in there until you try to get it all out. I had to remove the alternator to get enough clearance to go around the hood latch.

One very dirty engine bay. This will probably all be painted white once I've de-tabbed it and fixed all of the sheetmetal issues. Current count there is replacing the battery tray, cutting out and re-repairing a fenderwell, and cutting out the driver's side firewall to replace with thicker metal. Some of this will have to wait until the bead roller and dies show up, as I want to add some ribs and things to make it a bit stronger.

With the engine out, I discovered that it does have a nice new clutch and pressure plate on it from Spec, along with a lightweight SFI-rated aluminum flywheel of some sort. However, downsides have been numerous:

  • One of the engine mount bolts was crossthreaded
  • Various metric holes had english fasteners in them, though I've been able to chase these and save the threads
  • Bellhousing held on with ungraded exhaust manifold bolts
  • Some of the crappiest engine mounts I think I've ever seen
  • Related to above, the engine is mounted somewhat too far forward, with the torque tube somewhat under tension when installed. I need to figure out where everything *should* be before making new mounts. I'm not thrilled with the other off the shelf options out there either from what I've found online.
  • Tons of random hardware missing from the engine

Craptacular engine mounts:

Look at all the room for play in these things. Pretty astonishing. Supported on the hoist but before removing the through bolts, I could move the engine over a half inch in any direction. Sloppy.


Someone also went to town in a bad way on the crossmember, which will be replaced with the spare that came with the car. This one is trash. Sliced aluminum subframes have no place on a car that will see pretty serious side loading on the track.


I  think I've about reached the end of disassembly (the easy part). The car is almost a bare shell right now, though the rear still has suspension in it. Next steps, roughly in order, are to remove what's left of the body harness in the engine bay, cut out all the crappy repairs, make the header (nose) panel removable along with the hood latch, weld in patch panels, and mock up new engine mounts. With all that done, I should be able to paint the engine bay and do final assembly of the engine. I know there are a lot of steps in the middle there, but that's the rough plan.


By the way, as far as exterior paint goes - I cleaned more of the dirt off, and it would appear that most of the front of the car was poorly repainted, so I'm feeling more and more like I'll probably be painting the car one way or another. Lots of chips, dents, spray paint overspray, etc.

wheelsmithy
wheelsmithy GRM+ Memberand Dork
12/10/17 11:16 a.m.

Awesome project, and very cool to see it being (re)done right.

 I have input on paint, of course, it is an opinion, and can be taken as exactly that. 

Maybe silver for the engine bay. That way, should you repaint the stock color with the accents mentioned, it will all tie together. Also goes fine with the earlier suggested Jeep blue.

Party On.

docwyte
docwyte SuperDork
12/10/17 1:05 p.m.

Those are the Texas Performance mounts.  Is the bushing rubber or poly?  Regardless, I suspect those are 1st or 2nd Gen mounts, which I warned you about. 

The flywheel/clutch is a package from Spec and should've come pre-balanced from them.  It's expensive and it's good, so reuse it.  So is the QT bellhousing, I had one on my car and it was bombproof.

M3Loco
M3Loco Reader
12/11/17 3:48 p.m.

Good luck on the build.. I have an 87 that suffered a timing belt "issue". Engine pulled and now inventorying what I need for an LS Swap. 

Had a spare 944 engine laying around, but since I'm not pressed for time, and I wanted to do something different, the LS swap is next. 

Following!

gearheadE30
gearheadE30 HalfDork
12/11/17 5:19 p.m.

wheelsmithy said:

Awesome project, and very cool to see it being (re)done right.

 I have input on paint, of course, it is an opinion, and can be taken as exactly that. 

Maybe silver for the engine bay. That way, should you repaint the stock color with the accents mentioned, it will all tie together. Also goes fine with the earlier suggested Jeep blue.

Party On.

I could see silver working as well. The main thing is that I want to lighten it up so I can see everything in there if I drop something, or if there is a leak. The other aspect of it is finding paint that will hold up to abuse and to chemicals. I've heard good things about using tractor/equipment paint for this, thinned with some acetone. I know I can get white; I'll have to see what's out there for a lighter silver. That would probably clash less with whatever color the car ends up being, blue or otherwise.

Here's a white bay for example, and the car that got me thinking it might be worthwhile. I do love the silver/orange look, though this car was built with much deeper pockets than my own:


docwyte said:

Those are the Texas Performance mounts.  Is the bushing rubber or poly?  Regardless, I suspect those are 1st or 2nd Gen mounts, which I warned you about. 

The flywheel/clutch is a package from Spec and should've come pre-balanced from them.  It's expensive and it's good, so reuse it.  So is the QT bellhousing, I had one on my car and it was bombproof.

I believe the bushing is rubber, based on its flexibility. I haven't tried the melting test to verify. There is no copper sleeve though, from your earlier post. The isolator is just the clevis part bonded to a backing plate. There is no failsafe/positive locking if it delaminates, which is a major concern to me since the 944 driveline mounting relies partially on the engine mounts to support dynamic loading of the torque tube and transmission.

I will probably end up making my own using the dimensions of these mounts for reference, since I see a lot of problems with the off the shelf designs and enough internet failure reports to back that up. My plan is to use internally-locked BMW E30-style mount (material undecided) between the subframe and the engine mount arm to get the load path back into the right direction, with a fixed mount off of the block. The TPC/Renegade mounts use that through bolt at the side of the engine mount pad, which can pivot as everything flexes during use. The lack of rigidity from this bolt and all of the slop around it leads to a lot of extra load on the lower stud of these mounts. Removing that pivot could reduce that load by stiffening the system, which I would have to believe would protect against reports of that stud failing in track use. I'm probably overthinking it, but now's the time to do it right, and it's not really any extra work to make the mount this way instead.

EDIT: the off the shelf mounts are also a compromise on the LS, as they are actually adapted from the Gen1 block mounting. There is no reason for them to travel forward with an LS install as far as I can tell, as you can use the block's mid mounts instead and simplify the load path quite a bit. I'll have to check header clearance to verify this, but that's about the only thing in the way.

Good to hear on the flywheel and bellhousing. The flywheel and clutch do indeed have balancing alignment marks on them.


@M3Loco - glad to have you along for the ride! This will be a fairly involved project, so you may end up getting there before me. Hopefully between my trial and error and docwyte's insight from experience, there will be a lot of good info here for anyone else building one of these.

docwyte
docwyte SuperDork
12/12/17 8:43 a.m.

1st Gen motor mounts have the rubber bushing.  2nd Gen have a poly bushing with a copper sleeve that also sucked.  3rd Gen seemed to work fine but I ended up selling my car before I could find out what it took to make them fail.

People have a lot of hate for Renegade but some of the early Texas Performance stuff was garbage...

AngryCorvair
AngryCorvair GRM+ Memberand UltimaDork
12/12/17 10:25 a.m.

my V8 944 was dark teal.   when the engine was out, i cleaned the engine compartment and applied gloss white Interlux Brightside boat paint from West Marine using foam brushes.   like you said, easy to spot leaks and it really made the underhood POP.

1 2 3 4

You'll need to log in to post.

Our Preferred Partners
rgxKpbaM70QyNnpwq7Gnme7NT1bbUolh7oQG8MJtZqi1VjHOmhVdQTtEmyo9OAXm