1 2
jakeb
jakeb HalfDork
1/23/16 7:35 a.m.

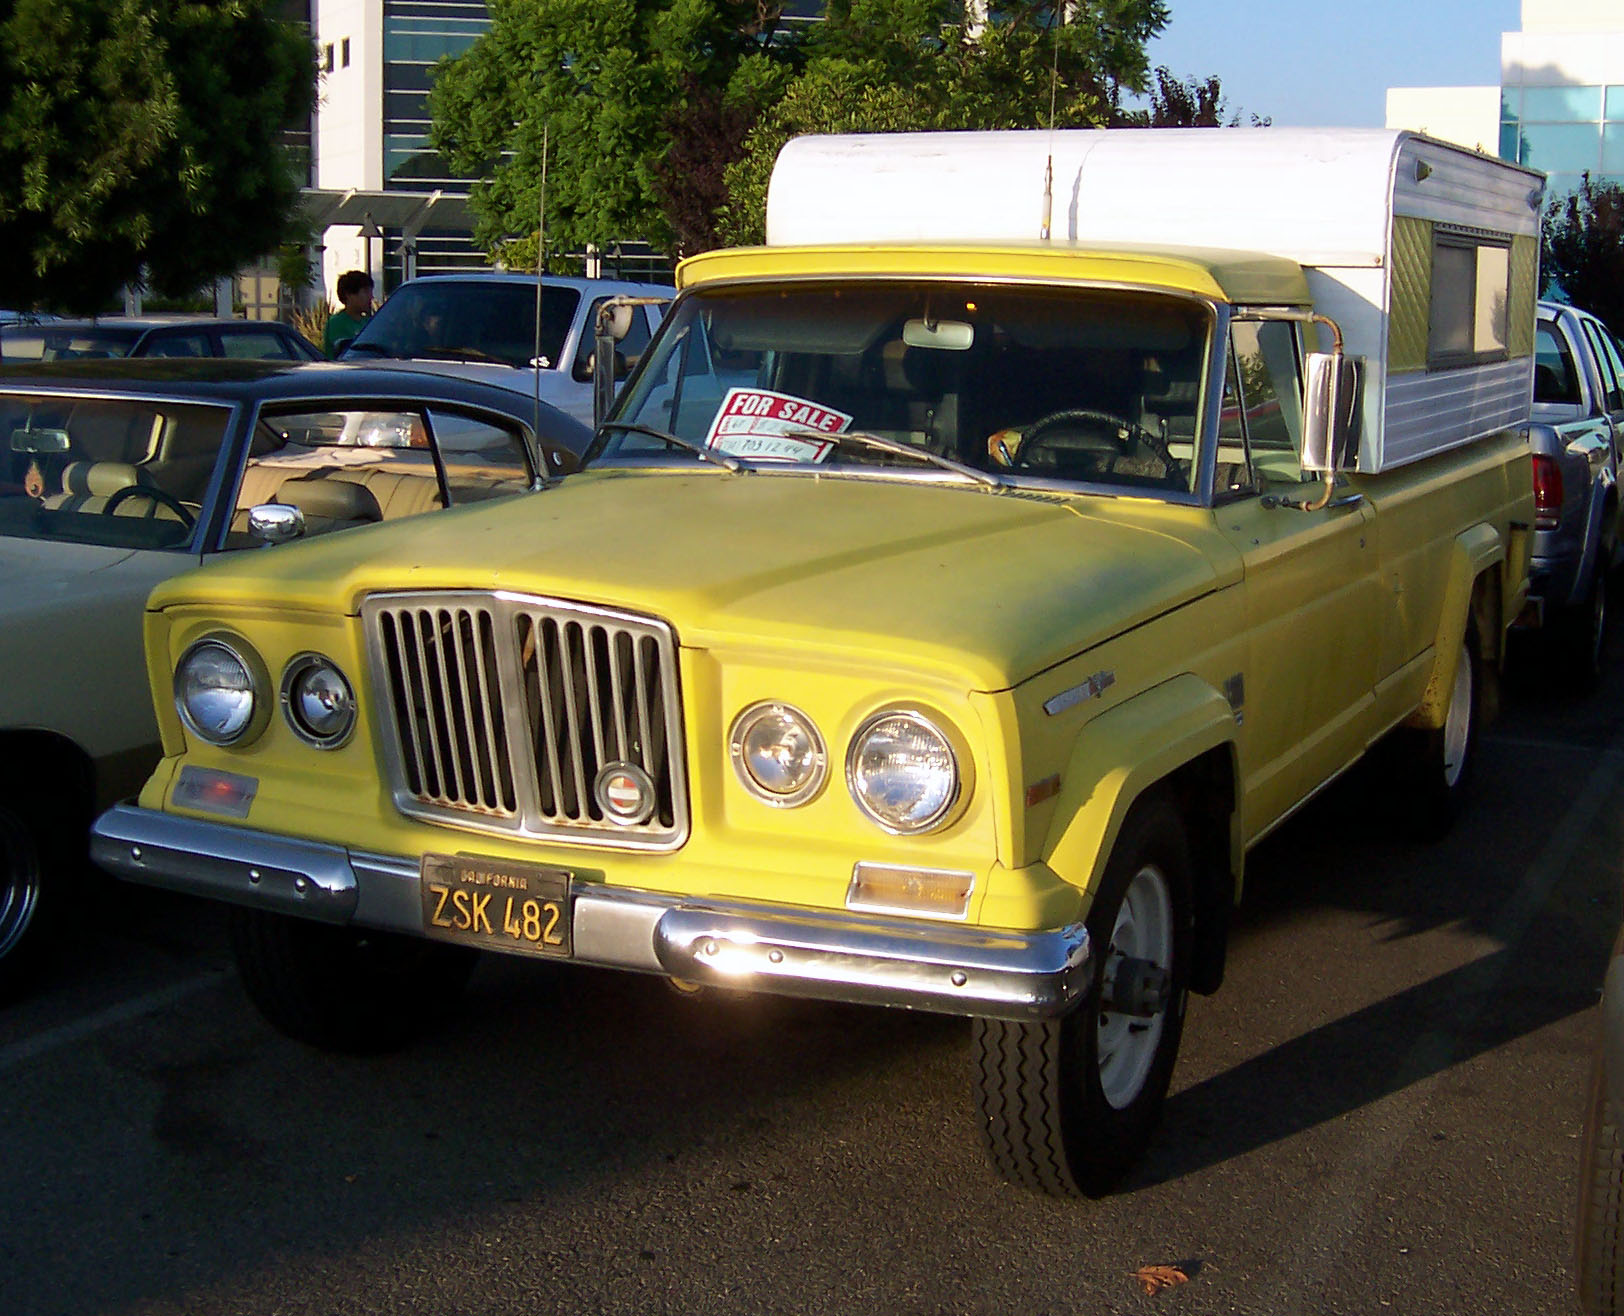
I really need to get back to posting build threads. It's hard to find time when we are so busy in the shop. Anyway this is a quick build I am doing for myself. Or my wife for her winter ride.

Reposting what I have posted to a jeep forum but I will continue to post here as the project moves along.

The machine... It's solid enough to not be a rust bucket but has enough rust that I am ok driving it in the winter.

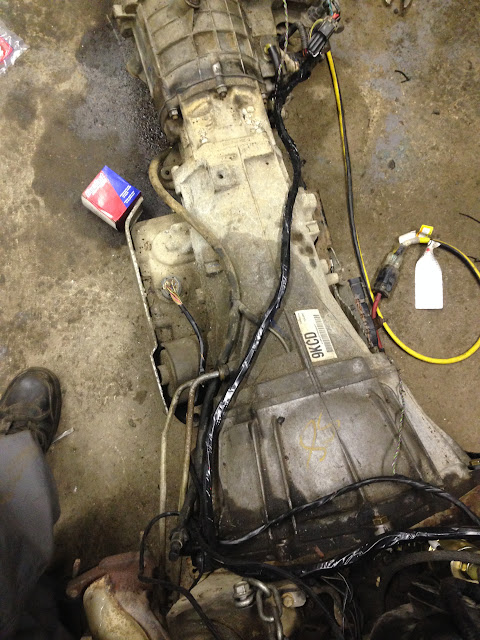
I picked up an LM7, 4l60e, push button gm transfer case when I bought the jeep. No pics of that.

Started pulling it apart this weekend. Pull the entire front end, gas tank, driveshafts, exhaust, engine all disconnected and ready to come out. When I have some help tomorrow we will yank the old drivetrain. (anyone need anything cheap????)
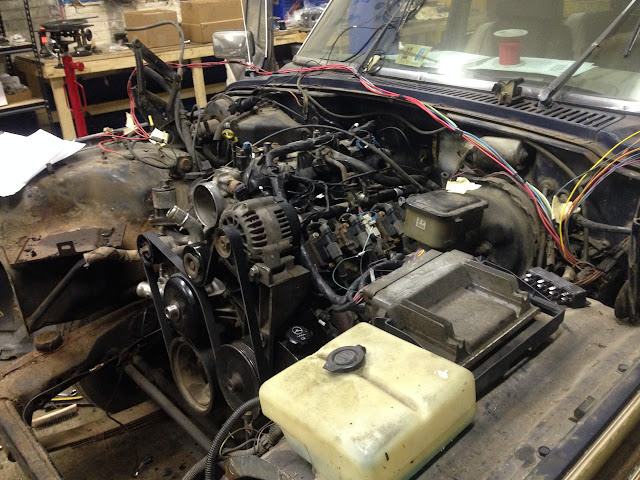
Engine out

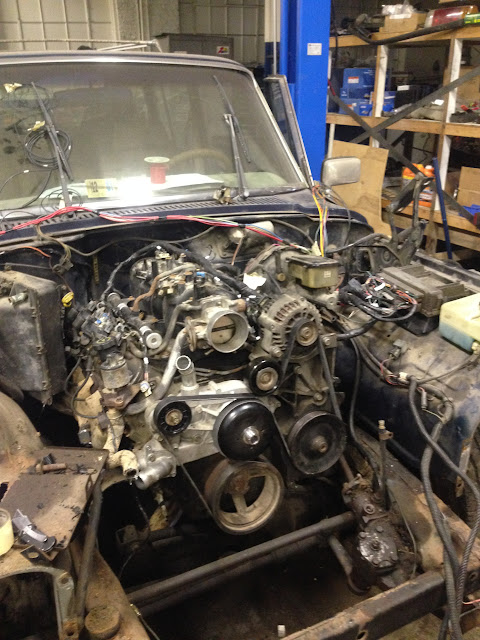
Engine is in. Using the stock jeep mount arms and jeep rubber mounts. Had to trim some off the mount arm and flip the rubber mount to give room for the exhaust manifold. Then made a mount to bolt to the engine and to the rubber engine mount.

These are just to hold it in and then will get boxed once they come out.

For the trans mount I was able to just move the cross memeber back to the second set of holes. Add a little riser and all worked. Still needs to be welded all the way and painted.

using the 2 door jimmy gas tank and pump. I will add some foam on the top of the tank in a few spots so it is held right to the bottom of the jeep and doesn't rub/vibrate on anything

After opening up the hole in the firewall just a bit the GM throttle cable will work.

Engine is back out now. Mounts will be fully welded and boxed today. As well as jigged in case we ever do another or anyone wants some of these.
Should have the engine back in today and mostly hooked up tomorrow.

A few other things I have found along the way.

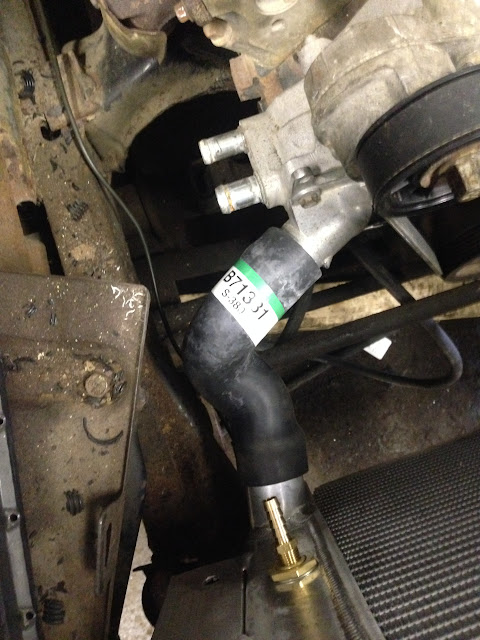
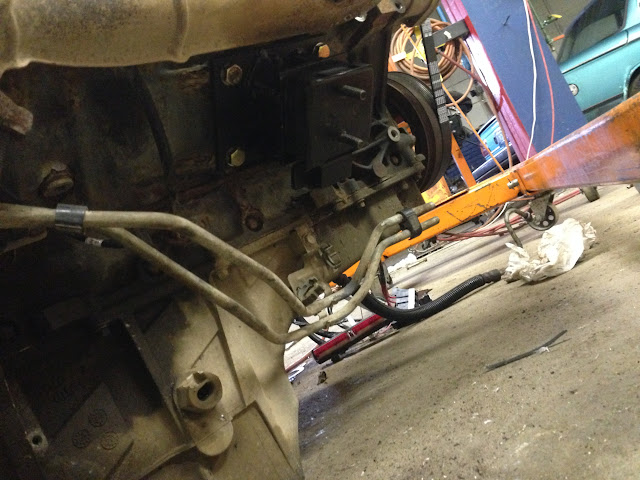
The GM Power Steering line after a little bending works to the Jeep steering box. Some adjustments to the shifter linkage the the column shift works fine. Can't get to 1st gear yet...but still need some tweeking on this. The front driveshaft fits without any changes other than a conversion ujoint Rear drive shaft is made and ready to go on when the engine is back in.

Some more progress today. Never as much as planned tho.
Ended up needing the replace both front brake lines and also the hard line to the front.
replaced all the rubber brake lines ran fuel feed to new tank (will use the stock fuel line for the return) Put together a big spread sheet for all the tcase wiring Wired all the wires coming off the tcase 
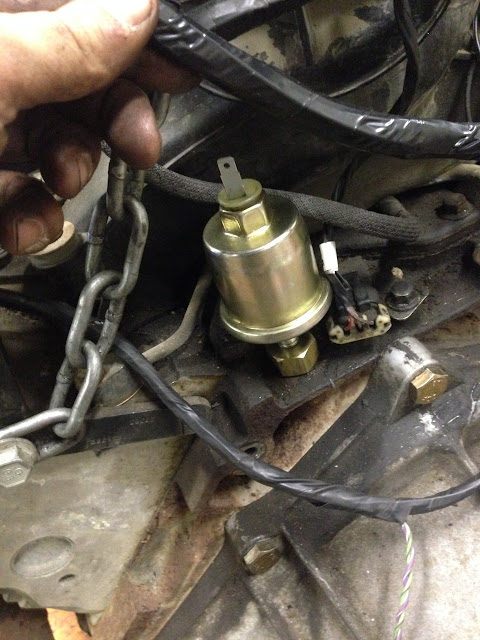
installed jeep oil pressure sensor in LM7 Rebuilt front driveshaft ujoints Reinstalled the engine.

Transfer case wiring

trans cooler lines

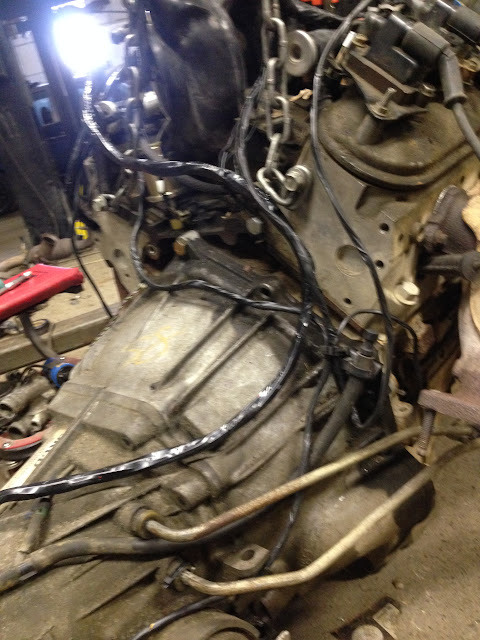
Mounts...nothing super pretty for these. If I would make more they would be a little more pretty. These are boxed around the back sides and some in the inside.

jakeb
jakeb HalfDork
1/23/16 7:38 a.m.

Forgot these two...

Jeep oil pressure sensor in place on the LS

And the mount off the trans for the filter linkage. The jeep bushing mount will bolt to this.

wheelsmithy
wheelsmithy GRM+ Memberand HalfDork
1/23/16 8:26 a.m.

Wicked awesome!

Strike_Zero
Strike_Zero UltraDork
1/23/16 8:52 a.m.

Sweet!!

xflowgolf
xflowgolf Dork
1/23/16 1:06 p.m.

Excellent project.

jakeb
jakeb HalfDork
1/23/16 5:13 p.m.

boring picture but the transfer is 98% wired...just needs constant 12v, switched 12, ground, and a wire ran to the PCM to tell the PCM it is in 4wd low.

TheV8Kid
TheV8Kid Reader
1/23/16 8:41 p.m.

Cool Project!

crankwalk
crankwalk GRM+ Memberand Dork
1/23/16 11:02 p.m.

This is outstanding!

noddaz
noddaz GRM+ Memberand Dork
1/24/16 4:38 p.m.

I like this...

NOHOME
NOHOME PowerDork
1/24/16 4:56 p.m.

Every time I see a project start with an underside this vile, I am reminded of the plains of Mordor from the Lord of the Rings series.

Having seen the results of your projects I might have to think of changing your name to Frodo!

On a separate note, is this now the full time jig or are you still teaching?

jakeb
jakeb HalfDork
1/24/16 7:32 p.m.
NOHOME wrote: Every time I see a project start with an underside this vile, I am reminded of the plains of Mordor from the Lord of the Rings series. Having seen the results of your projects I might have to think of changing your name to Frodo! On a separate note, is this now the full time jig or are you still teaching?

haha!!, the thing is actually pretty clean on the underside. Lots of cobwebs and stuff from sitting for a long time but it's really solid. Maybe I'll clean and paint the frame in the spring. Right now I just need it going so I can use it.

Yes I quit teaching about a year and a half ago. Been in this shop 2 years come March

jakeb
jakeb HalfDork
1/24/16 7:33 p.m.

Some random pictures of the engine and wiring getting cleaner. 
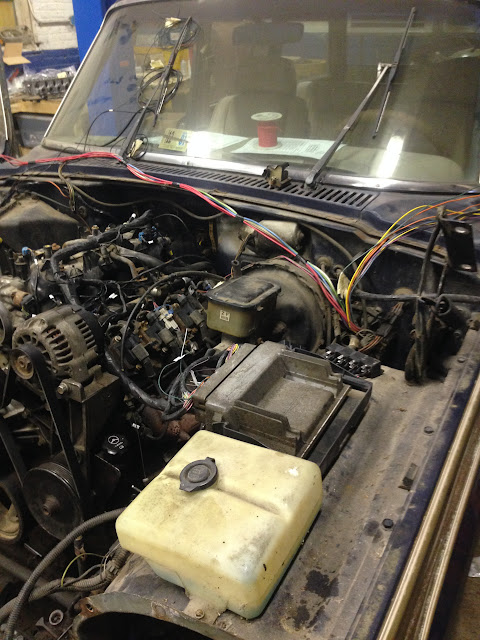
PCM fits nicely on the drivers side inner fender...once I removed the cruise and can. If I want cruise I will retorfit one of the early 90s GM electric units.

Wiring that got pulled out. Anyone need the ignition box?

sorta a useless pic...but the wiring pulled aside that is needed.

RossD
RossD UltimaDork
1/24/16 8:00 p.m.

I love full size jeeps. Are you going to put the original grille on or do a round headlight and gladiator grille back date?

oldtin
oldtin UberDork
1/24/16 8:09 p.m.
NOHOME wrote: Every time I see a project start with an underside this vile, I am reminded of the plains of Mordor from the Lord of the Rings series. Having seen the results of your projects I might have to think of changing your name to Frodo! On a separate note, is this now the full time jig or are you still teaching?

I've seen the pics of him dealing with wiring. Pretty sure he's closer to a wizard. Cool project. Those 360s were always the weak point of those trucks in my mind.

bluej
bluej GRM+ Memberand SuperDork
1/24/16 8:10 p.m.

Always making it look easy.

jakeb
jakeb HalfDork
1/24/16 8:33 p.m.
RossD wrote: I love full size jeeps. Are you going to put the original grille on or do a round headlight and gladiator grille back date?

I actually like the stock grille. It goes with the 80s look of the "wood grain"...

oldtin wrote: I've seen the pics of him dealing with wiring. Pretty sure he's closer to a wizard. Cool project. Those 360s were always the weak point of those trucks in my mind.

thanks! Also the LSx should get a bit better gas milage. The 360 gets some like 8mpg....

bluej wrote: Always making it look easy.

thanks!!

Gearheadotaku
Gearheadotaku GRM+ Memberand PowerDork
1/24/16 10:02 p.m.

How much time has this taken so far?

jakeb
jakeb HalfDork
1/25/16 6:14 a.m.
Gearheadotaku wrote: How much time has this taken so far?

I would say I have about 60 hours into it...pulling the old engine and gas tank included.

jakeb
jakeb HalfDork
1/25/16 5:28 p.m.

Some days it feels like a ton got done and others not so much...just running around getting things.

Anyway... checking things off the list Brake Booster line hooked up. Ended up using GM valve and hose in the Jeep booster. The jeep valve fitting was much smaller than the GM so dealing with a hose with two sizes would have been a pain.

Hooked up vacuum line for heater system, teed into the FPR vac line.

Removed EGR and plugged hole with 1 3/8" freeze plug

Bolted torque converter to flex plate

Installed starter

Replacing trans filter in progress

Made mount onto summit aluminum radiator and added 1/8" NPT port for steam vent

Ran lines to Heater Core

Replaced oil filter

Figured out lower radiator hose

ordered some couplers for intake and upper radiator hose

confirmed all the wiring is what I need by powering up the jeep.

ran hoses to trans cooler hard lines

One thing I did learn is you need to use a 1996 Jimmy Fuel pump and not 97+. The 97+ has a different ohm range for the gauge sender and the 96 matches the jeep exactly.

This is a summit racing radiator. I tigged the angle brackets on the side to mount it to the stock Jeep mounting points.

lower radiator hose

bluej
bluej GRM+ Memberand SuperDork
1/25/16 6:11 p.m.

Integrated trans cooler? What'd the rad run you?

Looks slick.

jakeb
jakeb HalfDork
1/25/16 6:25 p.m.

Yup built in cooler. Retail is $190, http://www.summitracing.com/parts/sum-381328

jakeb
jakeb HalfDork
1/26/16 6:20 p.m.

Spent two hours adjusting the shifter linkage to get things to line up, 1st gear is a little weird but P, R, N, and D line up pretty good and will sit in the locks of the column.

This is way out at 1st gear. Angles are not ideal but it works and it's ore than fine when in P-Drive. Have it in this position to figure out the exhaust routing.

The Truck exhaust manifold exit angle really wasn't in a good spot so I switched to an LS3 drivers side manifold. The passenger side truck manifold fits perfect and the pipe off of it worked well so that stayed.

Pic of drivers side manifold exit location.

Start of the exhaust. Going from the two manifolds to a Y and will go with a single 3" back. Maybe go down to 2.5 at the tail pipe. Trying to reuse as much as the silverado parts as possible and then just some bends around the shop.

I am used to building VERY tight exhaust systems and forget how much room I have with this thing. Well other than around the front driveshaft.

Is there a good muffler than people use in the jeep? I wanted to run the silverado Cats but there is no room for them. So...might run a big cat and then big muffler as I want this quiet.

jakeb
jakeb HalfDork
1/27/16 9:33 p.m.

Cross over pipe is done.

Mounted the GM power and ground wires with power block in place of the old starter solnoid.

One thing that I sure wish I could have done would be to get a radiator with a inlet and outlet both on the drivers side. That still might end up happening if I can't get things to route the way I want to. THe radiator is bought and already modified now so will see what I can do to make it work.

jakeb
jakeb HalfDork
1/28/16 6:49 p.m.

More done today....

Got the 96 Jimmy fuel pump and it has the correct 0-90ohm fuel level sender. That is installed in the tank but tank isn't in the jeep yet.

Shifter linkage pulled out, painted, and reinstalled with new hardware and adjusted. The detent for Drive will let you go to 4th or 3rd. Did a but of adjusting and it just wasn't possible to be able to get Drive to sit in the right detent and still be able to get it into Park. I am guessing I would need a different detent in the column to make it perfect.

The rest of the day was spent working on wiring.

Below are the Jeep wires/colors all coming out of the multi pin connector at the drivers side firewall.

Hope these help others. Start wire..there is a splice in this where it went to the ignition box. This wire normally connects to the starter solenoid on the passenger side inner fender. This will now hook to the GM starter.

Yellow wire, 12v in RUN and START. I ran this to a relay that powers the GM main relay, my speedo drive box, and the transfer case stuff.

Orange wire, 12v in RUN only. I am not using this....I MIGHT end up running this to one of the transfer case connections that was in RUN only in the silverado.

Blue is the coolant gauge wire

Oil PSI is mentioned above in the thread.

Reading the PCM with HP tuners.

Wiring still needs to be cleaned up a little bit but I want to make sure everything is working before I wrap it up. But here is a pic of the new fuse blocks, relays, and GM PCM mounted on the drivers side inner fender.

The transfer case reacts when I push 2wd, 4wd, and auto modes. The lights are not coming on the switch showing that each mode is engaged but all seems to be doing when it should. I don't have the "dash lights" wire hooked up to the switch which I thought was just for the back light but that might not be the case. Planning to hook that up tomorrow and see what happens. If still no lights I'll just get it running and give it a test in some gravel. I can always take it and have the transfer case module scanned if needed.

Should be running tomorrow.

jakeb
jakeb HalfDork
1/31/16 6:44 p.m.

Tank is in for good now. I ended up welding the Jimmy vent and fill up and installing some ports that matched the Jeep hose size and also in a bit better location.

Don't mind the running paint. I wanted to spray something on the raw metal to stop any rust.

This was before I changed the inlet and vent but you can see the hose rouing. Added foam on the top of the tank to keep everything tight and from rubbing.

I've said multple times but I sure wish I would have bought a radiator with a inlet on the passenger side....but either way I had to use what I had. If this radiator every leaks I will be going a different route. But here is the upper radiator hose and intake piping.

trans cooler lines and vent line hooked up.

Taurus 2 speed puller fan. Trimmed down on the top when I thought I needed more room. Ended up not needing but don't affect anything.

All hooked up.

1 2

You'll need to log in to post.

Our Preferred Partners
MLDjelbACx9Rl5ZqGxenRdiJz78wC3WbPypq8wQbv9LIzsncpYzZpVaN5EPDiTyG