


In reply to Greg Voth:
I'm pretty sure that this car is going to get a cage in a couple of months.

In reply to Greg Voth:
I'm pretty sure that this car is going to get a cage in a couple of months.
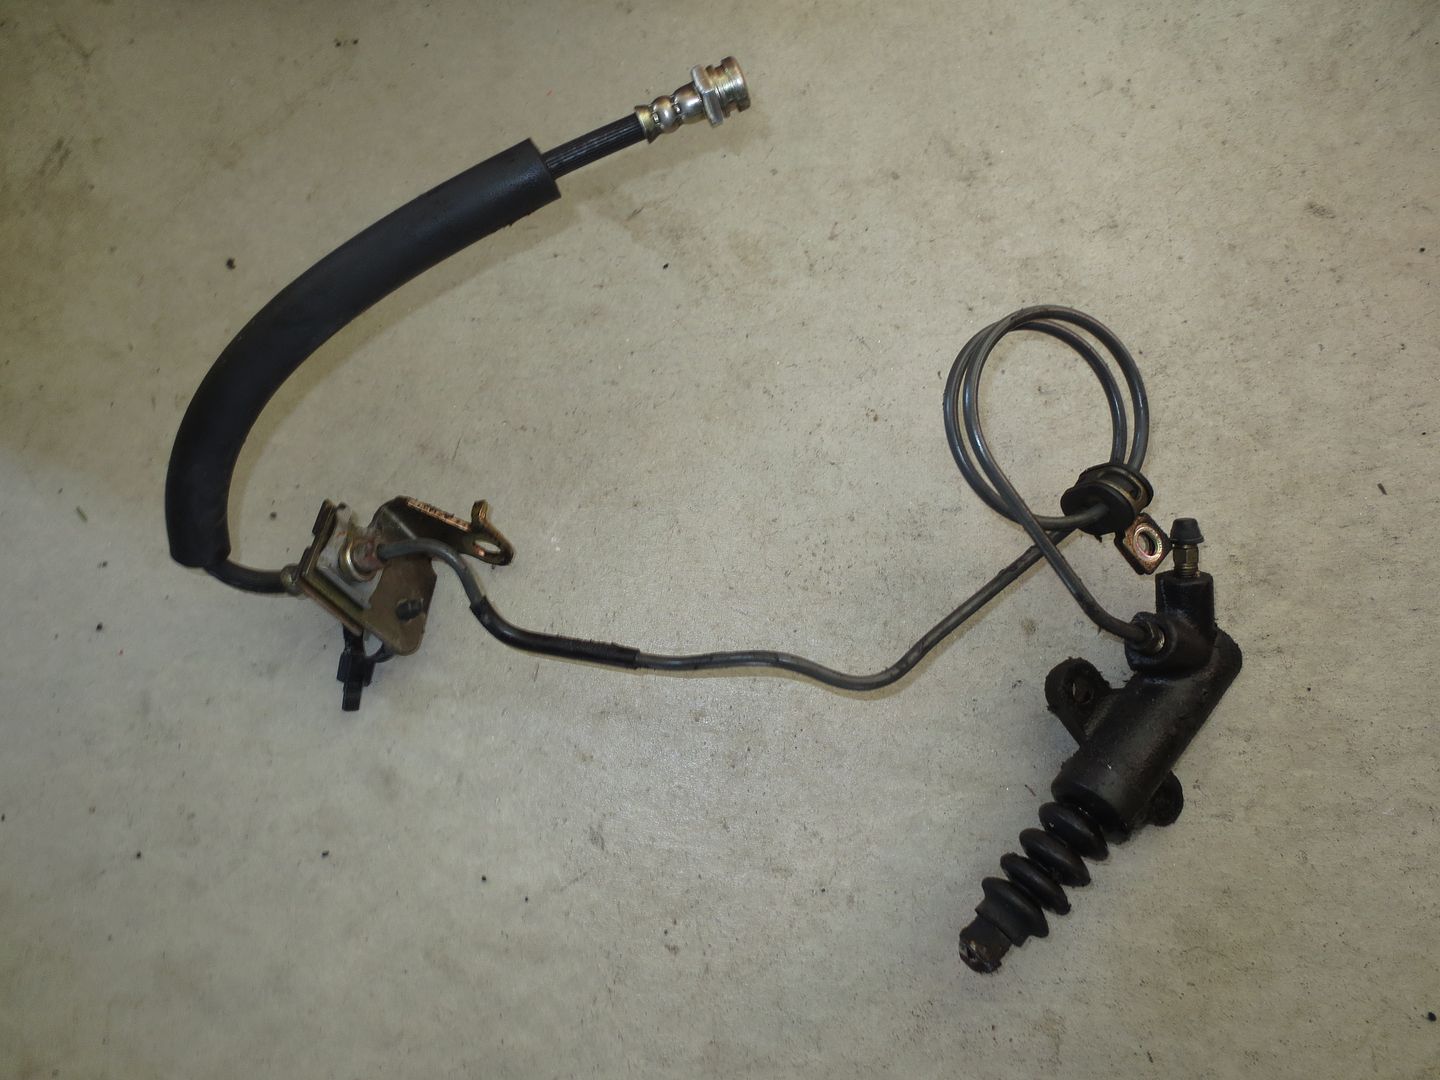
When I bought this car, I immediately noticed that the very black fluid in the clutch master cylinder was pretty low, and a few days later, there was a small puddle behind the passenger's side front wheel. It was obvious that the clutch slave cylinder was in need of replacement. Fortunately, new ones are really cheap and I've done the job three times in the past, so I knew what I was up against.
I decided that I would also add a braided steel clutch line at the same time. The new, longer versions of these things replace both the rubber line (which deteriorates and turns your fluid black) and the double coiled portion of the hard line that mounts to the side of the transmission. With the new line, installation is a piece of cake and bleeding the hydraulic clutch line is much easier.
I removed this...

...and replaced it with this:

Along the way, I also invented this tool for removing the pesky cable tie that holds the old line to the wiring harness between the back of the cylinder head and the firewall...

...and removed this little bracket because it wasn't really needed anymore and was slicing the E36 M3 out of my hands.

New system in situ:


Before tossing the old slave cylinder into the recycling bin, I pulled off the rubber boot and found that it was full of fluid, thus confirming its leakyness. I think the new one was less than $15.
No photos, but this morning I refilled the cooling system. It took forever for the thermostat to open because the car was outside and it was only 20 degrees out, but once it did, I topped it off and took the car for a ride. No leaks (Woo-hoo!).
The idle is a little low, so I need to adjust that, along with the timing. I'll probably tackle that on Monday morning if the weather is good.
I also jacked the car up and pulled the wheels off. After struggling with the passenger's front wheel during the timing belt job, I suspected that I might have some trouble with the other three as well. Sure enough, they were all fused to the brake discs. A few whacks with a rubber mallet freed them all up, and then I hit the mounting surfaces with a wire brush, put a little grease on there and then bolted them back on.
When I bought the car, it was missing the battery hold down assembly. The battery is fairly new, but it was pretty clear that it had been flopping around in the trunk for a while. Subsequently, the negative battery cable was badly frayed at both ends.


The cable is crimped right into the wiring harness, but I knew that it needed to be replaced. I cut it away from the original crimped fitting. The battery probably won't notice the difference.


I grabbed a new cable from Auto Zone for $7, found a longer bolt and lock washer in the Big Bucket of Miata Hardware and bolted it through the harness fitting and into the original grounding point.

I finally got a chance to use my *brand new inductive timing light. I bought it to replace the old 110v light that my Dad bought back in the 60's. His old light was always so much brighter that the 12v DC lights I'd used, and while it worked great for my Mustangs, the coil(spring)-on-plug design was kind of hard to use with spark plugs that are hidden deep down in the valve covers of modern cars. As I went down to the basement to get the old light, I was thinking that it was about time to upgrade to an inductive light. I guess that I did, about ten years ago. The unopened box was sitting on the shelf under the old light.

Good news: The new light is nice and bright too.
The baseline timing was way off, and the idle was all screwed up (probably to compensate for the stretched out, twenty two year old timing belt that I just replaced), but once I got the idle dialed in, I advanced the timing to 14 degrees BTDC.
I have made the commitment to Premium Fuel.
This engine is humming along nicely now.
I decided that I didn't want to sacrifice my nice carpeted mat to the mud and snow. I had hoped to buy a set of WeatherTech Floor Liners like the ones that I love so much in my truck, but alas, they do not make them for early Miatas.
*Note to David MacNeil: I love your products, but this is the third sportscar that I have wanted to buy your Floor Liners for, but they are not available (NB Miata, BMW Z3, and now an NA Miata). Yes, I understand that they are all old cars, but they are enthusiast cars that have huge aftermarket support and probably a disproportionate amount of enthusiast cash showered upon them compared to many current vehicles.
Anyway, back to our story...
The NB Miata and the BMW both got Lloyd's RubberTite mats. The BMW was eventually deemed WayTooNice to drive in the winter, so they never came out of the box. For some reason, Lloyd makes BMW mats in tan, but the Miata mats only come in black. Fortunately, the BMW has more legroom than the Miata, so I traced out the shape I needed and cut down the BMW mat to fit.
I may be cheap, but I'm color coordinated.


I wanted to mount a fire extinguisher in the car, and I planned to remove the passenger's seat for extra cargo capacity when I travel to these events anyway, so I made a simple, easily removable mount out of the lower section of an old seat slider. The lower rail from the tunnel side would have been preferable, but I didn't have one so this will do for now.


In reply to Woody:
Nice! I like your extinguisher mount. ![]() I'm still not sure where to put one in the Vette, so it may end up mounted to the floor directly in front of the passenger seat.
I'm still not sure where to put one in the Vette, so it may end up mounted to the floor directly in front of the passenger seat.

The red wires looked faster, but ice racer, blue, makes sense.
![]()
I wasn't super happy with this arrangement. The reach wasn't as bad as it might appear in the photo, but I didn't like having the nozzle pointed downhill. I had visions of the powder packing itself up high and wasting the charge when I pull the trigger. The reason that I mounted it over there in the first place was that I had a section of seat bracket that only fit on that side. A more thorough search of the basement turned up another modified bracket that would fit on the tunnel side. It's worth noting for anyone who might be thinking about doing the same thing to their own Miata that these were both driver's side brackets. You should be able to make either driver's or passenger's side brackets work, though you may need to chop off the locating pins on the underside. These are just the lower section of the factory seat rails with the sliders removed. They are three pieces that are riveted together. I probably could have cut a little metal away and ground it down a bit to save an extra 1/4 of a pound, but I doubt that it would be enough to overcome nearly 1/8 a ton of driver ineptitude that the car will soon be subjected to. 


Do you still need a front plate bracket? I found one today in the garage from my old NB in near perfect condition, you can have it for shipping cost if it works for you

Woody wrote: Before tossing the old slave cylinder into the recycling bin, I pulled off the rubber boot and found that it was full of fluid, thus confirming its leakyness. I think the new one was less than $15.
The new slave set up looks great. Where did you get it from?
In reply to Sonic:
Gah!! I just ordered a new one, but thanks anyway. Put it on eBay. There seem to be a lot of people looking for them.
I live in a town with zero actual crime, so every week the police report in the newspaper is filled with people who got pulled over for no front plate. ![]()
In reply to Cooper_Tired:
The slave cylinder came from Rock Auto and the braided line came from 949 Racing. The slave was about $15 but the line was about $40.

Can you reach the extinguisher where you have it mounted?
Unless the rules state you must have one in the car, they're fairly useless mounted somewhere you can't immediately put your hand on it.
I'd rather bail out of the car vs fumble around trying to get the extinguisher...
In reply to docwyte: Yes, it's very easy to reach in either location, but I won't be sitting inside a burning car trying to put the fire out.
If everyone has a fire extinguisher in their car and someone else gets trapped inside a burning car, others can stop and potentially save a life. The cumulative effect of several 2.5 pound extinguishers could be enough to change someone's day dramatically.
I polished the tail lights with Meguiar's #17, followed by Meguiar's #10. It took about ten minutes to do both sides.
Here's sort of a before and after on opposite lights because they were the best pictures that I had.


The lights came out better than the photos indicate.
A few months back, I decided to take a chance on a set of used Koni shocks from California. They were described as "like new", but when they arrived, they looked a little rough. Even so, they were only $200 shipped and came complete with a set of stock '96 springs and tophats, so I still think it was a fair deal.

The original bumpstops are integrated into the shock boots, and they had clearly exceeded their useful life.
Some people choose to go without shock boots, but I live on a dirt road so I like to have them on there. I ordered a generic set of four boots off of eBay for about $20.
A very generous GRM'er donated set of gently used Flyin' Miata bumpstops to the project. Many thanks!![]()
So today I finally got around to cleaning up the used shocks and putting everything together. In the interest of a quick swap, I decided to use the '96 springs rather than my original '95s, even though I've been informed that the '96 springs sit pretty high. To compensate for that, I dropped the spring perches down one notch on the shocks. That still leaves me one more notch, in case I want to go lower at a later date.
I do not like working with spring compressors...![]()


This is all that was left of the four original shock boots.

Rear shocks are in.

Time to tackle the front shocks and bring the nose of the car down to a level that works with the tail.
I took the "long bolt" approach...

The driver's side took about an hour and a half, the passenger's side took 15 minutes.

I haven't even driven it to settle the suspension yet, but it's already sitting noticeably lower than it was this morning. Maybe not the best thing for the snow, but it fits in with my long term plan. ![]()

Interested in selling the cruise control parts? The cruise doesn't work anymore in my car, and no one has any idea how to diagnose them or figure them out, and I frequently take loooong roadtrips in my car, so I miss it.
I got myself a few Valentine's Day gifts: A set of Flyin' Miata sway bars and a pair of Planted race seat brackets.

Even though the sway bars aren't exactly what I need for the ice, I was getting a little tire rub on the left front at full lock now that the car is sitting lower. Installation went very smoothly and there was an immediate noticeable improvement.
I haven't messed around with the seat brackets yet, but I'm very excited about them. I am thrilled that there are finally some simple, low seat mounting options out there for these cars. I'm looking forward to dropping them in and taking some measurements so I can get a better idea of which seat to order.
You'll need to log in to post.


