Full choke. This would come into play at lower gas pressures later.

Left a lotta room for base plate and shutter wheel modifications later if needed. Another cutout is only 60¢. There's also room inside for a diffuser, like to test that out but will have to come later.
Original plan was a MIG tip threaded in a Schedule 80 1/8 black nipple... dimensions were that close. Nipple had a big lump of a inner weld seam and while it did tap the threads were kinda shallow. Could have brazed the tip on but that would defeat the purpose of quick change. Almost abandoned that idea.
Found that a Schedule 80 brass nipple had a thicker wall, drill and tap 1/4-28. Typically, Miller and Lincoln MIG tips in 0.023, 0.030 and 0.035. Import tips are M6.
Many years in pipe fitting but can't ever remember a brass 1/4 x 1/8 90° elbow. 1/4" female ell w/ bushing would kinda look like E36 M3 now. Researched and found industrial sites that priced the ell at $6.45 ea. Cross referenced the part number and found it in the 'Bargain Bin' at one supplier for $1.01 ea. ....I'll take a dozen please.

Brass polished up nice. The needle valve is an option but paid off in low pressure test. Rather have it than not
SS 1" x 3/4" reduced coupling, ground out threads and polished w/ HF kit. Faces surfaced on disc sander.

Needed a small compression spring to tension the shutter wheel in place. Who doesn't have a stash of springs for 'yur gonna need that' for projects. My stash was too heavy or didn't fit the ID. Hello internet and bag of 100 small compression springs. More than several worked.

3/8" shaft collar from Fastenal for $1.02, drilled to nipple size keeps spring tension on the shutter wheel. Fastenal, my new favorite store.

This is turning into a sexy beast!
Drilled hole in the bell OD for allen wrench access, used the same hole to tighten bell to nipple w/ spanner wrench.

Nozzle assembly unloads fast for MIG tip or shutter wheel change.
Being adjustable was part of the plan.
Needed a mount to chuck in a vise for testing. 1-1/2" angle iron and 3/16" flat stock off the shelf w/ Dupli-Color black engine enamel to finish.

Had U-bolts on the shelf, found pipe hangers at HD that coulda worked but stumbled across these hangers at Lowes at the last minute, wasn't even lookin' for 'em. Had to grind out the ID because they are for 3/4" copper pipe not black pipe.

Casting was kinda crude, needed some work on the pedestal disc sander.
Rockwell-Delta pedestal 12" disc sander similar to this helped a ton w/ cleaning, squaring and contouring pieces for the build.
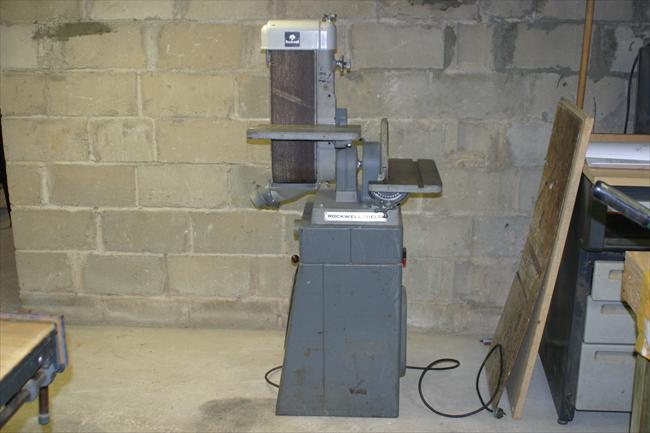
Really, really, really need one of these at home.
Consensus online was a 40# regulator, many operated the furnace burner around 30# +/-. I wanted to experiment w/ higher pressures w/ larger orifice size up to .035 MIG tip so went w/ a 60# regulator. There may be other applications for this burner besides a furnace.
1/4" NPT brass street ell to acclimate the gauge for easy viewing. 1/4" ball valve for quick shutoff... ya know, safety while playin' w/ fire, quarter turn FTW. Chose a 10' SS braided propane approved hose for safety reasons also.
Yellow gas line thread seal tape was used on the air inlet bell to pipe nipple to hot end SS bell. Loctite 565 thread sealant was used on all brass fittings.

Moved the nozzle back halfway through it's adjustment, needle valve full open, primary air shutter half open, pressure at 20#.
The burner lights... I giggle like a sixth grader at the science fair.
Minor adjustments w/ pressure and air choke. Can now turn the pressure down to 10# w/ shutter adjustments, this may be good for low firing as in curing furnace refractory. Burner reacts well from 10-20+ # w/ .030 MIG tip and primary air shutter adjustments. Press on. Above 30# the air shutter and needle valve are full open now. Can always tweak the shutter plate and wheel later, 60¢ a pop for the plate and a hole saw cut away.
First video, pressure is now around 45#. There's plenty more.
Me likey. 
https://www.youtube.com/embed/63pD6WD0Kx4
I'd want that in my shop even if it didn't work!

Haven't had much time to tune or tinker w/ the burner lately, working too much OT and bought a new truck that wants accessorized.
Original plan in the grand scheme was to test orifice size w/ primary air shutter adjustments, nozzle tip distance in bore as well. Planned to build a 'stack' to measure flue gas temperature and tune the burner accordingly as to orifice size, gas pressure and primary air setting.
It's all about flue gas temperature ya know.
The testing piece would be all 3" pipe starting w/ a 12" length that the burner would attach to followed by a large radius 90° ell leading into a 36" or more 'stack' where the flue gas temps and A/F ratios could be measured w/ a flue gas analyzer. Max temp and economy of fuel in the long run. They are quite a pricey instrument outta my range for now, work doesn't have one either, while they should. Could borrow one from a coworker but ain't goin' there. A throttled restriction at the stack outlet could further add to tuning. Not a big chunk of change for pipe and fittings, mostly scrounging like GRMers. Next option re: flue gas temp is a IR thermometer, skipping that for now but maybe later, gotta move on.
Tonight I did manage to test a .023 orifice nozzle vs the previous .030 nozzle w/ good results, the adjustable primary air shutter really paid off in low fire, the burner still likes 30#. With a larger air shutter wheel I could tune it down further.
After all the extra work I'm calling this exercise a big win.
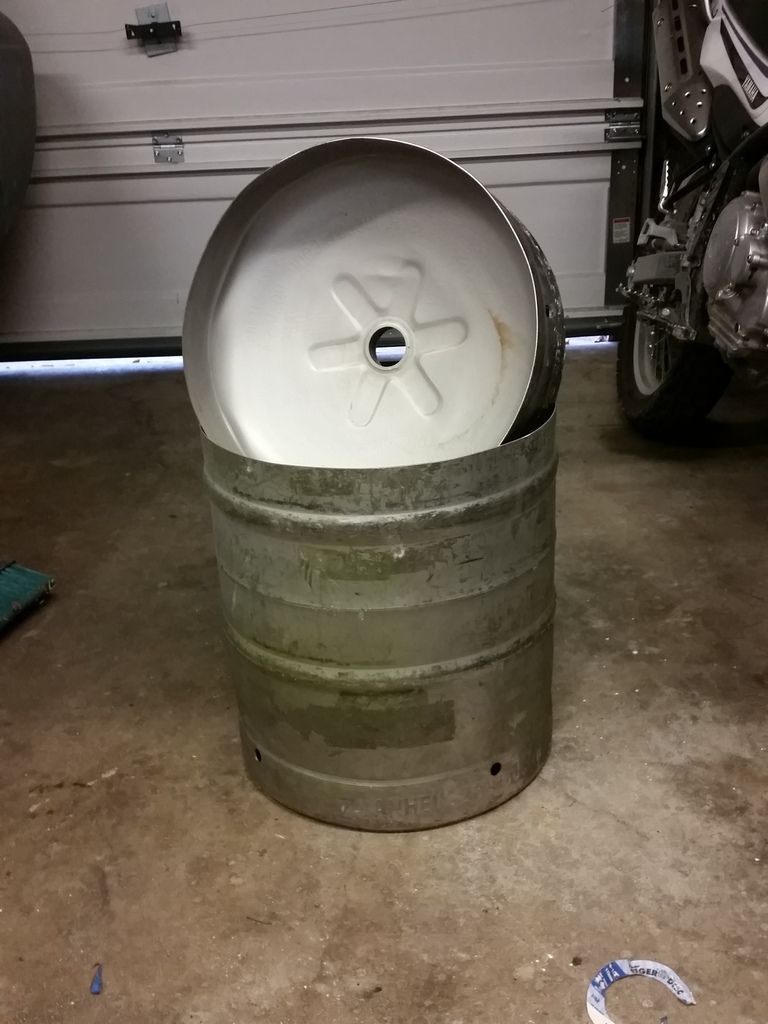
Material arrived today to start the half keg furnace build... I'm stoked!
pictures! many many pictures of the furnace build process!

simon_C
New Reader
3/8/17 11:38 p.m.
The only thing I'm "worried" about would be that in your video, the flame seems to be burning a little far back into the combustion chamber nozzle. It looks like it may be overheating.
This is still pretty cool though. I want to see where you take this.
In reply to simon_C:
The SS bell reducer got rather hot looking in the video at around 45# gas pressure w/ a .030 orifice but only got 'warm' back to 3 to 3-1/2" from the face end of the SS bell. 45# was just a balls out test run to see what it'll do, I'll probably be running a more conservative 30# normally from what I've learned, it likes it there, that would be ample. I'll hit it w/ the IR temp gun if any further testing... that'd be berkeleying interesting to know.
Gotta test stuff ya know, that's why 'the mule'... 60# regulator and .035 orifice yet to go. Doubt I need to go there but.... 
Too much OT and a little snafu w/ parts for the keg build.
Plan B: cut another shutter wheel for the 0.023 MIG tip. New shutter wheel is on the right. Needs more finishing but was anxious to test it.

New shutter wheel installed w/ original shutter base plate.

Tried starting w/ 15# gas at full choke but the burner didn't like it, cranked up to 30# and it lit. Once warmed up I could could reduce gas pressure and adjust the shutter to suit.
Kept reducing the pressure a few pounds at a time w/ shutter adjustments. I learned no sudden adjustments, it just don't like it. Adjust, swig beer, repeat.
Patience... my kinda work.
Got the pressure down to 4-5# w/ shutter at max close.
Amazed it could hit that low a pressure. 
This 0.023 set doesn't like pressure above 35# tho. Callin' it my 'low fire' set up.
Started taking temp readings w/ the IR temp gun, shoulda done that from the gitgo. Readings of the SS hot end bell went from 250° at lowest pressure to 375° at 35#. Oughta keep a log, not that it matters. 2.5" back from the bell face were 115° at low pressure, 3.5-4" back from bell face was 60°. Garage temp was 25° btw.
One thing learned today was that it needs to warm up before adjusting. Kinda like old carburetors.
Originally planned a 30 gal. grease drum furnace, I have one sitting in the shop. Research over the winter found a half keg may be best... and it is stainless, who don't like stainless.
Not to experiment on my own or reinvent the wheel fwiw, I'll mostly be following the Brian Oltrogge keg build as seen on YouTube w/ some changes to suit my build. That's a really talented guy there and he has over 100 fires on his kegger and it's holding up well.
After months of scouring CL and other sites w/ no results I found this half keg listed on CL... was only posted for 10 hours when I saw it. First call in and scored it two days later for $80. Seller was super nice and met me off the interstate to save me 30 minutes each way, no bartering, I woulda paid full price anyway. Keg has no dings, minor scratches on the beads from rolling it across the dock maybe once.
Pristine actually, too nice to cut up, in fact woulda made a cool table all polished up w/ a beveled glass top. I take this as a sign from the gods of fire and metal that this score was meant to be.
Build time, let's cut 'er up.
Step one:
Depressure keg. Rag over ball check in tap flange, depress ball w/ large screwdriver to bleed off pressure.

Gushed quite a bit considering it was last used in 2002 at his sisters graduation party according to the seller. Spewed maybe a quart of beer out w/ considerable pressure yet after 15 years.
Funny tho, the beer didn't even smell stale.
Next: removing the lock ring, kinda stubborn.
Shoot w/ WD, rubber hammer, grind down old screw driver to fit the slots and finesse the motherberkeleyer out.

Win
Calculated the lid cut to have a minimum 3" refractory thickness. Max thick w/ the dome of the lid will be 4" at flue out.

Cut w/ Milwaukee 4-1/2" angle grinder w/ Dewalt cut off wheel. Pretty easy cuttin'... edges dressed w/ flap wheel, drum and wire wheel.

There goes my tap room table.

java230
SuperDork
3/21/17 9:44 p.m.
Nice! Those snap rings on the dip tube are a pain in the ass!
Carry on, I have a couple empty kegs in the garage.... I made one into a keggle for brewing too. They are nice stainless.
.125" x 1" 304 SS flat, rolled on Pexto slip rolls to 15.5" dia. Keg walls and lid sections at cut lines are pretty stout, just adding reinforcement. SS rivets to attach.

That Pexto was prolly older than me, worked like a champ. 
Great minds and all that.
I am also copying Brian's furnace build (and your burner  ).
).
What direction are you going with for refractory? I have gone back and forth between using the tried and true kaowool/satanite/ITC100, or just being lazy and taking the simpler 1 shot Kast-o-lite 30 or mizzou route. I'm leaning towards the Kast-o-lite at this point on account of it's local availability and pricing.
As always, your work looks fantastic. Thanks for sharing!
In reply to Burrito:
Nice choice. Stainless is great ain't it!!
Current thought on lining is 1" Cera-Chem glued to the walls w/ the highest rated refractory I can find locally, 2600° minimum. We use Clearco 444 spray adhesive to glue Kaowool in our boiler doors but any upholstery spray adhesive like 3M oughta work. There are at least 10 industrial suppliers around the steel valley, one that we deal w/ at work. I'll start shoppin' around shortly.
Seasoned opinions online vary as to refractory thickness over the ceramic blanket, most are at minimum 1" thick, IIRC. eddie2799 on YouTube used a 2" blanket in a grease drum and it seems to be holding up. Rather have the blanket lining than not as superior insulating over castable alone. It's all a compromise though, will the castable around the blanket crack over time? I really don't want do-overs... but it's still a great learning process.
I have a line on a roll of 1" x 24" Inswool-HP, AP-Green Castable and a product similar to ITC100. The Inswool would make a good outer keg blanket wrap around glued inside a welding blanket but that comes much later. It's all nasty stuff, gonna need a good mask.
Everything is still subject to change at this stage tho.


