Please let me know if you find somewhere locally to get refractory stuff. I'm finally getting around to getting ready to order in my ceramic blanket and refractory for the propane tank build I'm doing, and driving 45 minutes to your neck of the woods beats paying $50-60 for shipping.
This project of yours looks fantastic so far though, everything all shiny and professional looking.
In reply to RevRico:
I'll prolly order the 1" Cera-Chem blanket on ebay.
Message sent per refractory.
Plan on muddin' up around May or later, outside temp dependent.
So once all of these get set up, how are they going to play into challenge budgets? I for one would be willing to buy damaged/disgarded aluminum engine parts/wheels.
In reply to Rufledt:
As far as I can figure, this is a tool, and tools are exempt from challenge budget. If you scrounge up free ally and cast go-faster parts, it should be a zero budget scenario, so long as you don't pay for finish machine work.
This is part of my plan for global domination (and the $2020 challenge...).
If you want more domination, get David Gingery's "metal shop from scrap" book series 
RevRico wrote:
Please let me know if you find somewhere locally to get refractory stuff. I'm finally getting around to getting ready to order in my ceramic blanket and refractory for the propane tank build I'm doing, and driving 45 minutes to your neck of the woods beats paying $50-60 for shipping.
https://www.yellowpages.com/pittsburgh-pa/refractories
Was gonna stop in at Chiz Brothers in Elizabeth, right off 51 on my commute. I won't be buying for another 4-5 weeks. We use Unifrax products too.
I could get some wool and castable you might be interested in. Tried to PM you but got returned. Try to PM me w/ your contact info.
1/8" X 1" 304 SS flat is now attached to the keg lid and bottom w/ SS 3/16" X .250" grip pop rivets, 3" on centers. I left 3/16" stickout of the flat above the keg wall. SS flat was prolly overkill, CRS would be ample enough... but damn, I like stainless.

Planning on gluing in 1" Cera-Chem blanket to the top of the lid.
There is enough of a ridge w/ the 1/8" X 1" SS flat that should secure the castable... should. However, heat does crazy things. Debating on adding 1/4" X 1-1/4" SS screws to help secure the refractory like Brian did or welding in 1/4" rod in a #-like grid. Concerned about expansion and cracking tho. Got two sticks of SS TIG rod yesterday at the welding shop JIC, it was free. 
Want to minimize any chance of cracking, gotta think about securing that yet. Drink beer.
Removed the paint stripes w/ the HF paint stripper wheel, short work there. Tried a little polishing w/ Norton #2 foam pad and ICE compound, lotta work but prolly try a more aggressive polishing wheel later. Not that it matters but it will clean up nice.

Did score the 1" X 24" Inswool-HP. Better part of a 25' roll anyhow. I'll use that for the keg outer blanket, that's much later tho.
Spent more time chasing down castable than riveting in the SS rings. BS'ing w/ local suppliers, while they like big money sales they think our builds are cool. Found there's a local Resco mfg. plant but not goin' w/ that when the preferable Kast-O-Lite 30 is available, little drive but worth it. That'll be a few weeks out yet.
Other projects first. Truck is gettin' a Helwig rear sway bar and OCC. Lawn tractor carb needs attention right now... grass isa growin' like crazy.
Fasted said:
Gotta test stuff ya know, that's why 'the mule'... 60# regulator and .035 orifice yet to go. Doubt I need to go there but....
I was messing with mine over the weekend and I get the feeling that going much over 30 would bring doom upon you and your furnace. The things will behave differently with the nossle jammed in a furnace even though it's vented.
Rufledt wrote:
Fasted said:
Gotta test stuff ya know, that's why 'the mule'... 60# regulator and .035 orifice yet to go. Doubt I need to go there but....
I was messing with mine over the weekend and I get the feeling that going much over 30 would bring doom upon you and your furnace. The things will behave differently with the nossle jammed in a furnace even though it's vented.
.030 MIG tip at 30# gas pressure is the 'sweet spot' so far for this burner.
There may be other burner uses as in heating/ bending metal... or, as a boiler man I may wanna make steam some day.
Once the furnace is built the burner will be tuned in the furnace, first w/ secondary air then primary air only. Will need better test equipment as in thermocouple or flue gas analyzer. We'll see, there's a lotta time yet.
I'll try the .035 tip and up the gas pressure today. It's my day off and feelin' adventurous.
No, not really, I feel like a kid w/ his first pack of matches.
I totally agree with first pack of matches level of excitement. I might have used some bad judgement and temporarily rigged mine up with forced air last night to see what it would do. Big loud impressive flames with sparks (until it burned the metal filings away). That's what it would do. 

Tested the .035 MIG tip yesterday w/ the small air shutter wheel. Thought it would be a no-brainer to light w/ shutter full open and 25# pressure. Nope, did not like it.
Took full choke and 15# to light. After warming around 45 seconds I could adjust pressure and air. That's odd. It was 65° in the garage.
Choke full open, the SS hot end reducer began to cherry over 45#, roared at 50#. Near 55# it really needs more air. I was tempted to remove the shutter wheel altogether but my gut says the .035 tip needs a 1" pipe for air at higher pressure... but that's another build.
Did get pressure down to 10# w/ a little choke. Adjusting the needle valve down really came into play now, got a nice mellow flame I didn't see before w/ the other tips.
May build one more hot end bell. Heat and swage one end of a 3/4" steel coupling.
Some burner folks don't think much of 'pipe fitting' burners. I think it's a great way to test and get dialed in, learned a lot so far w/ this burner.
.030 MIG tip at 30# is still the sweet spot. May fab an all SS burner w/ weld fittings once all dialed in... but it's early yet.
Do you plan to use the flare on the end when the burner is in the furnace? I have a 1" pipe burner and my flare on the end is much bigger. I don't thing a gaping 2" hole is a great idea just to fit my giant flare... I've read lots of people don't even use a flare on the end, but the furnace kind of acts as a flare.
When you say it doesn't work do you mean it won't light, or it isn't a good flame? I never have trouble getting mine to light, but the mix on mine is almost always a bit too rich. About the only way mine will quit burning is if I remove the flare and crank the gas too high, it seems to blow the flame out too far from the pipe and it dies.
Pipe fittings probably aren't really designed for this application, there must be a better material. Probably not many cheaper options though 
I don't have a flare on mine at all, and it works pretty good in the bucket furnace. I actually have the end of the burner sitting in the refractory using the body of the furnace as a flare itself.
How this will scale I'm not sure, but there is definitely a tuning difference between open air and inside a closed furnace.
There is also the preferred tangent to take into account where the burner enters the furnace.
Not trying to be a downer, just remembering things I overlooked and am trying to remember for the bigger build.
 The hot end SS bell goes from the .884" 3/4" pipe ID to 1-5/16" ID w/ the threads ground out and polished all w/ in one inch from the 3/4" nipple end. Some will say excessive but it makes a nice broad flame w/ .030 tip at 30# pressure. Me likey.
Any way you look at it we are tailoring a venturi >---< to our build needs. Burning/ expanding gas sucks air in, just tweak the inlet/ outlet and orifice to our build.
Not having a problem at all. .030 tip and 30# is still sweet. Swaging a 3/4" steel coupling for the hot end is last on the list for now but worth testing w/ this mule to see where it's at w/ this scheme. If I had the time I would build the 'test stack' I mentioned earlier to test flue gas temp... and it's all about flue gas temp. Ultimate test/ tweak is still in the furnace.
Lotta more things to test as y'all say. You guys are way ahead of the curve for me yet, live n learn. There will be a lot more tweaks by the time this is ready for prime time, no doubt.
On to the keg build.
Have a E36 M3 load of hole saws but not a 2-1/8" to get close to making a guide plug for the 2" ID of the dip tube flange. 2-1/4" yes.
2X4 for the cutout plug.

Popped the cutout from the hole saw and made an arbor from a long 1/4" bolt w/ hex head cut off for use w/ die grinder. Welded a washer on the bolt shaft, cinched w/ washer and nut, sanded down to fit the ID of the dip tube flange. Hammer fit.

Had to buy a new Milwaukee 2-1/2" hole saw, the old DeWalt HS was gettin' rather shabby for SS. Milwaukee 1/2" Magnum drill FTW... nice n slow.

Cardboard template made from beer box. 1/8" pilot drill and 1-1/4" hole saw to fit 1" PVC pipe center guide.

Some kinda Govt. warning sticker: Do not operate machinery after drinking, blah, blah. Get the hint, calling it a night in the shop.
RevRico wrote:
I don't have a flare on mine at all, and it works pretty good in the bucket furnace. I actually have the end of the burner sitting in the refractory using the body of the furnace as a flare itself.
How this will scale I'm not sure, but there is definitely a tuning difference between open air and inside a closed furnace.
There is also the preferred tangent to take into account where the burner enters the furnace.
Not trying to be a downer, just remembering things I overlooked and am trying to remember for the bigger build.
Tangent you are referring to would be this?
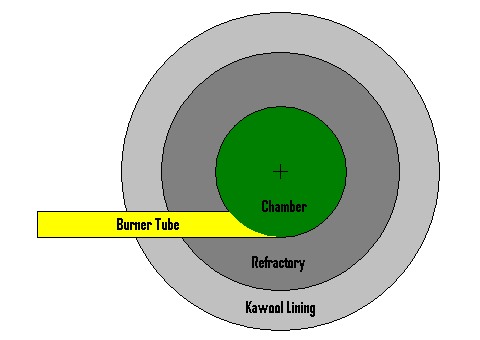
Been taken into account. Current plan is a 2" OD X .125" W DOM tube through the keg wall to chamber to mount the burner through. Two schools of thought to test: Stuff wool around the 3/4 burner tube to run on primary air only or leave the gap open between burner tube and 2" DOM to allow secondary air. Burner would most likely have to be richened up w/ the secondary air.
That's where a flue gas analyzer would be the tits to tune air/ fuel and flue gas temp at the flue out. They is espensive, may be able to borrow one tho, dunno. Thermocouple is the next bet. Other than that I have a Fluke 62 Max IR gun that could cobble temp reading at flue out, reading over say flat stock steel for max temp while adjusting, inexact A/F tho.
Haven't heard of goin' w/o the flare end yet but that could be worth testing.
Everything is subject to change as this build progresses... go with the flow.
More research, more testing.
This is like science class in my garage, I'm diggin' it.
Been debating ways to secure the refractory inside the lid. The SS flat riveted inside the lid only provides a 1/8" lip. Concerned about thermal expansion and the lid will be on/ off a lot.
Oltrogge used 1/4" X 1-1/2" SS screws placed around the flue out and lid to help secure the refractory but he didn't use blanket. He had minor cracking he attributed to the threads cutting. Minor tho. Eddie2799 used rebar welded inside the steel drum lid. Others have tried SS wire mesh but reported cracking.
Was gonna weld CRS 1/4" or 5/16" rods inside the lid in cross pattern as shown but concerned about thermal expansion of the rods vs SS lid that could cause cracking.
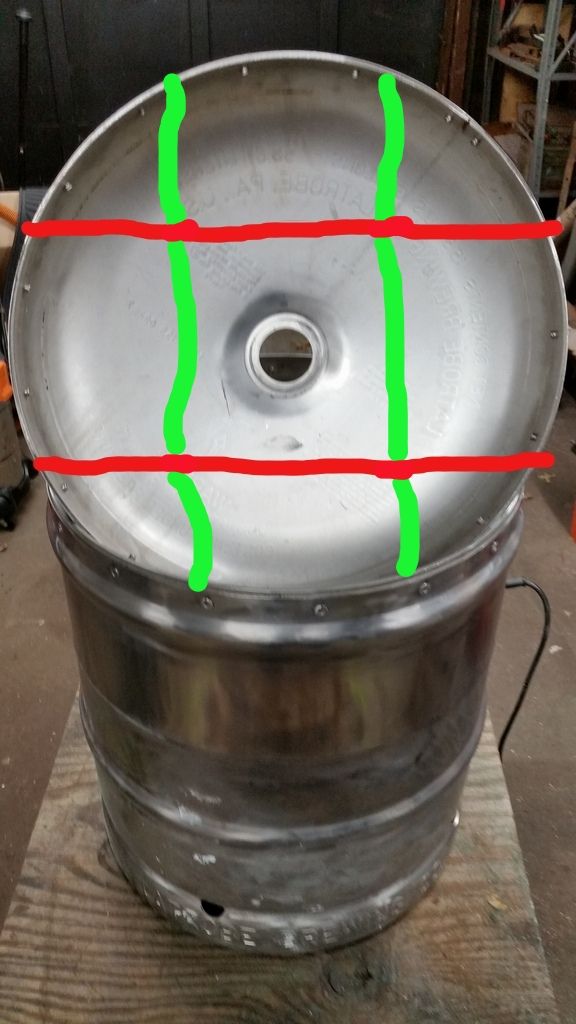
Best plan so far is drilling the lid for 5/16" rods across the lid, shown in red. Threading only the ends outside the lid. They could expand on their own w/o pushing on the lid OD.
Not much more room height wise but can add two rods in a cross pattern (green). They'd only be about 3/4" above the rods in red. They'd float too.
Our boiler doors have ceramic blanket and steel reinforcement but they are 24" deep w/ over 10" refractory and are over 7 foot diameter. Whole nother animal there.
This lid is 15.5" diameter and only 4" thick from base to flue out at the dome. There'll be 1" ceramic blanket glued inside as well that should compress to 1/2" or so w/ the mud. There's a lot goin' on there in a small space.
Could always add SS 1/4" screws around the circumference like Oltrogge.
Dunno yet, still debating.
Lotta OT comin' up, project might be back burner for a while.
Guys, regarding insulation for your furnaces, check out your local pottery suppliers. You want insulating fire brick. It's the same thing they line kilns with. It can be cut easily by hand, friction fit in place, and then (depending on what you decide to use) a refractory hotface can be cast or troweled on.
The same friction fit properties of the brick can be exploited when designing the lid, it won't even need a hotface. The hotface in a furnace is there to protect the insulation from mechanical abuse when crucible lifting tools and such are being used inside the bore. It also protects from slag and fluxes which can eat into wool type insulations. If you're exposing the lid to those dangers, you're doing it wrong. The lid just has to sit there, no need to design it for orbit.
This is how I plan to build my next furnace, and I have cast iron intentions...
Had a call back today w/ quote for Kast-O-Lite 30 from a steel valley refractory supplier. $61.50/ 55 lb. bag w/ pickup at their shop. Harbison-Walker distributor was near $10 less/ bag but near a 160 mile round trip, can't really differ w/ this price as I can pick it up on my return trip from work, I pass it every work day.
Every build is some kind of compromise, whether vehicles, home and shop or in this case furnaces.
I'll be sticking w/ the castable over 1" ceramic blanket vs brick as it's been in the works from the get-go. Oltrogge's all castable keg has lasted 100's of firing and eddie's 2" wool lining is holding up as well. I'll be in the middle w/ 1" blanket (rather have it than not) and should have a minimum 2" castable keg wall, 4" castable on bottom and estimated 3.5" in the lid.
I can get a mid-size PU bed full of fire brick, basically for nothin. Not apt for this build... more like a 55 gal. drum build. I might rescue it yet.
This is the first burner and furnace build and all subject to change along the way.
I likes where this is goin'.
Cut some 3M purple pads to fit the 5" disc sander. Removed minor scratches, any paint residue and oxidation.

Realized after seeing the draw marks from stamping that this is one helluva deep draw for stainless steel. I'm really impressed w/ the process.
After the 3M purple I hit it w/ wool bonnet and compound, nice shine w/o gettin' crazy. I have buffs and rouge here somewhere to polish out further. No real need to go there tho, looks good now.

Lotta yard work to get done now that the weather is better.
Still planning the lid and furnace body. It'll get there, lotta time.


