


Its British. Rust repair is never REALLY done. Its just in hold until the next rebuild.
Congrats!!!!

Its British. Rust repair is never REALLY done. Its just in hold until the next rebuild.
Congrats!!!!

Thanks, guys. It feels good but I know it's probably just a matter of time before it needs it again. Hopefully that matter is 40-50 years when it can become someone else's problem!
Seriously though, putting this thing back together has driven me crazy in some ways because rust traps are inherent in the design. So many overlapping panels!
Last night was nothing picture-worthy. Just getting fasteners and bolt holes to line up, fitting the drivers handle and latch and massaging the passenger door a bit. Focus was at a minimum last night so I made little bits of progress on many little things.
Again no pictures but two straight hours last night fiddling with latches and strikers was a ton of fun...

The trick now is to not stop and bask in the glory or what you have acheived.
I find that I can procrastinate like a champion when I finish one thing and then have to start the learning curve all over again with the next step, say body and paint or interior; stuff that I never really wanted to learn in the first place. But once moving, I seem go get in the grove and get the needed sense of achievement as I go along.
Where you are now is my favourite part of a project. Its the part where the foundation of the car is solid and if it were a "guest" car that I was helping someone with, it would go home and not be my problem!
The car is looking good.
Pete
Yes, trying not to bask. The other difficult thing to get past is that I've been putting in hours on hours of work and very little changes (by appearance).
Now both doors latch and do not rattle. Both fenders have all fasteners located. All but two fasteners are located for the rear quarters. The shroud has been brazed and fitment adjusted. Shut pillar brackets welded in. Probably other things I'm forgetting and unless you're really looking for it, you can't tell any of it has been done!
For whatever reason, the shut pillar on the driver's side did not match up with the supporting bracket. The bracket was adjusted.

I just welded those tabs on over the gaps and along the insides. Yes it's hack-ish. Yes it's ugly. Yes it's staying like this.
A couple spots where the shroud was repaired failed when fitting it to the car. Since I don't have the ability to weld aluminum and they're just minor cracks, I figured I'd give brazing a shot. It's really not an easy process. Getting enough heat into the piece along with getting it clean enough is difficult.

Above was before some sanding. Below is after. Obviously there is more to do but I think it's going to work for what I need.

After ~4 hours of work today I started to feel myself getting impatient so I put down the Healey and finished trimming Elmore's bumper.

After last night, there is now only one fastener to locate on the driver's quarter. It wil just be a matter of drilling a hole for the clip to cling to.
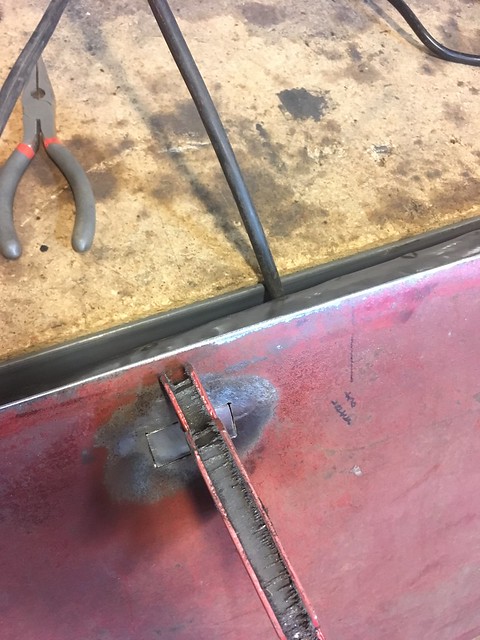
Weeks ago I went to Home Depot looking for angle iron of the correct thickness to fix the bottom edge of the driver's door. All of the angle was too thick so I bought some square tubing. After spending about 50 minutes last night cutting the square into a piece of angle and fiddling around trying to make it fit, I realized that it will never work. Although the bottom of the door appears to be a right angle, it definitely isn't and neither of the sides are close to straight. This means multiple patches. It'll take longer but oh well...

Since it's the bottom of the inside of the door (can't see it) I'm going to cut the patch pieces over-size, clamp them to the inside and then stitch weld them on from the outside. I'll them seam seal and smooth over with some filler. The only one I won't be able to use this method on is the far left patch that goes over the side of the hinge panel. I'll fully weld it along with a plug weld to the hinge panel itself.

The looks of that seam makes me itchy. Can you see inside the door real well to make sure it's not about make pinholes on the outer skin?
With the amount of rust on the corner I'd have a hard time trusting there isn't something lurking in the seams.
In reply to Crackers :
It ain't pretty but I think the lighting in the picture makes it look worse than it is. I have found one pin hole in the door but it is above the fold. I'll get some pictures of the inside if I have time to get over there tonight.
No work this weekend. Sometimes my wife's birthday falls on Mother's Day weekend. This was one of those times so I spent the entire weekend with my wife and daughter. Pretty nice.
Last night was back to the door. After two failed attempts to make the angle iron idea work and multiple hours wasted, I elected to do the deed with two flat pieces.


I had the heat turned way down on what is actually the bottom side as the metal had a good bit of surface rust (before cleanup). I had absolutely no problems with burn through so I may go back over a couple spots with a little more heat to make sure it's all good. Possibly from the inside although it's really difficult to get in there.
A keen eye will notice one spot beneath the fold (sort of in line with the left side of the patch) where the inner skin has a rust hole... not really sure how to handle this. I'm certainly not going to un fold the outer skin to get at it. My thought is to Dremel out the really thin portion, weld a little patch over top and then rust converter should stop it in its tracks. It will literally never be seen.
Ew, yuck, but it's done save a little more cleanup.

More rust repair, yay! This was the pin hole along the bottom of the door. Keeping in mind NOHOME, I decided to do a repair with only rounded edges. ![]()
I enlarged the hole with a step bit and made a circular patch. The metal looked and felt pretty good.


I was 90% done with welding it up and got a blow through. Hm. I fixed it. Then I flap disc'd the whole area, put a flashlight behind and there were millions* of tiny pin holes where I had gone over it. This had been time consuming to make a perfect circular patch and make a bunch of tiny tack welds. I was out of patience so I fell back to my old (potentially bad) habit.

Would it have taken me a total of 5 minutes more to cut the corners round? Yes but I'm so tired of fixing rust that I couldn't get myself to do it... This will obviously get cleaned up a bit more but I wasn't in the mental state to make things look pretty.
Oh and I also pulled out the trunk latch on the E21 because it's not being used any more and every gram counts! Hopefully I'll get it out on the road this weekend. I've been itching to drive it especially after pulling Elmore out this week.

I don't think round really matters for that small of a patch. HAZ's will be overlapping no matter what you do.
At some point in its life, the trunk apparently had a luggage rack. Ever since I've known the car there have been four carriage bolts "filling" the holes. No longer.

Then it was filling a couple holes on the driver's fender. One is of unknown origin, the other is where the mirror was. It is not going back in that spot.


Saturday was gorgeous. I got to the shop and couldn't resist waking the E21 up. I didn't do a great job bleeding the cooling system when I put antifreeze in it last fall so I fully bled it and took it for a ride. The front tires were a bit low and the trans sounds like it would appreciate some new fluid but it ran great!

All told I had it out for 45 minutes, half of the time on the highway going between 70-80. My hope is to take it to a Nelson Ledges track day in June.
Along with filling the fender holes yesterday, I finished brazing the rear shroud, located the final driver's quarter fastener and tidied up the driver's door. I'll pull the passenger door off once more and get it squared away on Thursday. Then it's time for body work.
With the body just about ready to go, I could really use some advice in the body work category. I have no painting capability in the garage I rent save rattle cans, rollers and brushes. My plan has been to sand down (do I go to bare metal?), put down a guide coat of some sort and then fill/sand/fill/sand until I'm pleased. I would then take all of the body panels to a shop to be finished with primer and paint.
Does this make any sense at all?

Looking really good now. I suggest using Eastwoods 2K Epoxy primer after your have all panels throughly sanded to bare matal, https://www.eastwood.com/eastwood-gray-epoxy-primers.html They've upped their paint game quite a bit in the last few years. Quality is good and ease of application is even better. You can get the 2K epoxy primer in a special aerosal as well. I've used they're products and I've been in the industrial coatings business for 30 years, I think Eastwood offers the best valve for the DYI applicator.
Best
Doug
Down to bare metal with 80 grit and then a good coat of epoxy primer. This becomes the foundation for the rest of the work. While I have not considered it in the past, I cant think of any reason why the epoxy could not be applied with a foam brush? Not like it will ever be seen under the subsequent coatings.
Rage gold bodyfiller over the epoxy but only after the epoxy has been scuffed with 80 grit. Fill any obvious low spots first and use the durablocks to smooth the panel. Then do a second coat of filler basically skimming the whole panel and using 80 grit to sand it off; working in an X pattern, let the durablocks tell you what is high or low. It goes pretty quick even by hand. Watch the durablock vids on youtube. Or the eastwood videos on car painting.
As you are sanding the skim coat of filler you will eventually find the fist sign of metal. Stop at that point; it is decision time. Either you are going to lower the metal high spot and sand off more filler, or you are going to build the rest of the panel up to this level. Any further sanding after you have found the metal high spot just means that you are putting a wave into the panel.
All of your shape and flatness should be established with bodyfill sanded to 80 grit. You can practice the guide coat thing at this stage, but in reality your hands and eyes will tell you if the panel is flat. Guide coats are really more for when you are chasing the thousandths of an ich of low stuff or pits and spots that you missed.
I like feather fill over the filler. Lay a coat on and sand most of it off with 220. The second coat is then finished with 400 and in theory could be painted over at that point. Featherfill now makes a version that can be painted Direct To Metal ( DTM) so you might want to consider that, else you have to go around and coat any bare metal spots that have snuck back before you shoot featherfill.
If you have done a really good job of the filler work, an option might be to skip the featherfill and go straight to a 2k urethane product. Some of these are formulated so that depending on how you mix, they can be either a high build primer or a final sealer coat for paint. I sand this to 600 grit. Once the car is coated in urethane, you can wash it it with water and get a very good idea of how it is going to look when done. Don't wash the filler or featherfill layers with water. Below is a pic of the roof panel on the Molvo. This is a Valspar 2k urethane sanded to 600 grit. I did one coat mixed as a high build and then a second as a sealer. I was pretty much convinced by the reflection that shows what is on the opposite wall, that it was good enough for paint.

If you have a painter in mind, do him the courtesy of asking what product he wants to see as the final coat that he will spray on. Some Painters are kinda opinionated on the subject .
Pete

Ugh, I wish my garage addition wasn’t behind schedule.
Doug, Pete - can't thank you enough. Looks like the Eastwood primer in grey is out of stock so I'll just go with black, I suppose.
Sanding shall commence this week.
In reply to Patrick :
What, you want to paint the Healey or something?
In reply to AxeHealey :
The black will be fine. You could just shoot it in black epoxy and drive the thing eh?
Pete
Done a bit of searching and the results of brushing epoxy are not that encouraging. Very few people have done it but a lot advocate against.
You can get away with a cheap gun and a small portable compressor if you are willing to do one panel at a time.
Pete
AxeHealey said:In reply to Patrick :
What, you want to paint the Healey or something?
Not particularly, but i have all the equipment and a down draft paint booth is part of the garage addition plan. It’s going to beat the stuff i have been painting in the driveway
In reply to Patrick :
Do you or any other local GRM'ers have a TIG setup?
I've run into an issue that cannot be brazed away and I'm sort of stuck until it's fixed.
I do, my argon tank is empty but that can be fixed with a trip to airgas. My regulator has a leak but I just ordered a new one.
You'll need to log in to post.


