


Got two new tires today from Wally World- Nexen LT tires, 109 load rating. Also scored a set of running boards on craigslist. Amazingly, this all fit in my 300TD wagon. ![]()

Got two new tires today from Wally World- Nexen LT tires, 109 load rating. Also scored a set of running boards on craigslist. Amazingly, this all fit in my 300TD wagon. ![]()
Last night was the first real nice day we've had all year. Mid 60's, sunny...for awhile, anyway. I swapped the 4 "new" tires and wheels onto the 'Burb, and got 3 of the spark plugs changed before a big rainstorm blew in. The massive hood of the truck provided some protection, since the wind was blowing over it, but eventually I gave up and went inside to play with Carmella. ![]()
While swapping the tires, I checked the brakes, which were in surprisingly decent shape. The rear wheel bearings seem to have some slop though- and I'm not sure how much is "acceptable" with these. Both rear wheels could move in and out about 1/8" (with the truck jacked off the ground) and had enough vertical play that there was an audible thunk as I jiggled them up and down. The passenger side rear axle seal was seeping some gear fluid, which I know is not right, so it's at least going to get new rear axle seals. I guess I should just do bearings, too, while I'm at it.
Well, we made a slight detour to here for the rear end bearings, but the rest of the truck is coming along as hoped. I finished the tuneup, and yesterday the new transmission cooler was mounted. Curiously, the truck has an oil cooler- a big ole thing mounted in front of the A/C condenser- but had no transmission fluid cooler, other than the one in the stock radiator. So I added one- nicely bracketed and all, too, not jury-rigged with those mo'cheese'mo plastic tie straps they give you with the kit.
I received the TransGo shift kit, along with the bigger boost valve and gasket and filter, but now I'm having second thoughts about doing this myself, on a dusty driveway. Internal transmissions mods may better be left to my trusted local mechanic. ![]() Once I get the axle finished, and the truck registered, I'm thinking about letting him have a crack at the Mr. Shift kit.
Once I get the axle finished, and the truck registered, I'm thinking about letting him have a crack at the Mr. Shift kit.
Also, apparently, the truck has a "gov-lock" rear end. I've never heard of such a beast...
And, apparently, they suck about as bad as the 10" rear ends do.
http://www.ringpinion.com/TechnicalHelp/ContentFrame.aspx?FilePath=~%2FContent%2FParts%2FPositractions%2F%2FAn_Improved_Eaton_Positraction.inc

volvoclearinghouse wrote: And, apparently, they suck about as bad as the 10" rear ends do.
So they're more than adequate until you start actively trying to break it?
Kenny_McCormic wrote:volvoclearinghouse wrote: And, apparently, they suck about as bad as the 10" rear ends do.So they're more than adequate until you start actively trying to break it?
Pretty much. ![]() The one in the diff looked pretty clean. I think when guys start hopping up their engines, running 38" tires, and driving over boulders they start complaining about 10" rears going south. Meanwhile, a buddy of mine with a GN runs deep into the 10's on a basically-stock GM 10B rear, even with street slicks.
The one in the diff looked pretty clean. I think when guys start hopping up their engines, running 38" tires, and driving over boulders they start complaining about 10" rears going south. Meanwhile, a buddy of mine with a GN runs deep into the 10's on a basically-stock GM 10B rear, even with street slicks.
Decided to try the Redline 75W-110 in the rear. A bit thicker than stock (75W-90), should provide a little more cushioning for the gears.

Ive always found the ten bolt life span to be luck based. a friend drove his 4.3 stick s10 with a mini spool on the street beating on it daily for 2 years with no issue. his race truck also did fine but one random morning his v8 street truck backfired through the carb cold and the shock managed to blow the ten bolt onto the ground.
In reply to volvoclearinghouse:
My dad has one with govlock in a 99 GMC with the 5.3, has pretty high miles, it still leaves two black streaks on the street now and then, he definitely hoons it in winter, hasn't exploded yet.
Two boxes showed up yesterday; one was crammed into my mailbox, barely leaving room for anything else. The other was sitting on my front porch. Why didn't USPS just leave them both on the porch? It's not like the little one was light.
One box contained the new lug studs and nuts. The other box had the two new axles, bearings, and seals.
Unfortunately, some butt-hat decided to plow over the mailbox at our rental house, so I spent yesterday (after a very long day at work) making a field-expedient repair on it with the few tools I carry with me in my car, and a sledgehammer and shovel the tenants had. Came home a little after 7 to a screaming baby, a wife desperately trying to finish dinner, and a dog who had to pee desperately (and who, the vet called to tell me today, had lyme disease, lovely). I scooped the baby in one arm, grabbed the leash in the other, and took everyone out of the house while Mrs VCH attempted to regain her sanity over a pot of pasta and greens.
Luckily, I had stopped at the Italian store on the way home to grab a tin of olive oil (we go through a LOT of this stuff) and, on a whim, picked up a fresh cannoli as well. That, and a glass of port, made everything better for everyone. ![]()

Kenny_McCormic wrote:volvoclearinghouse wrote: And, apparently, they suck about as bad as the 10" rear ends do.So they're more than adequate until you start actively trying to break it?
So, we're forgetting that the truck in question currently has a dying ten bolt?
More than adequate does not mean 'seals break and starts ruining axles' like this one did.

I likes me some Suburban Subdivision.
Still regretting passing on a cherry Challenge priced one with a big block recently.
tuna55 wrote:Kenny_McCormic wrote:So, we're forgetting that the truck in question currently has a dying ten bolt? More than adequate does not mean 'seals break and starts ruining axles' like this one did.volvoclearinghouse wrote: And, apparently, they suck about as bad as the 10" rear ends do.So they're more than adequate until you start actively trying to break it?
I'm not sure how my 10B is "dying". The axles had 176k miles on them, and the bearings and seals were probably original. I got new axle shafts, new bearings, and new seals, all fairly inxepensively, and the gears, gear oil, and even the "dreaded" gov-loc look to be in pretty good shape.
Minor snafu, the new axles from ROCK arrived and...they were too long. 33". I measured the ones in the truck and they're a bit under 31.5". Well, crap. Whoda thunk they made two different length axles?
I surfed about online, and finally happened upon some aftermarket axles that are supposedly stronger than stock, and for only a bit more (115 each vs 75 for the Rock parts). Plus, they had free shipping. New axles on order, Rock parts will be returned. Oh well. I wasn't going to get this done this weekend, anyway. Peter Cottontail will loading up the wife and 10 month old to visit the little one's grandparents and great-grandfather. ![]()
The junkyard will totally have these, and some of them will still be good. I have had to swap before in 12 bolts.

I've seen this thread on here for weeks but I had no reason to post to it. But... I love the title. It catches my eye every damn time.
tuna55 wrote: So, we're forgetting that the truck in question currently has a dying ten bolt? More than adequate does not mean 'seals break and starts ruining axles' like this one did.
That's more of a thing that eventually happens to all C clip axles without a real wheel bearing inner race.
I know this is Grassroots Motorsports, and not Big Moneybags Motorsports, but spending $226 on a set of new, alloy axles vs. laying on the frozen ground under 8 different trucks in the junkyard to find a set of passable axles for $50 seems like a decent call to me.

Shaft! It's a bad motha-SHUT YOUR MOUTH!


My brother is the original owner of a 2004 Suburban. He uses it to haul his kids and my father's boat. I'm secretly waiting for him to decide that it's time to replace it, but not so much that I'm ready to announce my intentions and encourage him to start shopping. I'm waiting for my dad to call and say, "Hey, I heard that your brother's thinking about a new car..."
Woody wrote: My brother is the original owner of a 2004 Suburban. He uses it to haul his kids and my father's boat. I'm secretly waiting for him to decide that it's time to replace it, but not so much that I'm ready to announce my intentions and encourage him to start shopping. I'm waiting for my dad to call and say, "Hey, I heard that your brother's thinking about a new car..."
'04, so that's what, GMT800? That would be a great truck- great engines. Especially with a known history. 1/2 ton I assume?
Having never removed the rear wheel bearings and seals on a GM 10B rear, last night was abit of a learning process. Presumably, there are other folks out there who, like me, have also never removed the wheel bearings and seals on a 10B rear. For those looking to attempt this project, here is a step-by-step primer on accomplishing this task:
1) Jack up vehicle, support on jack stands.
2) Remove wheels and differential cover. Allow differential fluid to drain into a catch pan.
3) Drill out the rusty bolt that a previous owner broke off flush with the differential housing and stuffed with RTV. Retap hole.
4) Remove axles and brake drums.
5) Using the biggest, meanest, nastiest slide hammer you can find, attempt to remove the bearing and seal at the same time from one side. Note word "attempt".
6) After several minutes of cussing, sliding, hammering, and getting a blister, give up on removing the seal and bearing together and focus on simply getting the seal out.
7) Destroy the seal with the slide hammer, but finally succeed in extricating it from the axle housing.
8) Return to slide-hammering on the bearing. Destroy the inner race, send rollers and chips of metal flying everywhere.
9) Use a magnet on a stick, several rags, and a long grabby arm tool to remove all debris from the axle housing.
10) Curse.
11) Slide hammer on the outer race for several more minutes, using both hands, and grunting heavily.
12) Go searching for the MAPP/ Oxygen torch. Try all 4 Oxygen tanks you have, and realize they are all empty. Switch to propane. Heat bearing race for several minutes, all the while daydreaming about putting the whole stupid thing back together.
13) Slide hammer at the bearing race some more. Curse.
14) Go off in search of Dremel tool. Find Dremel tool, and realize it's missing the little screw thing on the end that retains the bits. Search futilely for several minutes for the screw tip thingy. Finally find an old, broken, cordless Dremel and scavenge the screw tip thingy off of it.
15) Using a cut-off wheel, carefully cut a diagonal slot in the bearing race, being careful not to break through to the press surface on the axle housing.
16) Go in search of a hammer. Fail in your mission, come back with a large crescent wrench. Question your organizational skills.
17) Use a screwdriver to pry up the edge of the bearing race. Pound on screwdriver with crescent wrench.
18) Curse.
19) Break off chunk of bearing.
20) Using slide hammer, finally, extricate what's left of the bearing race from the axle. Clean out the axle, removing all chips and metal shavings.
21) Move to the other side of the vehicle, actively dreading the task.
22) In an attempt to economize tasks, go directly to removing/ destroying the seal, and attempt to slide-hammer the bearing, unsuccessfully. Destroy the bearing, as previously.
23) GOTO step 17 through 20.
24) Put tools away as it starts to rain.
25) Manhattan.
Aren't we missing a few steps, or is it still apart?
This was simply the instructional on how to remove the bearings and seals. Installation is the reverse of removal. ![]()
If this were Superman-world and somebody made a Bizzaro Slide Hammer, then installation would indeed have been the reverse of removal. But it isn't. And no one does. And so, after fastidiously cleaning and sanding the insides of the axle housing where the bearings and seals press into, I had to figure out a way to coerce them in there.
Harbor Freight makes a dandy little seal driver kit, with a wide selection of diameters. And it worked great for getting the bearing started down it's path of becoming one with the axle assembly. But after the first eighth of an inch or so of pounding with my 3 pound Engineer's Hammer, it refused to go in any further.

(I've no idea why it's called an Engineer's Hammer, but since I is an Enginear, when I saw it at the store I knew immediately that I must possess it.)
Several minutes of diligent searching around the garages yielded no other tool of an appropriate diameter to use as a bearing driver. The scrap metal pile (always a source of inspiration) did produce a length of pipe slightly smaller than the OD of the bearing, which would be perfect...except that length was approximately 6 feet...and it's difficult to hammer upon a hollow pipe.
About 10 years ago, I had to do a rear wheel bearing job on my Dodge pickup, and ended up buying an outrageously expensive 2-1/2" socket...which I then had to grind approximately 1/4" off the OD of so that it would fit inside of the brake drum to get to the nut. The Dodge has been gone for a few years now, but the socket continues to roll around the drawer in my toolbox where all the odd/large/used-it-once-and-probably-never-will-again tools seem to congregate. But this weekend, it had its time to shine again:
What you are looking at (sitting on one of our homey, country placemats, where I was showing off my ingenuity to Mrs. VCH, who was suitably impressed) is a 3" section of the afore-mentioned 6' pipe, cut off precisely (mostly) squarely with an angle grinder, wrapped in electrical and duct tape to fit snugly inside of the 2-1/2 PROTO socket, with another layer of duct tape wrapped around the end (where it will bear against the bearing), to protect it from beating against the inside of the axle housing and more-or-less center it on the bearing as I whacked on the socket with my Engineer's Hammer.
It worked amazingly well. After the bearings were pressed in completely, the seals went in (the HF seal driver worked perfectly for this) and things were looking up...
I think I've finally got the whole Suburban model nomenclature thing worked out. In 1988 or 89, GM changed the body style of their pickups, but the Suburbans soldiered on the same until 1992. Since my truck is a 4 whee drive, apparently it's a "V1500". I'd mistakenly thought it was an "R1500", which, among other things, has a longer axle shaft (found that out, earlier) and 1/2" wheel studs. The V1500 has 7/16" wheel studs. Which I found out when I tried to install the R1500 studs I'd gotten from Rock Auto in the (correct) V1500 shafts I got later. Oops.
Fortunately, Advance Auto carried the new studs, so all I was out was a half-hour trip to go pick them up. I grabbed some shiny new lug nuts, too, as I eventually want to get the old style trim rings and do the full Rally wheel look.
Axles in:
Here's a view pictures of the Glorious Gov-Lock differential, in what appears to be remarkably good shape:
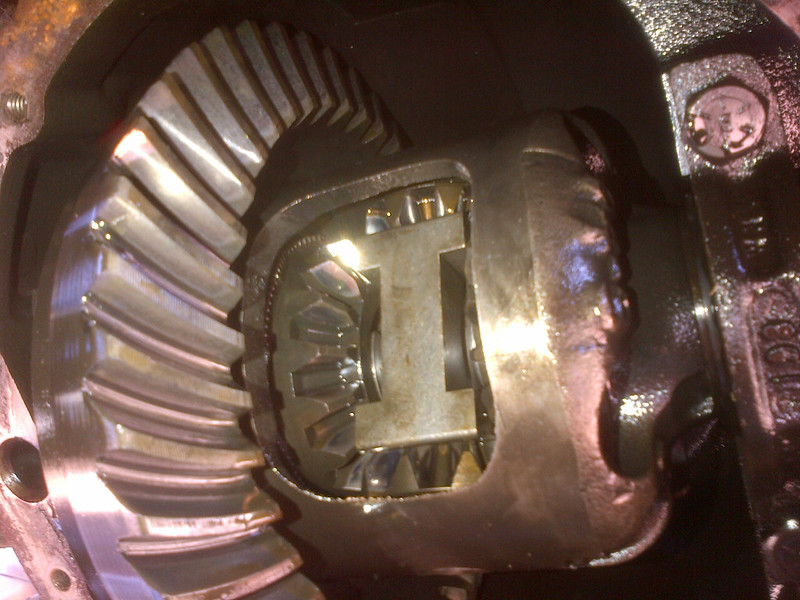
For all of you into "reading" gear tooth wear patterns, how does this look?
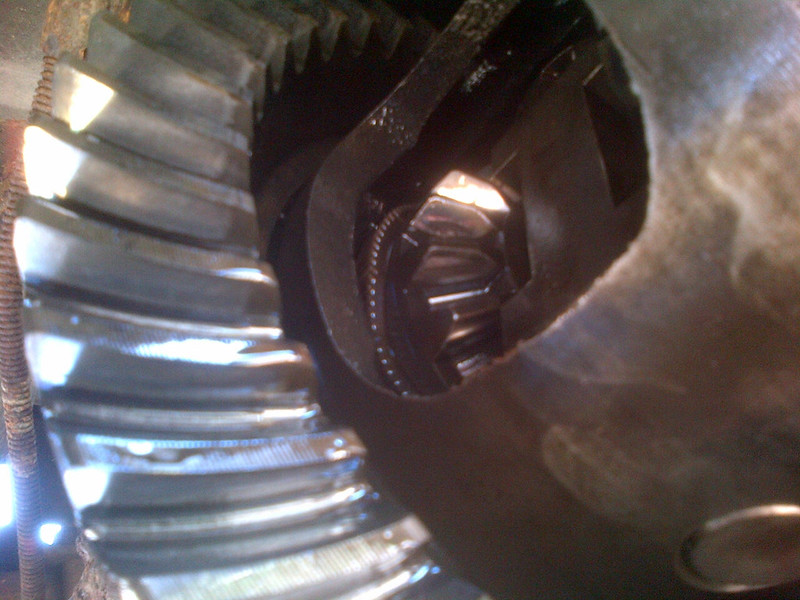
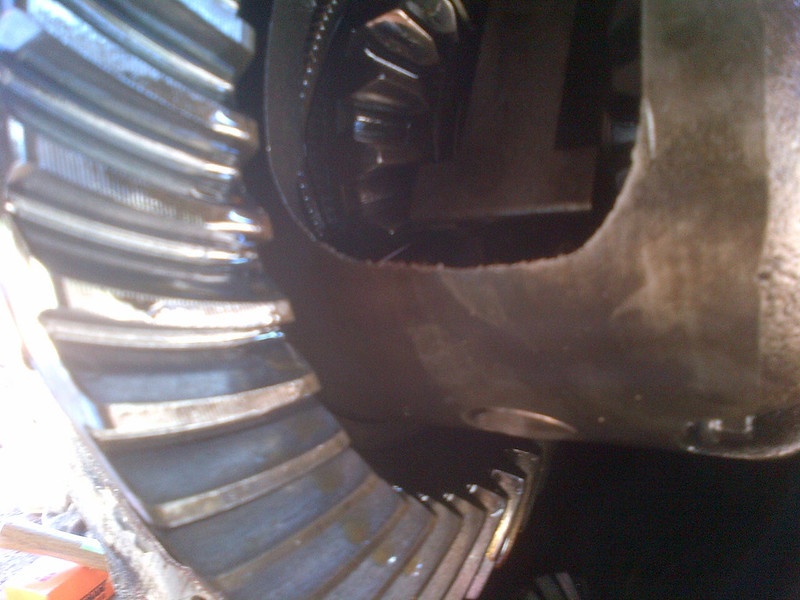
And the other side:
Just called the insurance company, and added it to the policy. I plan on stopping by the tag and title place after work and getting plates. "Black Betty" will soon be cruising the mean streets of Baltimore!
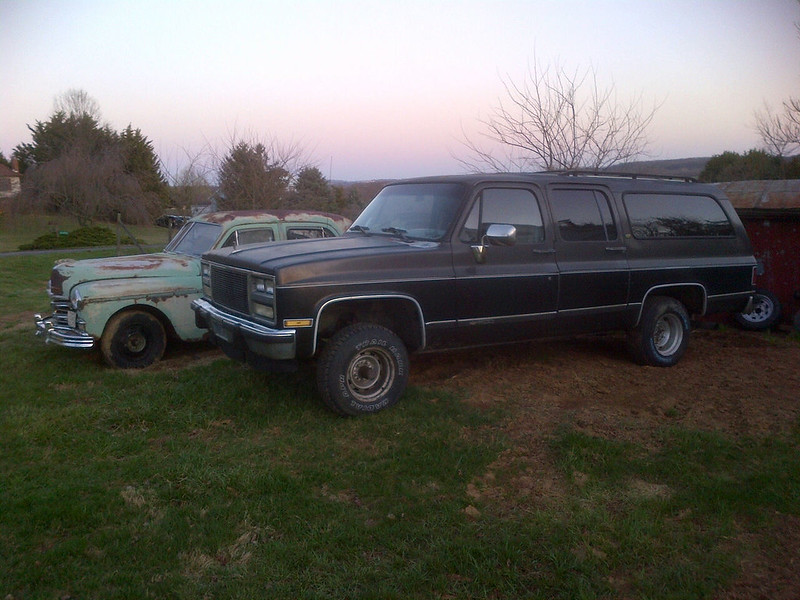
Bam-Ba-Lam!
You'll need to log in to post.


