1 2 3 4 ... 8
wae
wae Dork
2/26/18 8:17 a.m.
eastsideTim said:

Going to try to keep it under Challenge budget, at least thru October?  Hint, hint...

I'm not specifically planning to bring it to the $2018 Challenge at this point, but I haven't ruled it out.  Assuming that there isn't anything terribly wrong with it, I'm not planning to spend much on it or really do that much of a build to it (spoiler alert!).  If I were really serious about it, I'd sell off the hardtop to make it an almost free car and then spend the remaining budget money on suspension, some sort of propulsion, and a little vinyl wrap.  The problem with that is that it's way too nice to thrash up and I'm one of those freaks that thinks convertibles look goofy and prefer the look of the hardtop.  I am, however, saving my receipts so in the event that the spirit moves me to go to Gainesville that option is open to me.

I suppose I could source a junkyard engine that I could drop in specifically for the challenge and hook up a bottle...

wae
wae Dork
2/26/18 8:18 a.m.
Jerry said:
EvanB said:
wae said:
Jerry said:
EvanB said:
wae said:
EvanB said:

You know what owning a Miata with a hardtop means...

That even if the motor is totally thrashed, I can sell the hardtop, scrap the shell, and not be out any money? laugh

I was thinking more along the line of rallycross. 

I think we all were.

Rallycross?  Never heard of it.

It's where you drive around cones in a field, but that isn't important right now.

Surely he's heard of it?

And don't call me Shirley!

AngryCorvair
AngryCorvair GRM+ Memberand UltimaDork
2/26/18 4:28 p.m.

Sell the hardtop to a friend who will sell it back, and who will let you store it for him during his ownership thereof.

wae
wae Dork
3/1/18 7:26 p.m.

Last part of the parts shipment was delivered to the workshop today according to FedEx, so hopefully work will begin either this weekend or next week!

wae
wae Dork
3/4/18 9:45 a.m.

Well, today is the day!  All of the parts have arrived to the workshop and the Rallycross car is not in need of any serious surgery (that I can find at this point) before PE #1 in 41 days.  Plus it's beautiful out and even though it's barely above freezing, seeing all that sun makes me want to drive around without a roof.

Not to get too far ahead of myself, but I do have a good straightedge and some feeler gauges, so I'm going to go ahead and check the head myself, rather than send it out to a machine shop.  I had it in my head that it was some sort of strange voodoo, not just using feeler gauges and measuring.  So, that's cool.  I'm a little torn on doing the valve seals.  The gasket kit came with new seals so it seems like with a 105k motor, I should probably do them "while I'm in there anyway" and have the head off.  Any major reason to not do that?

While I'm quite excited to get this job underway, I'm a little bit apprehensive, as well.  There's no telling what other things could be wrong with this car.  Badness might be all over the inside of the engine once I open it up, or the transmission could be in a bad shape, or any other number of Bad Things that would have been apparent if the car could have been test driven.  My dream scenario is that I'll get this apart and back together and it'll start right up and run like it should for several years, but I'm keeping a realistic expectation that there are a lot of unknowns in here.  I already got pretty lucky with the purchase price, let's see if that luck holds out.

wae
wae Dork
3/5/18 6:03 a.m.

Most of yesterday was spent in the workshop getting to know the Miata in basically the biblical sense.  It was fairly uneventful to push the car into the shop thanks to the low weight and having nothing dragging or sticking in the brakes or wheels. 


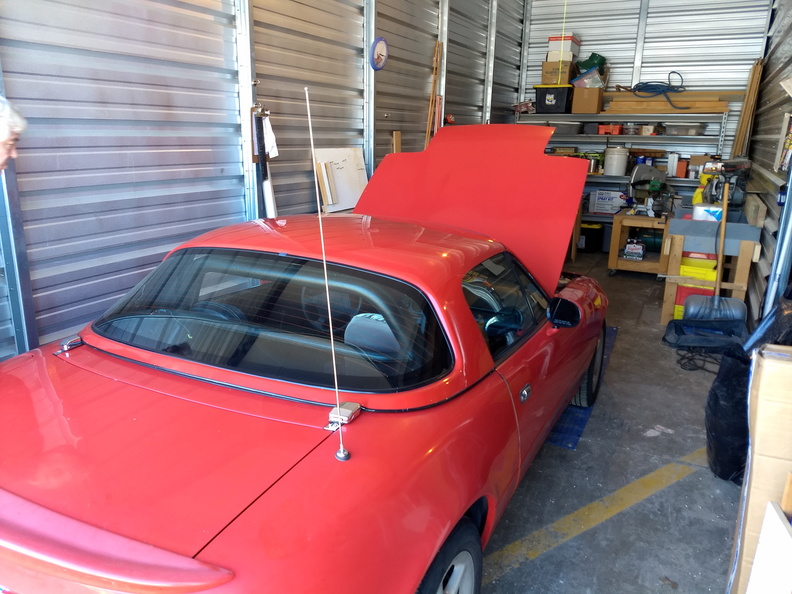
Once in the garage, I faced down my target and got to work:

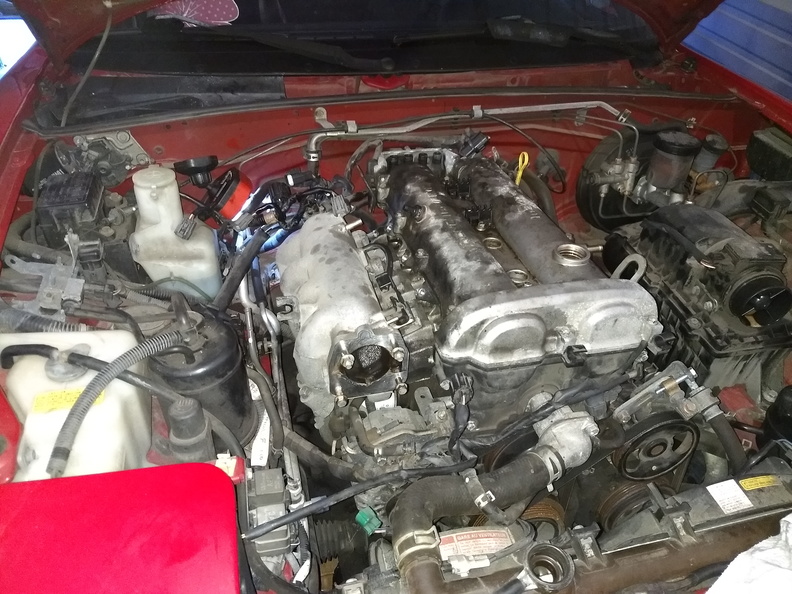
There's definitely some external cleaning that's going to be happening here.  The first thing I pulled off was the air intake tube, confirming that there's also a lot of internal cleaning that's going to need to happen:

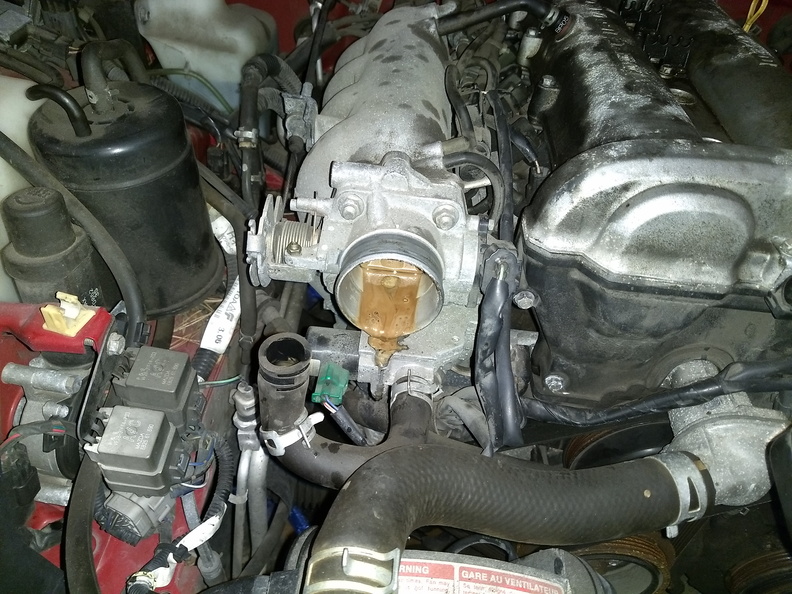
After some wiggling, I was able to get the throttle body off (that's not what required wiggling) as well as the fuel rail.  As usual, I forgot to remove the gas cap before disconnecting the fuel lines, so I played the little boy plugging his fingers into the holes in the dyke while I talked my dad through removing the gas cap to relieve the pressure.

After taking off the exhaust heat shield, I was able to confirm the source of the oil that was on the left side of the engine and on the bottom of the car:

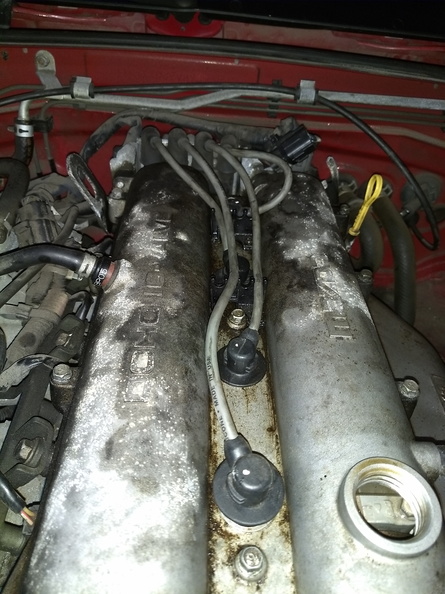
It looks like the valve cover seal is in pretty bad shape, as I suspected when I first looked at the car.  I can't see the rear main because there's this transmission in the way, but the front main looks good, so I think these top-end leaks are all the points that I need to worry about -- so all the stuff I was going to do anyway.  Taking the valve cover off revealed a lot of nastiness.  The antifreeze/water that the camshafts have been bathed in for the last couple weeks has caused a little rust on the lobes of the cams.  Since I want to do the valve seals anyway, I'll hit the lobes with a light bit of emory cloth and bathe them in a little oil to clean them up.

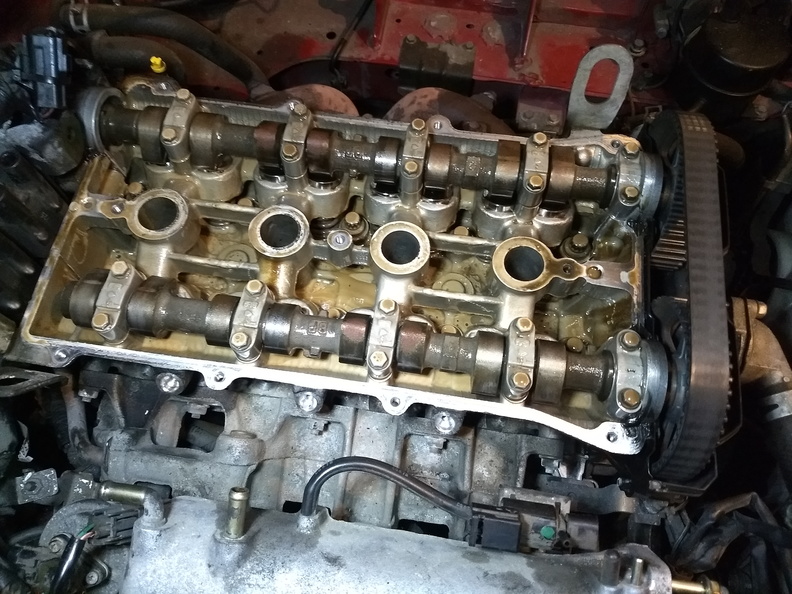
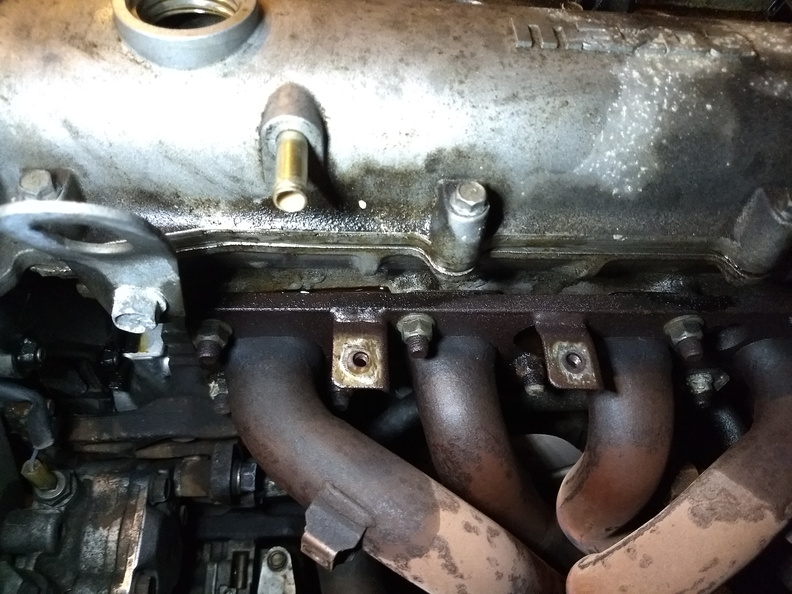
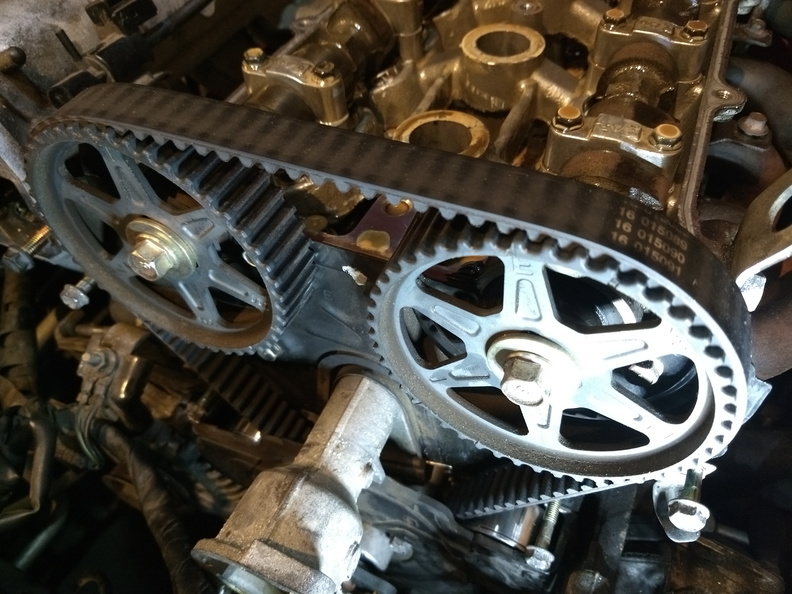
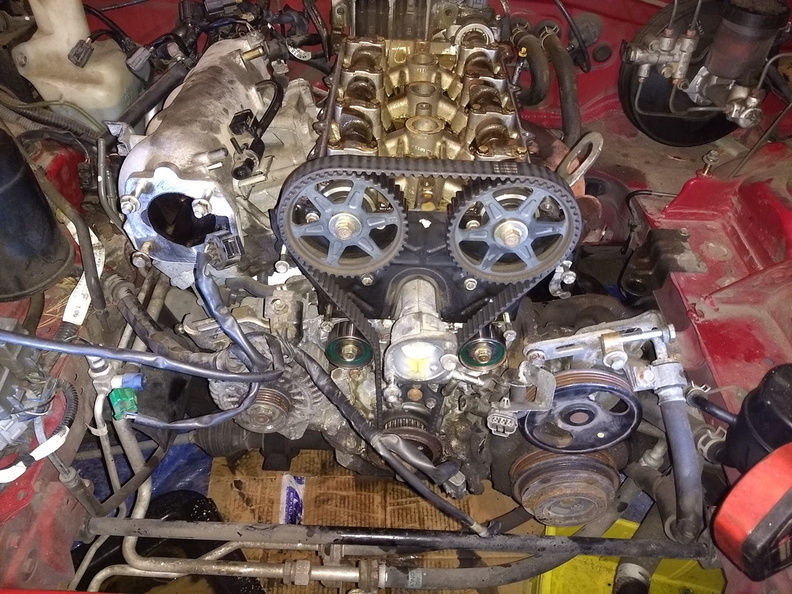
If memory serves, the timing belt replacement interval is somewhere around 105k.  The car has 105824 on the clock, and this picture kind of confirms to me that the belt service has not been done, so I'm glad I got the full kit.  I was a little bit concerned that I was going to spend a bunch of money to replace parts that had just been replaced, but that doesn't appear to be the case!

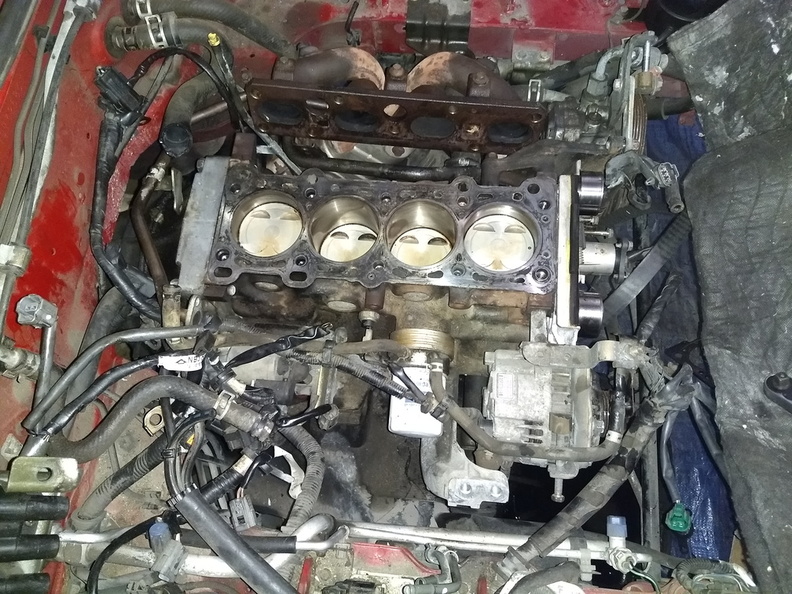
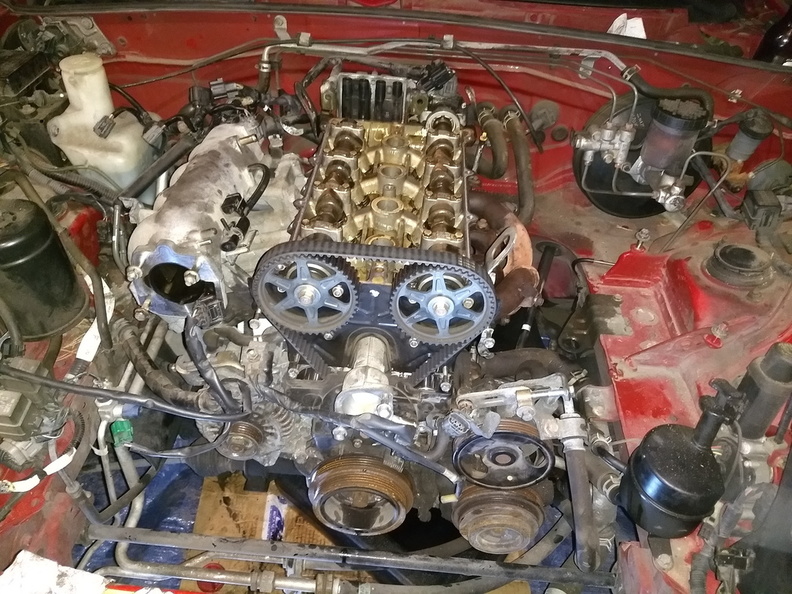
Next steps were to pull the timing covers off, get the pulleys removed, and disconnect everything that was holding the intake manifold to the car.  Since I'm going to replace the radiator anyway, I went ahead and pulled it to get a little more clearance for these jobs.

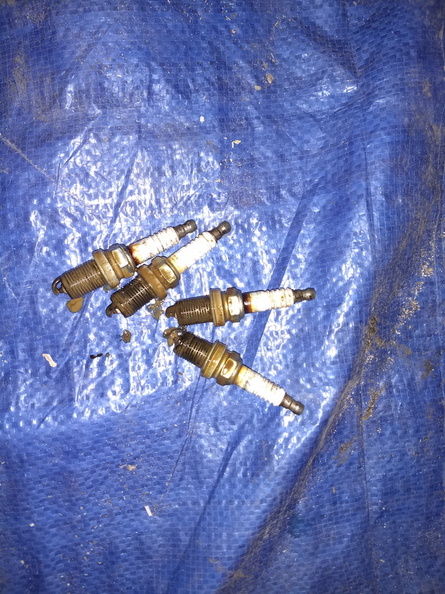
I also pulled out the plugs.  Ugh, just nasty.

Timing covers all off, and ready to take the timing belt off.

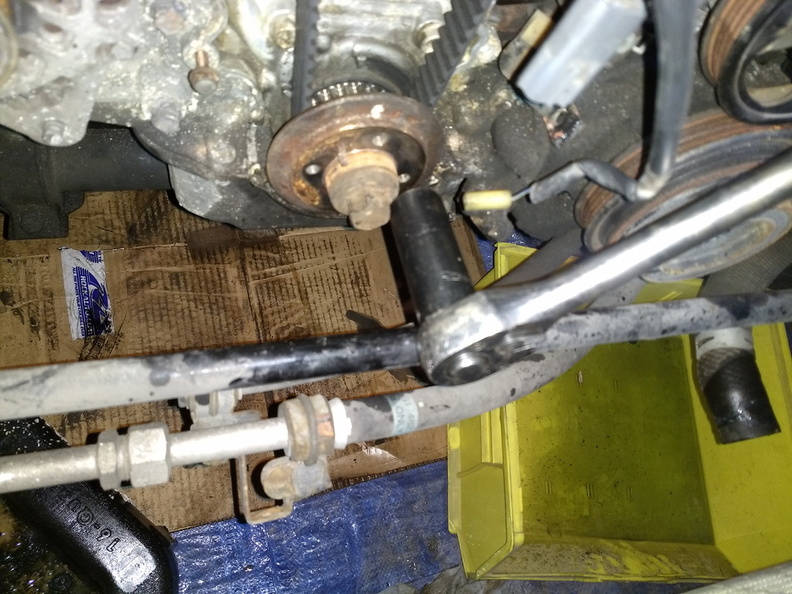
What were they thinking putting this swaybar here!?  I can't get a socket on the 21mm crank bolt.  I guess I need to go get a 21mm regular-depth socket to be able to take that off so I can remove the timing belt from the bottom pulley.  Even then, I'm not sure I can get my impact in there with the A/C condenser in the way, and I'm not entirely sure how to best hold the crank in place to to turn that with a breaker bar.  That's a problem for later, though.


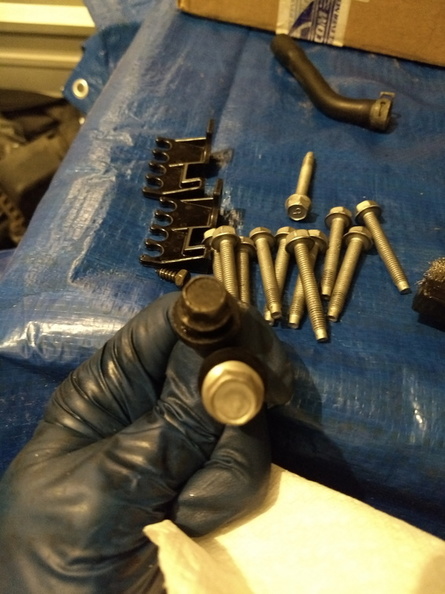
With that problem successfully pushed off to later, I went ahead and started pulling the head bolts.  One of them (#6 in the tightening sequence) was on much, much tighter than the others and also had no washer.  It was on so tight that this happened to my H-F extension:

It did come off, though, and after some finageling: 

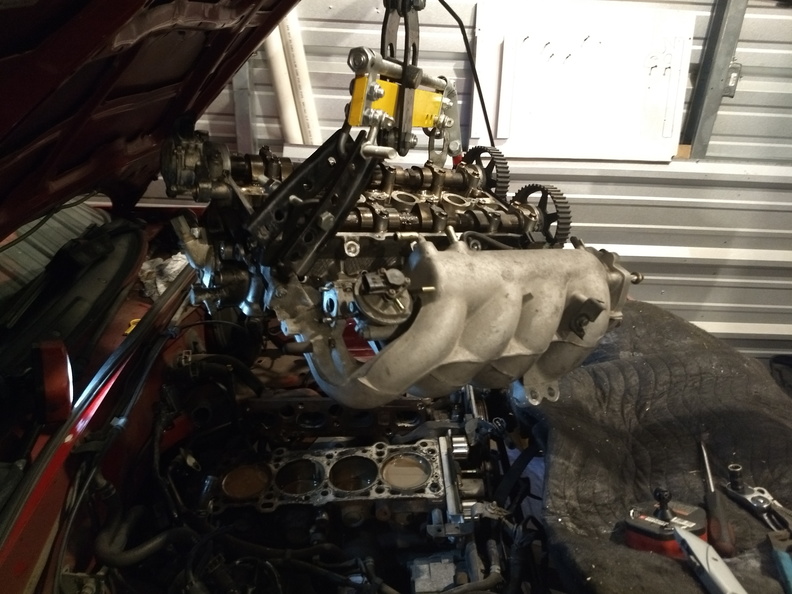
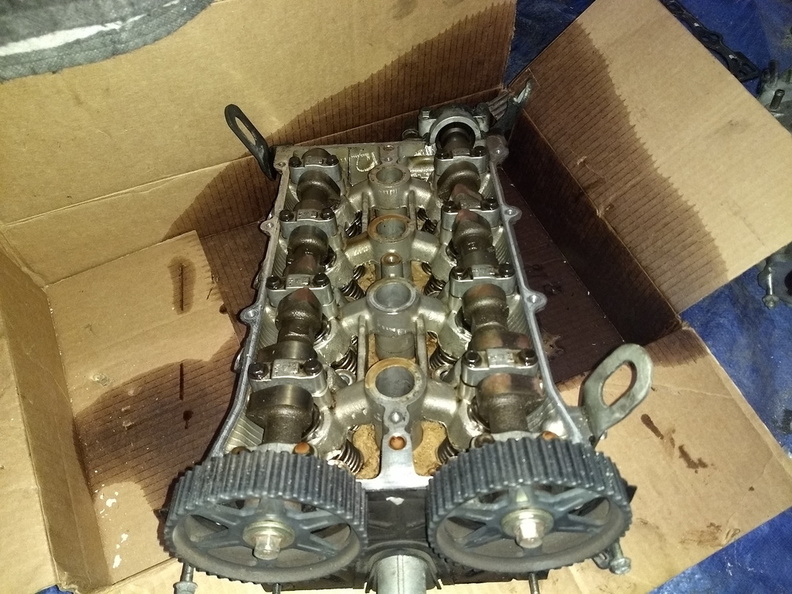
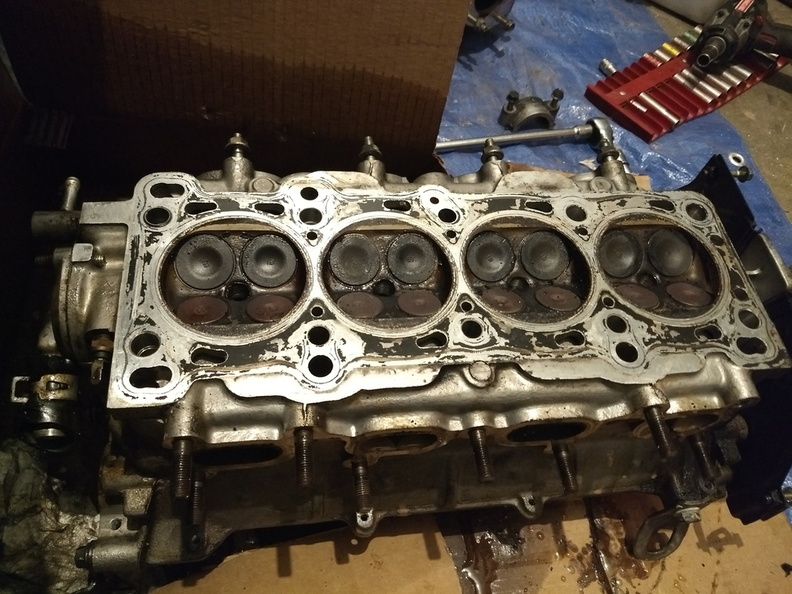
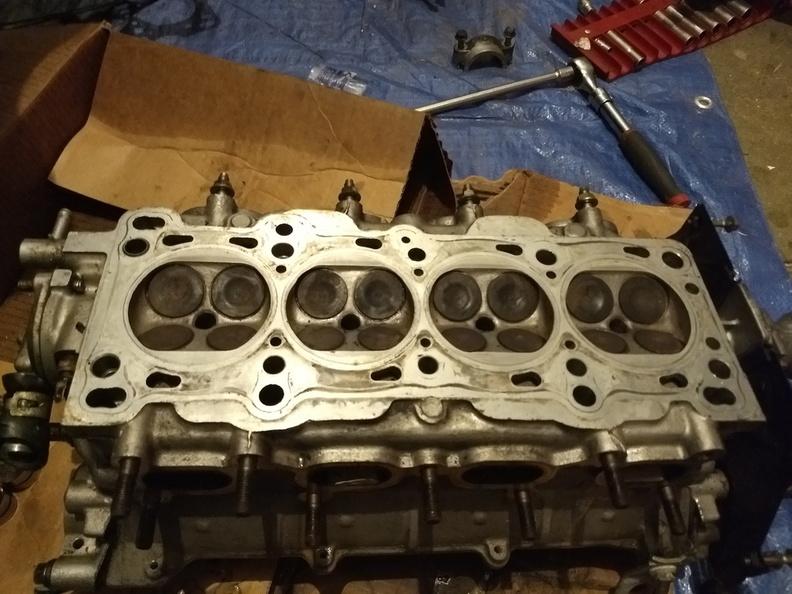
The head (and intake manifold) are off!  That's a real mess down in there, too.


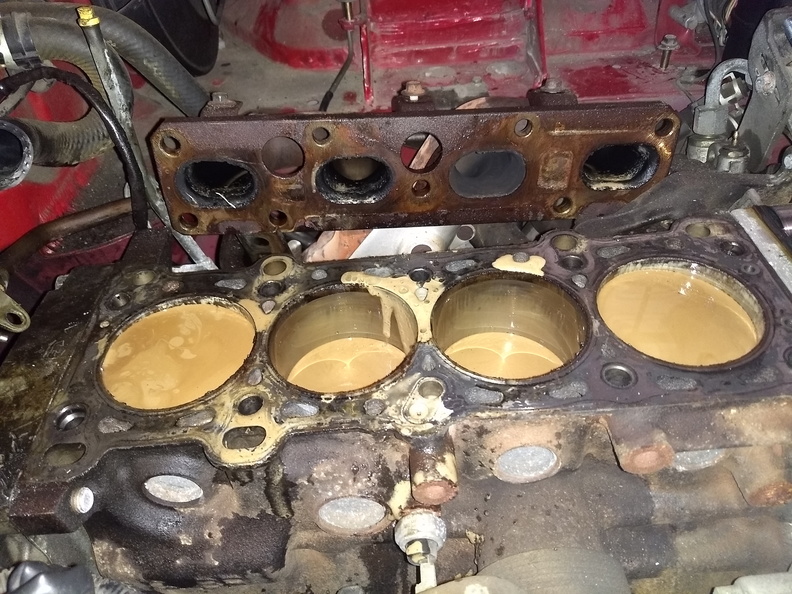
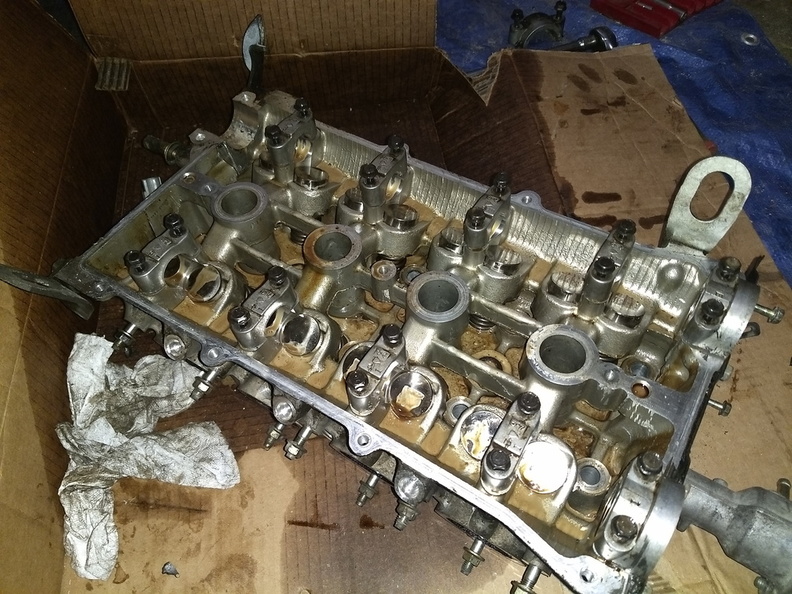
That's going to take some work to clean up.  I didn't see any real obvious breaks or anything in the head gasket, but the various layers came off one at a time instead of as a unit.  By the time I had the head lifted off, it was after 2200 so I popped the intake off the head, dropped the head into a cardboard box, and cleaned up my tools for the night.  I think I found the cause of the initial overheat, though: one of the heater hoses was split right at the back of the head.

Next big steps:

  • Swap water pump
  • Swap timing tensioners
  • Pull crank pulley to swap timing belt
  • Clean up the block and check the bores
  • Clean up the head
  • Swap valve seals
  • Clean up the intake manifold
  • Get an exhaust pipe gasket and swap that 
  • Clean up the valve cover
  • Clean up the engine and engine bay
  • Get new hoses other than the upper and lower radiator
  • Do the other things I forgot about
  • Reinstall everything
EvanB
EvanB GRM+ Memberand MegaDork
3/5/18 6:42 a.m.

You should replace the CAS seal while you are in there. If you didn't get one in your kit it is a standard size o-ring. I have about 5 laying around. 

wae
wae Dork
3/5/18 7:39 a.m.
EvanB said:

You should replace the CAS seal while you are in there. If you didn't get one in your kit it is a standard size o-ring. I have about 5 laying around. 

I think I saw one of those in there.  I'm pretty sure that was also leaking oil a bit.  I wasn't planning to leave any seal untouched on the top end of the engine!

Cousin_Eddie
Cousin_Eddie Reader
3/5/18 8:27 a.m.

The Flying Miata timing belt tool kit is handy as hell for what you're doing. It's got the bar to hold the crank for servicing that crank bolt as well as seal drivers for crank and cam seals and a lock tool to keep the cams steady while you're putting the timing belt in place. In my opinion, it was money well spent. If I wasn't about to use it again myself, I'd lend it to you. 

eastsideTim
eastsideTim UltraDork
3/5/18 8:35 a.m.

In reply to Cousin_Eddie :

I was going to mention the same thing.  I even have the tools sitting in a box next to me at my computer, since I am planning on doing the timing belt in my car.  I even have two of the cam locking doodads, since I need to return one to EvanB.

wae, you are welcome to borrow them.  No need to buy a set for a job you won't likely need to do often.


wae
wae Dork
3/5/18 9:21 a.m.
eastsideTim said:

In reply to Cousin_Eddie :

I was going to mention the same thing.  I even have the tools sitting in a box next to me at my computer, since I am planning on doing the timing belt in my car.  I even have two of the cam locking doodads, since I need to return one to EvanB.

wae, you are welcome to borrow them.  No need to buy a set for a job you won't likely need to do often.


Oh that would be awesome if I can borrow those for a hot minute!  Thanks!


Edit:  +500 points for making the cam gear lock tool also have a bottle opener in it.

pinchvalve
pinchvalve GRM+ Memberand MegaDork
3/5/18 9:38 a.m.

I can't believe no one has commented on this yet, but once you pulled the Miata out, wasn't there a Mazdaspeed 3 cleared for removal as well?  How could you take one Mazda and abandon the other?  We would have taken it off your hands!  (LOL) 

wae
wae Dork
3/5/18 9:50 a.m.
pinchvalve said:

I can't believe no one has commented on this yet, but once you pulled the Miata out, wasn't there a Mazdaspeed 3 cleared for removal as well?  How could you take one Mazda and abandon the other?  We would have taken it off your hands!  (LOL) 

Was that an MS3 back there?  It was raining and cold so I wasn't paying that much attention.  As far as I am aware, none of the other cars in the lot were explicitly for sale.  I have always liked the MS3s though.  Wouldn't mind trying to duplicate the Mazdaspeed 5 build in my wife's car!

Professor_Brap
Professor_Brap GRM+ Memberand Reader
3/5/18 10:13 a.m.

The FM kit is a bit sexier than this 

wae
wae Dork
3/6/18 10:43 p.m.

Yesterday was a long day at work plus my regular Monday night bingo prep work and when it was all done around 2100, I was just too pooped to go out to the shop.  I was dragging a little bit tonight as well, but I spent a little bit of time out there working on cleaning things up a little bit and inspecting things to see what I'm in to.

Previous pictures showed the state of the block so no need to repeat those images, but I used some paper towels to pull out the goo from the cylinders.  All four pots were still completely full of chocolate milk, so there's at least some sealing going on in there.  Once I had the goo cleaned out, I sprayed in a bunch of carb cleaner and let it sit for a bit before wiping it down to clean out the build up on the pistons.  I didn't get a "before" picture of that, but when I was finished, things were looking pretty good:

It didn't photograph at all, but the cross-hatching is still there and I was unable to see any indications of any damage to the block itself.  Granted, my tool is just a Mark I Eyeball, but I'm convinced enough.  Once that was looking a little better, I moved on to tackle this:

I took the cams out, making sure to put the cam caps back on in their rightful places to avoid any chance of mixing them up.  I didn't have enough of anything to clean the head, though, so that will need to wait until tomorrow night.

The bottom, however, was a different story.  Once I wiped off the goo, there was a similar build-up to what was on the crowns of the pistons:

More carb cleaner and some scrubbing left me with this:

That's looking much better!  I need to get back in there with some mineral spirits and a Scotchbrite pad to clean off the gasket surfaces the rest of the way, plus I need to hose down the head real well to clean it up.  Once that's done, I'm going to get my straightedge and feeler gauges and verify that the head is straight.  If it is, then game-on!

I also put in another Rock Auto order today to get new belts and the rest of the hoses.  That stuff should arrive right about the time I'm ready to commence assembly.  I'm pretty sure that there's no way I'm going to get all the gunk out on the first pass, so I'm planning to put on a decent filter and some conventional oil and fill the cooling system with water.  After letting it run for about 10-15 minutes, I'll do an oil change with a good filter and more conventional oil and run that for about 500 miles before doing yet another oil change to something in a full synthetic.  Somewhere in there I will also do a flush of the cooling system to clean that out and refill with a good 50/50 mix.

But let's not get ahead of myself.  First things first -- I've got a lot of parts to clean up!

wae
wae Dork
3/7/18 11:03 p.m.

No fun pictures to look at tonight, but I soaked things down in diesel fuel and scrubbed a lot.  I think the gasket surfaces are probably clean enough now, though.  The top of the head needs to be cleaned up to get the rest of the goo out and I need to get a valve spring compressor so I can put in new seals.  I also discovered that the PCV valve is cracked so that needs to be replaced.

While things were soaking I pulled the water pump off.  Even with the head off, that was a surprising difficult job due to that outlet that's on the side under the power steering pump.

wae
wae Dork
3/11/18 8:45 a.m.

According to the FSM, the maximum warpage tolerance is .006", so I went to the Hammer Store and bought a new steel ruler to check the head.  Using my .006" feeler gauge, I checked the diagonals, and everything looked good.  When I checked across the front-to-back centerline, however, the feeler gauge slid under the ruler with little resistance.  Given that the ruler is not a real straightedge with those type of tolerances, I think it's safe to say that the head is warped.  This is not really surprising to me at all, but I guess I was just hoping for a miracle.  Sending the head out to the machine shop was in the plan all along, so I'm still on target.  I'll have them do the valve seals while they've got it and it will ensure that the head gets all its goo cleaned out.  The biggest problem is that I have no idea how long this is going to take them.

Since I couldn't do anything else there, I spent some time cleaning things with diesel fuel and mineral spirts.

A before and after with the fuel rail bolts.  Just a little scrub with a stainless steel brush.  You can see the valve cover hardware in the background.  I had that soaking in diesel for a couple days, but still had to knock the crud off with the brush.

I also got into the plastic timing cover bits and cleaned them up nicely:

turned into:


While I wait on the head, I can work on replacing hoses, put the new water pump on, and start getting the timing parts done.  I borrowed the special tools the other night and I bought some not-deepwell impact sockets so I can pull the crank pulley.  I can also go ahead and start moving the fans from the old radiator to the new one and get it ready to install.  The intake manifold is still completely full of goo, so I need to clean that out as well, plus I really should hose off the plastic undertray.  So a handful of little things to do so that when the head comes back from the shop, I can button it up pretty quickly.

Knurled.
Knurled. GRM+ Memberand MegaDork
3/11/18 9:03 a.m.
wae said:As usual, I forgot to remove the gas cap before disconnecting the fuel lines, so I played the little boy plugging his fingers into the holes in the dyke

That's not how you spell...


You know what?  Nevermind, that works too I guess.


wae
wae Dork
3/11/18 9:11 a.m.

Oh, I just remembered something that I found weird:  I didn't see any evidence that the head had ever been separated from the block since they were mated back in Hiroshima, but one of the head bolts (the one that was incredibly difficult to remove) did not have a washer, but all the other ones did.  I've looked around to see if it just fell off or something, but I'm pretty positive that it just wasn't there and the new head bolts did not come with washers.  I assume that I should source a replacement washer for that one?

wae
wae Dork
3/11/18 9:13 a.m.
Knurled. said:
wae said:As usual, I forgot to remove the gas cap before disconnecting the fuel lines, so I played the little boy plugging his fingers into the holes in the dyke

That's not how you spell...


You know what?  Nevermind, that works too I guess.


If you can't have a little lowbrow humor while getting a head job done...  laugh

docwyte
docwyte SuperDork
3/11/18 11:14 a.m.

Hopefully your machine shop doesn't take 2+ months like mine did last summer.

wae
wae Dork
3/11/18 2:23 p.m.

I am somewhat concerned about how long they're going to take to get this done...

In the good news department, I put my newly acquired regular-length 21mm socket on the crank bolt and gave it a few turns.  No funny sounds or resistances so I'm going to deem the bottom end as okay enough!

wae
wae Dork
3/12/18 7:47 a.m.

The crank bolt came off without any problems yesterday and after a couple light taps on the pulley boss I was able to pull it and the old timing belt off.  I was a little taken aback that the whole gear didn't have to come off the crank, but there you go.  I didn't touch the key at all, slid the new belt on, put the pulley boss back on, and put the crank bolt back on to 122 ft-lbs (book says 116-123).  I don't need to goop that up with Loctite or anything, right?  That was just the whole old short-nose fix?  The book didn't mention using any threadlocker and the crankbolt was completely clean when I pulled it out.

Other than that, I just sort of tidied up things, wiped down my tools, gathered up all the parts I had taken off and boxed them up to keep them out of the way, generally just got the project ready to sit for a while as I wait on the machine shop.

Which brings me to my next point.  After dropping the kids off at school this morning, I went over to Monarch and dropped off the head and the new valve seals.  When I asked about how long he thought I'd need to wait he told me that they'd probably have it done on Wednesday and that I'd be working on it by this weekend for sure! 

Mad_Ratel
Mad_Ratel Dork
3/12/18 9:23 a.m.

It's been 10 years since I graduated college. Studying for the PE now...

Not sure It will be enough to pass... lol

wae
wae Dork
3/13/18 3:43 p.m.

Machine shop just called.  Head's ready.  $100.  I'll probably go over and pick it up first thing tomorrow morning. 

1 2 3 4 ... 8

You'll need to log in to post.

Our Preferred Partners
HnIP29ngHClKQoD8nS7zNggRuqTxrJS1H8QZBzUjxWzfLSanWK5bH7wf0XmzDgLU