
tuna55
MegaDork
1/12/17 10:45 a.m.
So I'm a huge fan of this method, especially rather than a "Z" in the frame. When you cut stuff like that with a 4" angle grinder, how do you make the cuts even on either side? Just "carefully"? It seems like there might be room to accidentally add a bow in the material in the other plane when you weld it up - how did you handle that?
In reply to tuna55:
Yep, just very carefully. Most were done with the chop saw, so the cut stayed pretty much perpendicular to the rail. Before any cuts were made, I measured and marked each cut so the rails would be the same. But then I had to add more cuts. As far as welding goes, also very carefully.
I've started the long process of welding all 80 slices back together.

I even have my own frame table, just like the pros on TV!

(okay so it's just a work bench made out of a thick office door I found in a dumpster, WHATEVER)
tuna55
MegaDork
1/13/17 9:43 a.m.
Dude that's great.
I totally missed the chop saw in the pic, and now feel pretty dumb.
I also now want to build my own frame, so thanks for that.
Welding update: ran out of argon on Saturday, so I tried to "pulse-MIG" some of it. Until I ran out of C25 a few minutes later. So I went back and ground all the welds I had done until then. I don't have a picture, but trust me, it looks good. Then I sat the body on top of the frame and slid the engine between the rails. Again no picture...but let's just say I am very glad I am doing it this way.
Progress from right to left. I think I started with the pool too narrow and feed rate too high, so I exaggerated the pool and fed less filler.

Here is some of the MIG work, which was done with half-second pulses and a very hot amperage. You can see which one I ran out of gas on.

EDIT:
Welding tips and critique GREATLY appreciated here. I watched basically every video on weldingtipsandtricks website and felt grossly inadequate. Then I watched the Datsun Minitruck episode of Roadkill and now I feel very good about my structural welds.
Having never done TIG I cant really say, but I see good looking welds and good heat penetration, so it cant be that bad!
Keep up the progress, its going to be awesome!
maschinenbau wrote:
Then I sat the body on top of the frame and slid the engine between the rails. Again no picture....
No Picture . . . . Why oh WHY do you tease us like this ? ? ? 
The welds look good to me, good HAZ, no undercutting, if you can handle a TIG or stick alright then getting good results with MIG is easy. I would be looking in those pie slices to double check penetration though.
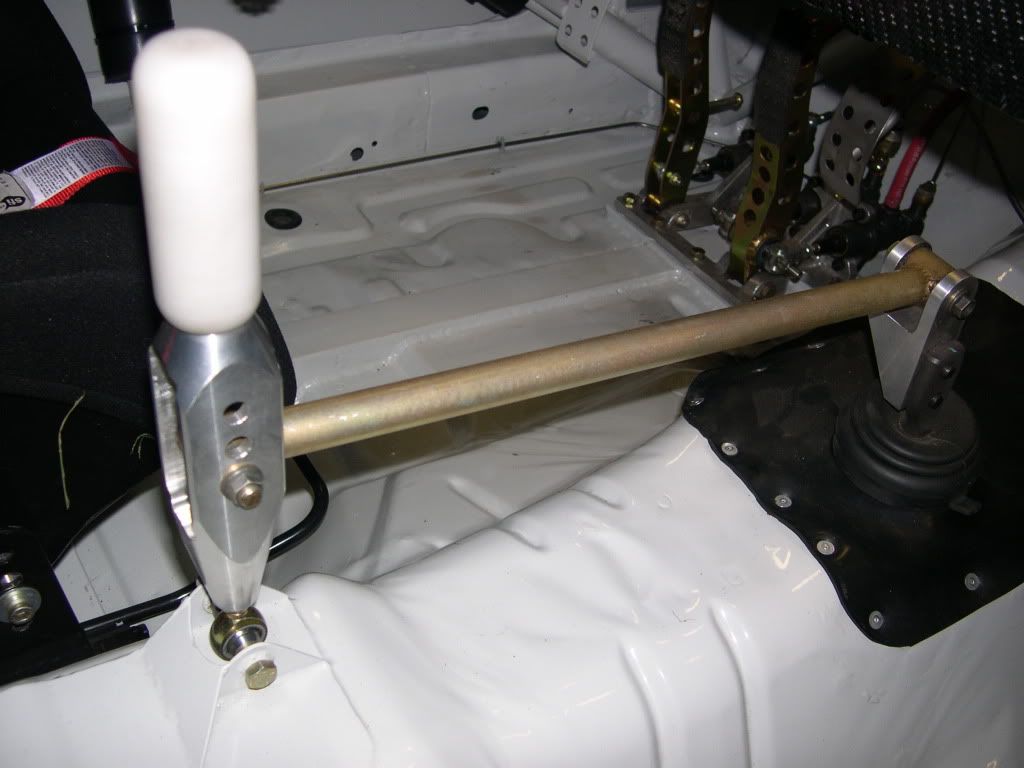
Just for you, Indy-Guy

The view from inside. Stick position is a little far back. I hear the Supra MkII shifter housing will move it forward a few inches. The SC300 W58 is a MkIII, and that seems to be what engine swappers like to upgrade to. Surely someone out there would trade their undesirable MkII housing for my coveted MkIII.


And more weld progress. Another 30 minutes should finish the front frame rails tonight, followed by at least an hour of grinding.

Time for a Cobra style shifter?

Love your build BTW. Keep it up. You make a slacker like myself feel really inadequate. And that's good.
In reply to fanfoy:
Thank you! That's a good idea for a shifter if I can't source the right housing.
You would be surprised how much progress you can make working just 1 or 2 hours after work on 3 out of 5 weekdays, and 5 hours or so per weekend day. I still have plenty of time for things like hanging sheetrock in SWMBO's new pottery studio or binging on Netflix all evening after eating too much for dinner. And drinking. Always plenty of time for that.
I always liked the look of this type of linkage for moving a shifter, as a bonus you can alter your throw length based on where the link is attached.


IF you're going that far might as well get crazy (would we expect anything less from this build?)

http://imgur.com/a/Qymmg

RossD
UltimaDork
1/20/17 7:54 a.m.
Can you flip the cover? Then if it's too far forward have a truck style shifter.
Frame rail progress. The welds are all ground smooth now. Not much else was done this weekend because I've been working on the house and SWMBO's pottery studio.


I did happen to find $100 worth of 1JZ-GTE turbochargers on craigslist though... $25 per turbo including pipes and flanges. I was thinking 3 would do it - 1 turbo per 2 cylinders. And a blow-through carb because MS would be way out of budget.


What about finding the parts to run the important bits from a turbo engine? This thread seems to have some info on it.
Blow through carb on a previously fuel injected engine which already has a turbo variant seems like an awful lot of reinventing the wheel to me- although maybe that's the appeal of it 
In reply to ¯_(ツ)_/¯:
By the time I buy the turbo ECU, higher rate injectors, MAP sensor, etc I will be over budget anyway. With a blow-through carb, all I need a second-hand Holley and some JB weld. I am hoping the stock ECU can keep controlling the ignition without the injectors present. I can put the stock MAF inline before the carb. And use my wideband to tune the carb.
...but first let me get this thing on the ground and running N/A. I just saw the turbos and couldn't resist the deal.
In reply to maschinenbau:
If you're keeping the stock ECU, keep a couple of the injectors but move them to the exhaust before the turbo, then switch them on for antilag!
klodkrawler05 wrote:
IF you're going that far might as well get crazy (would we expect anything less from this build?)
http://imgur.com/a/Qymmg
Amusingly enough, CD009 transmissions are a popular swap for the 2JZ crowd. I'm planning to go this route myself.
Toyota offerings are either fairly fragile (and still priced like T-56's) or the 6 speed Getrag which is very soon to be unobtainium.
Nice work, I look forward to seeing updates
maschinenbau wrote:
In reply to ¯\_(ツ)_/¯:
By the time I buy the turbo ECU, higher rate injectors, MAP sensor, etc I will be over budget anyway. With a blow-through carb, all I need a second-hand Holley and some JB weld. I am hoping the stock ECU can keep controlling the ignition without the injectors present. I can put the stock MAF inline before the carb. And use my wideband to tune the carb.
...but first let me get this thing on the ground and running N/A. I just saw the turbos and couldn't resist the deal.
There's an OEM 2jz manifold with turbos on the Houston CL for about the same money.
A blow thru turbo carb can work easy enough, but need to look at what Lotus did for the Espirt and Maserati did with the Bi-turbo.
You need a fuel pressure regulator that will keep the fuel pressure about 2 psi above intake charge, also need to vent the float bowl to intake charge. If not as soon as any boost pressure builds it will go very lean, the pressure will push the fuel out of the jets back into the float bowl.
Lotus, replaced the vented float bowl cover with a cover that had a hose fitting, to connect to the intake. Maserati put the entire carb in a box.
I have a extra fuel pressure regulator (Maserati), it should still work. Let me know if you want it, free.
"$100 worth of turbochargers" is my new favorite GRM phrase.
Cross-member progress. This will connect the frame rails, support the engine mounts, and protect the oil pan. It should sit about 4" off the ground, which is just over 1/2" lower than the lowest part of the oil pan. It will be welded to the frame.


Looks pretty level. At this point I guesstimated the width and slowly ground the edges until it barely squeezed between the frame rails. I also ordered some of those universal bolt-through engine cushions from Speedway.
This next part I don't know how to explain. This is how I am transferring the A-arm mounting geometry from Lexus subframe to my hot rod frame rails. It's basically a jig that holds all the geometric conditions in the right place. I will slide it under my frame, and fabricate A-arm mounts towards it. It should align exactly like a stock Lexus. I don't know.


Wooden control arms set to max camber, yo


Next steps: finish mounting engine and crossmember, then fab the control arm mounts.


