1 2 3 4 ... 10
adoyle88
adoyle88 New Reader
8/20/14 7:57 a.m.

Sorry for the long delay. We've been working hard on shop work in the last couple of weeks.


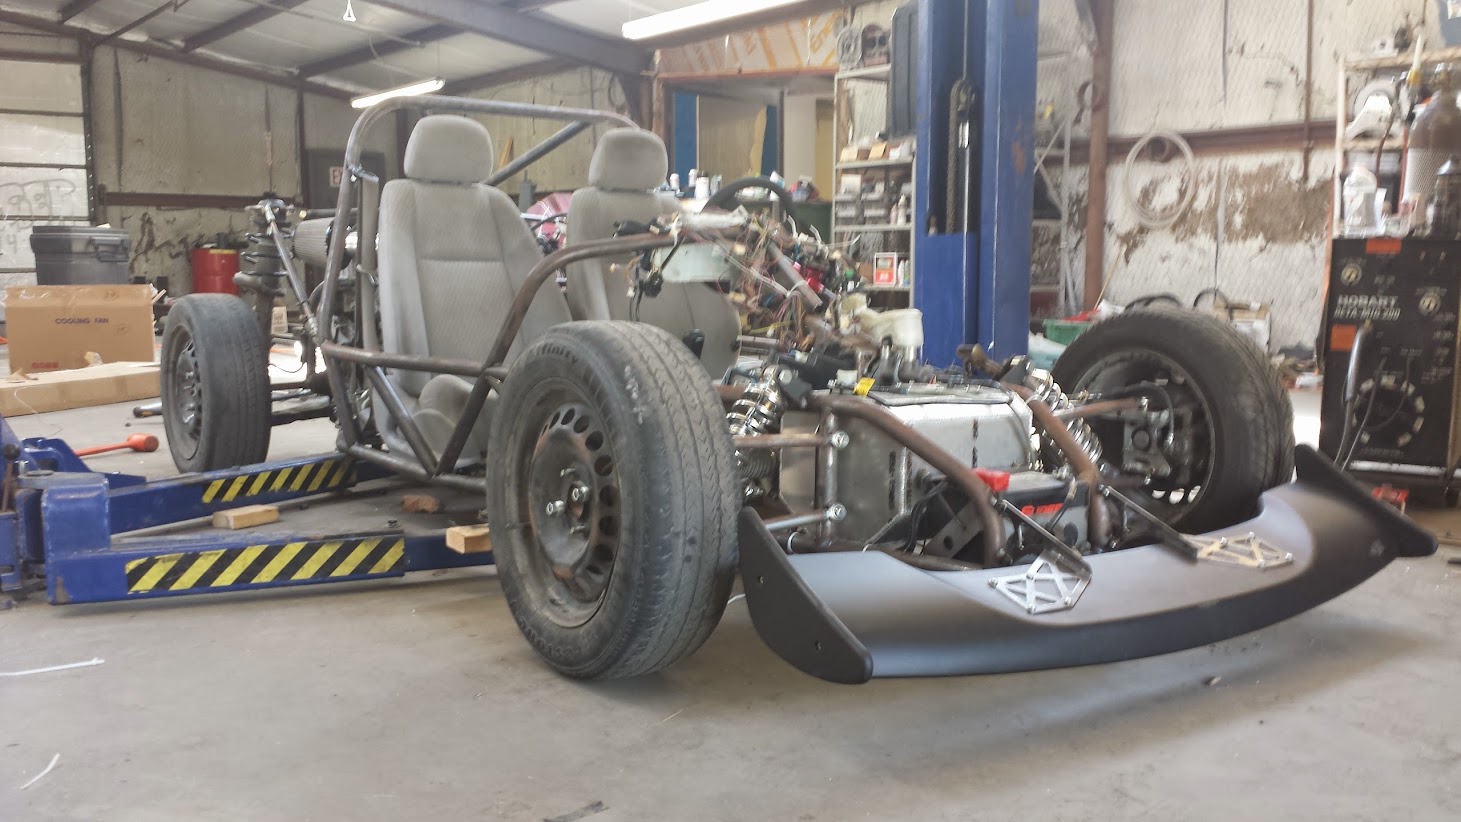
July 21 - Radiator installed

We ordered a new radiator and fan assembly from ebay. We trimmed the original radiator mounts and welded them to a horizontal tube welded to the main hoop of our car. If we ever need to remove the radiator, we just have to loosen the lower radiator mounts.

Radiator

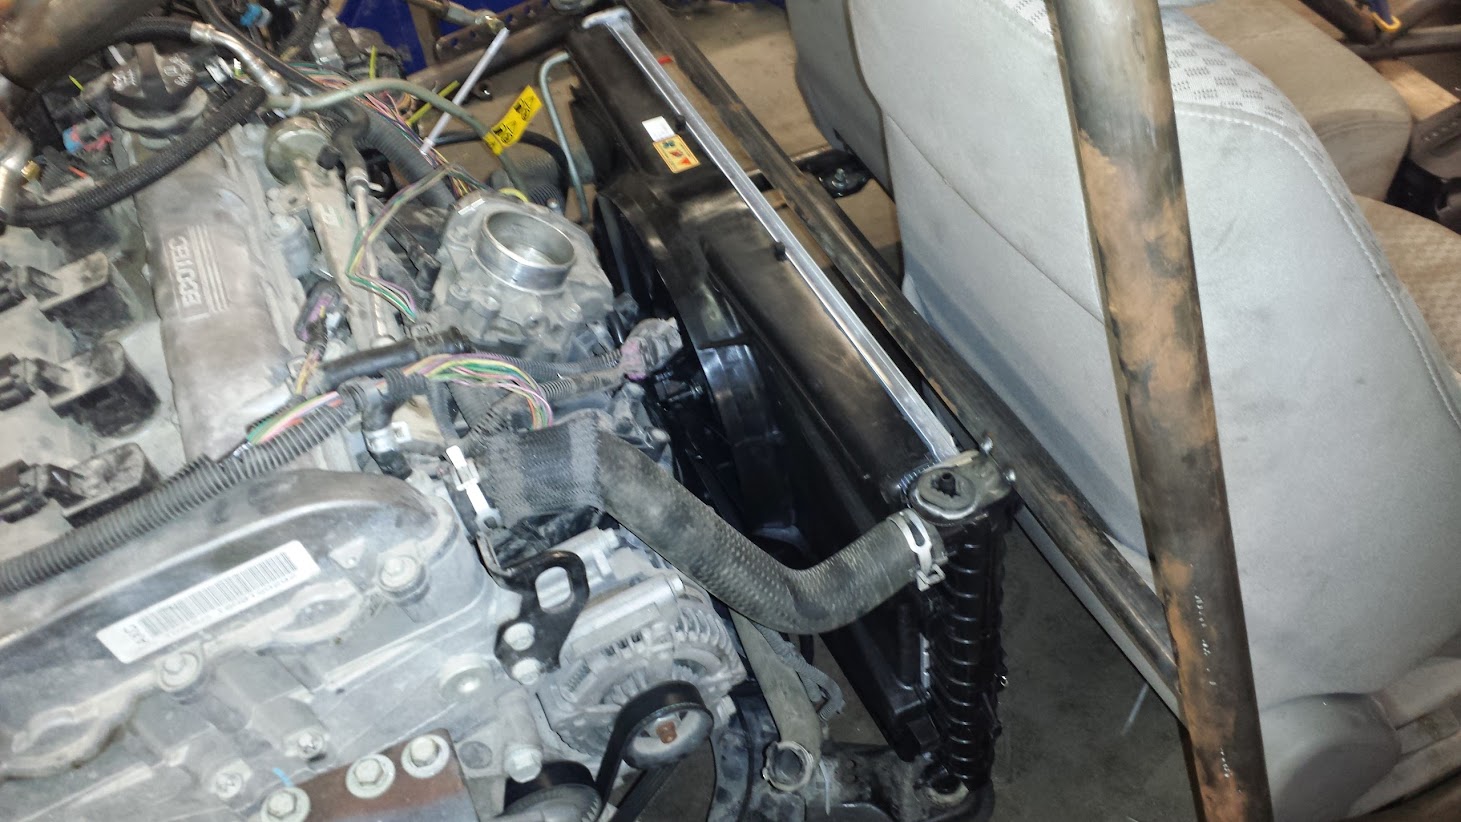
Afterwards, we drove the car around in circles in the parking lot see if the fan would come on. Using the Cobalt information system, we watched the coolant temperature slowly creep up. We assumed the fan would come on at around 190 degrees, but when it cruised by that, we assumed that maybe 200 was the magic number.

We eventually got to 210 before calling the test off, assuming the fan wasn’t working properly. We parked it and checked to see if maybe a fuse had been popped. No luck.

My daily driver is a 2009 Cobalt, so we cranked it up, revved it to 3000 RPM and waited. Sure enough, the temperature climbed to 210 without the fan clicking on. The fan didn’t turn on until it got to 217.

With this new found info, we cranked up the Goblin and brought it up to temp again. Right on 217 the fan clicked on. Very good news.


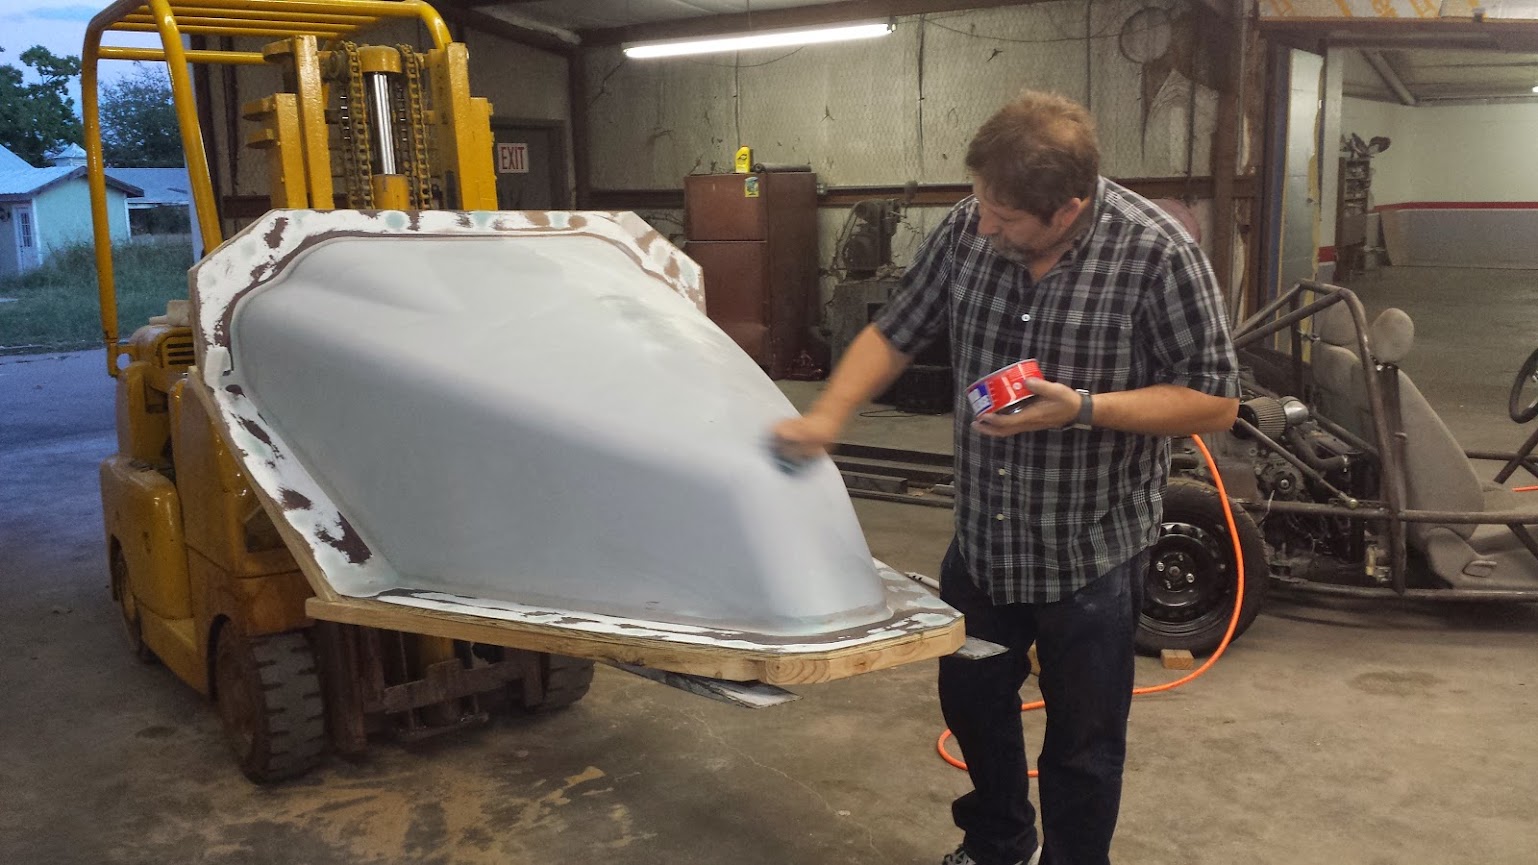
July 26 - Front spoiler

We went to eBay again, this time to order front and rear spoilers. They don’t match our model but we still think they look pretty cool.

To mount the front one, we welded together steel brackets that attach to the threaded inserts pre-installed in the spoiler. The brackets bolt to four tabs we’ve welded to the frame. We can definitely picture ourselves changing out the top tabs with some that have slots rather than holes so that the nose could be adjusted depending on if we are driving around town and want a little more ground clearance.

Front Spoiler


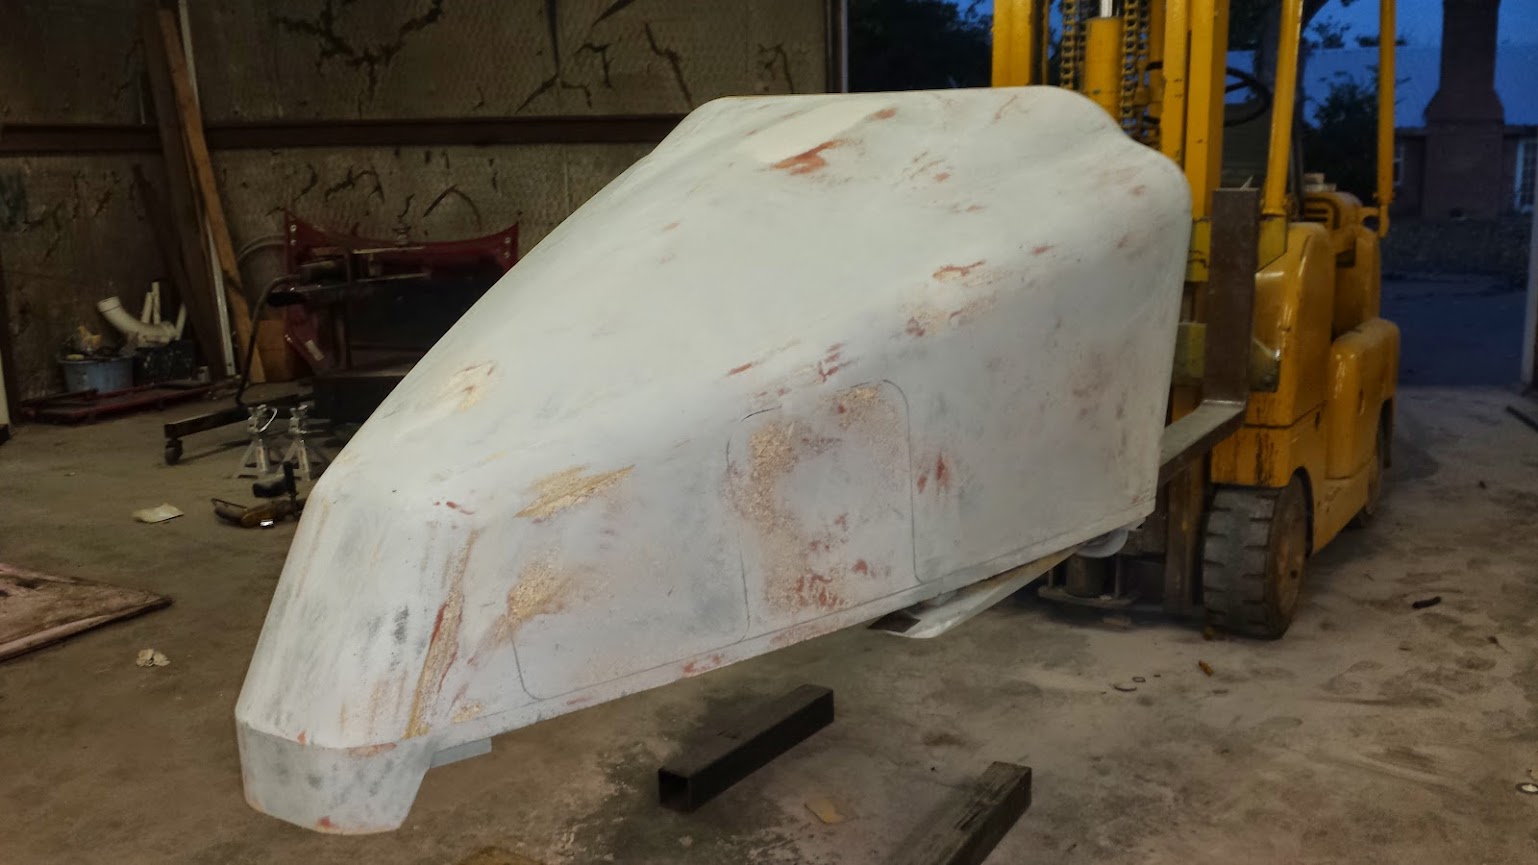
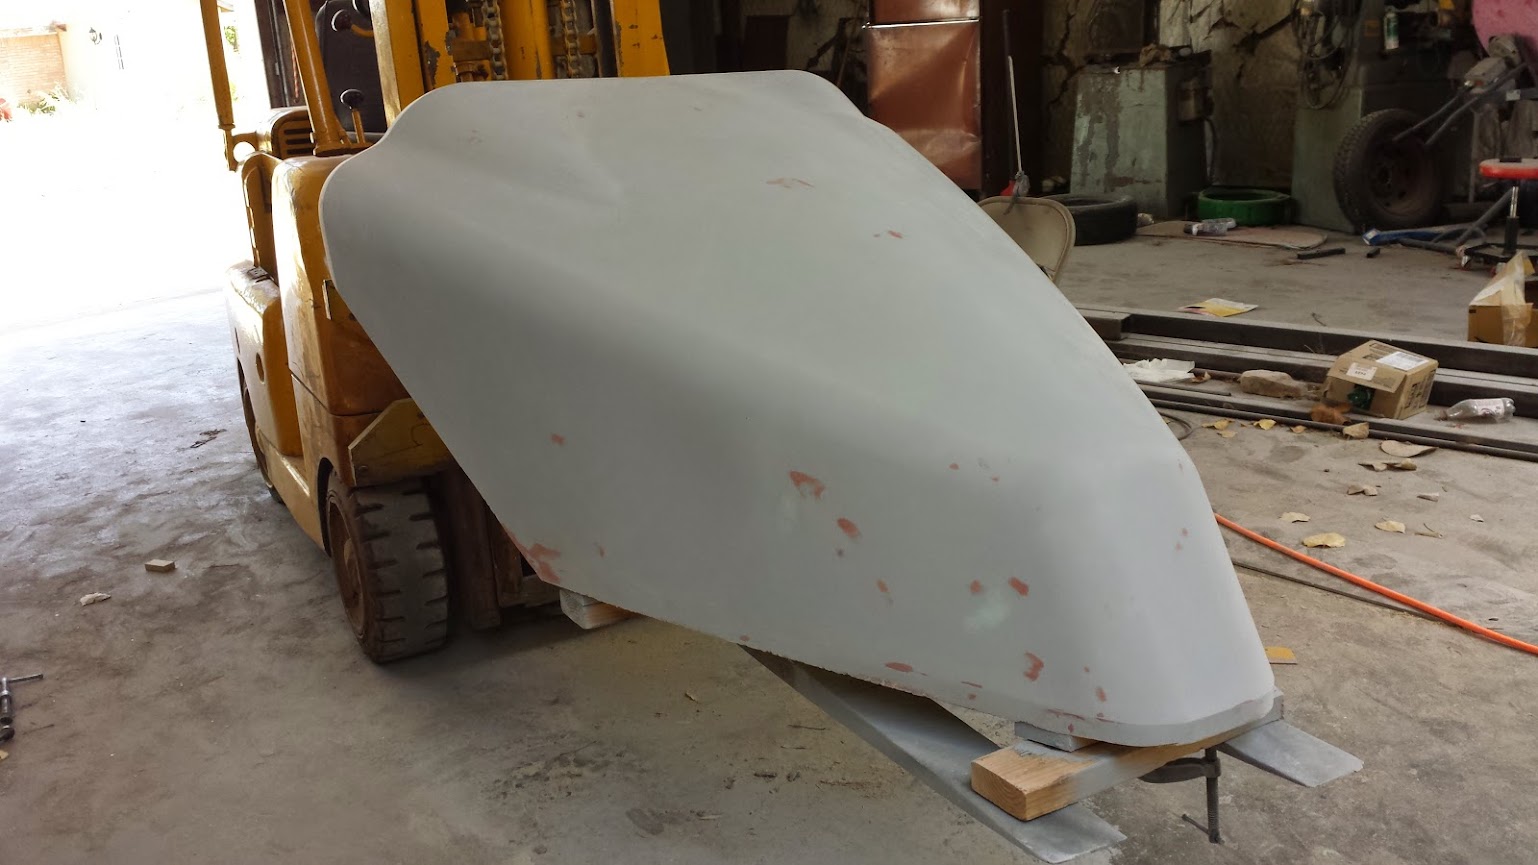
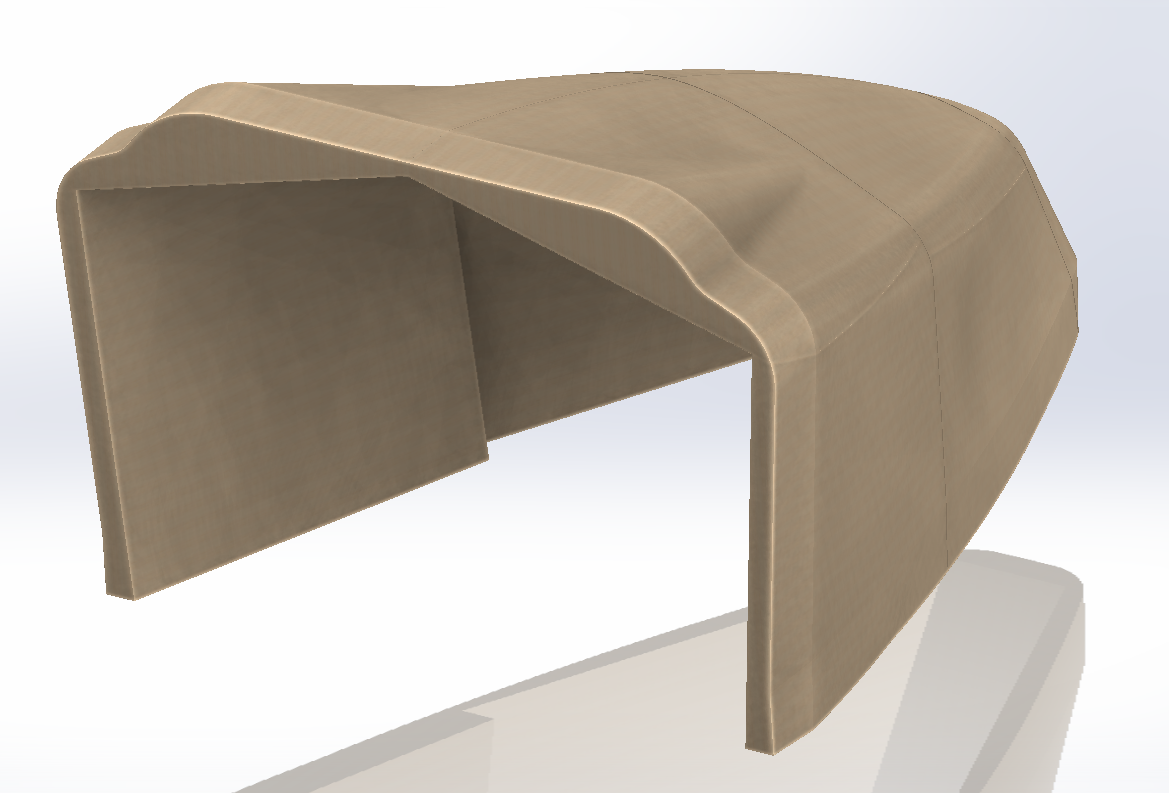
July 29 - Starting on the wood plug for the fiberglass nose

We are going to try to lay up the fiberglass nose of the car ourselves. My dad has some experience working with fiberglass on aircraft parts so we are going to do our best from what he remembers and what I can find online.

One thing we do feel confident about is making the wooden plug that a fiberglass mold will be made off of.

The first step was to fire up Solidworks and use the outside surfaces of the nose to make a model of the plug. We also split the plug into more manageable pieces. You can see the seams in the model.

Model of plug

Also, so that we wouldn’t have to deal with pieces of wood that were a couple feet thick, we designed the plug as an assembly. This makes very good use of the wood we bought.

Inside of plug model

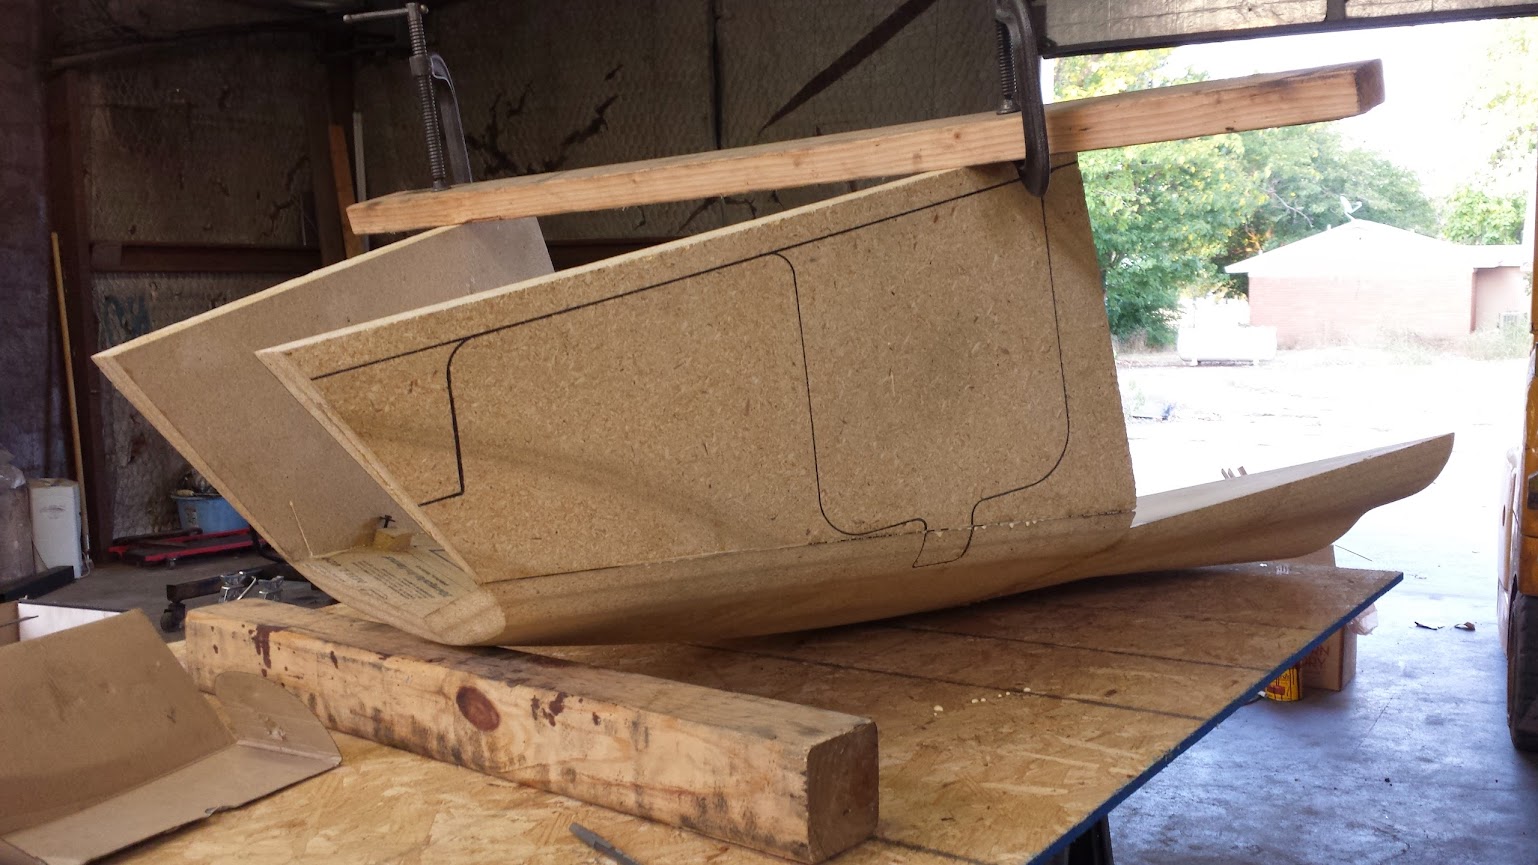
Starting with the cap that goes at the tip of the nose (because its the smallest and easiest to work with) we glued together six pieces of 3/4 inch MDF in the approximate shape of the cap. After drying, we clamped it on the CNC mill and started machining.

Cutting plug front cap

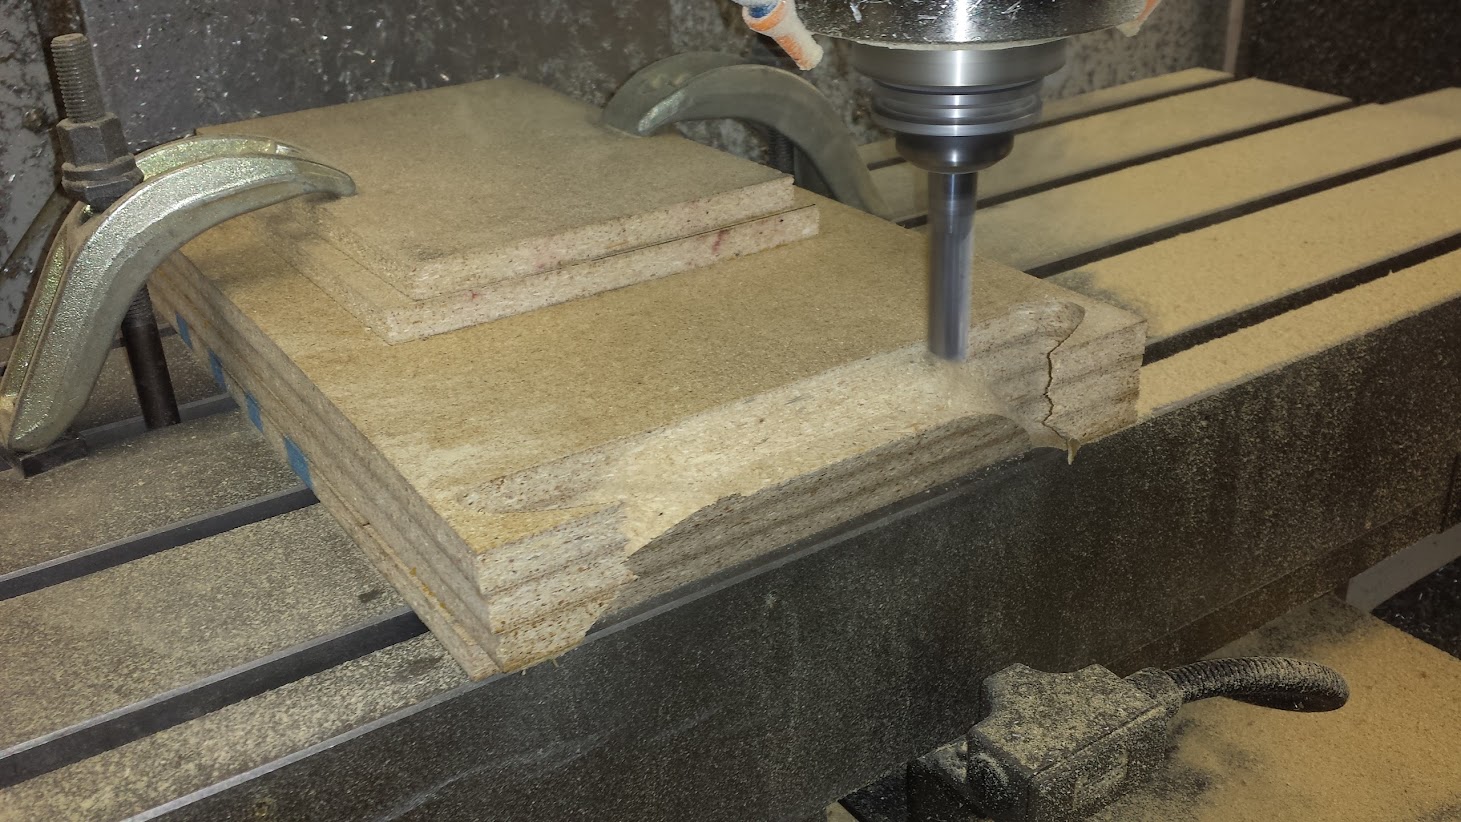
We’ve been machining a lot of stainless steel at work recently so it was interesting seeing the mill chew through something as easy to cut as wood. It is amazing how big of a bite it can take and how fast it can cut.

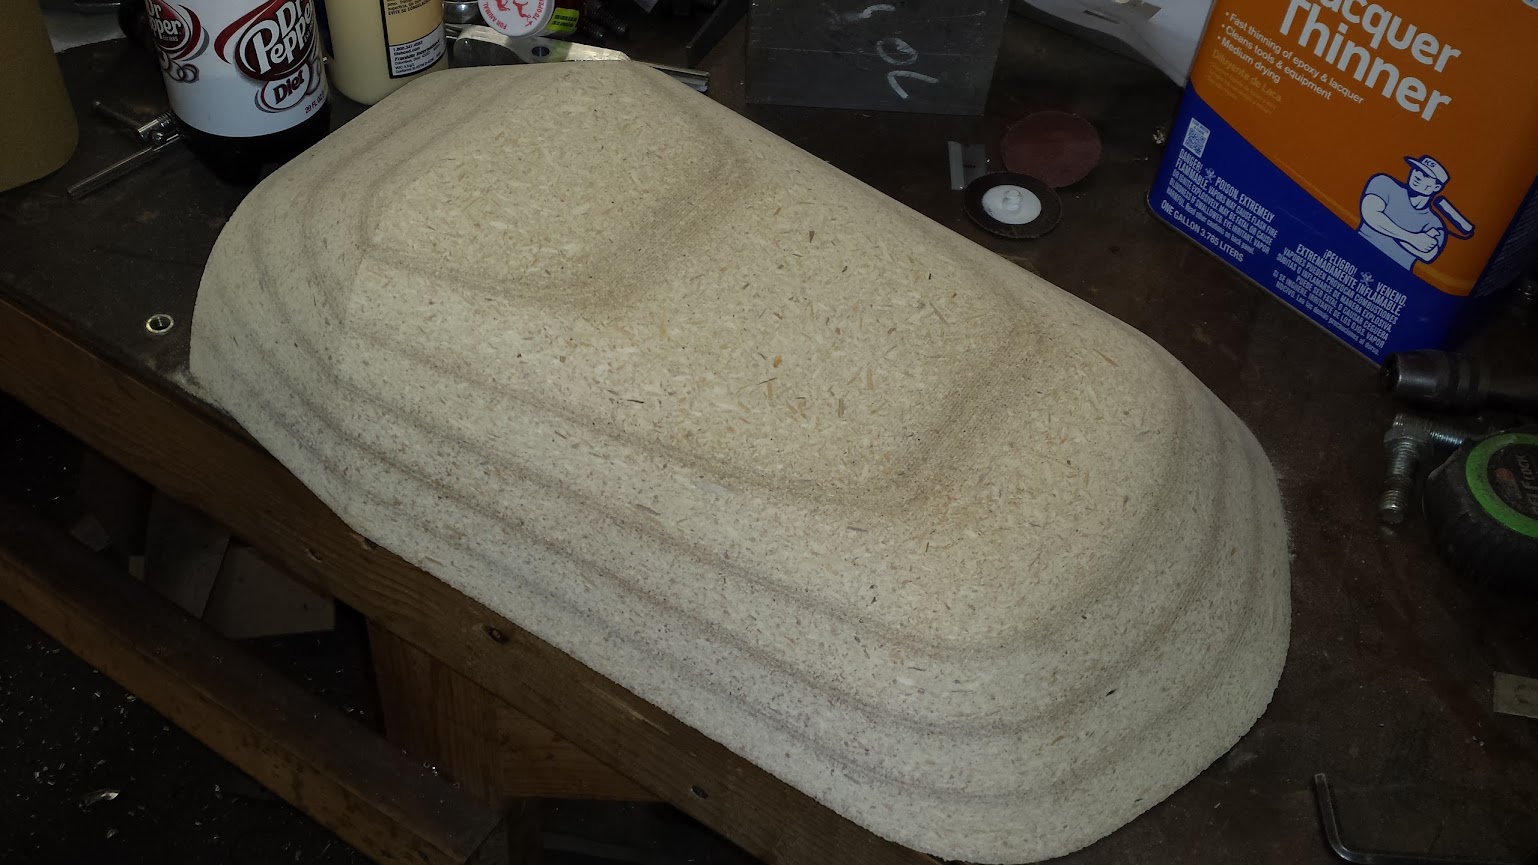
Here’s what the cap looked like after we had finished machining:

Plug front cap

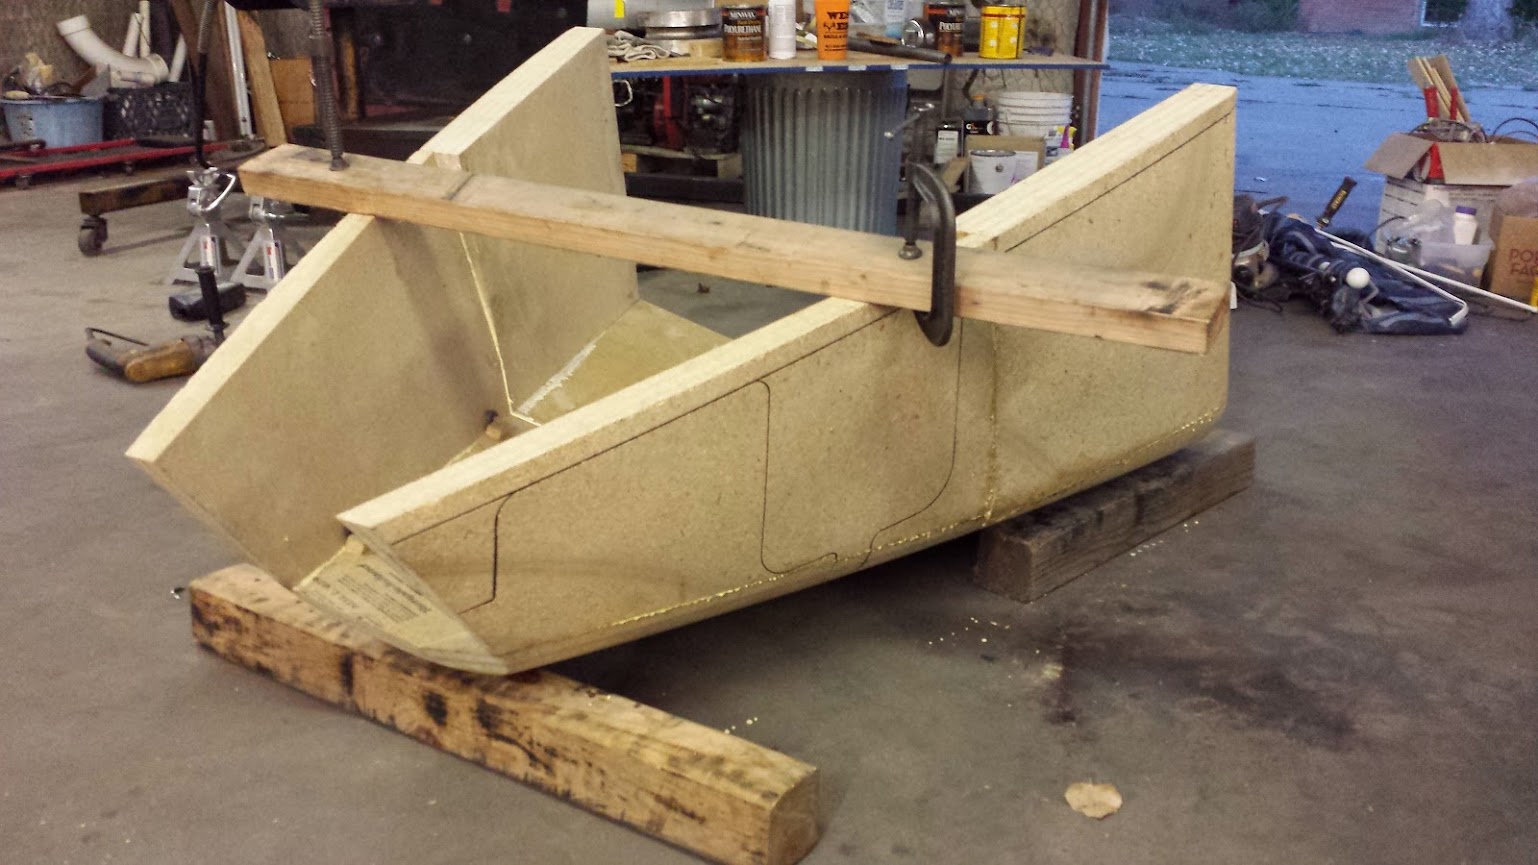
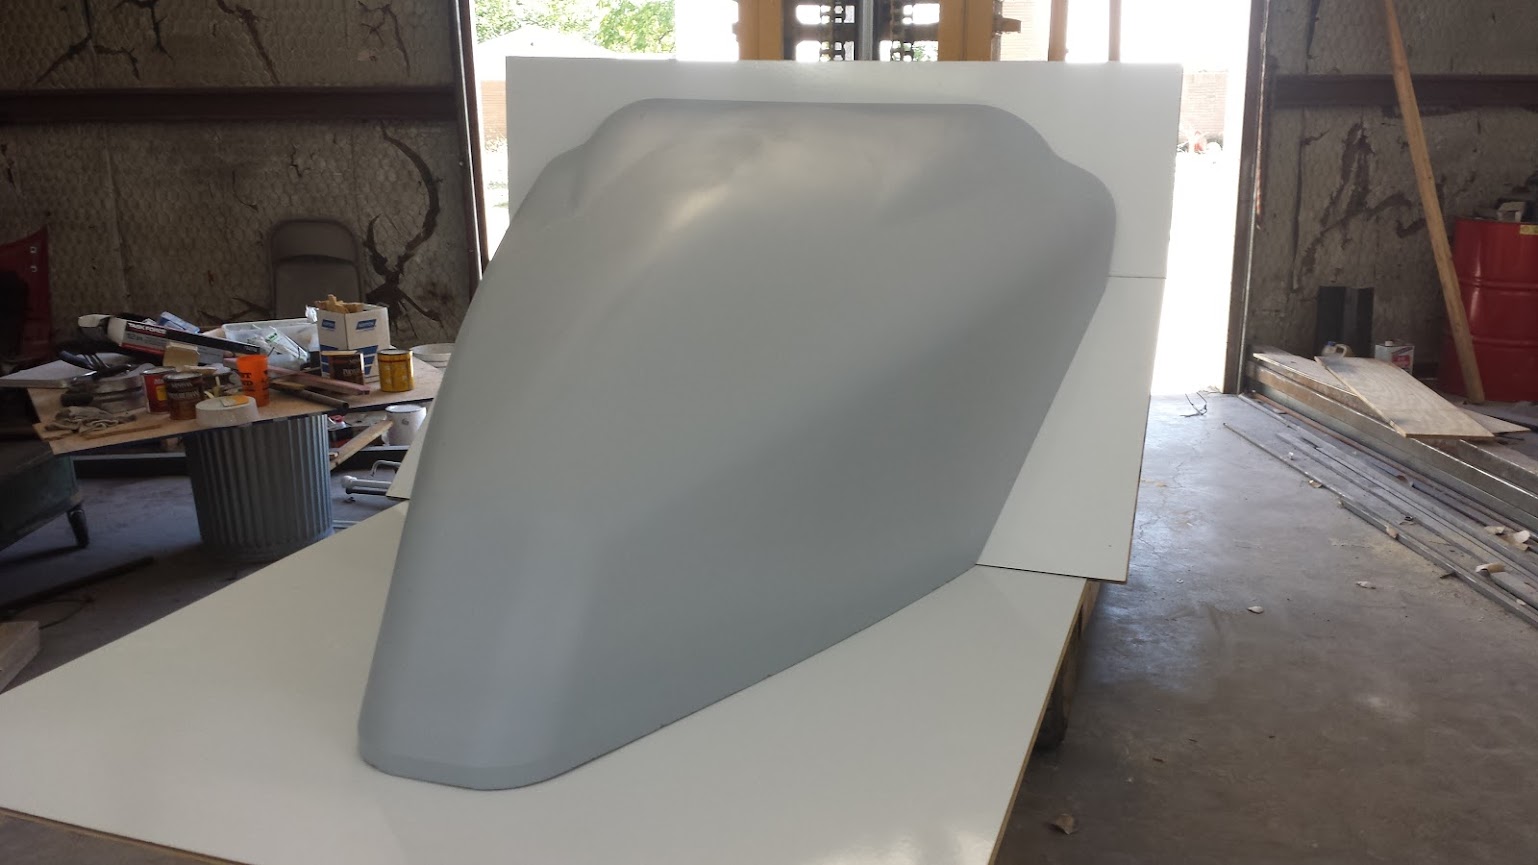
Two nights later we finished the next two pieces and mocked them up on the machine. These three were kind of the test run and we’d be getting back to cutting wood at a later date.

Three nose plug mock up

edwardh80
edwardh80 Reader
8/20/14 5:47 p.m.

Very cool. If only I had some of these toys to play with. Keep at it! Can't wait to see the finished result.

rebelgtp
rebelgtp UberDork
8/20/14 6:49 p.m.

This is looking cool! Can't wait to see the finished results

tuna55
tuna55 UltimaDork
8/21/14 6:49 a.m.

Great, now I need a CNC mill.

4cylndrfury
4cylndrfury MegaDork
8/21/14 10:30 a.m.

WOW, its really coming along pretty fast in the scheme of things. Keep at it!

beans
beans Dork
8/21/14 11:06 a.m.

So awesome.

Now build one for under $2015, show up at the challenge next year, and pimpsmack everyone into oblivion.

Wally
Wally GRM+ Memberand MegaDork
8/21/14 7:35 p.m.

Wow, really nice work.

tuna55 wrote: Great, now I need a CNC mill.

I would just find more creative ways to hurt myself

adoyle88
adoyle88 New Reader
8/30/14 6:54 p.m.

In reply to beans:

What's the challenge rules for a car like ours that is so custom? Can the car be this far from original? We would really like to attend next year if possible. We are also considering driving to this years just to spectate. It would be cool to meet some of you.

adoyle88
adoyle88 New Reader
8/30/14 7:27 p.m.

August 1 - Fabricated mirror mounts and installed mirrors

We went through many ideas on what side mirrors to mount. It would have been nice for the budget to use the stock Cobalt mirrors but they look huge next to our car. We kept our eyes open for cars with slimmer mirrors, but then it dawned on us to try out motorcycle mirrors.

It turns out, there are tons of awesome looking mirrors for bikes. We wanted a sporty, smaller mirror and looking around on Amazon, we quickly decided that a pair with turn signals built in would be great for us.

We found a relatively inexpensive pair with good ratings and two studs for easy mounting.

Mirror

We machined out and welded in some simple mounts. The mirrors bolted right on and were easy to wire up. The turn signals and side marker lights work just as they did on the Cobalt. Also, since the turn signal is a full size signal bulb, they are extremely bright.

In the picture you can also see the stock Cobalt ignition switch and the red anodized steering quickener as well as the hex that the steering quick release attaches to. Like I said earlier, don’t mind the ridiculously dirty seats. We’ll cover them later.

Now that I am looking at the photo, I also notice that I failed to mention that we got seat belts installed. They are the stock front belts from the Cobalt. The retractor mechanism is mounted securely down low on the main hoop and you can see the upper loop near the shoulder of the seat.

The following photo gives you another view of the mirror and shows off the safety device our office manager Jeff installed on the steering wheel for us. The turn signal switch is still not mounted in this photo so keep in mind that it won’t be sticking randomly up in the air.

Mirror and air bag

OHSCrifle
OHSCrifle GRM+ Memberand Reader
8/31/14 12:42 p.m.

better check that air bag. sandwich crumbs can cause problems.

/keep it coming. awesome project

johnnytorque
johnnytorque Reader
8/31/14 1:14 p.m.

what a fantastic project! love the attention to detail

NOHOME
NOHOME SuperDork
8/31/14 1:55 p.m.

Whoever said you cant have fast,cheap AND good never met you guys!

wvumtnbkr
wvumtnbkr GRM+ Memberand Dork
9/1/14 8:27 a.m.

Is the front wing on upside down? Awesome work guys!

adoyle88
adoyle88 New Reader
9/1/14 8:22 p.m.

You are correct about the front spoiler being upside down. We bought a spoiler that looked neat for the rear, but couldn't find one that fit well on the front. Most of the reasonably priced spoilers tend to have a curve that doesn't suit the front of our car. However, playing around with our rear spoiler, we found that if we flipped it over, it was easy to mount and looked good.

We modeled the spoiler and did a flow analysis to see how well it works. As you can see, with the spoiler installed, the pressure under the car is lower. The model suggests that at 60 mph we are going to have 53 pounds of downforce on the spoiler.

Since we were able to adapt the rear spoiler, the front and rear are a matched set and look really professional. And they were pretty inexpensive.

Animated comparison of front spoiler

wvumtnbkr
wvumtnbkr GRM+ Memberand Dork
9/2/14 8:11 a.m.

That would make me worry that the rear is going to produce 53 #s of lift.

It seems to me that both should be oriented in the same way.

You actually have a wing on the front. I am confused as to how it is producing downforce.

In other words, I would do some real world testing!

The car (and your work) is amazing!

Keep it up!

Rob R.

adoyle88
adoyle88 New Reader
9/2/14 9:27 a.m.

I neglected to mention one other thing we did when flipping the spoiler over. We not only flipped it upside down, we also spun it around so that what use to be the leading edge is now the trailing edge. With the spoiler oriented like this, it is less a true airfoil and more a deflector.

As you can see, the rear spoiler looks like any other functional spoiler. I haven't studied it yet though, so I will have to get back to you on its effects.

Also, if you imagine the rear spoiler slid to the front in its current orientation, you can see why it didn't work upside right and leading edge forward. The curvature of the spoiler stuck the outside points far forward of the car. It was very strange looking.

Car with new spoilers

adoyle88
adoyle88 New Reader
10/23/14 4:58 p.m.

I can't believe its been over a month and a half since I've updated the blog. Things got really busy at the shop, we visited Texas Tech University to meet with researchers that will be studying an engine my dad has been developing for longer than I've been alive (Doyle Split Cycle Rotary: info page and main page for those interested) and chunks of my weekends have gone to online classes. Unfortunately this left us with less time to work on the car and less time for the blog.

Without further ado here is the next step after we did the mirrors/turn signals.

August 5th - Headlight mounts and installation

My VW Beetle has 7 inch sealed beams and they look alright. However, holding a 7 inch headlight next to our car looked way out of place. They were just too big. We searched through the Locost forums and found that there were lots of options for small headlights, but most of them cost a small fortune. But then we found several mentions of the dominator headlight assembly from ebay.

![Dominator dual headlight](http://i.ebayimg.com/00/s/Mjg2WDQwMA==/$(KGrHqF,!iUE+OV6+tH7BQI7DLywtg~~60_1.JPG?set_id=8800005007)

This set has dual 4 inch lights in simple matte black housings. Each housing has threaded inserts on the sides, making it easy for us to attach brackets we made out of flat strap. As an added bonus, the thread size matches components on the Cobalt and we were able to reuse some of the donor car bolts. The flat brackets then bolted to mounts that we extended off of the upper shock mounts.

Headlight installed

They were easy to wire up to the stock Cobalt wiring and in no time we had fully functioning low and high beams operated from the turn signal switch. Also, because we retained the ambient light sensor from the Cobalt, the lights automatically turn on when it gets dark.

Headlights and turn signals on

The headlights seem sufficiently bright and their pattern looks acceptable. After we complete the car we'll know more about how good the lights are when/if we drive it at night.

T.J.
T.J. PowerDork
10/23/14 6:21 p.m.

Not sure how I missed this thread up until now. Love it. You guys really have gotten a lot accomplished in not a lot of time. Keep posting updates when you can.

adoyle88
adoyle88 New Reader
11/9/14 10:12 a.m.

August 7 - Building the wood plug for the fiberglass nose mold

Several posts ago we showed you the 3D model of the wooden plug we'd be using to make a mold for the fiberglass nose and the first few pieces we machined out. Since then, we machined out the rest of the pieces. That was the easy part.

The real challenge was to glue all of the pieces together with minimal mismatch. We could sand out and use body filler on small uneven areas but if something was way off, the final fiberglass nose wouldn't be the right shape.

Using a combination of clamps, straps and heavy blocks of metal, we started off by gluing the two upper rear pieces together. These pieces weigh close to 50 pounds each, which is just heavy enough to be a little unwieldy.

Upper rear wooden glued together

Next we attached the upper front pieces. They are only slightly lighter than the first two pieces so stacking them on top was a little difficult. We used a board with clamps on top to keep them in place while drying. Don't mind the glue running down, we have lots of sanding to do later anyway.

Adding the front upper pieces

August 8

After letting the glue set overnight, we put it all on a makeshift table and started to glue on the front side pieces. If you look inside the plug you can see a small block of wood attached to the inside of the top piece. We put 2 of these blocks on each side to help line up the side pieces while they glued.

Gluing in the front side pieces

At this point the plug was getting pretty heavy, so we opted to do the rest on blocks on the floor. The next pieces we glued in were the rear side panels.

Gluing in the rear side pieces

Next we glued on the last piece on the tip of the plug. We also attached strips of wood between the side pieces and rear to make the whole plug more structurally sound. Unfortunately, we don't have any photos of gluing in the front piece or adding the supports. In fact, we didn't even take a picture until after we had already started sanding, priming and filling (which will be covered in the next post). Here's what it looked like during that process:

Plug during finishing

Mr_Clutch42
Mr_Clutch42 Dork
11/9/14 9:51 p.m.

Lookin great!

TIGMOTORSPORTS
TIGMOTORSPORTS Reader
11/12/14 6:12 p.m.

This is not only fantastic work, but great photos and writing

adoyle88
adoyle88 New Reader
11/19/14 7:38 a.m.

@Mr_Clutch42 and TIGMOTORSPORTS Thanks for the compliments. I'm glad you're enjoying our build.

Last time I said that we didn't have any photos of the nose plug before adding primer and filler. Luckily, I was wrong and found some buried in my photo backups. I've included one as the starting point of this post.


August 9

After gluing all of the nose plug chunks together, we hoisted it up with the fork lift and did some initial sanding to knock down the excess glue.

Bare plug

The next step was to start making the surface of the part smoother. We first tried high solids primer to fill in some of the pits.

Primed plug with pits

This did an okay job at filling in the smaller pits but barely touched the deeper ones. We decided to block sand most of the way back through the primer and smear body filler over the nose to fill all of the rough surfaces. After another coat of primer, we sanded it back down and had a much smoother surface.

Filler and primer plug


August 21

We realized that the edge of part lines that were lightly engraved into the wood by the CNC mill would not survive the filling and sanding processes. Because of this, we decided that templates could be used to find these EOP lines later and we ended up filling the grooves completely with body filler.

After another coat of high solids primer, there were just a few small places left that we had to smear filler into.

Primer and few small filled pits


August 23

We had originally designed the nose plug to have several inches of excess wood extending down from the plug. You can see in the earlier photos that the front cap is extended and hangs below the rest of the plug. We had decided to go another route after talking to our very helpful fiberglass salesman (Billy Newsom at Composites One in Ft. Worth has been a lifesaver and we highly recommend anyone in the DFW area to contact him for fiberglass supplies and technical help).

Billy recommended that we attach a flange perpendicular to the plug all the way around. Then we would use filler to add a fillet in the corner between the flange and the plug. Because of this, we sawed the overhang off of the plug.

We sprayed on one final coat of primer before finish sanding the whole piece. Then we added a flange. In this photo the flange is untrimmed and you can see a sharp junction between it and the plug.

Final primer and flange


September 29

We had a lot going on at this point in time and didn't get a lot of free time. A month flew by with us barely getting to touch the car.

When we got back into it, we trimmed the flange a few inches from the part and sanded the glossiness off to add in a fillet all the way around the plug.

We then applied the first of seven coats of wax in preparation for tooling gel coat and fiberglass.

Waxing the plug

wvumtnbkr
wvumtnbkr GRM+ Memberand Dork
11/19/14 8:44 a.m.

MOAR!

jmc14
jmc14 Reader
11/20/14 8:40 p.m.

Great job. Love your build.

Toyman01
Toyman01 GRM+ Memberand UltimaDork
11/20/14 9:01 p.m.

Wow! Color me impressed. Outstanding project.

1 2 3 4 ... 10

You'll need to log in to post.

Our Preferred Partners
ZnX41MPVXY7fIKipfqsKwOiNzoOrKK3O6TLXZaUWTJ15PBzJhMn0prPespPC831g