


first drive... looks great
y'all made that look easy

first drive... looks great
y'all made that look easy

Congratulations. Very cool.

Wow. The car looks even better now that it runs. The job is half over. Please keep posting about all the tweaks and setup changes to get this thing settled properly. How did the brakes feel in your limited time driving?
I would think front wings would be an early order of business because the "dynamic" balance at speed with downforce could be worse than the static weight balance. Would venting the radiator from beneath disrupt airflow under the car or would it help create a low-pressure area for extra stick?

Awesome stuff. Looks like a lot of fun!
I'm impressed with how well it's turned out so far, and slightly annoyed how easy you've made it look. ![]() Fantastic stuff!
Fantastic stuff!
Do you think you'll be able to get it licenced for road use?

AngryCorvair wrote: since you've got a forklift, you can find your CG height with a set of corner-weight scales and a tape measure.
We'll definitely do that the next time we borrow the scales. It'll be useful to know the CG height.
Jerry From LA wrote: How did the brakes feel in your limited time driving?
The brakes will definitely get the car stopped in a hurry but the fronts do lock up before the rear when you really get on them. The front shocks and springs we are using seem very weak and allow the front end to really dive. If we put a shock with a higher bump rate and increase the spring rate, will the rate of weight transfer to the front be quicker and decrease front tire lock up on heavy braking?
edwardh80 wrote: Do you think you'll be able to get it licenced for road use?
We are already working on titling and registering it. We are crossing our fingers that shortly into next year we can have it on the road.
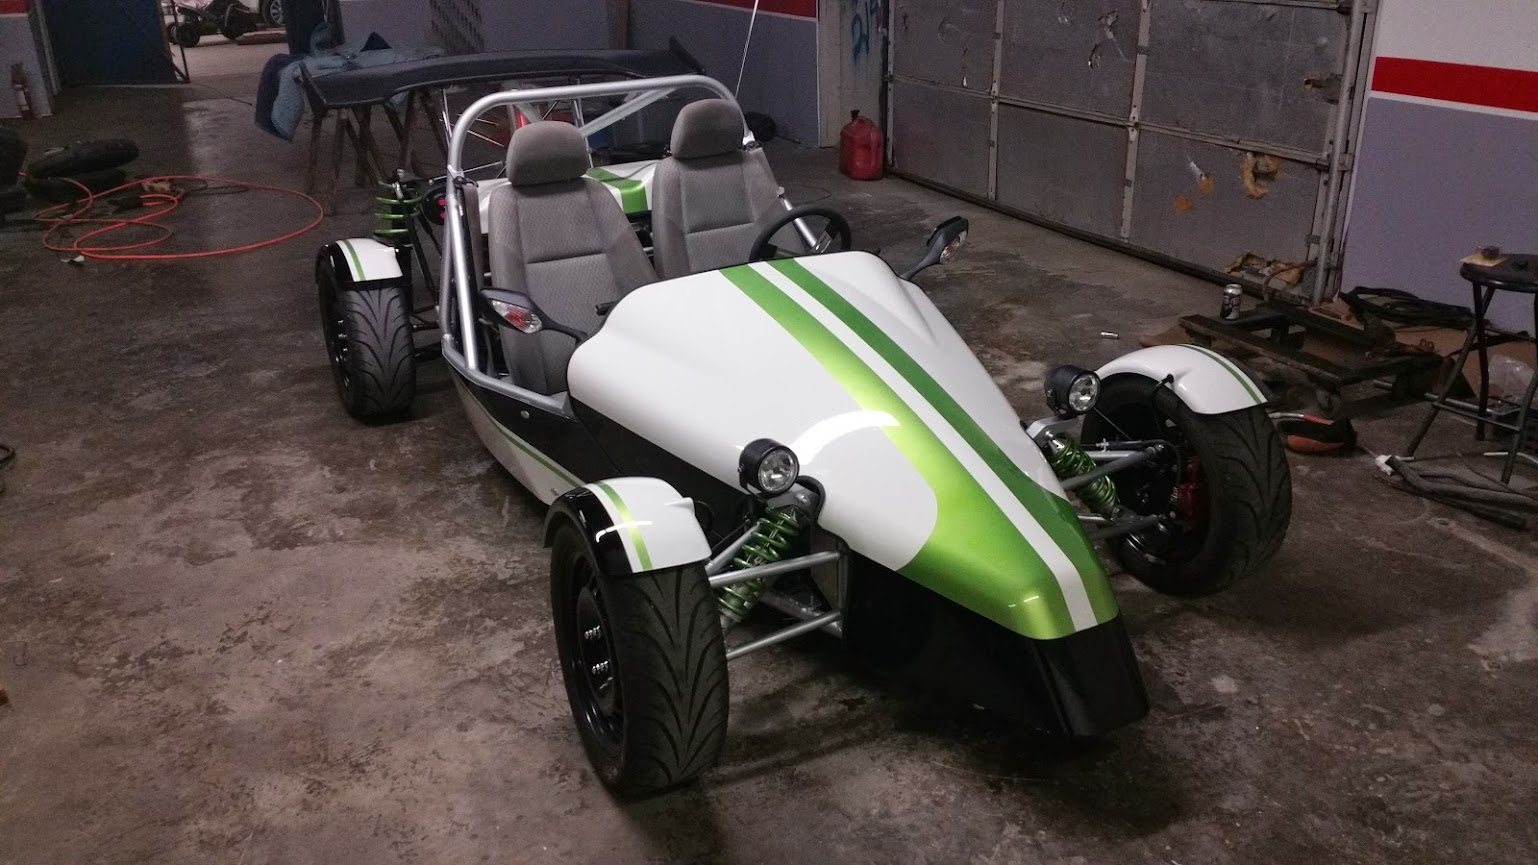
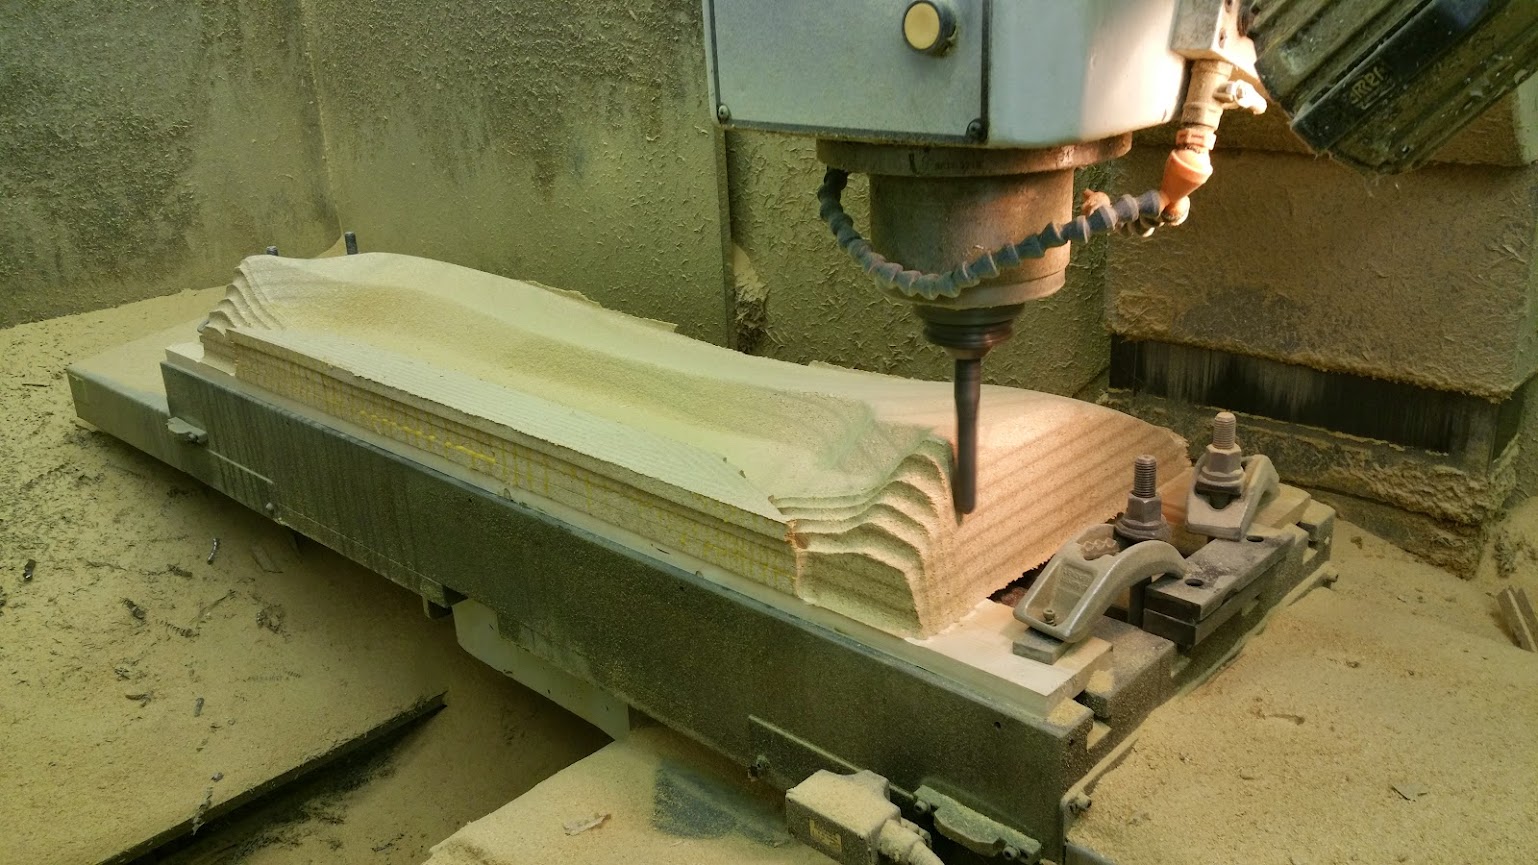
We've been quiet but not idle. Our list is getting shorter so we have been strategically taking on the toughest items first. Next on the list after getting the car driving around the parking lot was to make the fenders.
December 16
We looked at fenders of cars similar to ours and found two types: very functional fenders that wrap almost to the ground and less functional, racing style fenders that give a sportier look while passing as a fender. We decided to go with the latter style for looks and to save on material and labor.
Just like with the nose and engine cover, we started by modeling the fenders in SolidWorks. We are running 195s up front and 205s on the rear, so by designing the fenders to just fit over the rear we were able to reuse the same fenders on the front with just a little bit of over hang on each side of the tire. This saved us a lot of work as we would only need to make one plug and one mold. With the model drawn, it was time to glue some wood and get to machining.

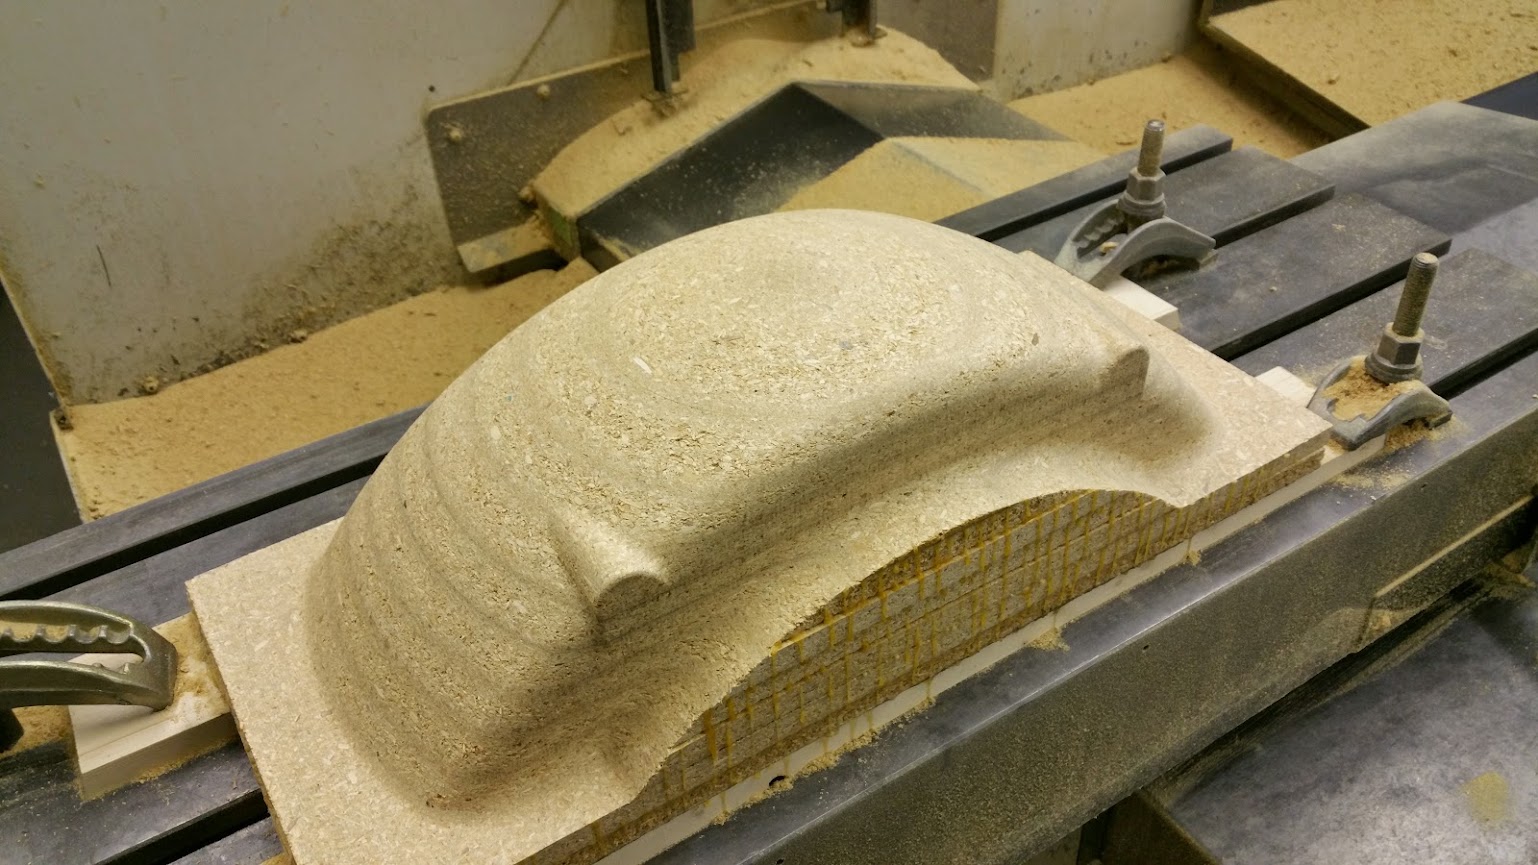
At this point on previous plugs we would smear body filler into all of the tiny pits in the particle board and sand until the surface was smooth. On this plug, we decided to do something slightly different. We slapped on a thick layer of body filler before removing the part from the machine. Then we reran the program, letting the machine clean up the filler instead of us having to sand it.


It worked out great. You can see dark bands where the body filler didn't fill anything. Those are places where the wood glue soaked out into the particle board and filled all the pores while we were gluing all of the sheets together. These areas are very smooth without filler.
December 19
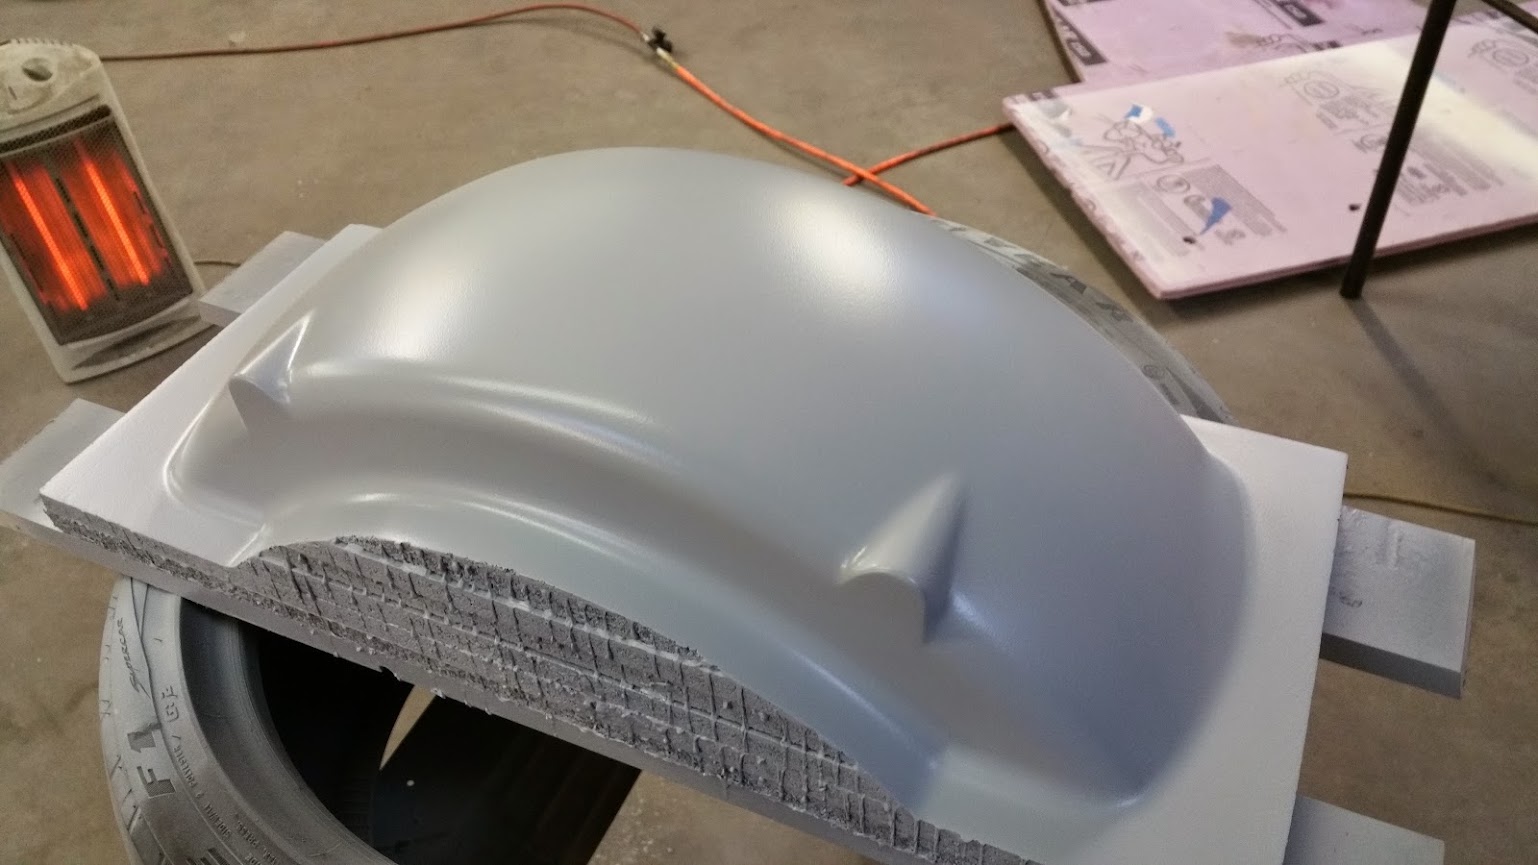
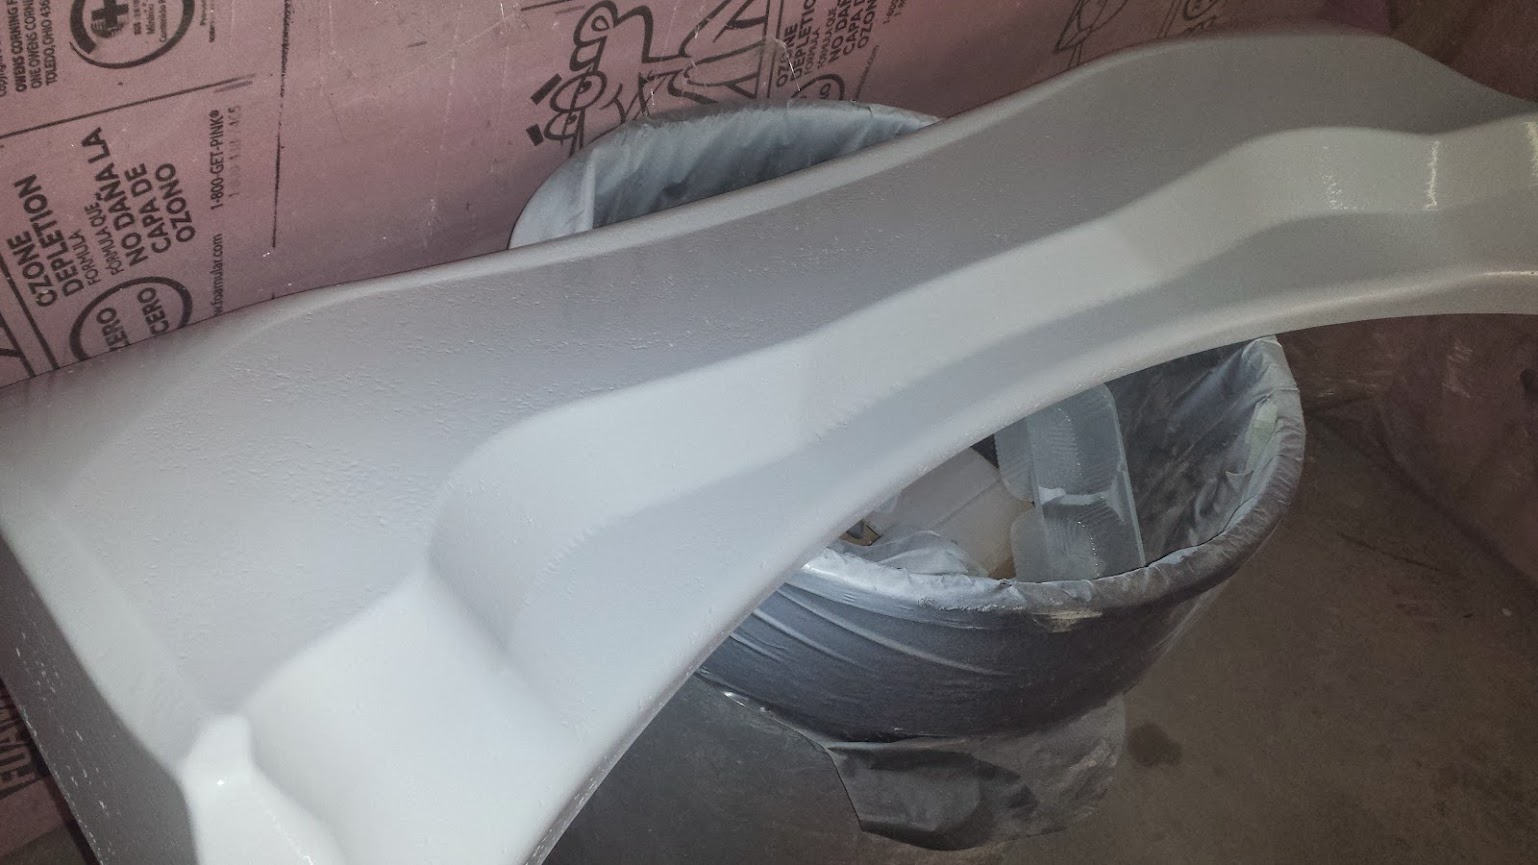
We lightly sanded the plug to knock down some fuzziness left by the tool and then primed and sanded it twice to get a very slick surface.
December 20
I won't bore you with lengthy descriptions of the next few steps since they were just like the nose and engine cover. We waxed the plug, sprayed on gel coat and applied three layers of fiberglass and resin.
December 23
Next we pulled the mold off of the plug and used it to lay up the first fender: sandable gel coat followed by two layers of fiberglass and resin.
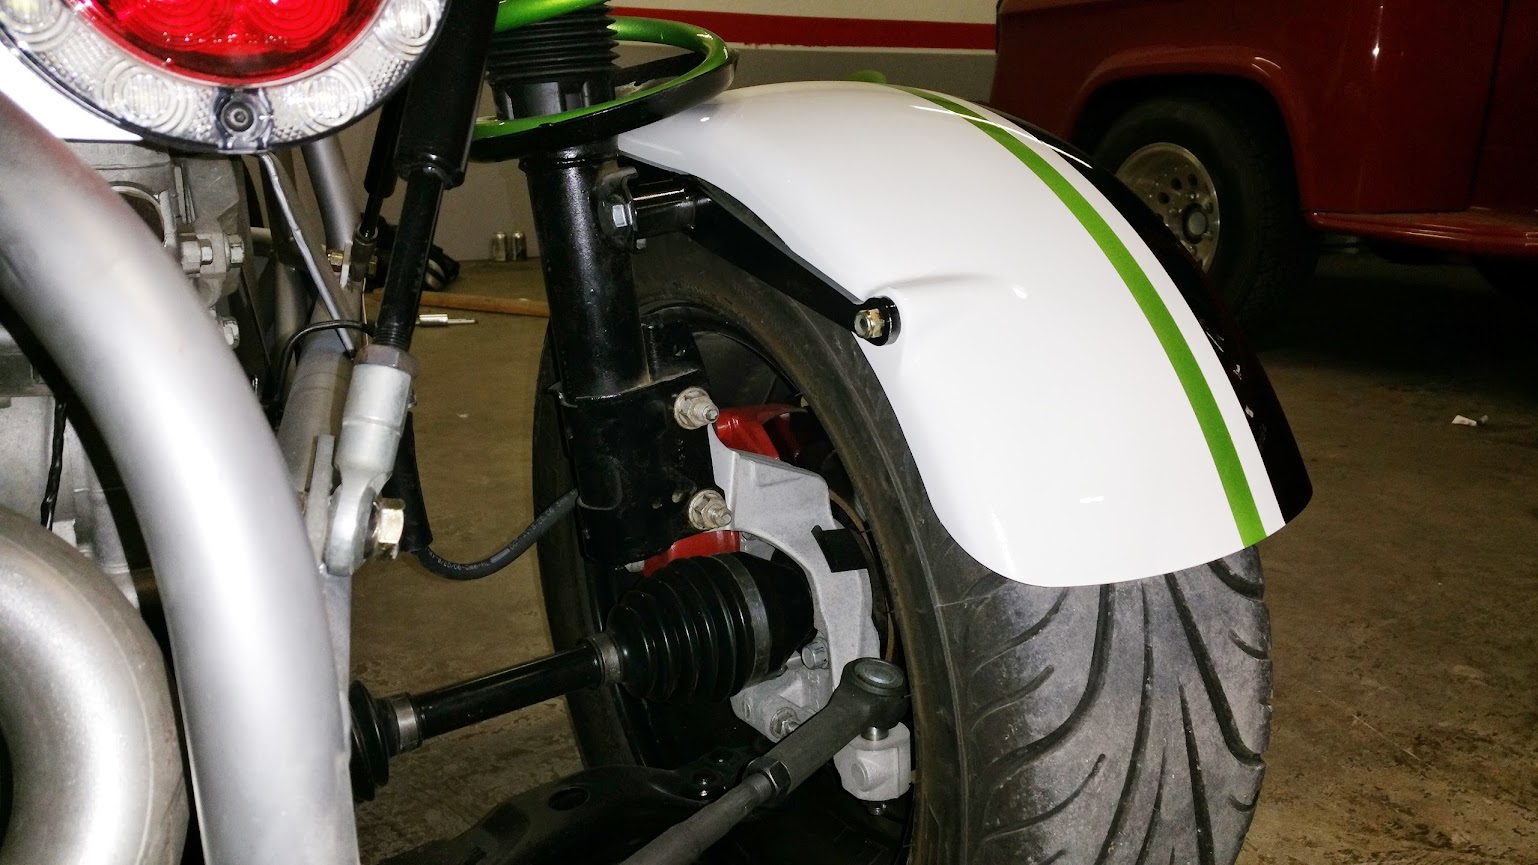
We were very concerned about ending up with fenders that flopped around while driving. To prevent this, we needed a sturdy mount that was slim enough to stay out of the way of the tire and not look awkward.
Our simple solution was to use short pieces of tube to make some mounts that would spread the load. We welded a washer to one end of the tubes, split and flattened out the other end and trimmed the area in between to fit the shape of the fender. Sounds complicated but the images make it easier to understand.


Applying a little pressure, the tubes settled into place on the wet fiberglass and held their position nicely while we laid strips of fiberglass over them.
December 24
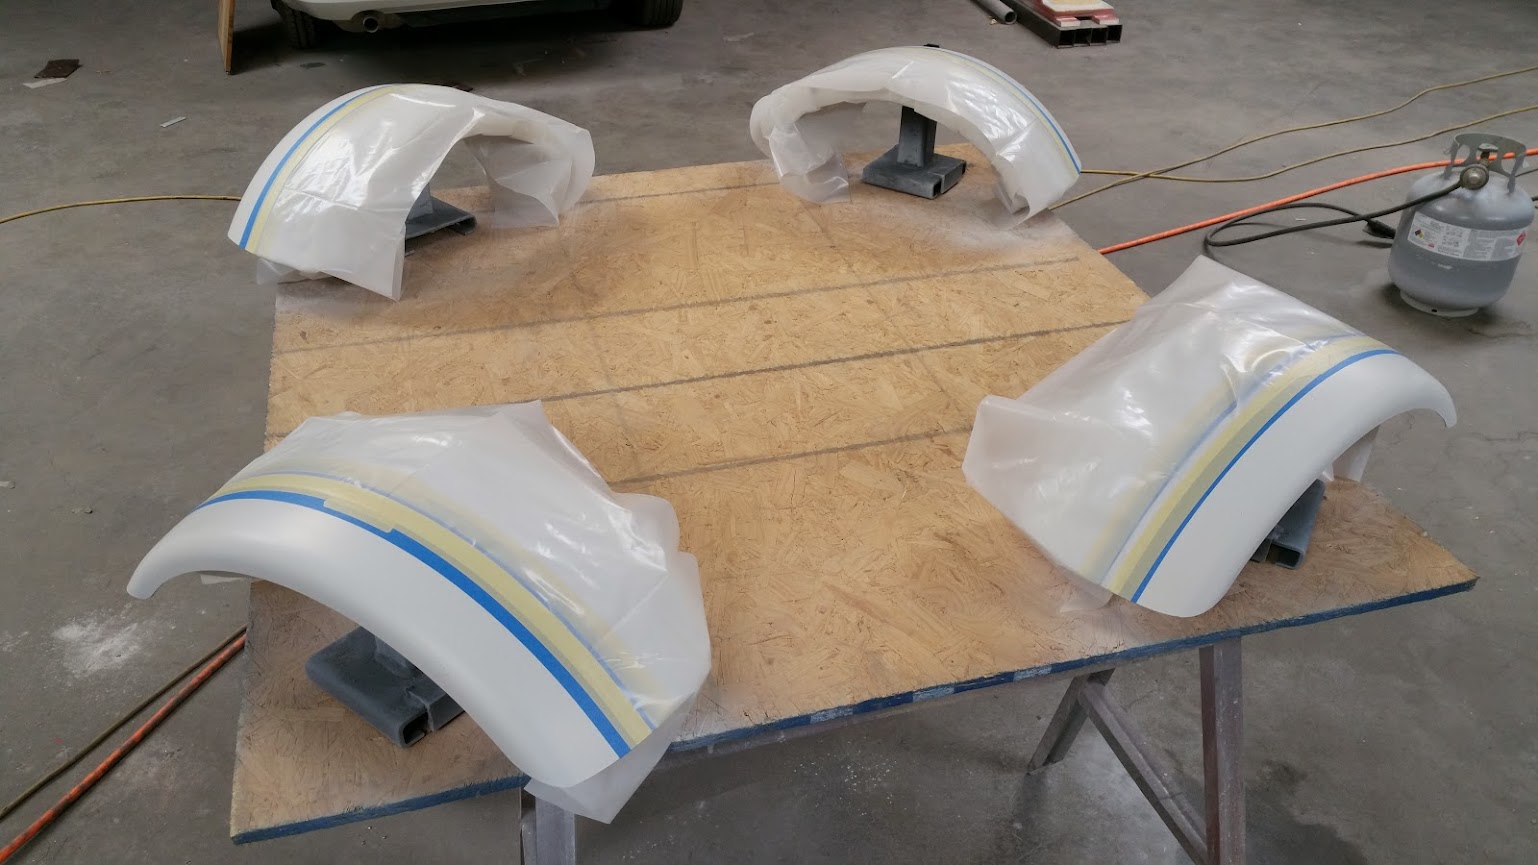
After it finished curing, we popped it out and laid up another one so that the second fender would finish curing while we were trimming and testing the first fender.
The front fender supports are made of a small plate welded to two pieces of solid round bar extending up and bending 90 degrees to meet the fender. Bolts go from the inside of the fenders, through the split tubes and into tapped holes in the end of the solid round bars.
We used the CNC mill to make plates that would weld together to make a jig to hold the front fender support assemblies together while welding. Using this jig, the front fender mounts are perfect mirrors of each other.
We bolted one of the mounts to the car and the fender to the mount. It all came out very rigid. It looks like we are going to have to work on the routing of the brake hose to prevent chafing but other than that, it all turned out great.
![Test fit the fender] (https://lh4.googleusercontent.com/-qNxRyX2sRXI/VKRgKuy63wI/AAAAAAAAYs8/zseg4_GyXh4/w1538-h865-no/20141227_104329.jpg)

December 30
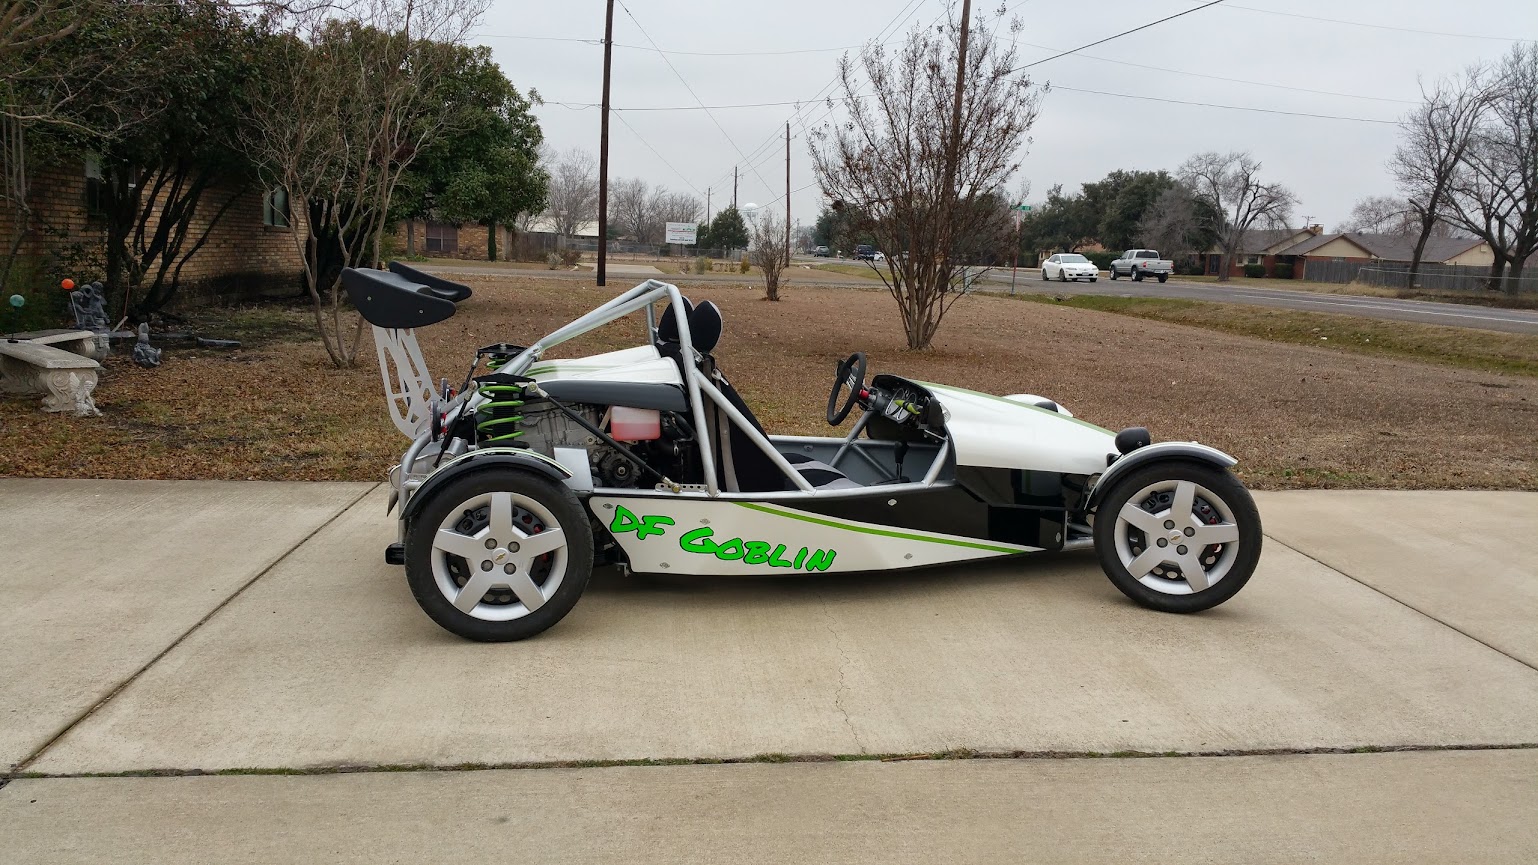
After laying up, popping out and sanding all four fenders, it was time for paint. We thought about doing simple black fenders but decided we would stick to our stripy theme.


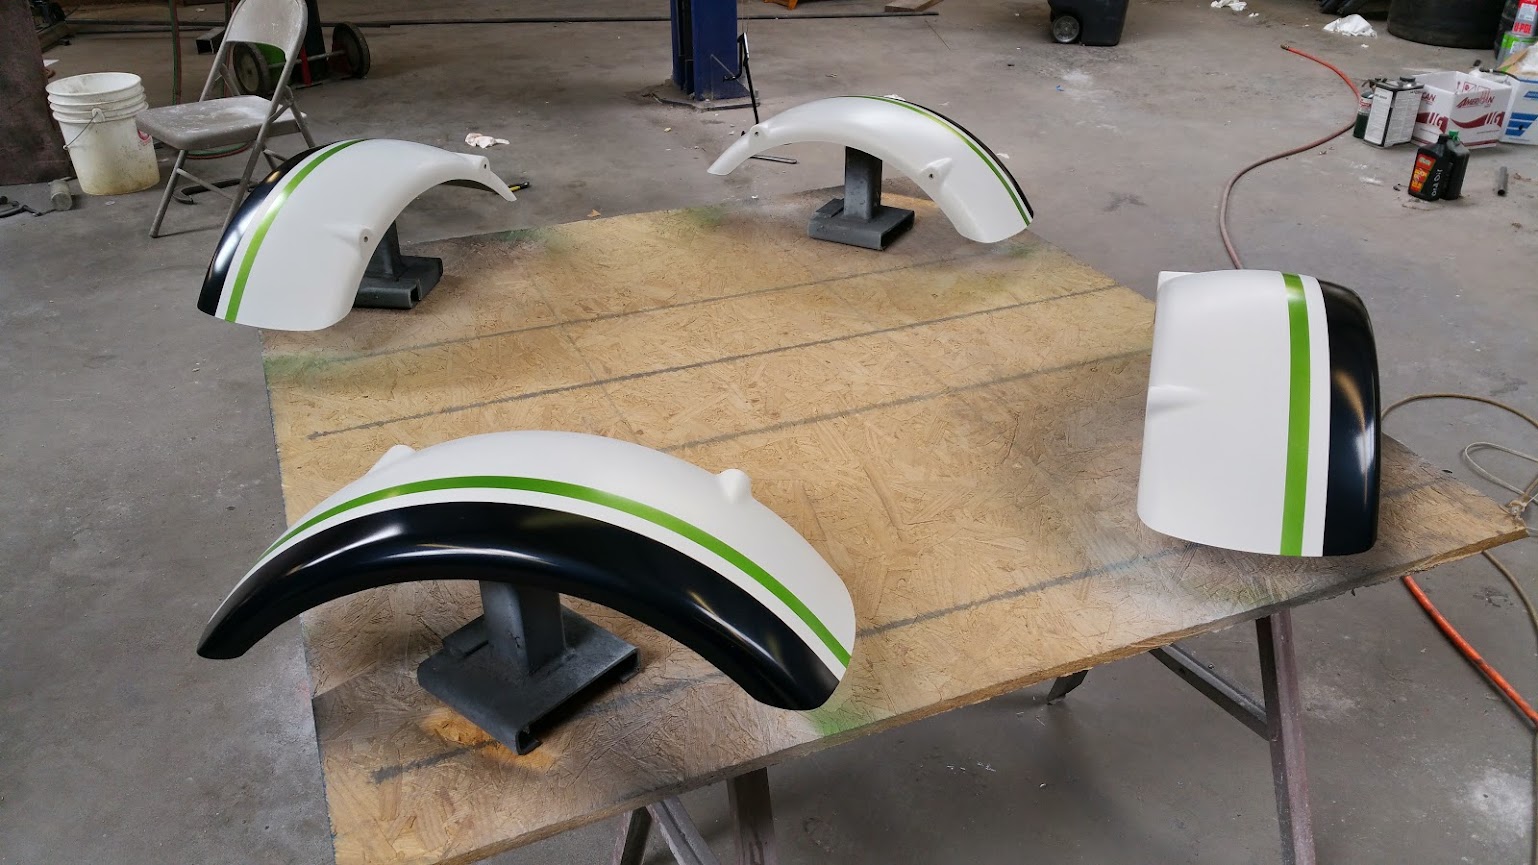

Later that night, we carefully installed them.
Here's a better view of the front mounts.

And here is the rear mount. We were able to bolt it to a plate that is on the stock Cobalt strut.
Things left to do:

Looks good. You may have issues with rocks getting kicked up and pelting you if you run sticky tires.

Add mudflaps and sell custom body parts to make your next project paid for....
Great work and quality.
Over the past few weeks we've been calculating how feasible selling kits could be. We approached the idea as if it was a job we were bidding for our machine shop.
Material cost and fabrication time are a big portion of every quote, but the largest, most time consuming step is tooling and setup. Because of this, sometimes running 20 parts isn't much more work than 10, so the 20 parts end up at a lot lower price per part.
Based on this, we have come to the conclusion that to sell our car as a kit at a reasonable price, we are going to have to dive in and go all out making more than just a few kits. This means fabricating and investing in tools, jigs, tubing benders and notchers, welders and materials.
Our next step is still to build a car for me, but now that we've decided to tool up to make kits, we are going to fabricate all of the tooling during my build. By the time we finish my car, all of the tooling will be complete and we will be ready to make kits for everyone else. Our first run is going to be ten cars.
We are still working on quotes for the body panels, lights and other accessories, but the price for what we are calling the "Naked Kit" (without body panels or lights) is coming out to $4990. You'd strip a Cobalt donor and assemble the kit to get the car driving.
Working on our car has been a ton of fun and delivering that to others sounds more rewarding to us than making aircraft tooling, so we are going to work hard to make it happen. If you have criticisms, suggestions, questions and/or comments, we'd like them all at this point.

adoyle88 wrote: ... but the fronts do lock up before the rear when you really get on them. The front shocks and springs we are using seem very weak and allow the front end to really dive. If we put a shock with a higher bump rate and increase the spring rate, will the rate of weight transfer to the front be quicker and decrease front tire lock up on heavy braking?
don't confuse body motion with weight transfer, because they are distinctly different. if your spring rates were infinity, you'd still have weight transfer, but you wouldn't have body motion.*
damping rates dictate the transient behavior, with a softer damper having a shorter transient. but damped frequency is not your fundamental issue. you've just plain old got too much front brake for the amount of front weight.
Thanks for the information AngryCorvair. I've got lots to learn.
January 10 (Today)
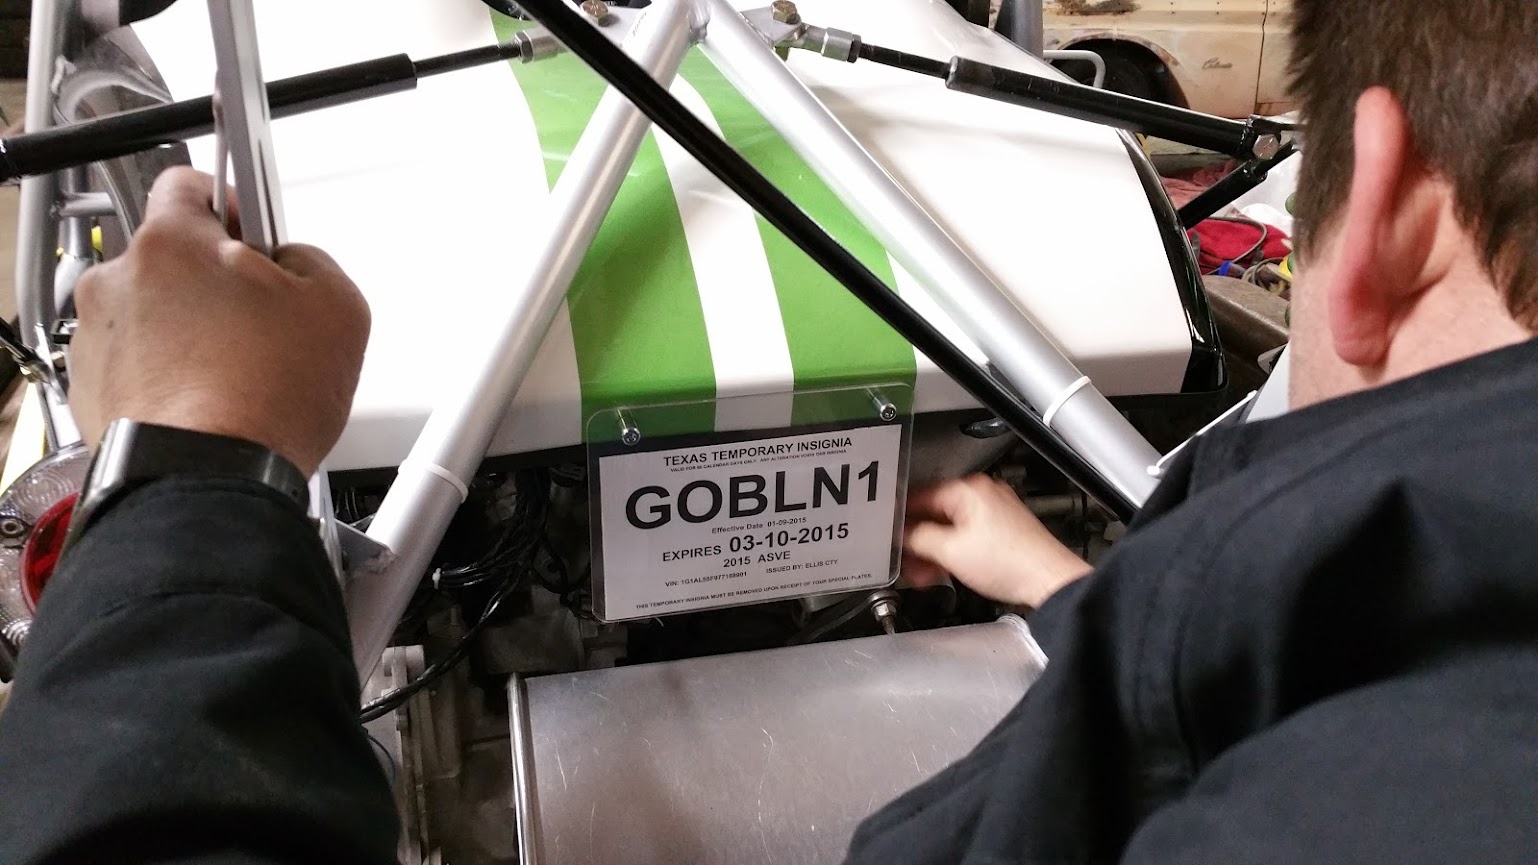
After playing ring around the county the last two days, we completed all of the steps to get our car registered as an assembled vehicle. The paperwork still has to go through the state but we are crossing our fingers it all works out.
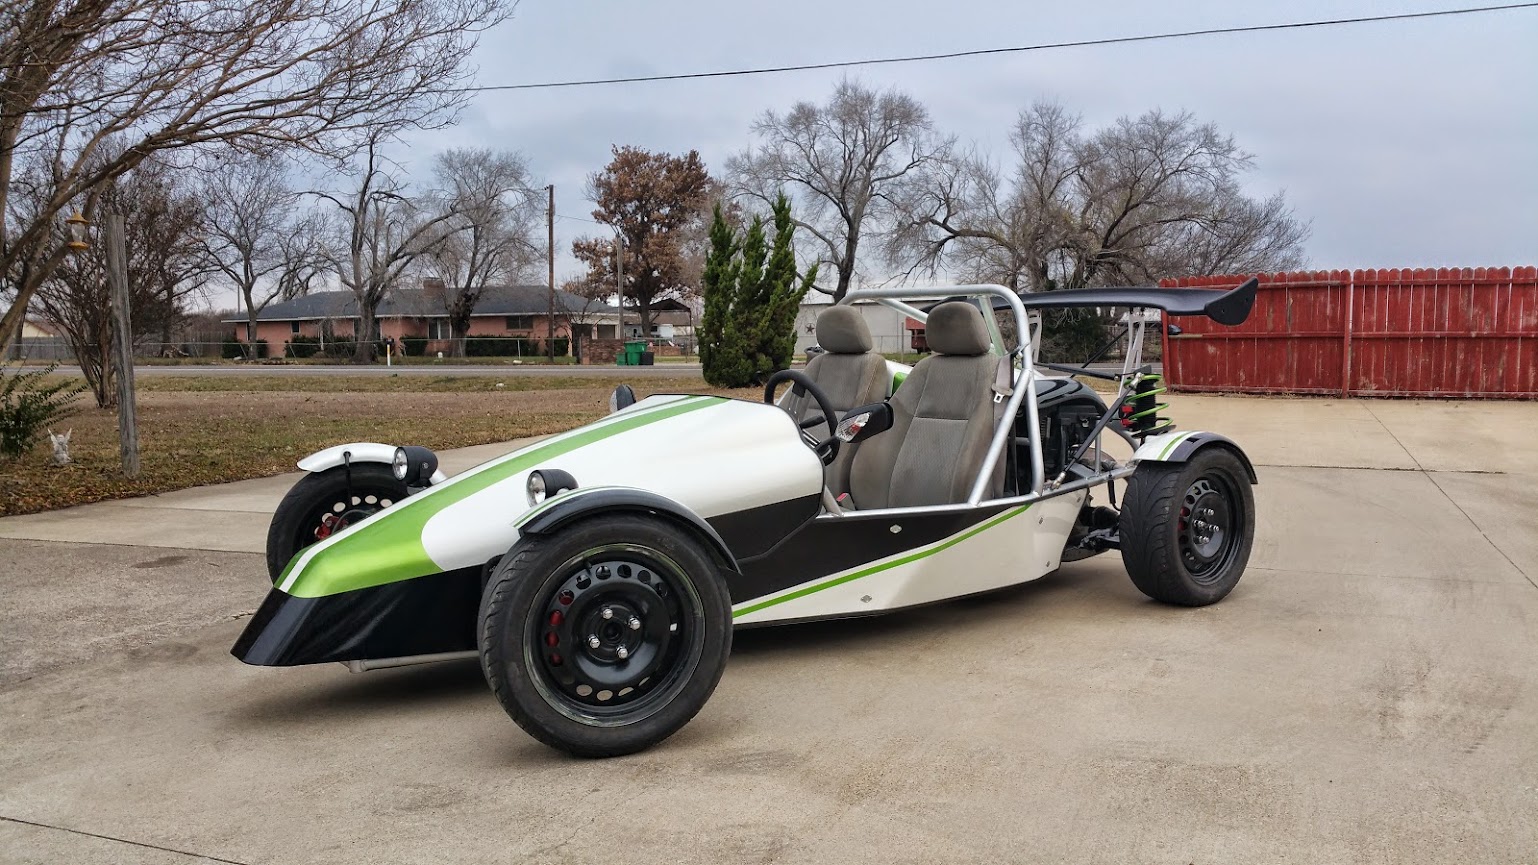
It was 33 degrees outside, but that wasn't going to stop us from taking the maiden voyage. We zipped up our jackets, slipped on gloves, popped on our helmets and hit the road.
First off we had to get fuel. At the gas station, just as we had finished fueling up and were closing the hood, a smiling onlooker approached and asked all about the car. We chatted in the cold, answering his questions. As we drove through the parking lot another man gave us a wave.
First impressions on the road: stock Cobalt power is impressive with a car this light and with quick steer and very little body roll, the car feels very sharp and connected to the road. It would be a lot nicer with warm weather though.
Through the week I spent the work hours working at my computer making a site to feature the kits we plan to sell. It is still under construction but I do have a simple landing page mocked up: dfkitcar.com
We are going to start by bending up my car and 5 others to sell. A local friend is interested in buying one to build a Cobalt SS powered car.
We remade the button panel into two panels next to the gauges. I don't have any pics at the moment so I'll take some tomorrow and post them. It really opened up the knee room.
The first drive down the road is always exciting. Congratulations.

comon no video of the first temporarily legal drive?
In reply to adoyle88:
build thread on Caliente in the background? :-)
In reply to Mad_Ratel:
It looks so gloomy right now with the sky so overcast. We will get a nice video as soon as the sun comes out (which might be this weekend).
In reply to AngryCorvair:
Good eye spotting the Caliente. That belongs to a guy named Brian Anderson, who is renting some space in our shops for customer and personal projects. The Caliente is his personal project. With us being very mechanical and not so good at freeform work, it is interesting to watch Brian sculpt body panels by hand out of metal. I'll let him know you are interested and see about getting him going with his own threads here.

The car looks incredible! Great work!
Sorry for the long delay in posting, but we've kicked the year off staying busy with shop work. However, I have been able to expand dfkitcar.com to show more info about the car and to advertise the kits we are going to be making.
I've also made a short video that gives a quick overview of the process of turning a Cobalt into the Goblin. It includes some on-board footage: Goblin overview video
For anyone in the Dallas-Ft. Worth area, we will be taking the car to the Dallas Autorama February 13-15. We'd really enjoy meeting some forum members.
So far we have put over 130 miles on the car driving it around town. Riding around in my dad's Camaro ZL1 turns a few heads but it doesn't even come close to the effect this car has. It seems like everyone turns to look, point or wave at us. Beyond that, our first impressions are:
We are currently working on a windscreen. We've drawn a contoured screen that fits to the nose and have cut out a wooden plug to vacuum form it. We did a trial run this past weekend and think that we'll have a usable windscreen this coming weekend.
Here's the plug during machining:
We are in the process of filling the pits and sanding the plug to a slick finish:
Here's a photo of the car parked at our house. We had a racing friend make the decals for us.

So I try to check back on this thread every month or so.
What I have learned is that my project is way too slow, and that you guys are ridiculous.
Excellent work.

I like the fact this is actually possible for me to get and not ridiculously overpriced. Its looking amazing and may be the next thing I save up for after I finish my current build.

This has been a great thread to watch and the car came out great. Congrats and good luck with the new business if you do start offering kits.

This is stunning, with the holidays I've some how missed all updates since the middle of December. Great to see it up and running. You have done a n outstanding job. While I hesitate to post anything but gushing praise, I did notice one thing looking at your promo video. It was hard to see looking at the rotating image of the chassis, but I'm concerned about the roll cage on the 'Track' version. The front hoop has bends out and up from the front members. That is probably a big no no for any organizing body if you want to do time trials, hillclimbs etc. I'd grab a copy of the SCCA and NASA rule books and have a look before you commit tubing to the CNC bender!
Again, outstanding job.

My favourite detail on this thing is the method for locating the top of the rear struts. If I had built this there would be 20 lb. of steel tubing welded across the back. The links are so much more elegant. Nicely done.

I feel a bit silly bringing this up in the face of so much awesomeness...
Is anyone else concerned about side intrusion? Looking at the relative height of the seat bottom and the top of the frame tube, the position seems a bit exposed to me. I recognize that a lower race seat would help, but wonder about protection from a lateral impact.
Maybe it's just me. I could be gettin' old...

This thing is amazing. Im really jealous of how easy you made it look.

In reply to Sanchinguy:
Looking at the bare chassis it's not so bad, though another higher up door bar wouldn't hurt.
You'll need to log in to post.


