Hell yah, looks good man.

In reply to 275nart :
What did you do to ensure that after all that welding the rear wheels are still pointed straight ahead?
Normally when you weld on a straight rear axle you'll get some toe in / out and camber change.
Just like you do with any fabricated pieces, move around a lot, don't put too much heat in it, and take breaks to let it cool. The axle tubing is .250 wall. It would take a lot of heat to warp it.
275nart said:Just like you do with any fabricated pieces, move around a lot, don't put too much heat in it, and take breaks to let it cool. The axle tubing is .250 wall. It would take a lot of heat to warp it.
One quick way to check is use a straight tube clamped on to each wheel. Measure front and back if they stayed the same, check for camber.
I haven't welded on a rear axle yet that didn't call for some straightening. Just weld on the opposite side and check again.
Checking now before it's too late will save you a lot of frustration.

275nart said:This is obviously a long overdue update. I was presented an opportunity to have nose and tail portions of the car 3d printed... yes, 3d printing part of the body buck! I bet this is the first time you will read that. While 3d printing full scale may not be an economic solution for building a whole car, there are a lot of opportunities to print detailed parts or molds (very quickly). I didn't even consider this earlier on in the build, because I just didn't know printing in this scale was possible. The massivit printer prints something like 1foot per hour for something of this size- it's nuts, and puts my rinky dink desktop 3d printer to shame.
While I could use these printed parts to build sheet metal panels directly from, I will be bodyworking and painting these printed pieces and pulling splash molds from them and will build the sheet metal from a fiberglass part instead.
After slicing to my liking, preparation of the model and printing was done by the sign connection in Gastonia, NC on their Massivit 3d printer and anyone who's serious about printing larger parts should definitely be talking with them.
Would you walk us through this process a bit more? Did you start this with the scans that WillHoonForFood made for you? I'm very interested in having something similar done (automotive-related but very different end application) but am unsure how to get from the idea in my head to possibly 3D printing something to then use for fiberglass molds. Thanks!

275nart said:Just like you do with any fabricated pieces, move around a lot, don't put too much heat in it, and take breaks to let it cool. The axle tubing is .250 wall. It would take a lot of heat to warp it.
Good to see this update!
It is not the heat put into the metal that causes warp or fitment issues. The problem is that metal contracts as it cools. If you lay a bead of molten metal over a gap, it will span both sides of the gap. As the molten bead cools,, it contracts. Once the molten metal solidifies, it is attached to the metal on both sides of the gap and is going to continue to shrink, pulling the metal along with it The result is a warp. Even without spaning a gap, a weld bead can exert enough force during the cooling contracting phase to bend a tube.
Never a bad idea to check the straightness of an axle after major fabrication.
Pete

What did you base your suspension design on, how did you come to the design that you did and the lengths of the links used? Suspension design always seems so intricate. Your setup looks nice and compact.
The suspension is based on the factory multi link suspension with the same pickup points.
I made some progress a while back but neglected to post. This was tedious work but it had to be done. I decided to add some gussets from the rear frame crossmember that would tie in to the strut tower area/frame rails.


Next I prepped the whole floor, top and bottom to remove any paint, surface rust, and factory undercoating.


Priming, seam sealing, undercoating


Painting the chassis, firewall and interior floor


seam sealed the interior floor for now

installing the front end and engine


Next up I AM starting on the body buck. But this project is taking a back seat for a few more months while I finish an engine swap/refresh in another car I have.

outstanding! i look forward to seeing more in a few months.


So glad to see this project making progress.

It all looks so clean, I'm not sure how to relate to it. LOL
mke said:Love it!
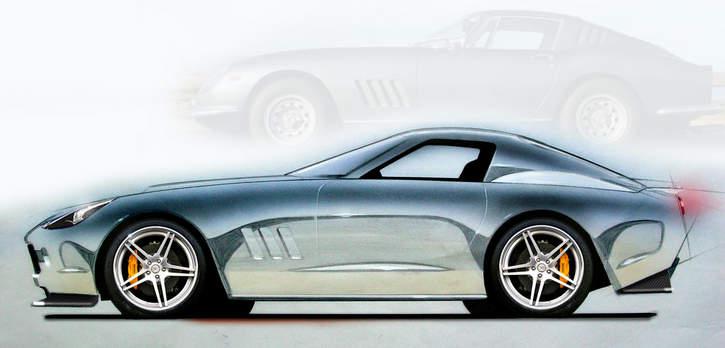
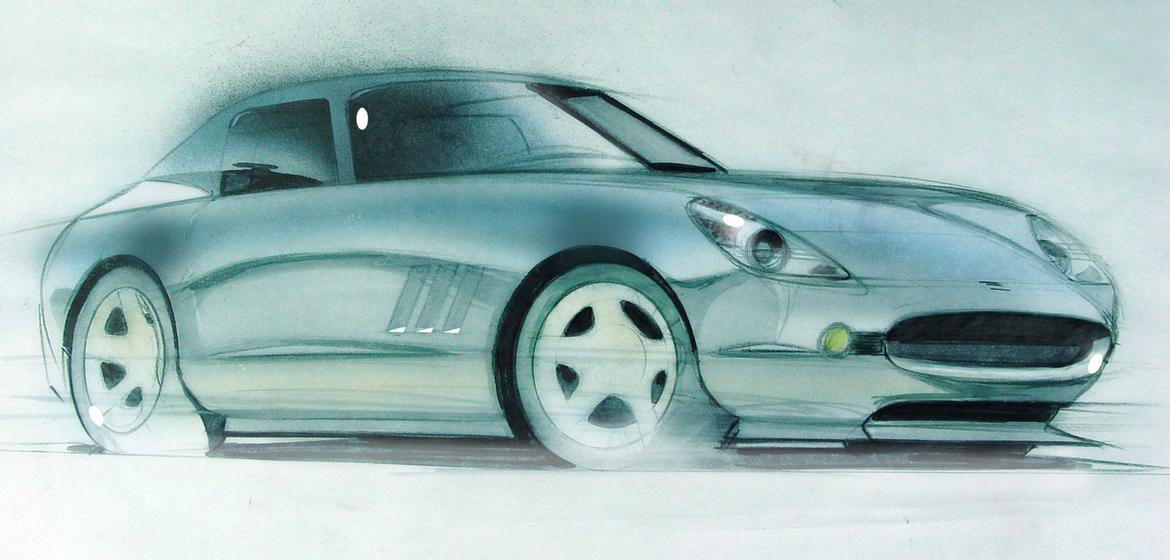
Edit: with a little more time to write my question is about the windshield and lights. A few years back i had an idea to make a modern 275gtb (small and light unlike the new stuff) and found an actual car designer interested in helping....he was really talented, this is what he came up with:
The big issue in getting it to look right though was the windshield.....he ended up using an actual 275 windshield. The other issue was the headlights, I didn't believe him and thought we could just pick something but when he did the sketches Porsche lights made it look like a Porsche and so on, the ones shown here are Ferrari California and worked pretty well. I've never had the time or really the budget to move it forward with the frankenferrari never ending but those were the design issues we ran into, hope it help you.
Not that I've ever thought about this even a little, but a person could make their own polished stainless buckets to accept universal projectors, and have a glass blower make clear lenses over a CNC steel form. Forms technically wouldn't even have to be CNC, just half decent polished.
But again, it's not anything I've ever considered before.
Thank you all! With 3d printing so main stream that is a really easy way to go for headlamp housings- just some finishing work and forming polycarb lenses with a male/female press mold. some OEM headlamp housings are so simple it's not even funny! Dodge viper for example.

Looking really good!
Are the frame rails going to be OK with seat height? they look to be running right under the seat, is head room going to be ok?
Curious what the two layers of paint are. Gray is primer of some sort so what is the black? I was assuming epoxy.
Pete
The gray is a 2k epoxy primer and I used raptorliner 2k bedliner for the undercoating directly over the epoxy. The black paint is a single stage enamel chassis black- chassis restore brand.
The factory volvo seats sat rather high, off of those same mounts on the floor but I'll be using much thinner bottomed seats so it should be a non issue there. Remember these cars were made for Swedes not Italians!

I just read through the entire thread, and I have to say the transformation is nothing short of epic. It is great to see guys who can create something new from something that was destined to be crushed. I love that you decided to utilize the Jag V12 instead of the mundane SBC. I know I will be watching this thread for sure. Keep up the great work.
Ron
In reply to mgb65 :
Not only did he save the car from the crusher, but 275nart has been very generous with people who needed P1800 tin to finish their projects. Here is a picture of the doorskin harvested from 275nart's car.

Pete
Thanks for the kind words! I think a lot of the car went to good use! I would not put an SBC/LS in anything that's not already GM... it's just been done too much. Plus that ruins the whole feel of a vintage european car. I have had a c5 and right now have a 14 camaro SS and those are what you want a torquey single cam v8 in...
275nart said:I'm still very much a beginner tig welder, but here are some shots of welds anyhow
The welds looks great. I've had a tig for many years and I don't thinkg my welds look that good.. Well done.
You'll need to log in to post.