
NOHOME
UltimaDork
12/20/17 11:06 a.m.
With the decision made and the dash in place. Time to get it attached to the car.
Turned out to be simple enough in concept, but fussy in execution.
The four bolts that attach the dash to the tunnel were easy; already there and no change.
The ones on the side that you see with the door open, needed some simple brackets made up.

Simple enough bracket once you figure out the angle and how to get it in place up behind the dash.

Notice that the bracket is not yet welded to the a-post. This is going to be world class PITA place to have to strike an arc. The upper bracket is even worse. In order to get the picture I stuck my phone blindly behind the dash and just took pictures until I accidentally got a good one. Might be doing the same when welding this in. I would trace it and remove the dash, but I don't think that this will tolerate much misalignment and that does not seem like a positive location method.
Someone suggested this as a dash treatment and I have to say that I kinda like it. No place to put the radio and heater controls, but I like it. And he has the same MOMO prototype that I plan on using.

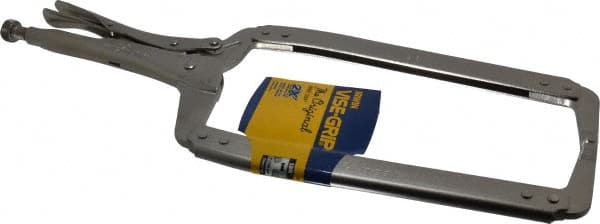
Do you have this type of vice grip and will it reach up in there to clamp the bracket to the A-post?

Ian F
MegaDork
12/20/17 11:49 a.m.
Mark the hole in the bracket on the sheet metal. Weld a threaded stud to that location. Loosely mount bracket to the body. Mount dash the bracket. Use U-shims to make up the difference between the bracket and body before tightening.
Blindly point a spray can at it and give it a brief shot. Align the bracket with it's own outline.
Just use the picture you posted as a guide?
NOHOME
UltimaDork
12/20/17 12:24 p.m.
All I need is a good tack to hold it in place. I think I can use the stick-out from the gun to feel the edge of the bracket and then give it a good zap of hot steel.
The other option is to use the bore-scope with the Minion telling me if I am close and hitting it with a tack that way.
Somewhere I saw a video of a guy tig welding behind a post using a mirror...My Hero!
Pete
I've used a mirror exactly once. And it worked!
The mirror was donated by Mrs Sparkydog without her actual knowledge of it. I used one of her little cosmetic mirrors that looked to me like it didn't have much of the powder goop left in it. I am glad I chose this strategy because the splatter from the welding trashed the mirror.
Couldn't you also drill a hole from the front and just spot weld it in place?
NOHOME
UltimaDork
12/20/17 4:54 p.m.
BirgerBuilder said:
Couldn't you also drill a hole from the front and just spot weld it in place?
It will be welded to the a-post via the hole in the bracket. AND all around the prerimeter.
Yo NoHome not down with the minimalist dash treatment, but hey your party...more partial to the BMCwoodgrained presentation....considering the age of the shell ...
In reply to NOHOME :
Right, but I thought you said that you just need to tack it? If you drill a hole in the A-pillar you could tack it from the front side, then unbolt the dash and weld it in permanently?
Slather some hot glue up in there to hold it while removing the dash?
NOHOME
UltimaDork
12/20/17 6:59 p.m.
bluej said:
Slather some hot glue up in there to hold it while removing the dash?
That is not a bad idea. I could use some epoxy to hold it in place and then weld it with the dash out. The only issue with that is that I worry about how weld moves everything around as it cools.
I will get out there tomorrow night and see if I can do a bit of braille welding.
Ok so i'm not nickB tonight , but if i'm looking at this correctly why not sharpie the bracket outline, remove ,tack, repeat etc.....or do I need to go to my room..NOW!!!?????
Note to self:
Self,
Mount dash before painting engine bay and installing motor.
You may need to cut access holes.
-Self
NOHOME
UltimaDork
12/20/17 8:38 p.m.
In reply to 759NRNG :
The thing is that there is zero wiggle room if the bracket moves. Pretty sure I can tack them.
You say zero wiggle room, I say you need some adjustability.
Me thinks you need to bolt your brackets to captives.
Edit: Don't you have a spare dash to sacrifice? Cut an arm/peep hole.
Drill a hole in the A pillar and plug weld to the bracket, then remove the dash and fully weld bracket in place?

JoeTR6
HalfDork
12/21/17 6:48 a.m.
I've used sheet metal screws and pop rivets to temporarily hold stuff together for alignment before welding. Remove when done and fill the holes with weld.
Ian F
MegaDork
12/21/17 6:55 a.m.
NOHOME said:
In reply to 759NRNG :
The thing is that there is zero wiggle room if the bracket moves. Pretty sure I can tack them.
If you have zero wiggle room, why are you so insistent on welding the brackets to the body? This seems conflicting.
Pete, could you get up in there with a stick welder to at least tack the brackets in place? The stick would give you a foot of reach and doesn't even need to be straight. I've seen guys bend the electrode where needed and then cover the area with missing flux with electrical tape. You'll need a fresh rod for almost every tack though.
Welding through a mirror works. Your brain will hate that your hands aren't moving the way it thinks they should, but this isn't as big a deal for tacking vs running a bead.
NOHOME
UltimaDork
12/22/17 7:54 a.m.
Was not nearly the ordeal that I expected. Traced it with a sharpie. Removed brackets one at a time so I could wave a roloc disc in the general vicinity until the sharpie mark was gone, re-installed the bracket and used the wire to feel for the edge of the bracket. Pull trigger. Repeat until I got a few tacks on the bracket.Repeat three more times.
Not the prettiest welds since I did blow a few holes in the thinner body metal trying to weld the 3/16" brackets to the thin tin, but the brackets are on good and solid and the dash fits. So, bit line across the line item "Attach Dash to Car".

Now I can move on to buttoning up the two cowls. At the moment, there is a gap between the Miata and Volvo inner cowl. Time to beat and bash and run the hot glue gun over the joint.

DS after beating and welding.

What I have left is this hole where the wiper action needs to occur. While I now have a pretty good idea of how I WANT the wipers to work, if I told you that was finalized, I would be lying.
I have found that the key to these kind of builds is to get comfortable with every step forward needed 1.95 steps backwards. A few nights ago I was sitting in the car behind the instrumented dash admiring the whole view, and now it looks like a war zone again. I know it is progress, but it sure does not look like it.
Pete
Yup -- death by a million details....
NOHOME said:
I love This. Call it resto mod, neo-classic, whatever. Looks great. I think simple and clean, and it will fit in nicely with the exterior.


