Not sure how I missed the swap so far but it looks amazing!
You mentioned getting the engine/trans mounts from someone in PA, does that person have a website or contact info you'd be willing to share? I really like that they use stock isolator mounts, the more OEM parts you can keep on the car IMO the more road trip worthy it becomes vs trying to source custom 1-off swap parts.

RossD
UltimaDork
12/16/16 8:33 a.m.
Great work! Looks like it could have been there from "birth".
Looks well thought out and nicely done! Thanks for sharing.
Thank you all. Yes, These in my opinion are the best out there in terms of mounts. I'm using the Bimmerworld Group N Isolators. I do not expect a whole lot of NVH from this once we are done.
Guys name is Chuck. Here is his site. Great guy. Very friendly
Link
Eager to get my car completed and get some road test seat time in because I'm pretty sure my car will be the first car completed with Chuck's mounts. His car is nowhere near completion at this point and I think he's only sold one other set of mounts and that person hasn't started their build yet.
Not sure how I missed the swap so far but it looks amazing!
You mentioned getting the engine/trans mounts from someone in PA, does that person have a website or contact info you'd be willing to share? I really like that they use stock isolator mounts, the more OEM parts you can keep on the car IMO the more road trip worthy it becomes vs trying to source custom 1-off swap parts.
I shared his link above. Thank you. We are building this with service in mind down the road. I don't want to have to hunt down one off parts down the road. I'll try and get some more installed pics of the drivetrain as well. Everything is also designed to come apart easily as well.
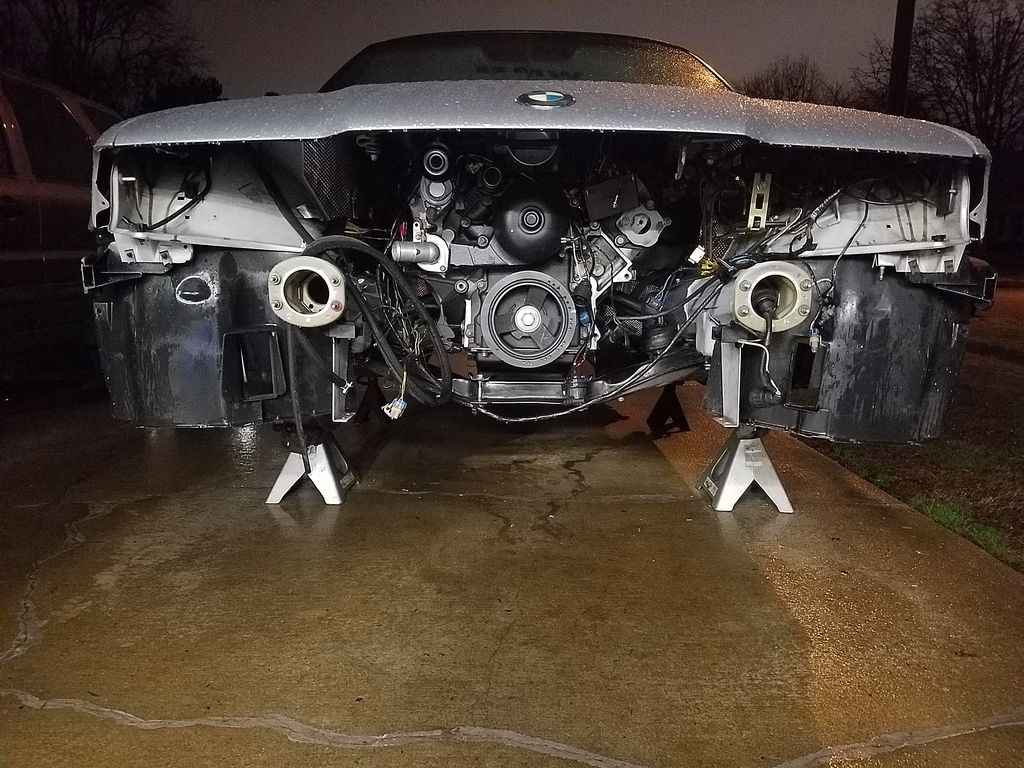
Been busy with past holidays and not much time lately on it due to spare time and weather but finally got some more time to make progress on the swap.
Did a 2nd test fit to check trans tunnel clearance and all was great so pulled it back out and prepped the engine bay.
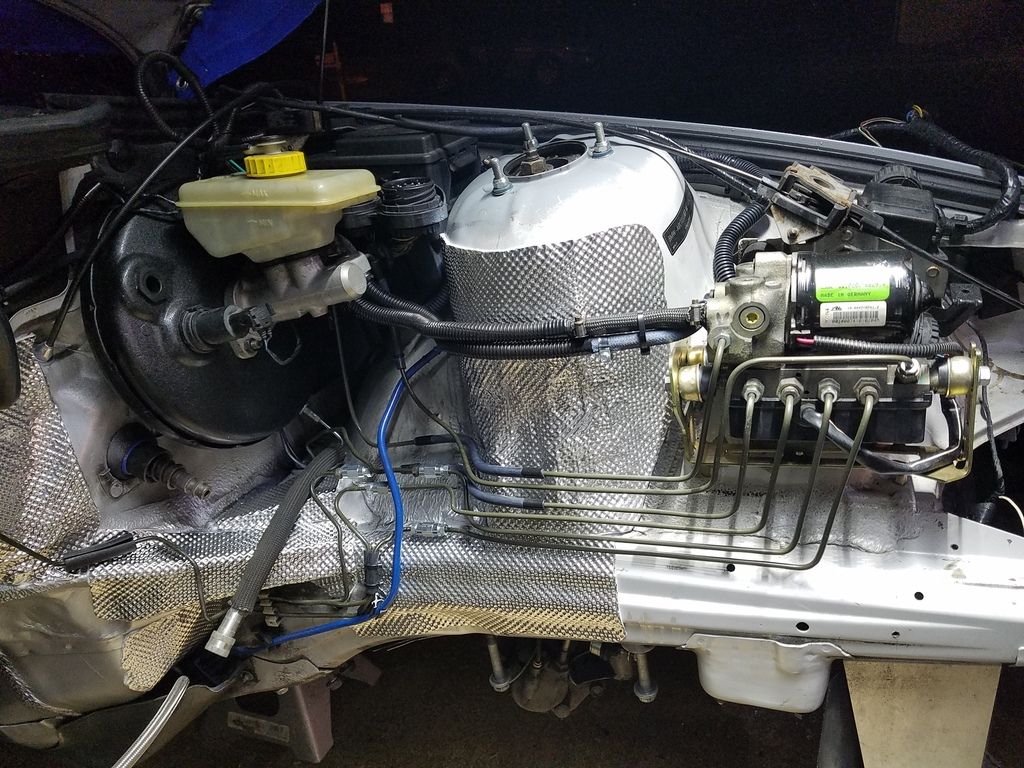
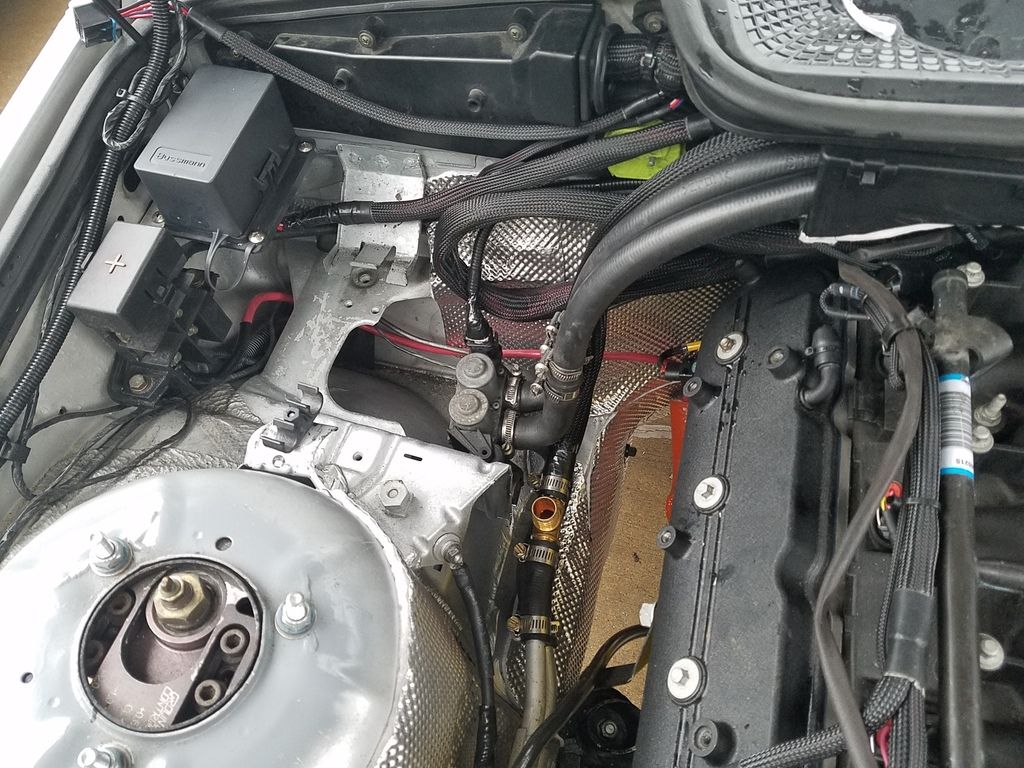
Relocated the ABS pump and made 6 new brake lines. Relocated the water valve and plumbed the heater lines. Bled the brakes. Bled the clutch too while the engine was in for it's 2nd test fit.
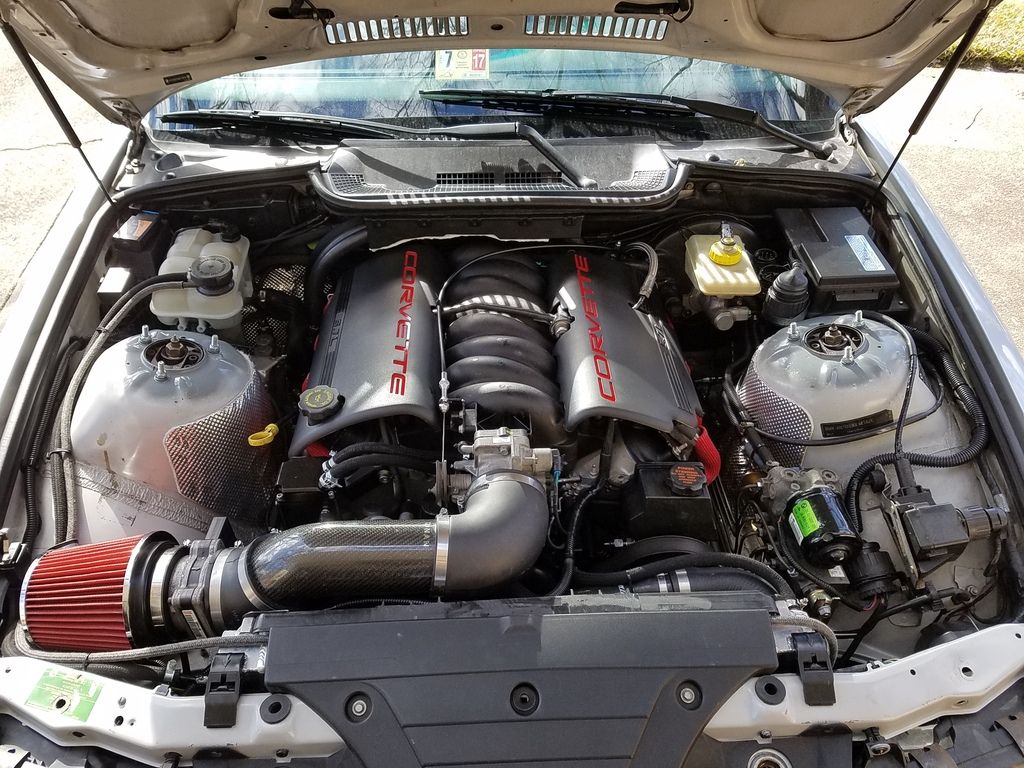
Engine and trans are now in for a 3rd time and should be staying in.
Final assembly starting now.
Few pics because that's what we are all here to see anyways 
Why the relocated coolant reservoir? You can't use the stock E36 radiator and overflow tank?
In reply to docwyte:
That looks like the euro coolant reservoir. He probably had it before the swap. It's self bleeding.
BTW, great work in those brake lines. I have no idea how people can bend those things and make them look like they came like that from the factory. Whenever I had to bend any, they always ended up looking like crap.

BTW, great work in those brake lines. I have no idea how people can bend those things and make them look like they came like that from the factory. Whenever I had to bend any, they always ended up looking like crap.
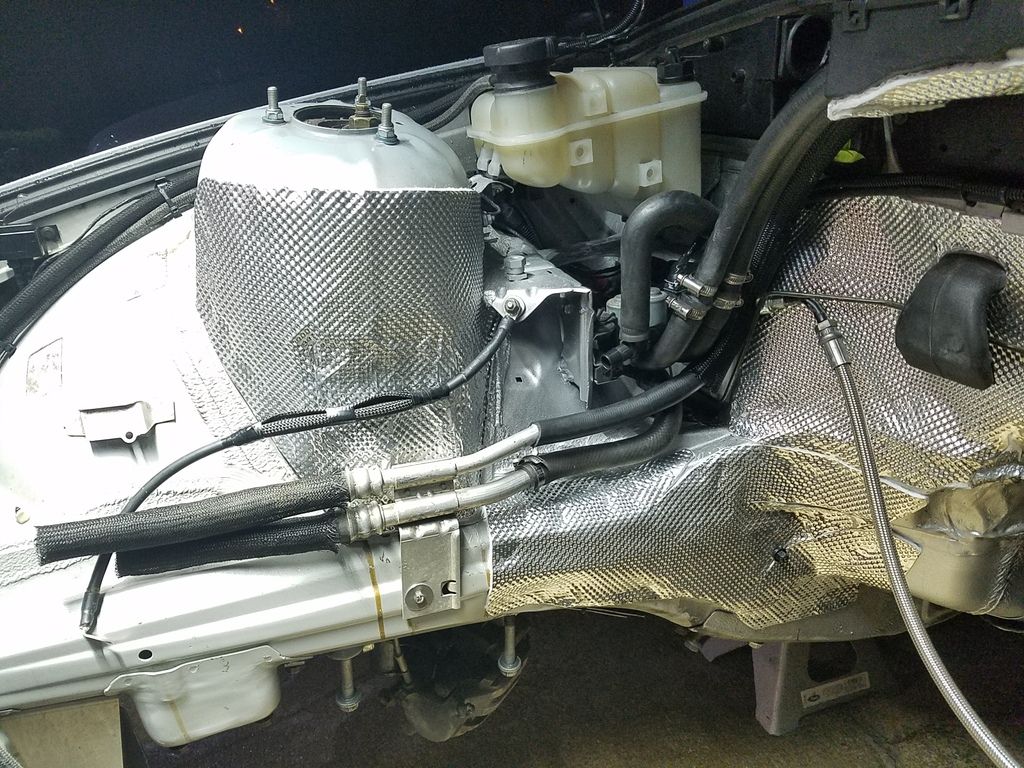
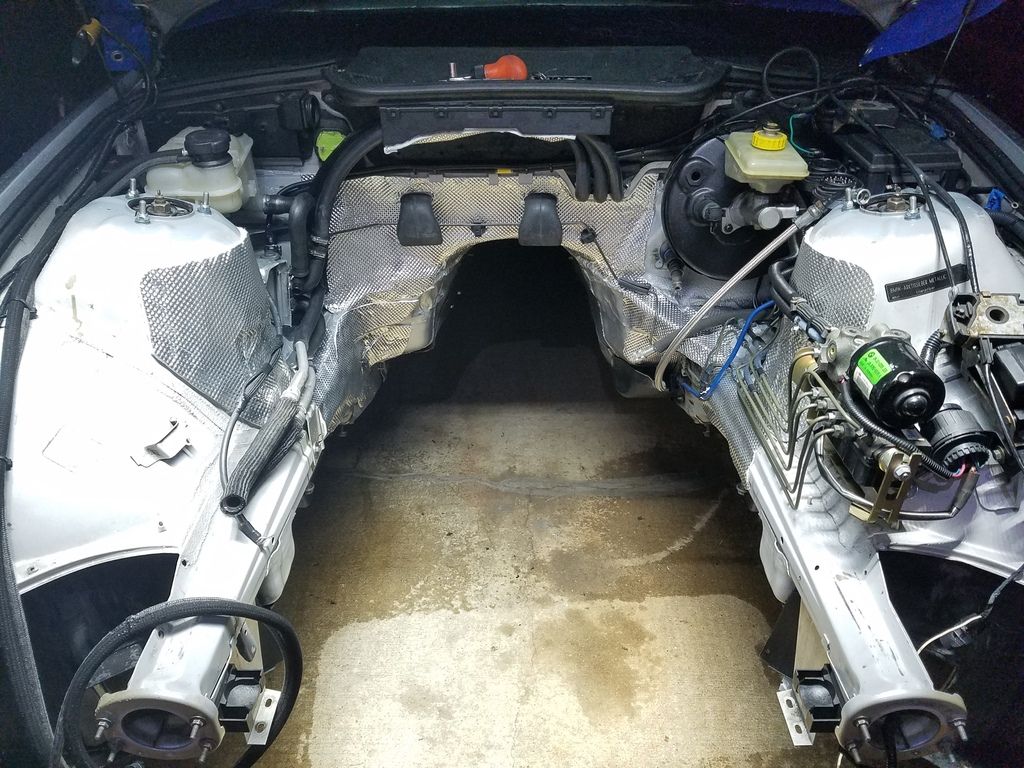
Thank you. And yes this is the Euro Expansion tank. Way better the US piece of crap that the US cars got and yes it is self bleeding. I'm also running a Mishimoto radiator that I already had in the car. See the pics from my first few posts on page one.
Thank you for the complements on the brake lines! I did my best to make them look like they were supposed to be there. They are a little close to the driver side header but everything else is close with these damn headers. DO NOT use Sikky LS Swap headers for anyone looking at doing this swap. The driver side collector flange should've been extended a few more inches longer so it would end up beside the T56 case instead of next to the bell housing. The driver side header collector is very tight between the bell housing and the fuel filter heat shield. I will eventually be ditching these and going a different route. We also had so many issues with the driver side and had to refabricate part of it and all 8 primaries are horribly bent right from the flanges which forced me to basically make a custom set of wires with 115* ends.
Anyways. It's in. Test fired right quick and it fired right up. Still need to get in touch with my HP Tuners connection so we can turn off VATS and set up a few more things. Then we can fill it with coolant and let it break in. After that we can wrap it up and set it on the ground and go from there.
Few more pics from this weekend and for the 5 secs we got to hear it run the exhaust sounds AMAZING!
Custom heater hose "T" I made since I couldn't find the size I needed in something other than cheap plastic. It's 3/4" on top and 5/8" on the ends. This turned out excellent!
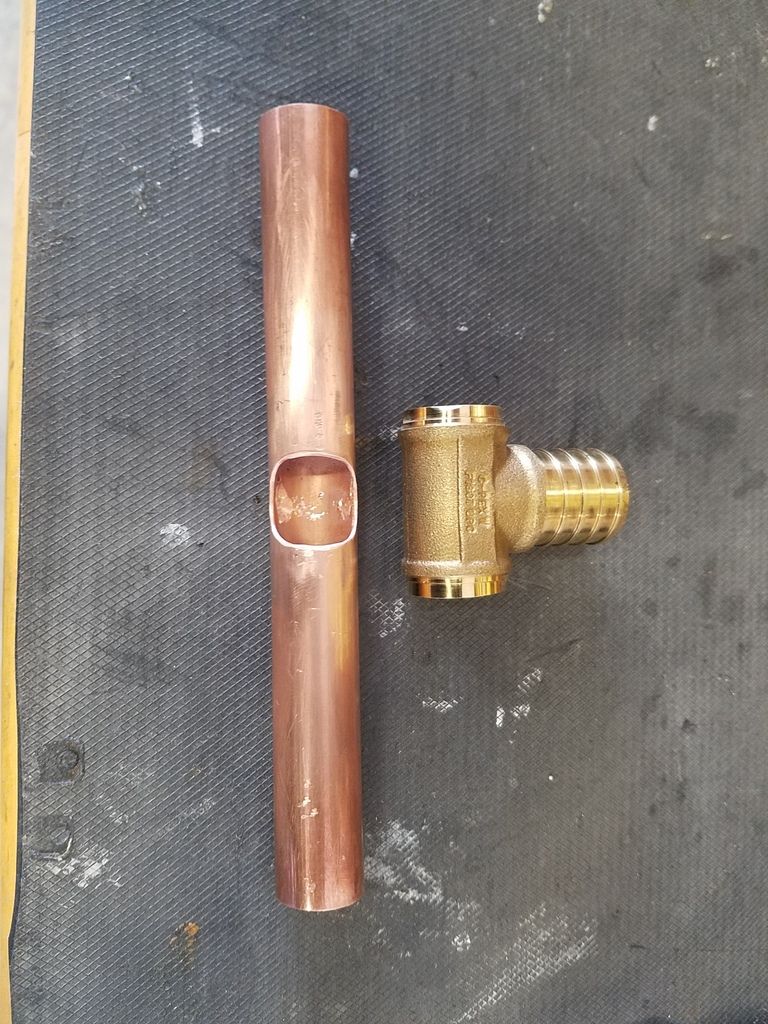
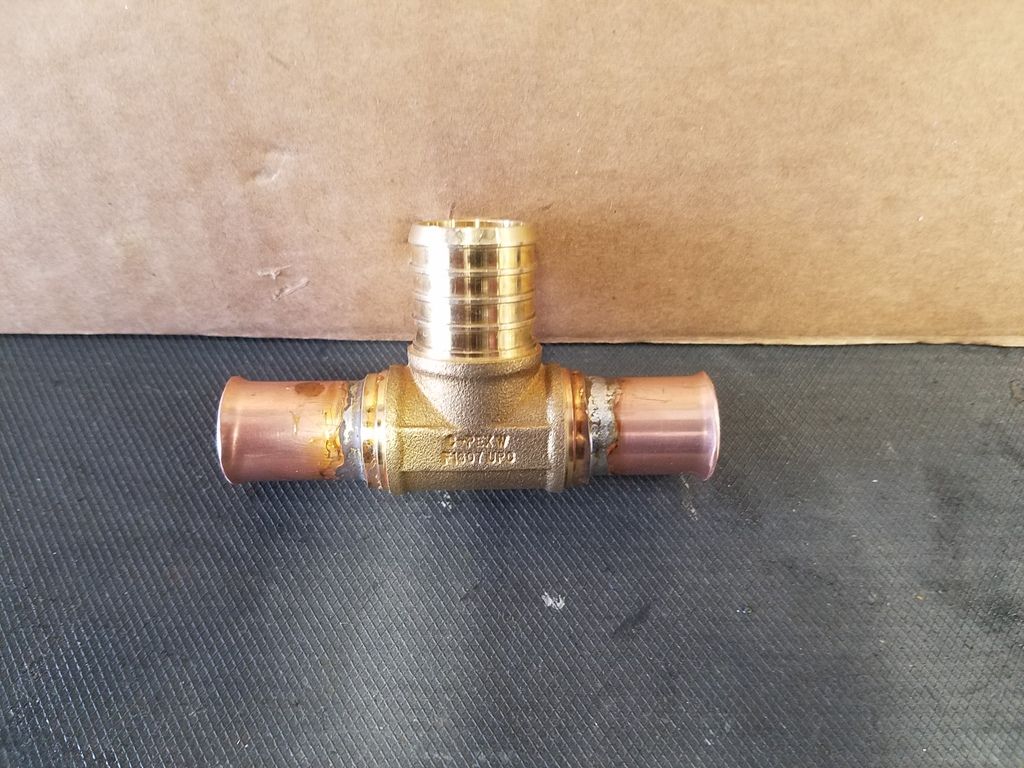
Heater valve new home and you can see the "T" I made to connect to the Euro Expansion Tank. Yes, That is the F-Body heater hose lines I cut down and installed on the frame rail. Also, all ends of the connections were flared so my hoses DO NOT blow off under pressure.
And the installed pic. All is connected, plumbed, etc. Only thing not filled up is the coolant. I need to pic that up tomorrow. Hoping to hook up with my HP Tuners connection so we can get the PCM set up! Still have to wire the fan connections to my harness though. We didn't get to that tonight.

Update ... Fired it up last night after some tweaks with HP Tuners thanks to a tuner friend that stopped by. Runs excellent. Fuel trims look good right off the bat. No leaks. Exhaust sounds nice and deep, little bit of lope (didn't want the typical "donkey dick" idle) at idle. Set idle speed at 775 rpm. Oil pressure, oil temp and water temp are great. Set the tach singal to read correctly for the BMW cluster. The exhaust is as quiet as I was expecting but you will hear it when your hard on the throttle. This swap is built with lots of comfortable miles behind the wheel in mind.
Will post some video when I get time to record some at better quality
Much want. Nicely done!
Thank you. It's getting there. Got the rest of the air out of the new front brake lines this evening. Put the interior all back together. Put the rear wheels back on. Finised up the front suspension. Have a new high torque starter on the way. I had the O.E starter from he F-Body rebuilt, had problems with it afterwards, took it back and had them go back through, still had problems with it again last night...So, it's getting replaced and while the passenger side header is off I need to dimple #2 and #6 primaries to free up a larger air gap between the heater lines and the frame rail. Passenger header actually comes out pretty easy so it's not a huge set back.
Goal is to have it back on all 4's by this weekend. We shall see.
Hmm, what's involved in the euro coolant reservoir swap and how expensive is it?
Hmm, what's involved in the euro coolant reservoir swap and how expensive is it?
Very simple set up. Extend the coolant level sensor harness. Weld in some mounting brackets. Plumb the hoses and done. Do an ebay search for the Euro Expansion Tank for a price. Not very expensive
Been a very busy weekend so haven't had time to get in front of the computer.
Car is back on all 4's. Finished it up midnight Friday night.
Have one small oil leak show its ugly head from my oil pressure sender feed line fitting so I have to run down to my local shop to have a new line made so I can change how I have I connected to the block.
Other than that she runs excellent for just a bar stool HP Tuner set up.
Gonna get it tuned after I get some more miles on it and change the oil. Then it's just start adding the finishing touches.
Looks great! I see you no longer have a windshield washer reservoir. What else has to be deleted? A/C? Cruise control? Etc, etc...
Thank you. I wanted it to look like it belonged in the car from day one.
Ditched the washer tank for the obvious reason. I never used it anyway. I will hook up cruise as soon as I have a longer cable made. The car will have AC. Haven't looked into best option as far as a compressor. Some run the GM unit, some say use a the 318i compressor because it is small.
My harness for the LS is a Wiring Specialties harness and it has a sub harness for AC. It's is separate but also plug and play. Just plugs right into my engine harness. AC clutch, ac pressure switch and grounds in the sub harness. I kept the drier and condenser from the S52 set up so it's just a matter of having 2 lines made and deciding what compressor is best to run. Then put it all in the car.
On my LS 951 I ran the gm compressor. It was the clear choice there, even if the 951 would've fit its $600 new vs $250 new for a GM one...
In reply to docwyte:
My thoughts exactly. And GM AC is always Ice Cold
This is so full of awesome, I'm drooling on my laptop.


