1 2 3
TheRev
TheRev New Reader
4/11/20 4:41 p.m.

In rural Texas in the '80's, cars were heavy, ham-fisted Crown Vics and Buick Regals that lumbered along in an ocean of pickups. None interested me in the least, until my dad took me to a European car meet. While e-type Jags drew his attention, it was a 911 that grabbed me and never let go. I left with an enduring love for its small size, elegant lines, and growling exhaust. In the intervening years, I have driven a wide swath of the automotive world, including a few noteworthy sports cars. Yet nothing has displaced an air-cooled 911 as my aspirational vehicle. So, after years of dreaming and saving, I began to hunt in earnest last year for one of my own.

After driving a few examples from various generations, I narrowed my search to an SC or 3.2 Carrera coupe in the best mechanical shape I could afford within a budget of $35k. For months, I scoured online forums, magazine classifieds, and Craisglist. While I found quite a few nice examples, few were in my price range, and some that were had “scam” written all over them. Case in point, I came close to purchasing a pristine looking Euro 3.2 Carrera only to discover through a confusing Carfax reference that it had been salvaged in Oklahoma, “washed” in North Carolina, and rebranded “clean” in Texas decades before the current owner even purchased it (poor guy had no idea).

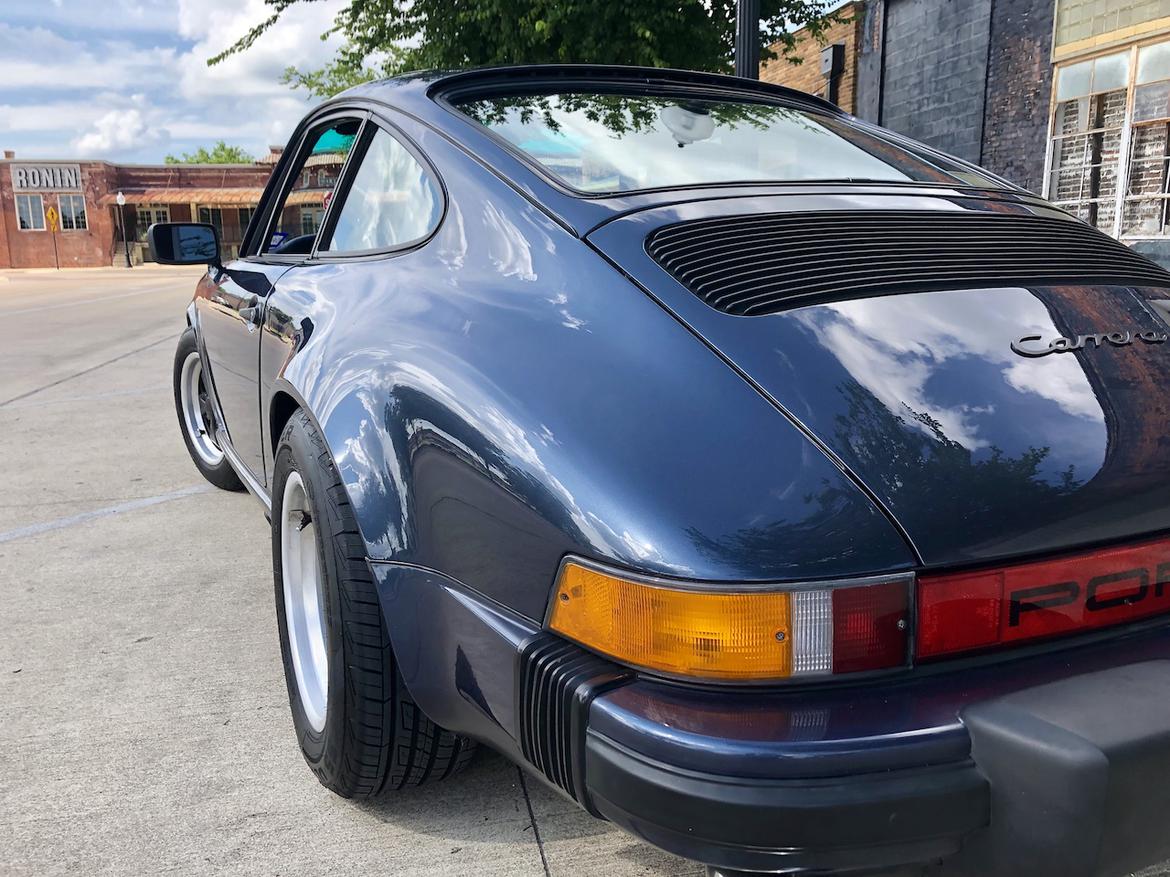
Finally, in April of last year (2019) an ’85 Prussian blue 911 coupe in upstate NY caught my eye. The price was too high for my budget, and the lack of AC turned me away. But it was truly beautiful. So with little hope of success, I sent a message to the seller asking if he’d consider letting it go within my budget. I got lucky. He was not interested in listing elsewhere and was tired of it sitting on Pelican. He had four Porsches, two TR6’s, and was about to purchase a new Mustang. He needed garage space in a hurry. Not only was his price negotiable, but his backstory was superb. He was a retired Porsche and Mercedes mechanic with his own fully equipped garage. He began to list all the work he’d done to the car over his ten years of ownership and it was extensive. Transmission, suspension, brakes, bushings, seals and gaskets, electrics, sensors, hubs and axles, headliner, sunroof ... on and on he went. The car was absolutely rust and leak free. It still had no AC, but research convinced me this was a job I could tackle. Best of all, when I contacted one of the moderators at Rennlist he claimed to know, he vouched for the owner's identity, mechanical aptitude, and character. So, I said one last prayer and sealed the deal with a stomach-turning wire transfer.

Less than a week later, the deep blue 911 of my childhood imagination tentatively backed out of a covered trailer in our local Lowe’s parking lot. Even covered in New England pollen, it was more beautiful in sheet metal than in the pictures. Half an hour later, with my twins in the backseat and my wife up front, we rocketed down a nearby country road yelling with delight. 

Almost a year on, I love the car more than the day I bought it, which has never been true of any car I've owned before. I've done a number of projects on her I'll detail below, the most ambitious of which is installing a new triple-condensor AC that actually keeps the car cool even in south Texas summers. I look forward to sharing my adventures with this car, my keeper, in this forum. 

84FSP
84FSP SuperDork
4/11/20 6:28 p.m.

Wow - happy family in the new P car.  Great color sir.

NOT A TA
NOT A TA SuperDork
4/11/20 7:24 p.m.

Nice car! I have an '86 Cab, will be watching this.

mr2s2000elise
mr2s2000elise Dork
4/11/20 7:56 p.m.

What a beauty! Love it. Following. I have never owned a 911. Aside from a 993 TT, no other P car has done anything me. However, everyday I think of selling my Elise+S2000 and consolidating into a 911, any 911, so all 4 of us can go on rides together .  I want Targa, with full glass roof. 


Love the rear fat fender and fat tire on the rear of your car. 

TheRev
TheRev New Reader
4/11/20 8:57 p.m.

In reply to 84FSP :

Thank you! I got lucky on color. I'd never heard of Prussian Blue and had never seen it in person till this backed out of the transport truck. Goes from medium blue to deep purple depending on lighting. 

Slippery (Forum Supporter)
Slippery (Forum Supporter) GRM+ Memberand UltraDork
4/11/20 9:13 p.m.

What a beautiful color! Looking fwd to reading about your adventure. 

Professor_Brap (Forum Supporter)
Professor_Brap (Forum Supporter) GRM+ Memberand SuperDork
4/11/20 9:20 p.m.

Awesome find, adore that color!

TheRev
TheRev New Reader
4/11/20 9:20 p.m.

In reply to mr2s2000elise :

Rear ¾ view is the best looking angle b/c of the wide stance (20mm spacers are helping, too). 
 

As for fitting all 4 of us, only on short trips. The back seats are tiiiiiggghhhhht. My daughter is about 5' tall now and barely fits in back. Still great, though, to be able to take all 4 of us on quick runs. 

spitfirebill
spitfirebill MegaDork
4/12/20 7:58 a.m.

The car is gorgeous.  Love the color and the story.  Enjoy it.  

Woody
Woody GRM+ Memberand MegaDork
4/12/20 8:04 a.m.

Prussian Blue is a great color!

Please tell me more about the AC system that you added. Last year I removed all of the factory AC stuff  (useless when it was new) from my ‘87 and I’m thinking of adding a modern aftermarket  system. 

BoxheadTim
BoxheadTim GRM+ Memberand MegaDork
4/12/20 10:54 a.m.

Very nice car! I'll certainly be following along (and like Woody I'd be interested to hear more about that a/c system).

TheRev
TheRev New Reader
4/12/20 11:46 a.m.

Assessing what I bought: delivery, records, and detail - May 2019

I had never bought a car sight-unseen, and this was the most expensive vehicle I'd ever purchased (the previous winner was our 2009 Honda Odyssey bought new). So the days between transferring the money and recieving the vehcile from the shipper were riddled with anxiety. Fortunately, there are no horror stories to tell. The car arrived without incident from upstate New York to College Station, Texas in an enclosed trailer. It fired right up, but did belch the characteristic white smoke so typical of an older 911 that hasn't been started in a while (more on oil consumption issues in a later post now that I have data). Fortunately, the smoke dissapated as the car backed onto the tailgate lift. I got my first look at "Prussian Blue" in person and instantly loved it despite the fact that the car was covered in New England pollen. The seller hadn't bothered to clean her before shipping, but since I would do a full detail upon receipt, I was not concerned. Here's a couple picks of her arrival.

One funny bit: the shipper, who spoke with a thick Russian accent, said as he handed me the keys, "This car will be beautiful once you put a big tail on it." No thank you, my friend. I have nothing but respect for 911's with whale-tails, but my "vision" of a perfect 911 has always been with a stock sloped engine lid. It's so uncluttered and simple. I'll stick with what I've got.

After receipt, I drove her the quarter-mile home cautionsly and checked the oil. A quart and a half low - yet another sign of oil consumption (more on that later). I filled her, looked her over, and took her for a test drive with the family (picture of all 4 of us in the 911 that first day above). She checked out. So time to read through the binder of receipts, crawl around and under her with a flashlight, and ensure that all the seller had told me was true. To my surprise and delight, all the work he told me had been done to a proper level, and I also found a number of improvements he had forgotten to mention (e.g. stainless brake lines and the relay-headlight fix, to name a couple. So, for those who enjoy lists, here are the details on this car...

VIN# WP0AB0916FS121588

Mileage at purchase: 119,000

Purchase price (2019): $34,000

Upgrades + work completed recently before my purchase:

  • Transmission fully rebuilt at ~80k miles with OEM short shift kit, new clutch, and resurfaced flywheel
  • Wevo shift coupler and new shifter linkages
  • Steve Wong performance chip
  • Turbo valve covers, new valve cover gaskets, new position, reference, CHT sensors
  • Recent valve adjustment
  • New wires, plugs, and injectors
  • Euro premuffler (no cat) and Dansk sport 84mm 2-in-1 exhaust
  • New engine and trans mounts and axles
  • New Bilstein HD struts all around, front ball joints and wheel bearings, turbo tie rods, lowered
  • 22 MM sway bar upgrade on front, front and rear Elephant swing arm and front A frame bushings
  • New rotors, pads, braided brake hoses
  • 1" spacers on rear wheels
  • New BF Goodrich TA Advantage tires on front
  • H4 headlights & relays
  • Re-gasketed seals on both front and rear windows
  • Hood, front spoiler, lower rocker panels repainted
  • 993 8-way power seats installed in matching blue
  • Recovered dash
  • Headliner replaced
  • Sunroof rebuilt

Not a bad list for a driver-quality 3.2 Carrera! 

Next, it was off to a full detail and paint correction by a good friend of mine. I needed to see exactly what I had in terms of paint and corrosion issues. His work was masterful and the news was good. The car had typical repaint for a 35 year-old vehicle - front spoiler, hood, and lower rocker panels. All else was original and in suprisingly good shape. Rust was at a bare minumum indicating a garage-kept, winter-stored vehicle. Here's a few detailing pics that show off the blue-to-violet blend of Prussian Blue in various lighting conditions.


That's enough for this post. Next up, installing air conditioning which has proven to be both the hardest and most rewarding work I've done on her so far.

mr2s2000elise
mr2s2000elise Dork
4/12/20 11:53 a.m.
TheRev said:

In reply to mr2s2000elise :

Rear ¾ view is the best looking angle b/c of the wide stance (20mm spacers are helping, too). 
 

As for fitting all 4 of us, only on short trips. The back seats are tiiiiiggghhhhht. My daughter is about 5' tall now and barely fits in back. Still great, though, to be able to take all 4 of us on quick runs. 

Rear view is gorgeous and most important in life 


I see lots of 991 and 997 TT around here with kids in back. These people use Tesla X during week, and their Turbos on Ferrari FF on weekends 


love the gold wheels in the background 

TheRev
TheRev New Reader
4/12/20 11:57 a.m.
mr2s2000elise said:

I see lots of 991 and 997 TT around here with kids in back. These people use Tesla X during week, and their Turbos on Ferrari FF on weekends 

Woah! TT's, X's, and FF's are way outside the norm in my neck of the woods. Around here, it's a sea of F-150's, Tahoes, and Odysseys. 

The modern 911's do have a little more room in the back, and are safer thanks to shoulder belts and airbags (my '85 only has lap belts in the back). It seems to me that the key measurement is your kids' leg length. Torso's fit fairly well b/c the rear bukets are so low. But there's just not much distance b/w the front seat backs and the rear seats. My daughter is 99th % tall for her age, and most of that is in her legs. So that makes it tougher for her to fit. Most elementary-aged kids will fit fine, though.

mr2s2000elise
mr2s2000elise Dork
4/12/20 12:01 p.m.

Yes my kids fit in back of Evora. Almost pulled the trigger last year, but don't really want another Lotus. Wish the F Type R had back seats. 
 

your 911 in my neighborhood says old money. 991/992 TT are LLC lease specials here 

TheRev
TheRev New Reader
4/13/20 2:55 p.m.

Installing modern AC into a classic 911 - Part 1


When I purchased my 1985 911 coupe last May it had one glaring deficiency: no air-conditioning. While that had not bothered the upstate New York seller, it certainly bothered this Houston-area buyer! So installing functional air-conditioning became priority number one. As most air-cooled 911 owners know, this is far easier said than done. Our cars’ unique design, with the engine in the rear and a narrow, radiator-less nose, presents significant packaging constraints for the required heat exchangers. The factory system relied on over forty feet of hose to carry refrigerant between all the various components, traversing the car both front to back and left to right multiple times. This was not going to be easy or cheap!


Step 1: Research

First, I needed to know all the components that went into the air conditioning system in its original configuration. Porsche’s online Parts Catalog with its diagrams and lists proved invaluable in this process, as well as during installation. These are complex systems with many hoses, fasteners, and brackets. Let the catalog guide you!


Second, I needed to assess what I actually had in the car, which wasn’t much. The seller had removed most of the factory system. Only the evaporator assembly (evaporator, fan, expansion valve, box), AC controls, and compressor bracket remained in the car. He did, however, send a box of removed factory parts including both condensers, the compressor, and a handful of hardware. Sadly, the compressor’s internals had been left open to the elements for years. It would have to be replaced. The other components appeared passable.

Third, I had to design a system within my budget of approximately $2500 that would be sufficient for 100-degree ambient temperatures. At a minimum, the system would require new barrier-style hoses throughout. Never reuse old, non-barrier hoses in a new r134 system unless you enjoy chasing leaks. I would also need a replacement compressor and drier. From the factory, 3.2 Carreras came with an r12 twin-condenser system with a large condenser mounted under the engine decklid and a smaller, fan-fed condenser in the nose mounted parallel to the ground. This arrangement barely sufficed when new, but once converted to r134, as most of these systems have been, it falls far short on both the condenser and evaporator side. The factory tube-style heat exchangers that worked in an r12 system fail have proven inadequate for an r134 system which needs serpentine, or ribbon-style, exchangers to function at maximum efficiency. Furthermore, even with ribbon-style condensers, an r134 system properly sized requires at least 50% more condenser capacity due to the unfavorable packaging of the stock condensers, with one soaking up engine heat and the other too small to do much. I would, therefore, have to replace my tube-style evaporator and augment my condenser set. The biggest bang for the buck on the condenser side is to leave the non-optimized factory units in place since they’re poorly located anyways (money spent to upgrade them to modern units nets little actual performance gain) and spend big on adding a new ribbon-style, fan-driven condenser in the rear, driver’s wheel-well.


Step 2: Buying parts

Time to spend some money! Fortunately, there are great aftermarket solutions available for air-cooled 911’s. Griffiths out of New Jersey builds the best, but also the most expensive. While I could cherry-pick a few of their best components, I could not afford their entire system. Zims Autotechnik out of Bedford, Texas offers a-la-carte AC parts and upgrades at a cheaper price, though not quite to the build-standard at Griffiths.

After consultations with both companies, I chose to purchase the bulk of my parts from Zims, including an r134 barrier hose set, compressor, drier, and rear-wheel-well ribbon-style, fan-driven condenser upgrade. Zims unit is both cheaper than Griffiths and locates this exchanger in front of the rear wheel rather than behind it. For some reason, Griffiths chose to place theirs behind the rear wheel which is very close to the catalytic converter, a source of copious amounts of heat. Griffiths does offer the option of adding a fourth condenser ahead of the rear wheel, but that adds even more cost to an already expensive system. Griffiths did come through for me, however, with a beautiful new ribbon-style evaporator with expansion valve. I also purchased a used fan housing for the front condenser off Ebay as mine was cracked beyond repair (a common problem).


Parts gradually came in over the following days. Unfortunately, Zims struggled with the hoses, sending me the wrong parts twice. This delayed installation by almost two weeks. To their credit, they were very responsive on the phone and eventually got it right.


...stay tuned for part 2...

TheRev
TheRev New Reader
4/13/20 3:08 p.m.

Installing modern AC into a classic 911 - Part 2

Step 3: Installation

Installation took a long time and a lot of effort. This is not an easy job. If like me you’ve never done this job before, you are likely to spend hours under the car running hoses – there are six once you add the third condenser! I highly recommend getting the car as high as you safely can. Also, wear eye protection because you will get showered in dirt and dust as you remove old hoses and run new ones. Running the two longest hoses through the engine fire wall and the front condenser hoses around the windshield washer reservoir proved to be the most challenging operation under the car. Be patient and get as much light under the car as you can.


Spending hours under the car was surprisingly not the hardest part of this job. That honor goes to the evaporator in the smuggler’s box. You will cut your hands and your fingers will ache. Be careful in removing the clips holding the plastic halves of the evaporator housing together. The plastic is prone to break. Griffiths’ evaporator kit comes with replacement screw fasteners that Porsche should have used in the first place. What a massive pain in the keister that job was!


On to the condensers. First, I needed to properly flush the two stock units with pressurized cleaner. This is a vital step to ensure all of the old r12 and oil are out before putting new refrigerant in. Once clean, the stock units went back on without difficulty, though the front condenser blower housing I bought used off Ebay didn’t fit without significant modifications with a Dremel. The add-on third condenser took more time to install than expected, but was not particularly hard. You will have to run a new relay to the engine bay to power the condenser fan, and don’t be surprised if you have to adjust a jack stand to get the access you’ll need for the installation work. 

The compressor and drier installation proved comparatively easy. Make sure to add the proper amount and type of compressor oil for your system. The final step was to remove the plugs on the drier and attach the lines. I left that for last, once the system was fully “closed” because I didn’t want the drier absorbing any moisture from our humid climate.


Step 4: Testing, charging, and improving

Finally, I checked the system to see if the compressor and fans would kick on correctly. To my great disappointment, they did not. Note to self: check the electrical systems at the beginning rather than end of a project. A quick scour of Pelican forums identified the AC relays as the most likely culprits, so I ordered replacements and waited two days for shipping. It only took a few minutes to install them once they arrived, but it didn’t fix the problem. After a couple of hours tracing wires and checking connections, I found the culprit. The connector to the console rotary AC fan knob had come lose at some point in this car’s past. Lesson: spend time doing proper diagnostics rather than simply ordering parts!

Finally, the car was ready to take to my local repair shop to vacuum test and, once passed, charge with refrigerant. Frankly, I was amazed she passed. This was my first AC system to build and, with six hoses and four total heat exchangers, there’s a lot of opportunity for error! But luck was on my side and within a couple hours I had a fully functional, modern air conditioning.

One final step remained: improving the distribution of refrigerated air in the cabin. For those not familiar, older 911’s utilize an absurdly complex combination of hoses and vents to direct cooled, fresh, and/or heated air around the cabin. Cooled air is only available from the two, directable center console vents, the ridiculously small side slit vents, and a center hole down by the floor. Fortunately, that lower hole makes a perfect place to attach a DIY crotch-vent! I grew up with 70’s era Chevy’s that placed a, for lack of a better phrase, crotch-vent below the steering wheel. Trust me when I say, it’s a godsend on a hot Texas day! So I found a flexible bilge hose, pipe clamp, and 90-degree PVC adapter at Lowe’s, spray painted them flat black, and installed them below the steering wheel where they are almost completely hidden. The result is a constant flow of cold air right where I need it whenever the system is on.


Results:

Time to discuss results. After a full Texas summer of use, the car runs comfortably cold in full sun, 100 degree ambient temperatures as long as I’m moving above 20mph. In stop and go traffic, it will eventually struggle to keep up since the condensers get less airflow. Comparing to our other vehicles, this AC is better than the one in my '05 BMW 330i but not as powerful as the one in our '09 Honda Odyssey which, with both front and rear AC's, can put you in a sweater even on an August day. I have found that the key to assessing an AC’s performance is to measure how quickly it can cool the cabin to a comfortable temperature on a 100 degree afternoon when the car has been sitting in full sun. Answer: approximately 2 minutes. I am very pleased. Yes, it did cost me the full $2500 I had budgeted (still far less than if I had a shop to it), but that is a small price to pay to get at least four more months of comfortable use out of this car every year. I would do it again in a heartbeat.


Woody
Woody GRM+ Memberand MegaDork
4/13/20 3:32 p.m.

Thanks for all the details on this upgrade. I finally pulled out all of the old system on my '87 last year, and that alone was a huge PITA. I had looked at the Griffith's kit about ten years ago, with plans to add it eventually, but never pulled the trigger.

Reading this is not encouraging me to go ahead and do it at this point!

TheRev
TheRev New Reader
4/13/20 3:48 p.m.
Woody said:

Reading this is not encouraging me to go ahead and do it at this point!

You can do it!! Just give yourself plenty of time. And if you can afford the full Griffith kit, it'll be a bit easier since everything will come as a single kit and you won't have any of the back-and-forth hose drama I dealt with. 

Thinkkker
Thinkkker UltraDork
4/13/20 7:21 p.m.

Very nice shot of Cafe Capri there too.

TheRev
TheRev New Reader
4/14/20 8:55 a.m.
Thinkkker said:

Very nice shot of Cafe Capri there too.

Owner's a good friend. Love that place. And it does make a great backdrop.

Thinkkker
Thinkkker UltraDork
4/14/20 8:56 a.m.

Yup, I know Rami.  Old TAMSCC members and all.

AngryCorvair
AngryCorvair GRM+ Memberand MegaDork
4/14/20 8:59 a.m.

In reply to TheRev :

Beautiful car!  Good on you for living the dream!

TheRev
TheRev New Reader
4/19/20 11:04 a.m.

915 Shifter Upgrade with Seine gated shift kit

My next project was to improve the shifter feel in this car. I don't particularly enjoy the "stirring soup" feel of a stock 915 transmission. Budget prevented me from choosing the Rennshift or Wevo options. Fortunately, my car already had the OEM short shifter and the upgraded WEVO shift coupling (sits under the floor behind the front seats). All I really needed was gates and a centering spring. After trying the Seine back-to-back with a Rennshift, I would say the former gets you 80-90% of the benefits of the latter at ⅓ the price. 

Installation was time consuming but technically easy. Worst parts IMO on a 3.2 are dealing with the console and carpet. With the OEM short shifter, the shift housing has to be significantly modified to fit the new pivot and spring mechanism. I suggest drilling a ½” hole at the new max height of the pivot pin and then file or dremel the rest of the slot profile. AFTER drilling/filing (including holes for new sprig bolt carrier), clean very well to remove any filings and re-lube. I like synthetic redline grease - overkill to be sure. Take the time to remove the carpet when removing the shifter from the car b/c you’ll need clear access to get the shifter back in properly. Lots of adjustments are needed with this kit, but it does allow you to really dial it in. Component quality is high, though the cost to manufacture the full kit is nowhere near the purchase price. The engineering and innovation are worth it, though.

Two installation notes: First, I did not need to cut my rubber boot as Seine suggests. The new centering spring hardware fit without surgery. Second, I did not permanently attach the tab onto the shifter until I'd had a week to test and make final adjustments. Some filing of that tab ended up being necessary to perfect the alignment with the 2nd gear gate. I have now JB welded the tab and it's held for eight months without incident. 

Result: This now feels like a much more precise, more modern shifter. No more stirring soup trying to find gears. Seine’s kit is an inexpensive, highly worthwhile improvement. 

Final picture is the price in blood this mod cost me. So far with this car, EVERY project has taken such a cost.

TheRev
TheRev New Reader
4/27/20 1:50 p.m.

Introducing the Keeper to my old haunt, Texas World Speedway

Visited Texas World Speedway a couple weeks ago. This is where my long-dormant love of cars came back to life 5 years ago. I made it to Advanced HPDE on this track. And of all 15 turns, T7 was my favorite. Here's what's left of her. The back straight's gone - that's where the new neighborhood is being built (at a rapid pace from the looks of it). The asphalt resumes on the ascent to T8. I grabbed the smoothest bit of asphalt in the T7 rubble pile I could find as a memento. I'm very grateful to have scrubbed a lot of rubber on that turn! 911 pic: this is the closest I could get my new car to the track. Sad she'll never run it. Sure wish I could have one more lap, but I'm truly grateful for the magical times I had at TWS. Out here at speed on a cool morning was about as close to heaven as I've yet found on earth. #ghosttracks #memories


D4A1C176-4E01-4190-A7B7-BFB75DED4CCE.jpeg

1 2 3

You'll need to log in to post.

Our Preferred Partners
jK3kzP3giDu2GbAmn0C6EXkpoFtzDIr0tDKTJNivo8KbGaqPFs1ShXMSw37slHEn