1 2 3 4 5 ... 10
alfadriver
alfadriver SuperDork
4/20/11 8:31 a.m.
Curmudgeon wrote: My thought was running the alternator off the cam would make for more room at the bottom. I'd keep the alternator to make sure the EFI fuel pump, ECU etc had proper voltage.

FWIW, we run a land speed car w/o an alternator- full EFI, pump, 8 coils (on a 4 cyl)- runs fine. I know it would be bad over a long run, but 2-3 min at a time? Especially if you set up a charger with the support vehicle.

the ECU should be good to 6 volts before protesting too much. Well, that's when it will shut down....

Nashco
Nashco SuperDork
4/20/11 8:37 a.m.

Even if it's outside the challenge, we will want to find a spot for an alternator for test and tune. Technically speaking, we could omit a starter and alternator during the racing, AFAIK...

Bryce

93EXCivic
93EXCivic SuperDork
4/20/11 8:41 a.m.

This might be more of a pain then it is worth but could you adapt a bike stator to work?

alfadriver
alfadriver SuperDork
4/20/11 8:42 a.m.
Nashco wrote: Even if it's outside the challenge, we will want to find a spot for an alternator for test and tune. Technically speaking, we could omit a starter and alternator during the racing, AFAIK... Bryce

that would be the overriding factor- what you do with the car when not racing....

I had thought about running w/o an alternator in vintage, but the weight gain was 25lb on the car, and the alternator was only 5lb. Even with the rotation and losses, it just didn't make sense to take it off. Especially since I can run a miniscule battery (once I get the start right).

Just a suggestion if you can't find any space for one...

tuna55
tuna55 Dork
4/20/11 8:59 a.m.
Nashco wrote: Even if it's outside the challenge, we will want to find a spot for an alternator for test and tune. Technically speaking, we could omit a starter and alternator during the racing, AFAIK... Bryce

I know ignition requirements differ drastically, but even most drag cars run alternators and some report SLOWER times without one.

weedburner
weedburner New Reader
4/25/11 8:54 p.m.

In reply to tuna55:

I've often thought about using lithium powerpacks from cordless tools for powering the fuel pumps and ignition systems on a racecar. Lots of voltage choices out there. Easy to re-charge, very common and available, simply plug in a fresh set of batteries each run. Power could be placed closer to the individual places where it's needed too, using seperate batteries for each circuit. Less heavy wire would be required, use relays and only one small wire would be needed for the run all the way to the switch panel.

gamby
gamby SuperDork
4/25/11 11:07 p.m.

Wow--I don't know how I missed this thread over the past month, but DAYUM. I like where it's headed!!!

Awesome work as usual. Hilarious how those VX 13's look so huge in those tiny fenderwells.

Looking forward to the updates...

ww
ww SuperDork
4/27/11 1:50 a.m.
WilberM3 wrote: jeff, we're doing something wrong.

Nah, it's not that you're doing something wrong it's just that you lack the commitment!

Hey, don't worry, I don't have that kind of commitment either!

blizazer
blizazer New Reader
4/27/11 5:18 a.m.

How much is this thing going to weigh? Leave the starter at home, cut a hole in the floor and let the driver bump start it Fred Flintstone style.

Nashco
Nashco SuperDork
4/27/11 10:42 a.m.
blizazer wrote: How much is this thing going to weigh?
Nashco wrote: Number three priority is to keep the weight as low as possible on the budget, we're targeting 1500 pounds complete.

Bryce

AutoXR
AutoXR Reader
4/27/11 10:52 a.m.

I think your weight is probably high considering Team gutty got a CRX in the 1600's witha B series.

Grudge
Grudge New Reader
4/27/11 12:06 p.m.
AutoXR wrote: I think your weight is probably high considering Team gutty got a CRX in the 1600's witha B series.

Hope you're right. I never saw the "gutty" car, but judging by the name they removed a fair bit We're being a bit conservative on our weight estimate because of the structure we have to add for engine and suspension supports.

Our brains are used to "normal" sized vehicles though, so when we started making guesses about what things will end up weighing, we've been surprised by how much we were over estimating things when we sit down and do the math.

Build update with more pics hopefully tonight...

  • Aaron
tuna55
tuna55 SuperDork
4/27/11 12:34 p.m.
weedburner wrote: In reply to tuna55: I've often thought about using lithium powerpacks from cordless tools for powering the fuel pumps and ignition systems on a racecar. Lots of voltage choices out there. Easy to re-charge, very common and available, simply plug in a fresh set of batteries each run. Power could be placed closer to the individual places where it's needed too, using seperate batteries for each circuit. Less heavy wire would be required, use relays and only one small wire would be needed for the run all the way to the switch panel.

That would be interesting. By the time you added appropriate wiring and batteries/holders though, you might add enough weight to not make it worth it.

Nashco
Nashco SuperDork
4/27/11 4:02 p.m.
AutoXR wrote: I think your weight is probably high considering Team gutty got a CRX in the 1600's witha B series.

We're using a very similar powertrain, suspension, drivetrain, etc. The shell is significantly smaller, but since we're adding a whole bunch of structure and going RWD, I don't think it will be a heck of a lot lighter. Gutty was also built by a huge team over several years, it took a long time to get to that weight. So, I think 1500 is a great target...100-200 pounds lighter than Gutty's end-weight is nothing to sneeze at. If we're way lower, AWESOME, but we're not banking on it. Also, my last challenge car was 3000 pounds (!!!) and was built to drive cross country on the first test drive (!!!) so this whole adding lightness thing rather than building to last is a completely new way of thinking for me.

Bryce

Nashco
Nashco SuperDork
4/28/11 2:41 a.m.

Slowly chipping away at metal fab work. We finally got our tubing bender dies and some DOM for the roll hoop, so the foundation is now being built! This is the first time either of us have built something like this from scratch, and this DOM didn't come cheap at $5/ft, so we were very cautious bending the tubing and measured every step of the way. So, $50 of tubing, $200 worth of bender dies, and about three hours of work, we ended up with this hoop:

The roll hoop ended up fitting awesome, we're about 1/8" from the roof and about 1/2" from the A-pillars. I really don't think we could have asked more for our very first attempt at making a roll hoop. There is a tiny bit of twist in the hoop (not all bends perfectly parallel) but we're expecting that we'll be able to correct that when we do the fore/aft tubing supports. We have focused on placing the roll hoop in line with the A-pillar so it isn't immediately obvious from outside the car.

This is the base plate that will disappear somewhat:

We're not welding in the boxes just yet, as we want to do as much welding on the roll hoop as possible before (like harness bar, etc.) but this is what it will look like:

Patch panels are starting to get welded in, slowly but surely we will rebuild it!

Bryce

blizazer
blizazer New Reader
4/28/11 6:59 a.m.

I really like how the boxed corners are looking.

DILYSI Dave
DILYSI Dave SuperDork
4/28/11 7:15 a.m.

Hoops twist. Not a big deal. Just shove it into the right place via ratchet straps, 2x4's, jacks, etc. when you weld it and you'll be fine.

VWralley
VWralley New Reader
4/29/11 1:36 p.m.

I have tires for you and will be in portland this weekend! I dont have any contact info for you so please email me asap!

brendon@ralleytuned.com

subrew
subrew Reader
4/29/11 1:42 p.m.

FWIW, I can run my FV (no generator/alternator) an entire weekend on track on a single charge of a cheap 15# tractor battery. That's likely 3+ hours of running time, plus 10-20 uses of the starter. I realize I'm running antiquated equipment, but I have electronic ignition, full gauges, wideband controller etc.

Nashco
Nashco SuperDork
4/29/11 6:37 p.m.

VWralley, I sent you an email.

You guys are still talking about batteries?! Sheesh, where were all of you battery bench racers when I was building the hybrid challenge car with 300 pounds worth of batteries???

Bryce

MrBenjamonkey
MrBenjamonkey HalfDork
4/30/11 10:14 a.m.

Way cool, though I think you'll surprise yourself with the weight as well. Me and some friends got an 80 Corolla down under 1500 lbs back in the day.

Nashco
Nashco SuperDork
5/2/11 2:20 a.m.

We continue on the path of no return. Yesterday we did our first fully welded in tube. The dash area had a bar that went across that was basically angle iron...pretty flimsy stuff, mostly used to attach wiring, dash, heater controls, shifter, etc. to. It was only held in with four spot welds, so it wasn't providing much structure originally. This was how it attached before:

We put a 1" x .065" tube in the same spot with 18 ga end plates. This ties into some pretty good structure right next to the door hinge attachment area. The main steering column support welds in, and a secondary bracket bolts to this, so that took some time to make the round tube do what some angle did before, but it was well worth it. The new tube is a jillion times stiffer than the old angle and actually weighs a few ounces less!

Having those huge holes in the floor makes it pretty easy to access weld areas:

Here's the "before" angle and the new tube welded in:

I was pretty happy with how the welds turned out. Hopefully this isn't just luck and the rest of the chassis goes similarly well.

Aaron worked on making some structural tie in at the rear. This will eventually tie in to the roll bar tubing and the engine cradle tubing, so it's important that we beef this area up pretty well. First, Aaron welded these pieces of angle to some 14 ga plate:

This is going into where the rear spring attachment point used to be:

With these plates tacked in and the gussets clamped in, this rear is way, way stiffer. Good progress.

Bryce

AngryCorvair
AngryCorvair GRM+ Memberand SuperDork
5/2/11 8:14 a.m.

Bryce and Aaron -- Your work looks top-notch, and your progress is simultaneously inspiring and disheartening. Keep it up!

Nashco
Nashco SuperDork
5/24/11 5:38 p.m.

We're way past due for an update. We've been slingin' lots of toobs over the last few weeks trying to get the engine attached to a cradle and a cradle attached to a chassis. I've also been jumping through some pretty stupid hoops trying to get decent trades on our few remaining Civic parts. This week I traded our complete Tanabe exhaust for a set of VX wheels, 440cc injectors, OBD2 engine harness, and a Delta regrind camshaft. My patience is definitely getting worn thin trying to trade Honda tuner parts on craigslist, but I guess that's how you have to play this game! We'll need the injectors for E85 and the harness to ditch our dual port setup for MPFI. The VX wheel trade allowed me to take the wheels out of the budget, the camshaft was just gravy.

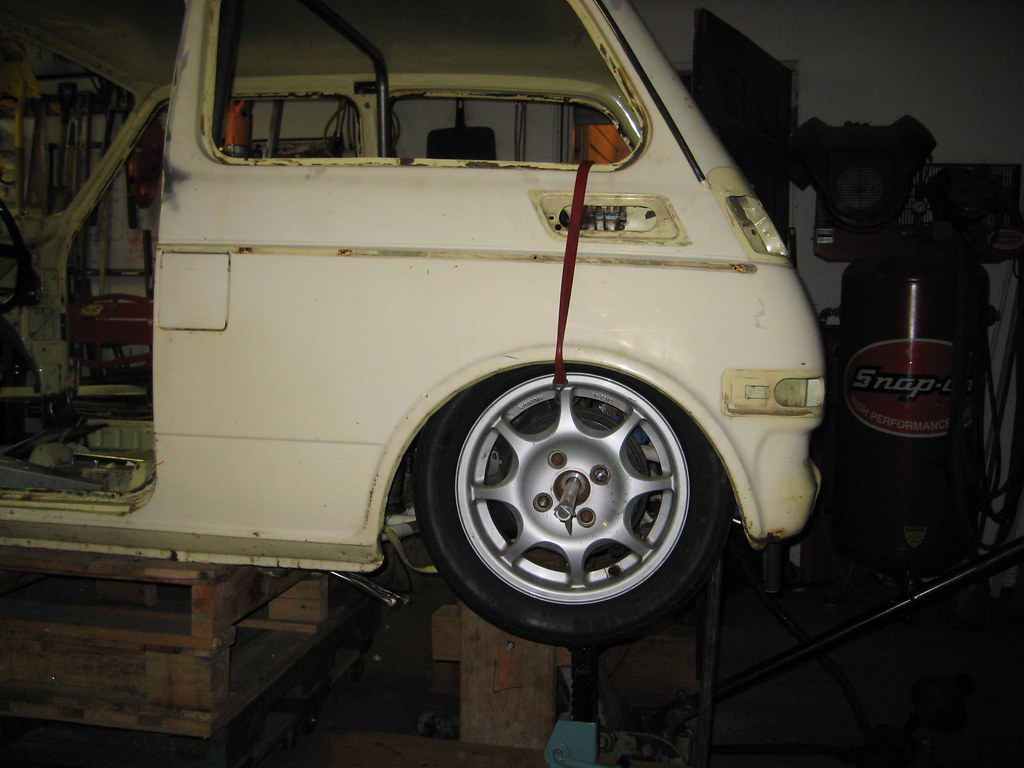
A couple of weeks ago we got some used tires from jbracingtires.net that we're really happy with. They charged me more than they said they were going to, not sure if I was remembering wrong or if they were remembering wrong. Either way, we got some used Hoosier TDs, a 185/60 13 bias ply DOT rated tire. These are a touch smaller than the 185/60R13 A6/R6 type tires, which is better for us. These tires look GREAT on this wheel, we're really happy with the fitment, plus the tread pattern looks appropriate on the Honda. I'm still trying to drum up a set of these locally for cheaper for the challenge, but I had to pull the trigger on something for fitment so we could get the cradle stuff going. These tires and wheels aren't that common, so I've had to scour pretty hard to find good deals on used stuff. In the last six weeks I've compiled three sets of VX wheels (better deal each time!), a set of shaved 175/50R13 street tires for test and tune, and the Hoosiers..getting pretty silly! Here's the new tires during a test fit showing the suspension at anticipated full jounce:

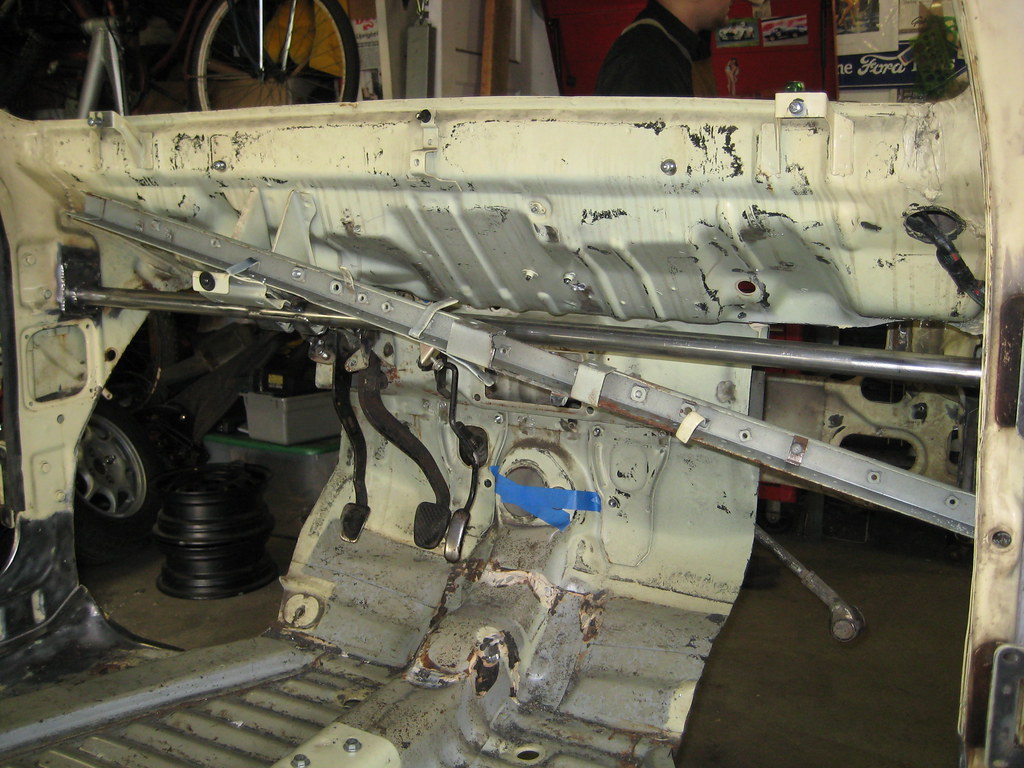
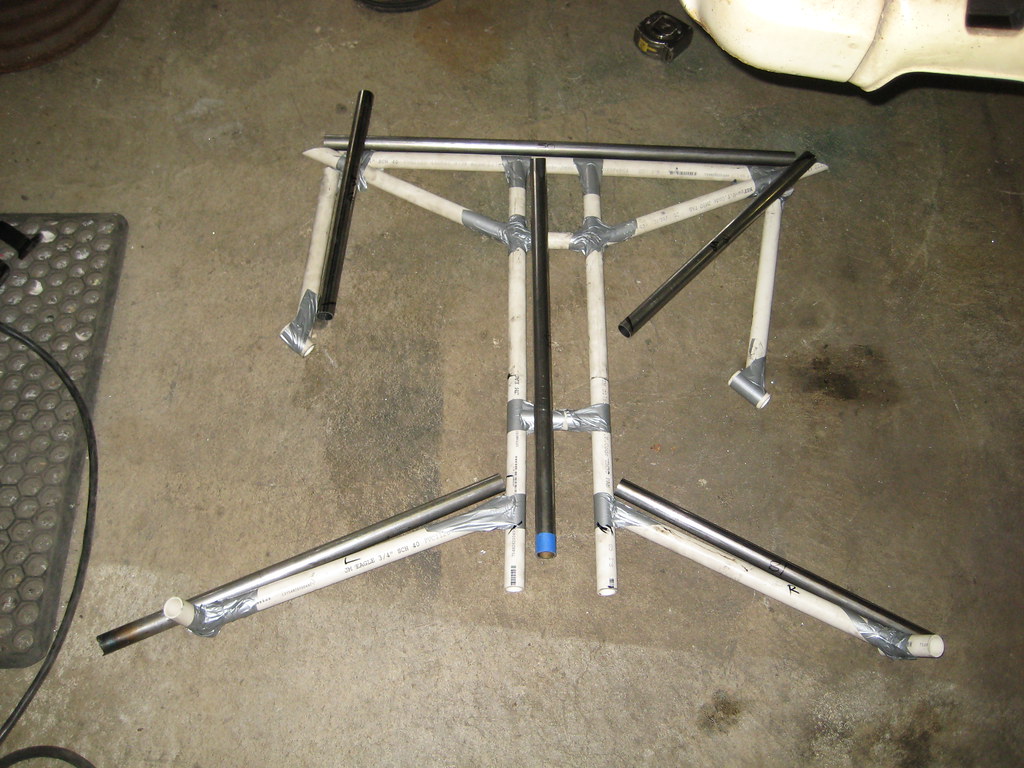
So, on to toob slingin'. We started the base cradle assembly by copying our PVC mockup. Our PVC mockup was pretty accurate, we used it to dial in our cut angles and lengths so that we could pretty much recreate it in steel...way faster to dial in PVC than to dial in steel! For reference, almost everything is made from 1"x.065" round, .75x.065" round, 14 ga sheet, and 18 ga sheet.

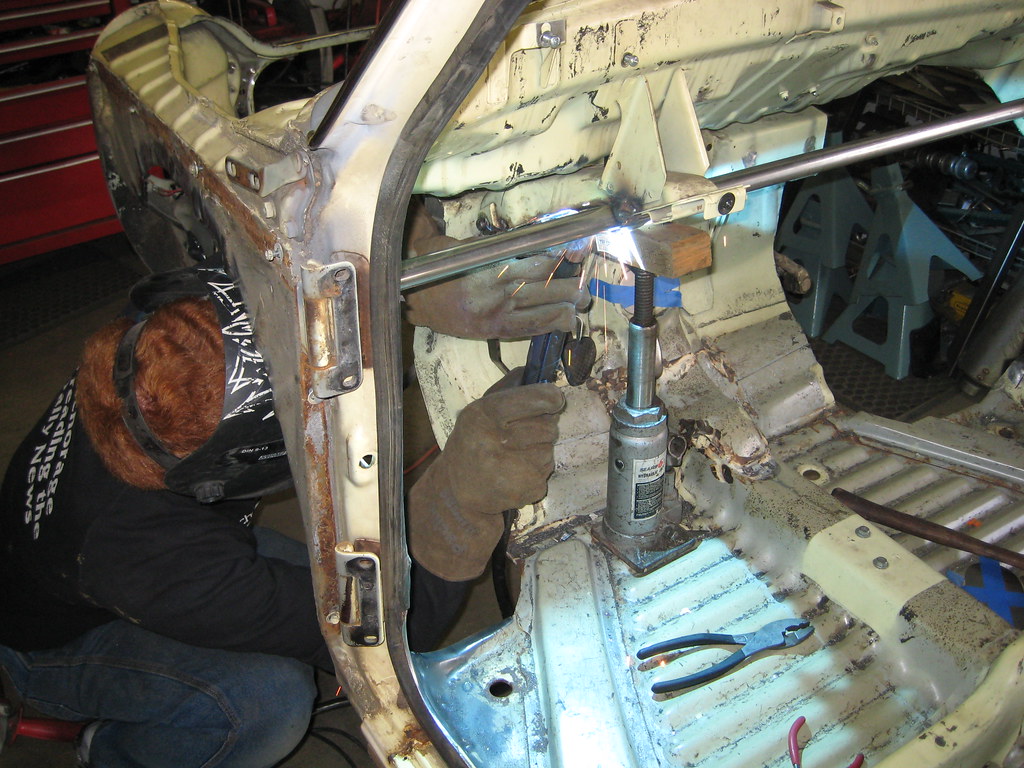
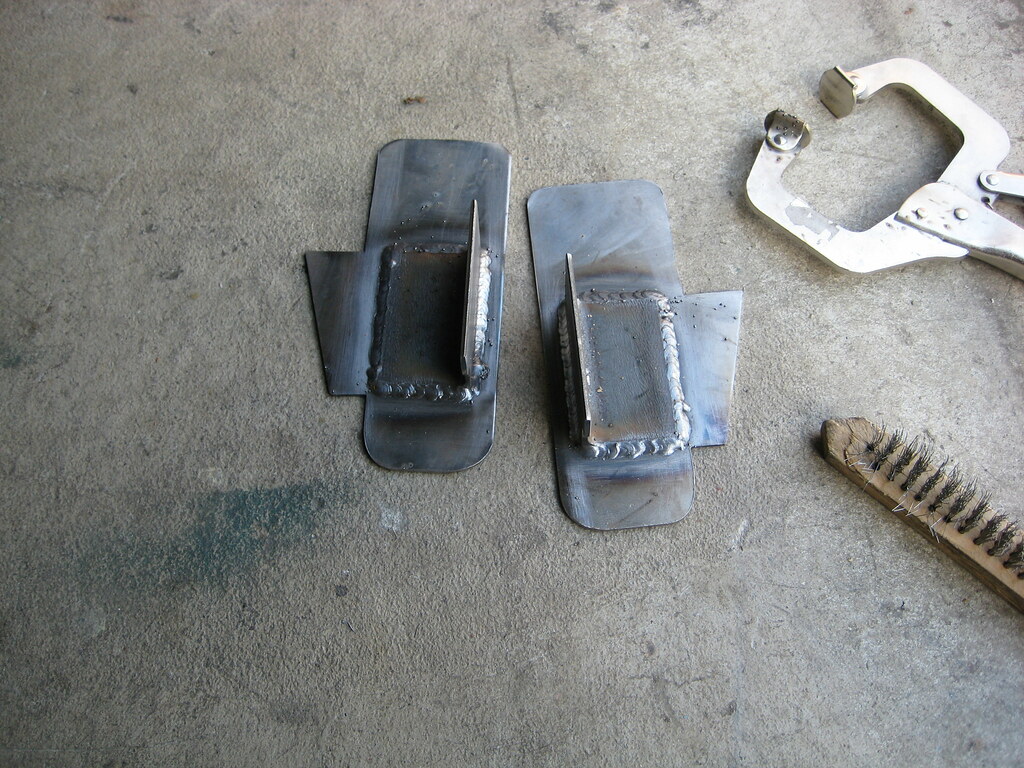
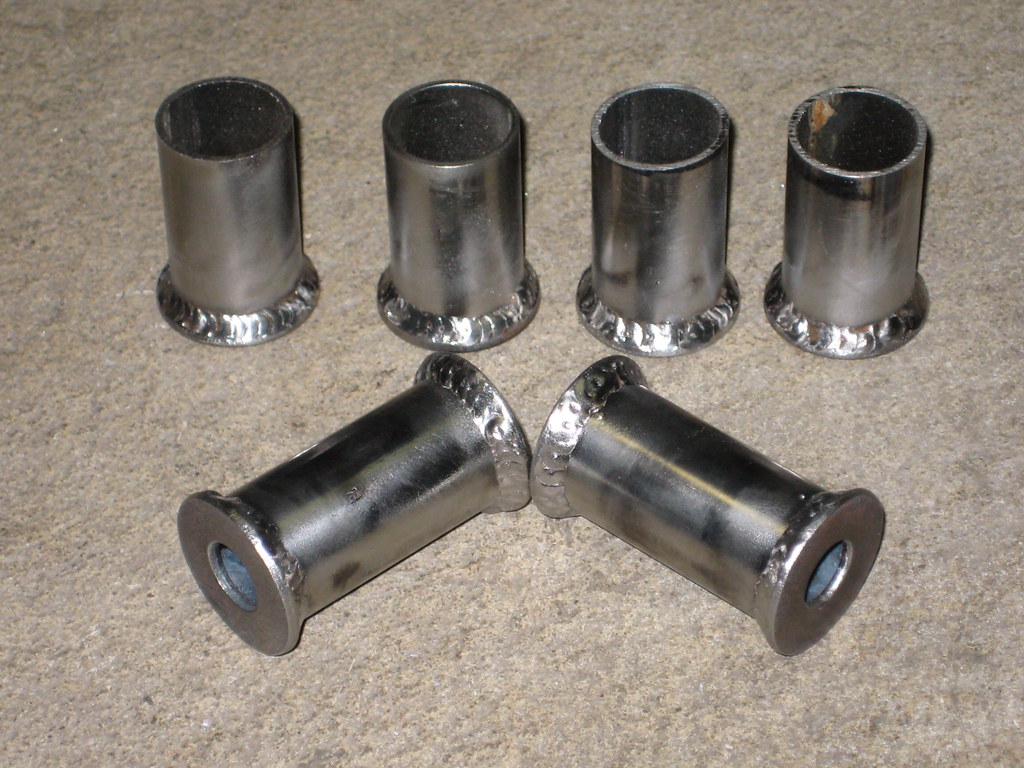
A lot of our tube ends use this scheme, a couple of washers welded to the 1" tube. The local (awesome) hardware store "Park Rose Hardware" had these uncoated steel washers that made it a breeze. Here's some of Aaron's welding warmup, nice and easy to access to dial in the welder settings.

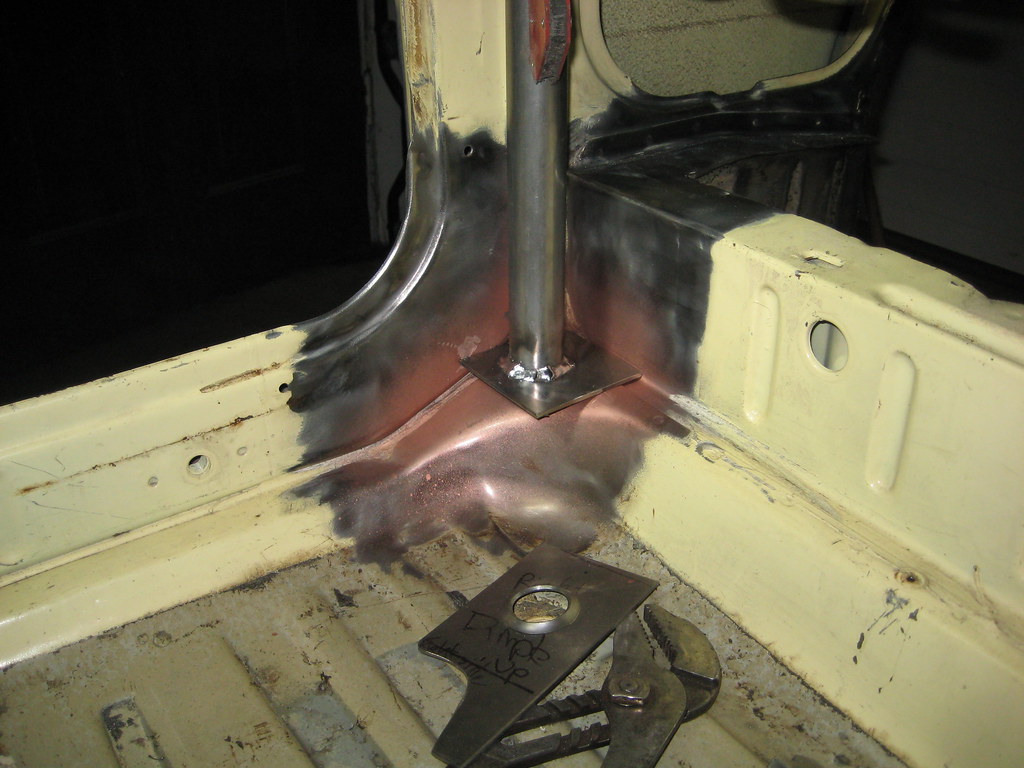
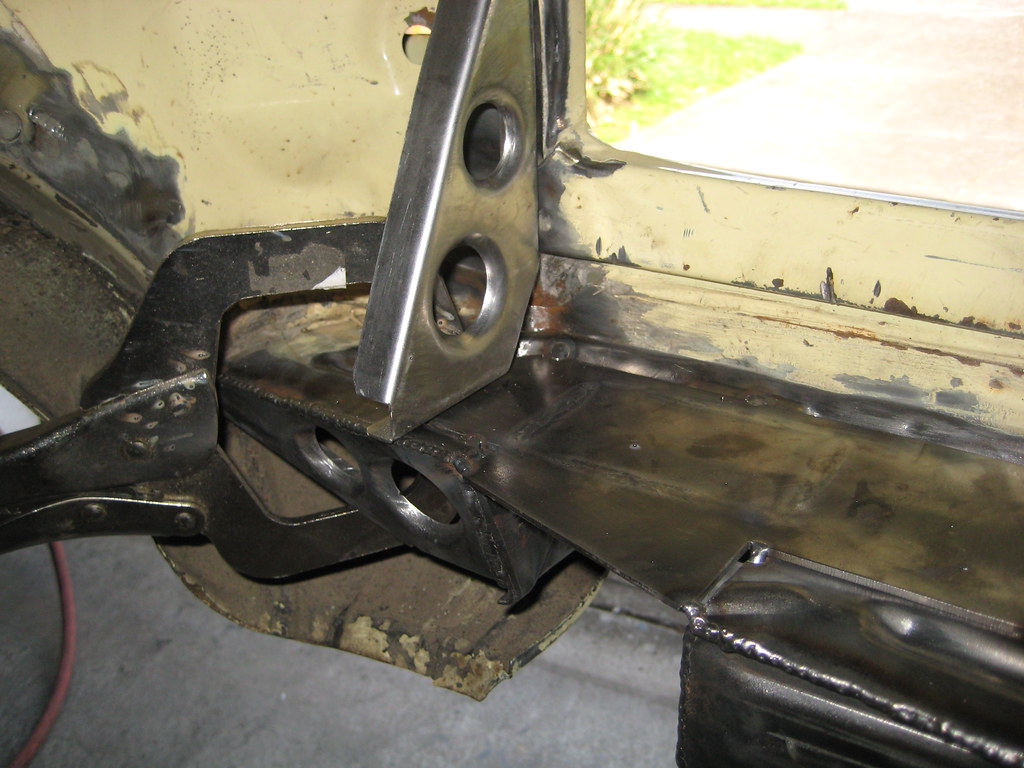
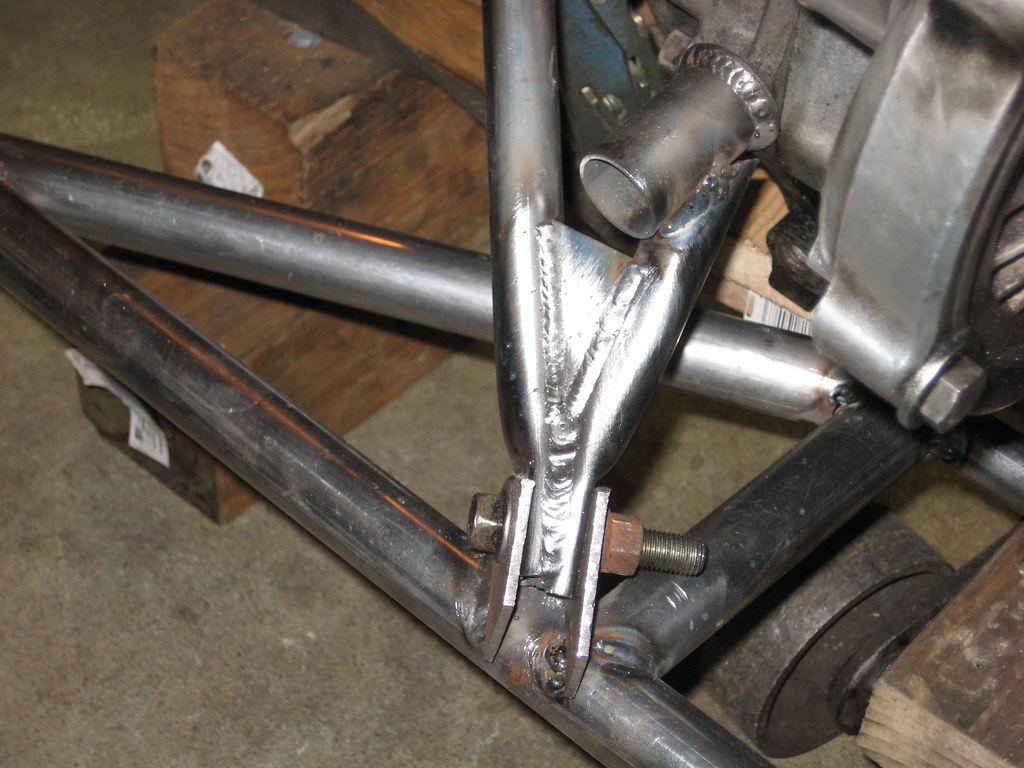
Our cradle uses a setup similar to the Fiero, which makes dropping the engine+suspension assembly a breeze. Here's our rear attachment area starting to form, which later gets more tube coming to it and some gussets.

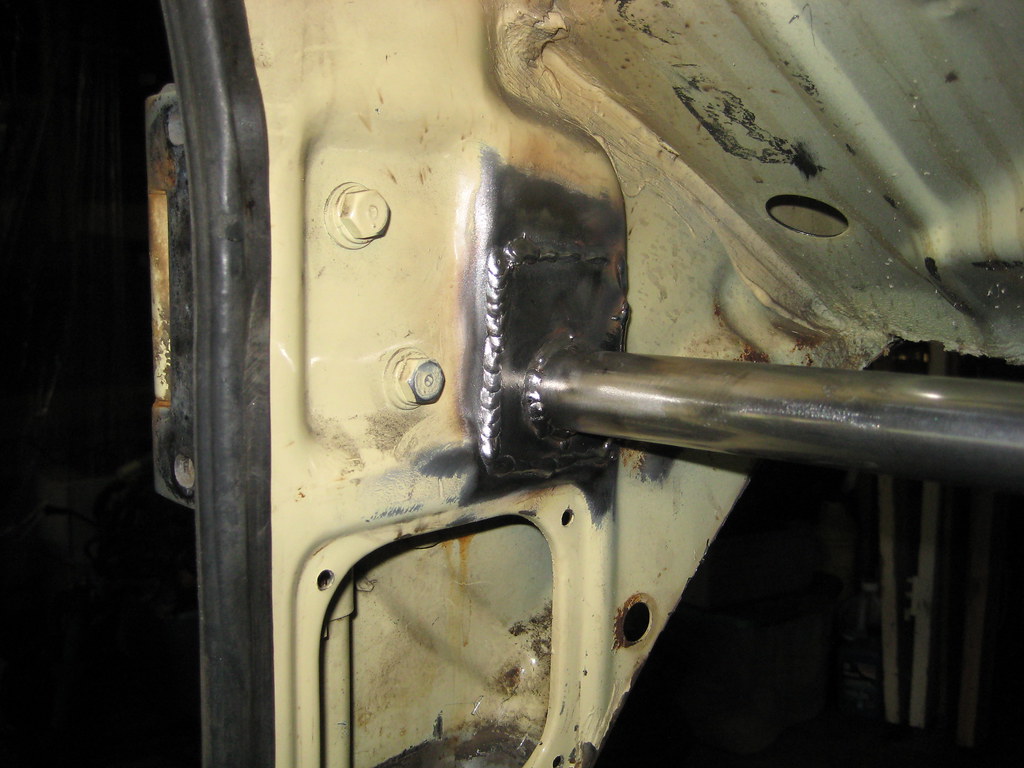
Here's the space wars bracket...I'm convinced this looks like something you'd see in a Star Trek prop. This one attaches near the oil filter and provides an attachment point for the tube coming from the rear cradle area that won't interfere with the axle shaft.

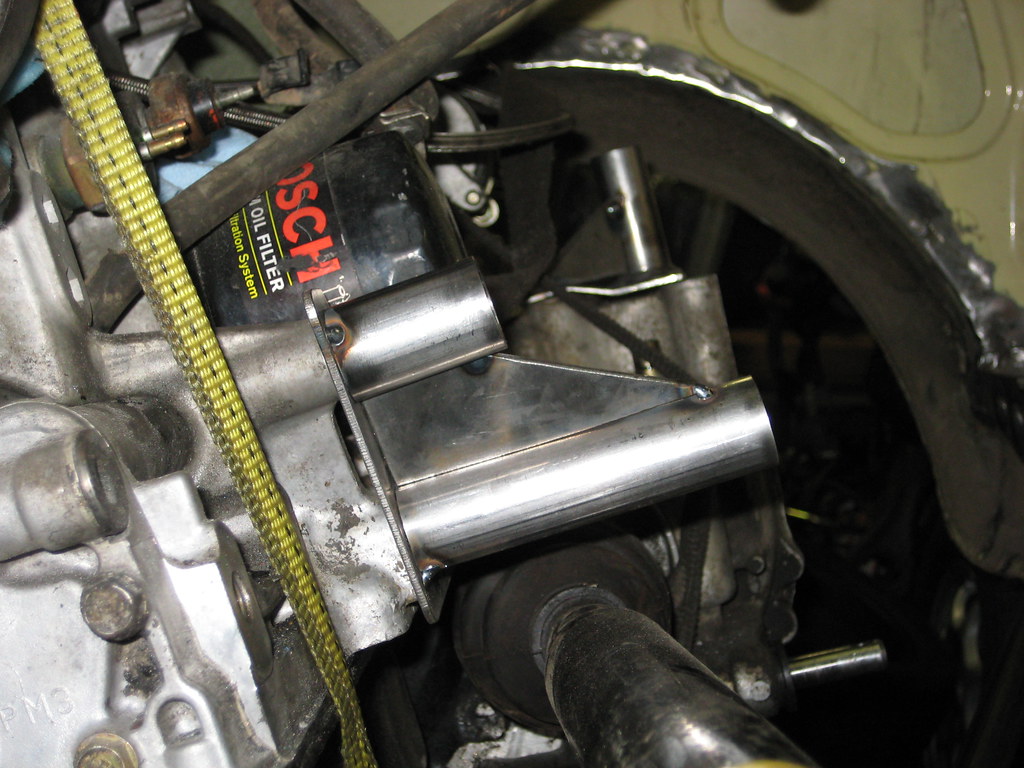
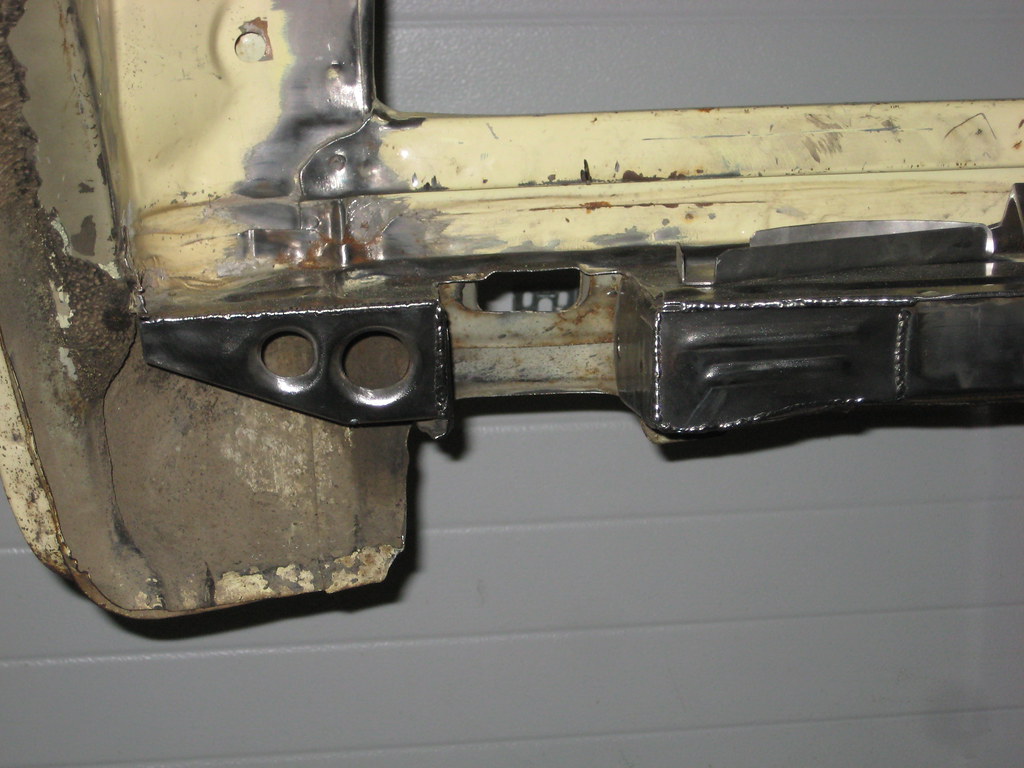
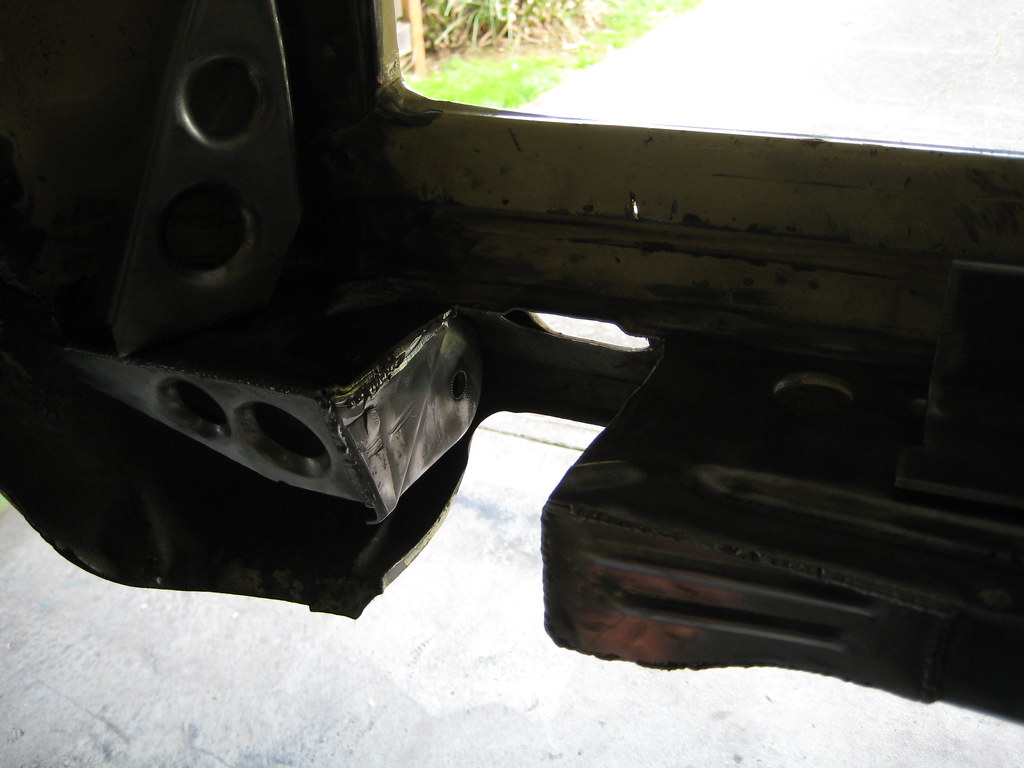
There were a few head scratchers, this was one of them. Trying to figure out how clear everything while also making it serviceable, strong, light, and manufacturable was a challenge on a couple of spots. Here's one where we had to get creative. All the pinched tubes have a short section of smaller tube pinched inside the larger tube, then they are welded on the end and a hole is drilled through the whole assembly. These are surprisingly strong and the secondary inner tube help to spread any bending loads that may end up in the tube.

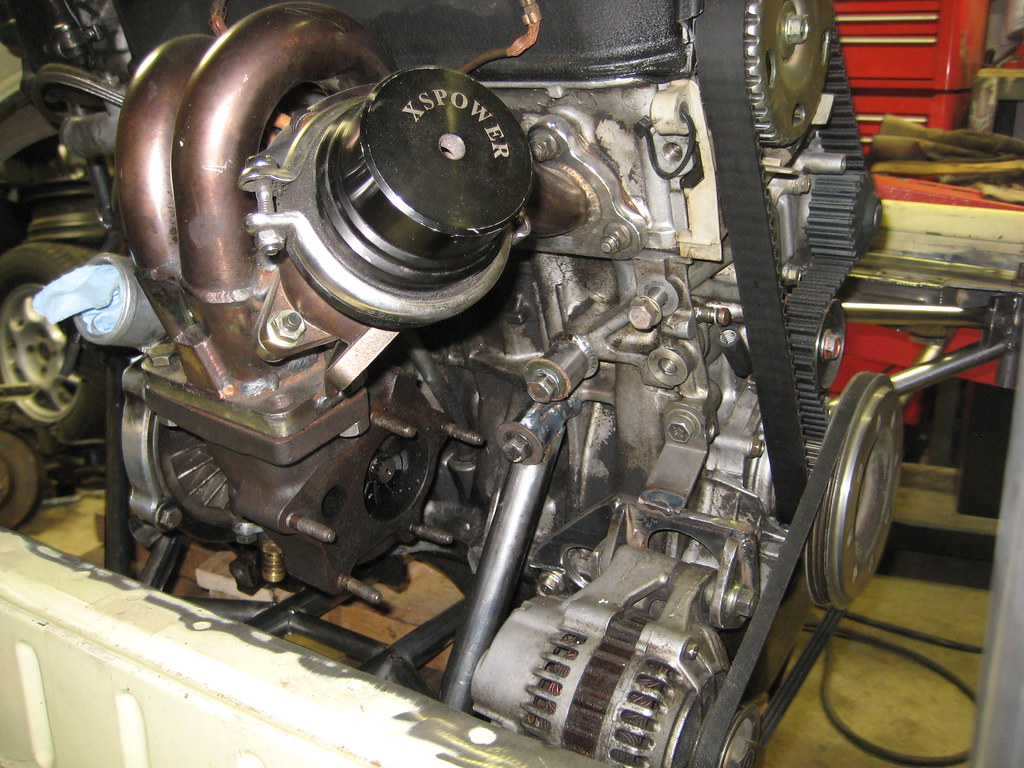
Based on how much talk there was about alternators and batteries, you will all be relieved to hear that I figured out how to get an alternator on there without interfering with the tire/suspension/axle clearance. I got a free D15 crank pulley and cam pulley from a craigslist adventure a while back, apparently early D15 crank pulleys didn't have any damper at all, perfect for modifying! Unfortunately, the early D15 crank pulleys were made for a smaller crank snout than our D16A6 had, so it didn't fit right away. My buddy Jesse (who helped with my Fiero build as well) chucked the pulley up in the lathe and machined a couple millimeters out of the center bore to match the D16 pulley and also lopped off the extra ribs that used to stick out for power steering and AC. I made a bracket to locate the alternator in just the right spot out of some 1/4" steel we got for free out of a scrap bin. So, we now have a FREE crank pulley and bracket that allow the stock alternator to work with the stock belt! I also bought an ebay special $40 pulley that will work before I got the free stock pulley, but of course I was glad to get that $40 back out of the budget. It's hard to tell, but there's just enough room for the turbo downpipe to shoot over the alternator, then turn down to exit in front of the tire.

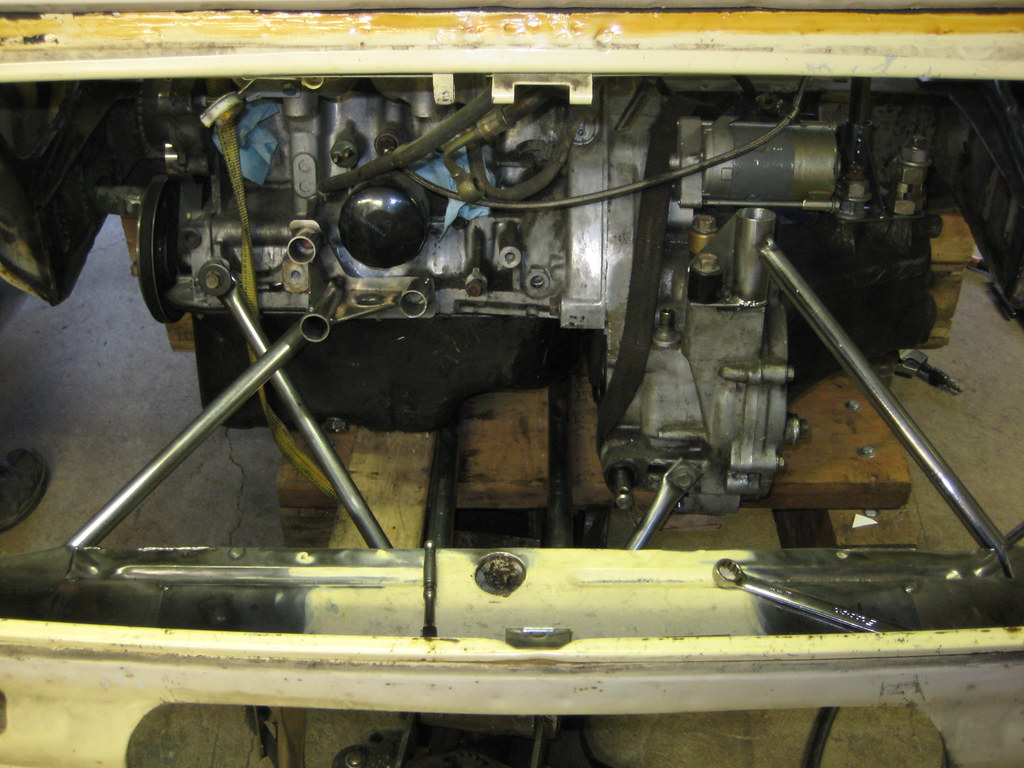
This was a pretty big moment for us...the engine is finally attached to the chassis without any crutches!

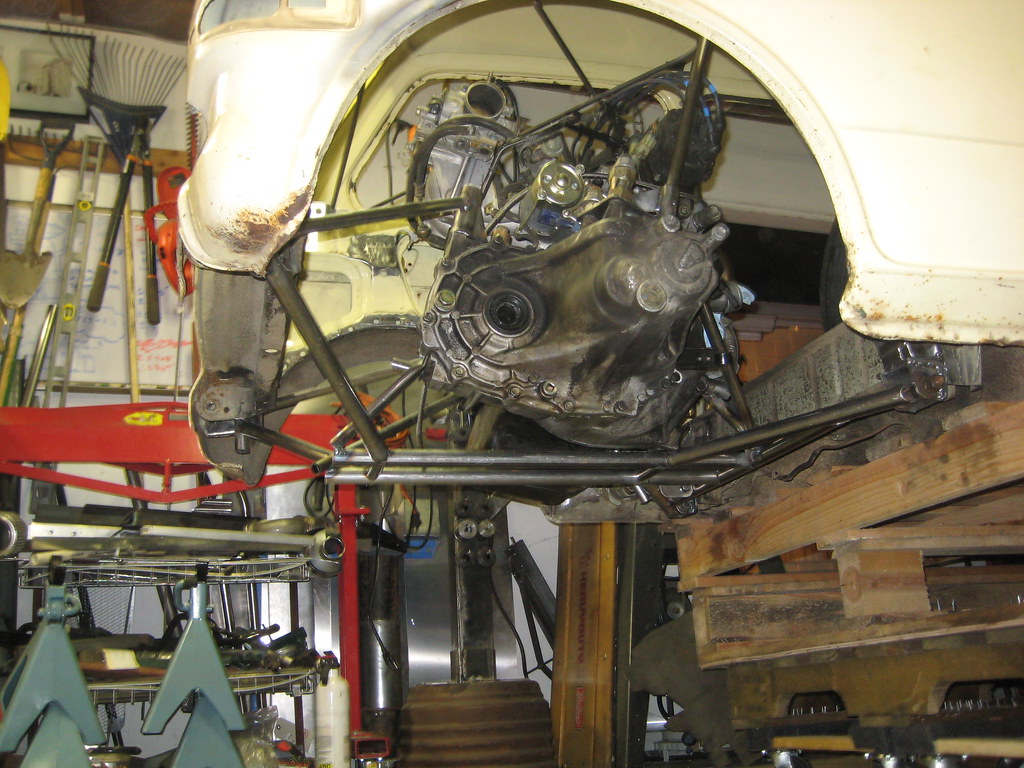
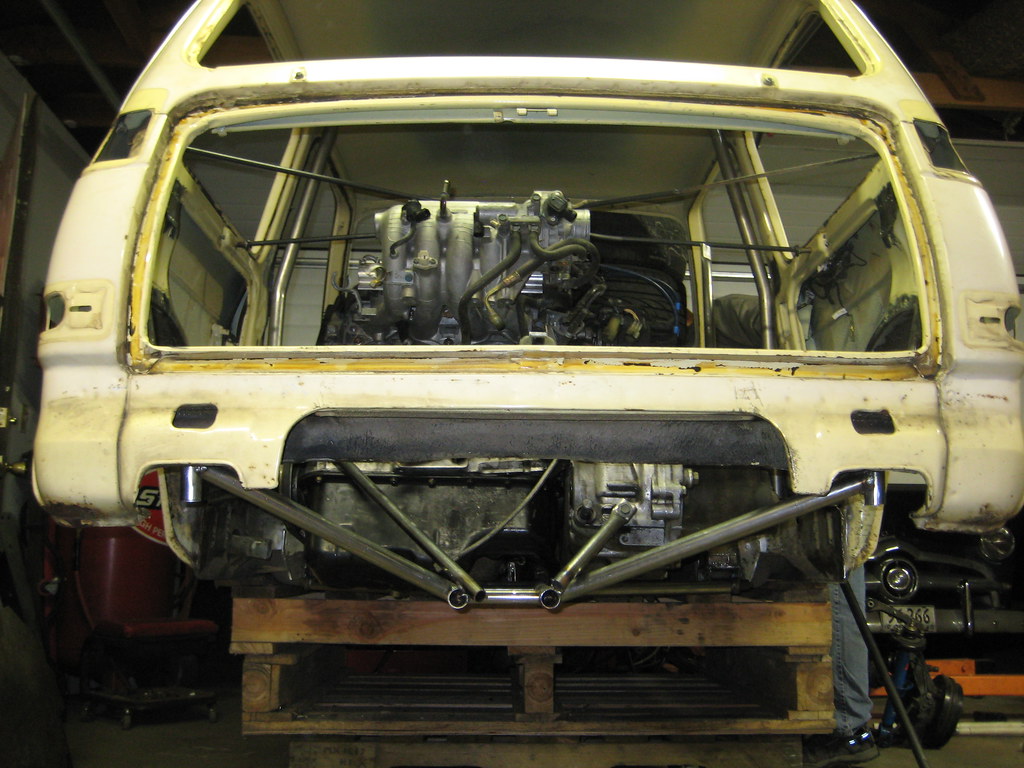
There are still some temporary struts between the cradle and engine; we could have removed them but figured that we'd leave them in as long as we can while we do suspension mock ups. Starting to see the details take shape is helping motivation, and we'll need all the motivation we can muster as we start to hash out the suspension mounting details!

That's all the build progress we have to show and things will probably be slow for the next week and a half or so. I'll be off the grid on a wedding location scouting trip with my fiance and Aaron will probably be distracted with his new toy:

Bryce

tuna55
tuna55 SuperDork
5/24/11 6:25 p.m.

Great work, guys. This thing is looking great. What kind of welder are you using? The welds look pretty good.

1 2 3 4 5 ... 10

You'll need to log in to post.

Our Preferred Partners
pA6e9HPWHsEtw2jcGuNdrJHThD7gbD7hVKi4AmYHgaBtfaMgxUJnGCpNUuOhE0ps