oldeskewltoy
oldeskewltoy HalfDork
10/26/11 1:32 p.m.

In reference to this thread - http://grassrootsmotorsports.com/forum/grm/6speed-option-for-your-toyota-apowered-rwd-car/40219/page1/

And so it begins....... above you will note is a parcel that just came to me from Joe Leen. Inside this parcel are 2 LEEN adapters - one for me, and one for the other purchaser here in the USA - Jesse

In the next few days/weeks, Jesse and I will be getting together to assemble my LEEN J160 (yep, I"m the guinea pig in the good ole USA) I'll be reporting all of the issues, and procedures to make it easier for you to do yourselves.

The first step was the purchase - not that hard... except prying $2 grand plus from your wallet

the second step was getting it here - The shipping charges on 2 kits was 135 euro - as can be plainly seen from the "EIRE" labelled tags. Oh! btw, that is NOT part of the purchase price.

its only money

In the next day or two, we will open all the packaging and account for all the parts purchased.

Stay tuned much more to come

4cylndrfury
4cylndrfury SuperDork
10/26/11 1:35 p.m.

unevolved
unevolved Dork
10/26/11 1:42 p.m.

I'm picturing it as some kind of scooter.

mad_machine
mad_machine GRM+ Memberand SuperDork
10/26/11 1:42 p.m.

I am lost too

bravenrace
bravenrace SuperDork
10/26/11 1:47 p.m.

Why don't you guys read the thread in the link he provided?

wvumtnbkr
wvumtnbkr GRM+ Memberand Reader
10/26/11 1:49 p.m.

Its a $2000 dollar kit that lets you buy a $200-$700 transmission to put into your $500 car.

If you also buy a $200 bearing and get a custom driveshaft, and don't care about the speedometer being accurate...... It will even work!

That is what I got out of reading the info that was linked.

P.S. Isn't this the same transmission that is known to be weak and suck ass in the RX8?

914Driver
914Driver SuperDork
10/26/11 2:03 p.m.

Is that a key of hash?

wvumtnbkr
wvumtnbkr GRM+ Memberand Reader
10/26/11 2:20 p.m.
4cylndrfury wrote:

Since I seem to be in a pissy mood, the bunny has two friggin pancakes on its head!

oldeskewltoy
oldeskewltoy HalfDork
10/29/11 1:40 p.m.
wvumtnbkr wrote: Its a $2000 dollar kit that lets you buy a $200-$700 transmission to put into your $500 car.

Well... it may be a $2000 kit, but most of the Corolla people I'm associated with have significantly more valuable cars than $500. I can only guess you are use to RX7s and so based your assumption of value on your very own POS

Now, getting back to showing HOW this would go together........

Well, since half of this box of goodies was not mine, I decided to wait till Jesse had some time. Joe used a small hamper basket to hold all the parts. As you can see each part is well wrapped

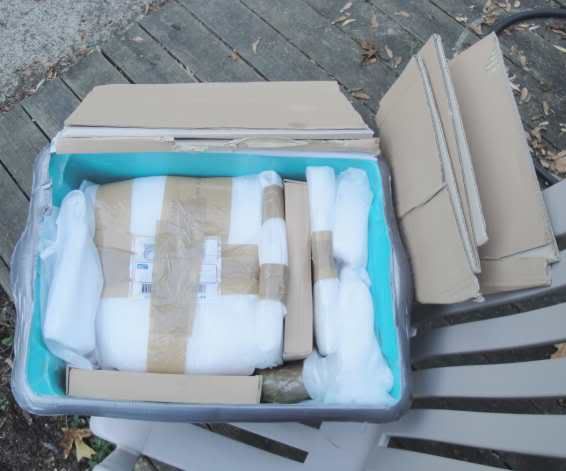
We unwrap all the parts to make sure LEEN sent us everything we purchased

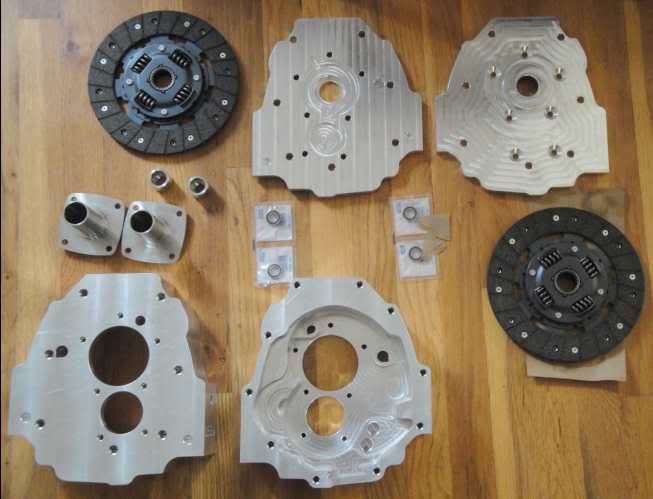
Each of the pieces is laid out to check for condition. It all looks GREAT... We did have to find 7 flathead allen metric 8mm bolts. We also had to salvage the seal. This MUST BE DONE WITH CARE... that particular seal comes on no other car... that means the only place to get it is where the J160 was offered.... Europe, or Japan

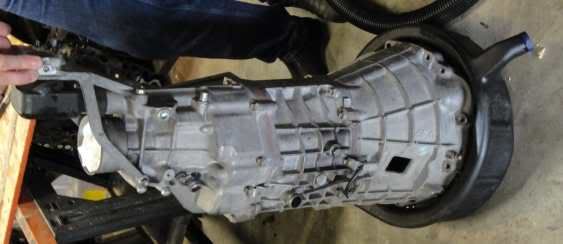
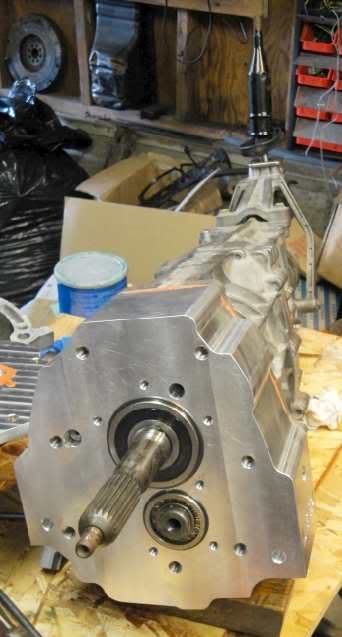
We bring the trans up from my basement, and found one drain plug in the center section, the plug is out of view. This shows the J160 in the drain pan, bell down, we had removed what we thought was a drain plug from inside, but in reality was a shift detente plug - no crime, no foul, no issue.

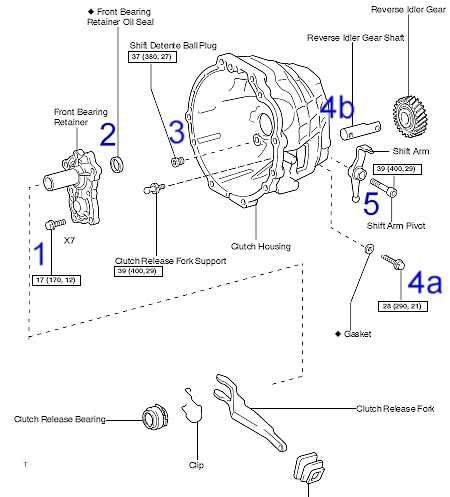
Here is the FSM view of the bell components. I'll be referring to this and likely reposting it (if easier then the viewer going back) to make the explanations easier. The detente plug I referred to in an earlier post is # 3

Once we were confident the box was empty, we proceeded to remove the bell section from the rest of the transmission. Toyota's procedure is to rest the bell as we had and disassemble it from the tailhousing forward. Since we have no need to rebuild it, Jesse and I decided to start it from the other end.

We began by removing the front bearing retainer inside the bell housing. There are 7 bolts (1) that fasten it to the bell. These will be replaced for the 7 flathead allen bolts we had to supply for assembly of the LEEN.

Once the bearing retainer was removed, there were 2 large snap rings that needed to be removed from the main, and lay shaft bearings. Using a snap ring plier the snap rings were removed

We then removed the reverse idler gear shaft retention bolt(4a) from the side of the trans case.

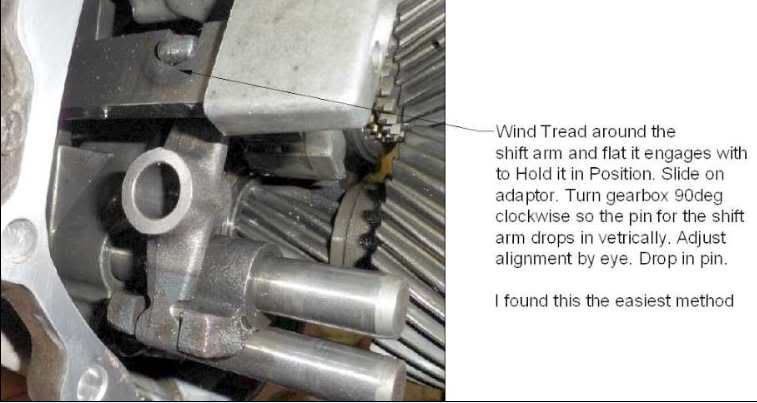
Followed by the shift arm pivot bolt (5) This will be one of the trickier parts on re-assembly since we chose to disassembly it from the bell housing end.

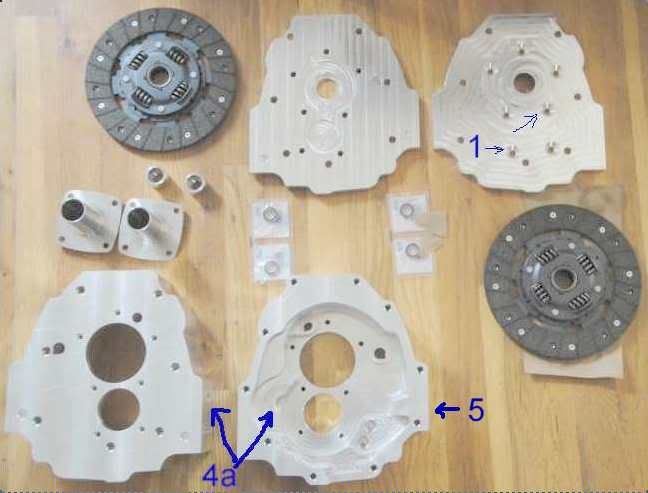
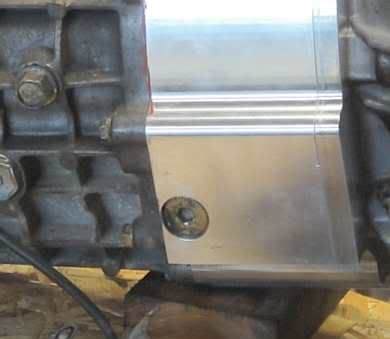
Here is an annoted version of the above parts layout. I've used the same numbers to help show the viewer how the LEEN fits. #4a shows the reverse gear shaft bolt hole, and how the reverse gear shaft nests into the side of the adapter, and #1 is pointing to the reason we need 8mm flathead allen bolts instead of the regular 8mm bolts. #5 is where the shift arm fulcrum bolt fits through the case to retain the shift arm

We then removed the 10 8mm bolts holding the bell section to the center section of the transmission. Following procedures described in the FSM we struck the bell housing with a mallet to break the sealant bond

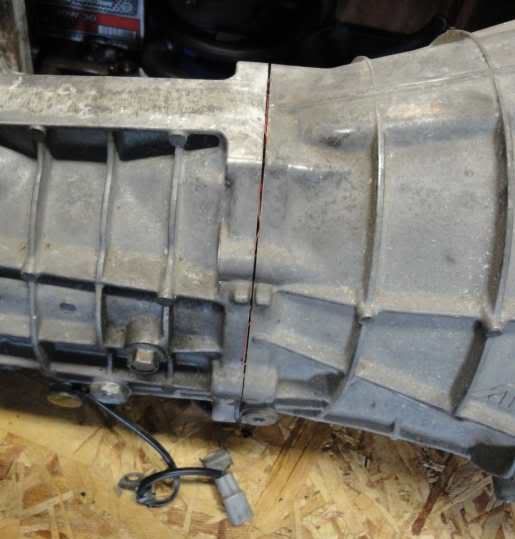
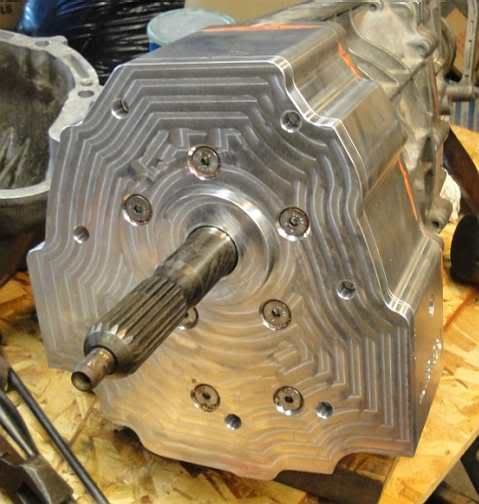
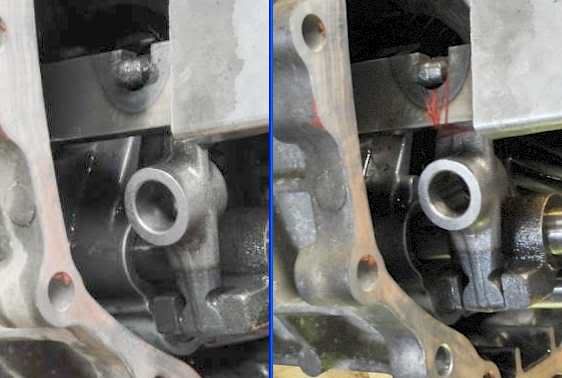
At this point Jesse and I started, and failed, initially to wiggle the case free. Not wanting to damage the mating surface of the block, we chose not to pry inside the split case. Not until after we took the above photo did we see the prying flanges in the center of the above photo. Using a screw driver we gently worked the prying flanges until the gap was about 5mm. Then using the handle of the mallet we used above, we tapped on the main, and lay shaft bearings till the front of the case came free

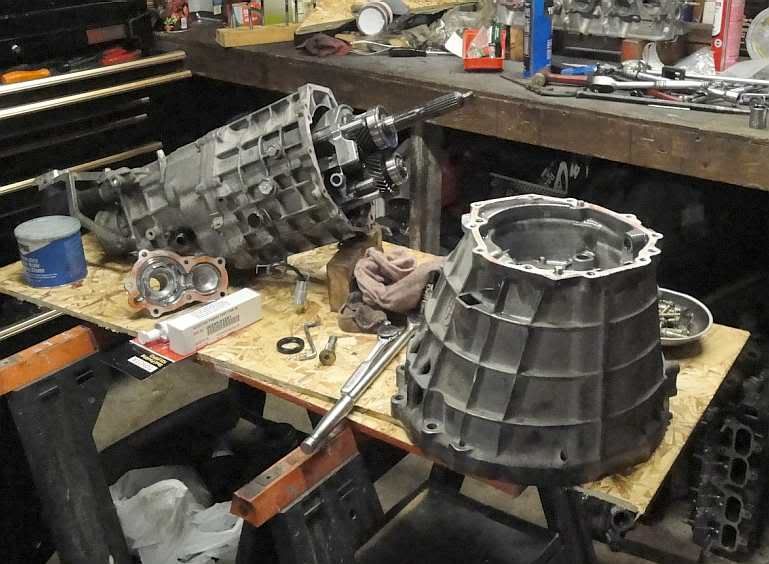
other things to note in the above photo....... the bearing retainer, the removed seal from the bearing retainer, and the shift arm fulcrum bolt. For those with sharp eyes you can also see the shift arm in the gearbox and see the hole it pivots on the fulcrum bolt

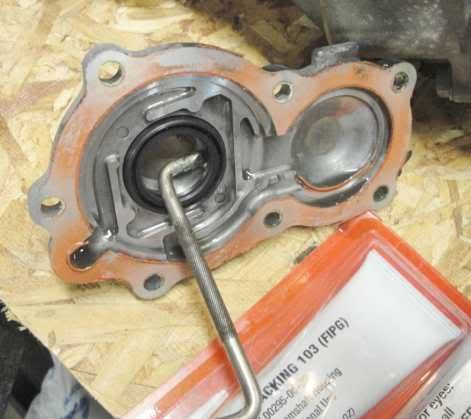
The input shaft seal, as mentioned earlier is not available in the US, at least not from Toyota. The seal part number is 90311-29001. I will recommend to LEEN that they add a new one to the minimum order for the next production run. Upon close inspection the seal in my J160 showed no wear, so I used a 90 degree screwdriver to GENTLY work the seal free from the bearing retainer

more to come........

JohnyHachi6
JohnyHachi6 Reader
10/29/11 3:32 p.m.

I'd bet this is identical to the RX-8 input seal. I just got one for my GF's car. Mazda part number is Y601-17-131. It was $10.70 from the dealer. You can take a look at the parts catalog here:

http://www.jimellismazdaparts.com/showAssembly.aspx?ukey_assembly=299800&ukey_make=995&ukey_model=14370&modelYear=2006&ukey_category=20276&ukey_driveLine=0&ukey_TrimLevel=0&ukey_modelRange=0&searchString=

oldeskewltoy
oldeskewltoy HalfDork
10/29/11 5:48 p.m.
JohnyHachi6 wrote: I'd bet this is identical to the RX-8 input seal. I just got one for my GF's car. Mazda part number is Y601-17-131. It was $10.70 from the dealer. You can take a look at the parts catalog here: http://www.jimellismazdaparts.com/showAssembly.aspx?ukey_assembly=299800&ukey_make=995&ukey_model=14370&modelYear=2006&ukey_category=20276&ukey_driveLine=0&ukey_TrimLevel=0&ukey_modelRange=0&searchString=

good to know... thank you

especially if we find that this adapter kit fits the Y16M-D transmission too. I measured the input shaft @ the seal and came up with 30 mm, is the shaft on the RX-8 input shaft also 30mm?

JohnyHachi6
JohnyHachi6 Reader
10/29/11 7:18 p.m.

It seems to be a bit under 30 mm (maybe more like 29.5 mm?). I don't have the case separated on my parts transmission so I can't get in to take a good measurement with my calipers. The ID of the seal itself is ~29mm though, so I expect it would work. The front bearing retainer (the part shown in your last image) looks identical, and the sleeve on that part where the input shaft goes through has an ID of 30 mm.

oldeskewltoy
oldeskewltoy HalfDork
10/29/11 11:15 p.m.

JohnyHachi6... what is the O/D of the seal? The O/D of the Toyotas seal is 42mm

JohnyHachi6
JohnyHachi6 Reader
10/30/11 12:53 p.m.

Mazda one is the same - 42 mm.

44Dwarf
44Dwarf Dork
10/30/11 1:43 p.m.

most seals will have metric numbers molded in to the rubber like 42 29 8 thats your sizes 42mm OD 29mm ID and 8mm think.

oldeskewltoy
oldeskewltoy HalfDork
11/3/11 10:52 p.m.
oldeskewltoy wrote: more to come........

We did do one additional thing last week... we "fondled" the parts some and did a first fit...

Jesse came back today, we had finished disassembly, so we proceded on to re-assembly.

The J160 is designed to be disassembled from the tailhousing forward - first the tailhousing, then the middle section, and finally the bell end. What we are trying to do is to just work the bell end of the problem, and leave the other 2 sections untouched.

Leaving the tailhousing and center sections untouched gives us one problem to overcome...... How to hold the 5th gear lever in one place, so that it stays in that place until AFTER the box is closed, and the fulcrum bolt is fitted. (#5 above) LEEN suggests using thread....

Jesse tried the thread retention method

Do to the curved shape of the shift arm, having the thread hold in one place wasn't easy. To make a long story short... it didn't work for us. While Jesse was running the thread, I began working on a back-up plan. I went inside and picked up 2 very thin rubber bands, the kind used to hold a advert flyer(newsprint type) together. The thickness of the rubber bands were about 1mm, they were about an inch in diameter. We used one around each end - this held everything in the right place for the fulcrum bolt to slip into position once the case was closed

Yes - the 2 rubber bands remain inside the gear box. I fully expect the petroleum based lubricants to soften the rubber and make the leaving behind of 2 rubber bands a non event.

So with the key problem resolved, we proceded with the re-assembly

The 2 shafts are drawn a bit forward so that the snap rings can be fitted.

Once the snap rings were fitted, the reverse idler retention bolt (4a in previous posted diagram) is fitted. The original bolt is just a touch to large, I supplied another Allen head bolt and used it to secure the reverse gear idler shaft

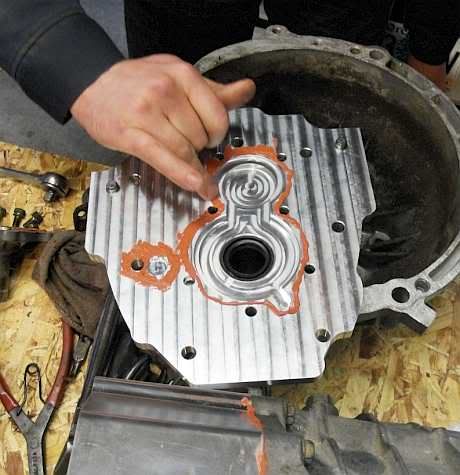
Once the adapter was installed, the seal plate was added. Here we are applying the sealant, and the previously removed seal, is now securely installed in the seal plate.
The one area outside the main sealing area is a hole allowing the shift rods full range of motion, we sealed all around it so there would not be any leaks.

If you look carefully you'll note we used a little anti-seize under the flatheads to allow a more accurate torque value, it also should minimize oxidation that might lock in a bolt.

And here we have one LEEN J160.... without the shortened shifter location

unevolved
unevolved Dork
11/4/11 9:25 a.m.

That's pretty sexy.

You'll need to log in to post.

Our Preferred Partners
dzjMaSbptrc4FETCSkHx6wnbeHplv8Z05lXgucGYwHUj81qwN02MxKzMY6M748w0