I'm about to blow the dust off the '66 Chevy II and finish what I started many years ago. I have the length of the rear quarter to butt weld the new panel to the old. Someone here had a method for doing this, and I wanted to review the process. As usual, my search skills are wanting. Anyone?
NOHOME posted some very good info across some of the MIG welding threads as well as in his build thread, but it's buried pretty deep so he linked a build thread from another site.
maybe start here https://grassrootsmotorsports.com/forum/build-projects-and-project-cars/volvo-p1800eskinda/72311/page34/
this one is good too http://www.garagejournal.com/forum/showthread.php?t=53534&page=16
https://grassrootsmotorsports.com/forum/grm/welding-sheet-metal/54469/page1/
https://grassrootsmotorsports.com/forum/grm/best-way-for-inexperienced-welder-to-weld-in-replacement-floor-pans/111784/page1/

NOHOME
PowerDork
10/20/16 12:45 p.m.
1988RedT2 wrote:
I'm about to blow the dust off the '66 Chevy II and finish what I started many years ago. I have the length of the rear quarter to butt weld the new panel to the old. Someone here had a method for doing this, and I wanted to review the process. As usual, my search skills are wanting. Anyone?
I do have this same tutorial burried in the Molvo build thread, but even I cant find it on short notice, so I will send you to the Volvo forum where I demo the method.
http://forums.swedespeed.com/showthread.php?327681-Sill-replacement-Easy-for-the-most-part
From start to finish the tutorial covers a sill replacement on a Volvo P1800. From removal of spotwelds to butt-welding and puddle welding on the new panel. If you just want the butt-weld tutorial, then go straight to post #14.
I'l be checking this out as well. Thanks!
In reply to NOHOME:
Awesome! Thank you. Back out to the garage for some more focused practice!
NOHOME
PowerDork
10/20/16 4:44 p.m.

Backside; you can count the number of times I pulled the trigger. There is no gun movement during the time the gun is hot.

Good stuff! About to start sheet metal repair on the Caprice, so this is quite timely.
NOHOME
PowerDork
10/21/16 9:06 a.m.
Pay special attention to the part where it tells you to clean both sides of the tin. Clean tin makes a huge difference. Often, the molten puddle will absorb either fumes or solids from the contaminant, and then, rather than flow and solidify, it will just fall out the back leaving you with a hole. If it happens, don't panic, just use the same technique to fill in the hole.
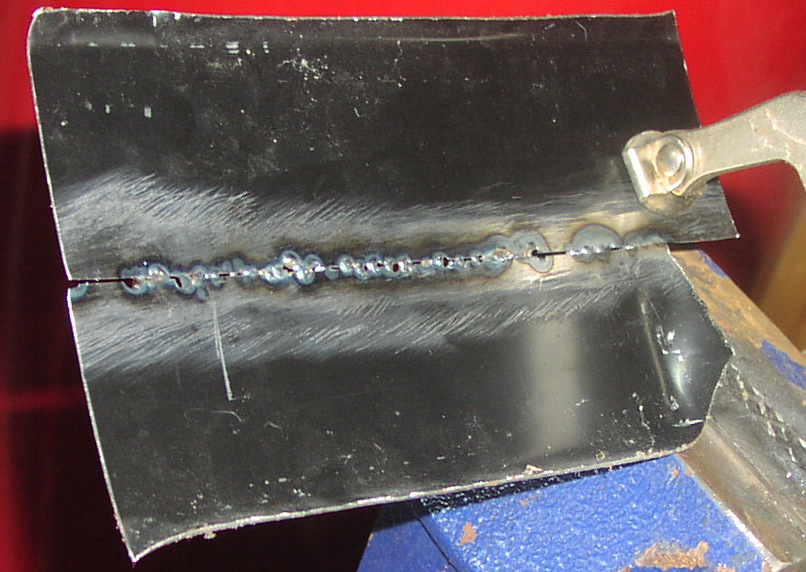
Well, apparently I stink at this more than I thought. I'm just getting a mess on the butt welds I've tried. Metal just lays on top. If I crank up the heat, I blow holes. I did make what I consider to be decent plug welds, and I'm reconsidering my decision to butt-weld this thing. I've already had one experienced body guy suggest backing the joint with sheet metal and plug-welding the length.
First pic, topside:
Second pic, backside:
NOHOME
PowerDork
10/22/16 1:47 p.m.
http://www.wellesworld.com/butt1.jpg
Biggest issue I see is weld contamination. First thing I would do is clean the metal.The brown E36 M3 is from paint burning off.
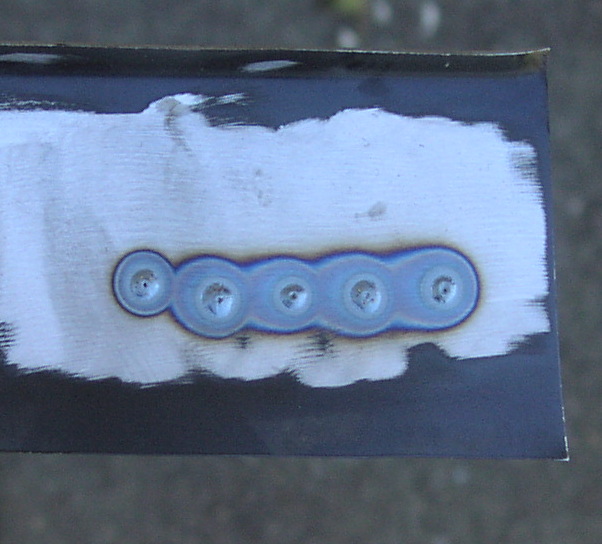
For troubleshooting purposes, rather than try and do a bead, go out and do a series of single dots like in the pic. That is just a one second trigger pull without moving the gun or doing anything; hard to mess up.

Use both hands: one to pull the trigger and one to hold the copper cup from moving at all. You want zero movement of the gun while it is on.
Pull the trigger and do a count of one second.
Stop.
Look at the results. Did you make a hole? If so, then turn the heat down one setting and try again. If you did not make a hole, then flip the piece over and see if the back looks like the top. If there is not enough penetration, turn it up and try again.
At this point stop trying to run a bead. Make ONE tack that looks like the one in the picture and build from there. If you cant get the single tack, come back with a picture and we can trouble-shoot. Did I mention that your metal needs to be cleans at least an inch either side of the weld? On both sides?
By the way, is this flux core or gas MIG?
Regardless, you need to have a look at the polarity of the gun. The gun should be positive for gas MIG and - for flux Mig
Another thing I will mention; crap or old welding wire will ruin your day. it it looks like you are burning sparklers then the wire is junk. I once bought a roll or Chinese wire and spend the whole day thinking my welder had a problem. Once I went back to a roll of Lincoln wire it was fine.
Couple of answers, but I don't think I'll be back in the garage to try again until tomorrow at the earliest.
Welder is Hobart Handler 140 MIG with C25. Pretty sure I've got the polarity set up right, since I've only ever run MIG on this welder. Not sure of the brand of wire but it's the stuff the guy at the local welding specialty store recommended. The wire is .024". Agree the metal must not be clean, although I did strip it back nearly an inch, and did do both sides.
I'm thinking the width of the gap may be a problem also, but I'm trying to be realistic about my fitment. There are places it's pretty tight, but others where it opens up to probably 3/16" or so.
NOHOME
PowerDork
10/22/16 4:07 p.m.
For purposes of setting up the welder, just do it on a flat clean piece of tin so that the dot looks close to the same on both sides; think of a man falling through a manhole and getting stuck halfway.
as in you don't need a seam to get the welder set up.
Okay, back to the salt mines!
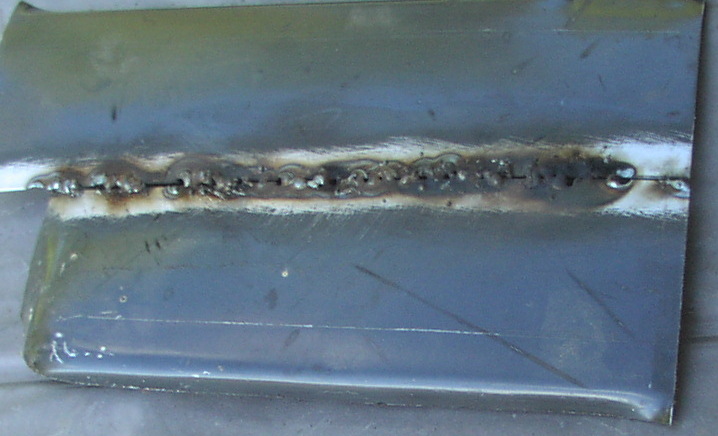
This is what I managed today. First pic is frontside, second is backside.
The polarity on the welder is correct. I am thinking the sooty-looking residue is from crappy imported steel. I forget exactly what brand of panel this is, but it's definitely an Asian import, and a relatively cheap one at that. I'm getting somewhat better looking welds on a piece of 20-gauge sheet that I picked up locally. The quarter panel fits easily in the "20-gauge" notch of my pocket gauge, but not quite into the "22-gauge."
Metal should be quite clean. Instead of wire-brushing it, I hit it with a 60-grit flap disk in my grinder.
These welds were made with the welder power setting on 4 of 5, and the wire speed around 2.5.

NOHOME
PowerDork
10/25/16 11:36 a.m.
1988RedT2 wrote:
Okay, back to the salt mines!
This is what I managed today. First pic is frontside, second is backside.
The polarity on the welder is correct. I am thinking the sooty-looking residue is from crappy imported steel. I forget exactly what brand of panel this is, but it's definitely an Asian import, and a relatively cheap one at that. I'm getting somewhat better looking welds on a piece of 20-gauge sheet that I picked up locally. The quarter panel fits easily in the "20-gauge" notch of my pocket gauge, but not quite into the "22-gauge."
Metal should be quite clean. Instead of wire-brushing it, I hit it with a 60-grit flap disk in my grinder.
These welds were made with the welder power setting on 4 of 5, and the wire speed around 2.5.
The heat setting looks perfect. Now what you do is overlap them doing exactly whatever timing you did to make those.
After you do a dot, wait until the red glow just goes away before you move over the small distance and hit the trigger again. Like I said, I end up using both hands to keep the gun steady when I do this and often have a bright light pointed right at the weld so that I can see WTF I am doing.
Considering that copper is considered a contaminant, you will always have SOME impurities in the weld, so don't get too bent out of shape. If you can get comfortable making the dots that you did in the middle of the seam, you are well on your way.
Keep in mind that the weld bead is a liquid. If you put it on the front sloping face of the last tack, both capillary action and gravity are going to move the molten metal to where you need it to be.
You might notice a small opening in the gap when you do this, almost like a small burn through. Don't panic, just do another hit on the last dot and it will most likely fill in the void. Called Key-hole welding and a sure way to make sure you have full weld penetration.
Okay, after a bit more experimentation/practice I've got the following observations and questions.
Observations:
I'm thinking the steel in the panel is crap. I can get a fairly nice bunch of welds on the 20-gauge sheet that I have, but not on the panel scraps.
The H-F buttweld clamps I have seem to space the panels too far apart. I mean, it looks to be well over 1/16, probably 3/32. The best results have come from having the panels tight together.
Questions:
How much stickout should I be starting with?
Should I start the weld with the wire touching the gap?
I've assumed that .024" wire is best for light gauge metal. Any advantage to going with .035"?
Thanks for all the help! 
Okay, definitely having better luck with little to no space between panels. The minimum gap allowed by the H-F buttweld clamps is about .040" which seems too wide given the thickness of the metal. Even working off the preceding weld, the edges just go away.
At the end of a 1-second weld, I usually have a small glob of metal on the end of my wire. Is this an indication that something is amiss? If I start my next weld with this glob, it tends to make for a messy weld. Trimming the wire after every 1-second burst is going to be onerous indeed.
NOHOME
PowerDork
10/27/16 4:10 p.m.
To get started, aim for as tight a gap as possible. After a while it will seem simple to deal with just about any gap.
I leave just enough stick-out to see what I am doing.
If doing a small run of these tacks, don't worry about the blob on the end.
When doing a new tack, or about to build off a previous tack, I always cut the blob of oxidized wire off and run a small wire brush over the starting point so I am not welding on soot.
When doing a spot weld, (puddle weld actually) I always cut the blob off before welding.
I have found this process to be independent of wire size. Time + wire speed= mass of wire going into the weld pool. If the wire is thin, then you end up with more time on the trigger. and vice versa. Ulimately what you do is set the welder up to make those nice dots that you did on the test sheet and go from there. For the record, I have gone from 0.024 wire to .035 for all my welding.


