I'm So Wired

We wanted a fairly robust electrical system in our new garage, so we ordered a 100-amp breaker panel on Amazon. How’d we decide on 100 amps? We added up the amperage of every appliance we could picture using at once–air conditioning, compressor, a few lights, a welder–and opted for just a little more capacity than that total. We also asked a few friends for their recommendations. Why reinvent the wheel when the data is already out there? Installing the panel only took a few screws and a quick read-through of the code requirements to make sure its placement was kosher. Then it was time for the hard part: powering the panel. There are two ways to do this: Have your electric company run a new power line and meter to your garage, or install a new breaker in your house’s electrical panel and then bury a big wire between the two buildings. We chose to feed the garage from our house, as the previous owner had installed an oversized electrical panel that left plenty of capacity for a 100-amp garage circuit. The first step of connecting our garage to our house: yard work. We needed a trench nearly 2 feet deep to house our giant wire and hopefully protect it from post-hole diggers and meteor strikes. We rented a trencher from Home Depot for about $80, and after a few hours of pure hell we managed to carve a path through our root-filled yard. We buried two conduit runs in the trench, one for power and another for an ethernet cable. On top of it, about 6 inches below the grass, we also buried some caution tape. Why the tape? Hopefully to prevent a future owner (or us) from accidentally digging into the cable. Our panel was now installed. Our conduit run was now buried. Time to get wired. We first ordered the correct spools of cable online, saving a few hundred dollars over the local options. Then we phoned a friend. Our neighbor Phil is a master electrician, and he was willing to help us in hopes of lowering the chances of a massive electrical fire burning down the whole neighborhood. So, how do you drag nearly 100 feet of giant, heavy cable through a pipe? Easy: Tie a string to a plastic bag and then suck the bag through the conduit with a vacuum. We then tied our bundle of four wires (hot, hot, neutral and ground) to the string. Finally, we pulled the string-and our bundle of wires–from our house to our garage. Success! After a few minutes of Phil touching hot terminals just to show us how well his insulated shoes worked, our house’s panel was officially feeding our garage.
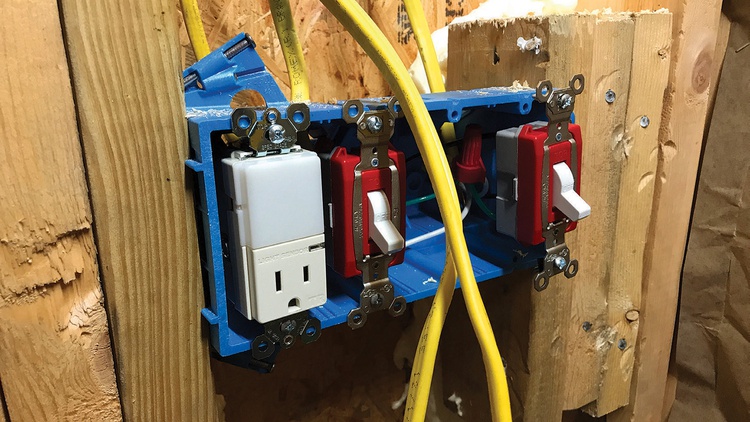
The Walls Are Electric

Our garage’s new panel had power, but those 100 amps were useless without circuits–the wires coming from each breaker to feed lights, outlets, compressors and everything else in the garage. We hate popping breakers in the middle of a project, so we decided to use 12-gauge wire and 20-amp breakers for every 120-volt circuit. Is that overkill? Probably. Most people never need more than one or two 20-amp circuits, but we grew up in an underwired shop that blew 15-amp breakers every time we used a vacuum or a chop saw. We weren’t about to revisit those demons, so we overdid things this time. Before we started installing those circuits, though, we made a wiring plan. No, not a diagram, just a plan. By mapping out roughly where each outlet would go–and which circuit it would be on–we could make our already oversized electrical system feel even bigger without any extra expense. For example, we decided to outfit our welding zone with one 240-volt outlet and two 120-volt outlets. Putting each 120-volt outlet on a different 20-amp circuit meant we could run 40 amps of 120-volt equipment in that area. This would keep that angle grinder/shop vacuum pairing from popping a breaker. We also opted to put our lights on separate circuits so a blown breaker wouldn’t leave us in the dark. With our plan sketched out, we bought a box full of boxes and outlets, a few hundred feet of Romex wire, and a pair of specialty wire strippers. Then we spent a few days crawling over every inch of the building, hammering down boxes, stapling wires and connecting outlets. Don’t forget the ground fault circuit interruptors. Code requires that every outlet have GFCI protection, but that just means the first outlet in each circuit needs to be a fancy GFCI unit. After running all of our wiring, we stepped back and photographed every wall, making sure to capture each circuit. This is a cheap, easy way to create a wiring diagram.
In addition to power for lights and tools, our shop needed enough electricity for air conditioning–a necessity down here in Florida. Our neighbor Phil showed us how to turn this daunting process into a relatively easy DIY project.
Condition Me

Next on the list: cutting a giant hole in the side of our new building. Adding air conditioning is cheap and easy if you don’t have any drywall to deal with, so we picked up a scratch-and-dent window unit on Amazon that’s also rated for through-the-wall use. With $400 and some scrap four-by-sixes, we had a climate-controlled garage. The unit even has a heater, though we doubt we’ll need it much during Florida’s mild winters.
Insulating Feeling

Lights. Outlets. Insulation! Now, we know what you’re thinking: “You’re going to waste time and a few hundred bucks insulating your garage?” Totally. Why? There are plenty of benefits, but let’s start with the obvious: Insulation keeps the inside of the building a more comfortable temperature, whether it’s hot or cold outside. It also makes the a/c more efficient, which allowed us to save a few hundred dollars by going with a smaller window unit. Next benefit: noise control. Insulation limits what your neighbors can hear. Instead of wondering if you’re building and test-launching a homebuilt spacecraft, they’ll get to enjoy the birds. And finally, think of the cars! Insulating cuts down on temperature changes, which means it cuts down on condensation, too. As lovers of ’80s Japanese sheetmetal, we believe less condensation is always a positive thing. Pro tip: Check Craigslist for insulation. We saved a few hundred bucks by buying someone else’s leftover building materials.
Drying Out

It was time to close the walls, and we faced a decision: What size drywall should we buy? Sheets come in a few standard sizes, with 4×8 feet being the most common. However, that size would require 1¼ sheets per wall in our garage, with a butt joint between each-in other words, a lot of extra time and drywall mud. Instead we went hunting for 4×10-foot sheets, which would stretch all the way from floor to ceiling. We did end up having to drive to a Home Depot nearly an hour away to get the taller size. (We grabbed more than 2000 pounds of drywall on that trip.) Still, our math says that we spared ourselves about 15 hours of labor (and quite a few unsightly seams). We also saved a few bucks, as the 4×10 sheets were less expensive per square foot than the 4×8s. We picked up a few drywall tools, too, like a three-in-one gadget that lifts the panels off the floor. The most helpful tool, though, was one we rented: a pro-quality drywall lift that cost us about $30 for the day. Instead of lifting and positioning each sheet by hand–not easy unless you’re 8 feet tall and built like the Hulk–we simply raised them with the crank of a handle. Then we screwed each sheet in place. After about a week of evenings hanging drywall, we were ready to tape and mud. “That’s too much finish work for a garage!” the naysayers will cry. “Screw some plywood on the walls and call it a day.” Fair enough, but we have a few good reasons to choose drywall. First, cost: Yes, installing drywall requires more labor, but the actual boards cost less per sheet than plywood. Drywall is also far easier to work with, as you can cut it by hand with a sharp knife. Second: appearance. Hey, we can have some vanity, right? Plus, this shop will be used to photograph magazine articles, and we wouldn’t want our readers gawking at our rough, ugly walls. Finally: safety. Drywall is actually a fairly good fire protectant since it’s basically made out of rock. Each wall covering has its pros and cons, but we decided that drywall fit our needs best.

It added a lot of work to the project, but installing insulation and drywall made the shop more comfortable and presentable. The rented drywall lift was money well spent, too.
Smooth Things Over

Time for the worst step. We needed to cover every drywall seam with tape and mud, let it dry, and then sand it smooth. Is this job hard? No. But just like automotive bodywork, it takes a careful hand and expertise to do well. We didn’t do a great job, but over the course of a week or so we managed to get an acceptable finish. We also got pretty dusty–don’t forget your respirators for this step.

After hanging the drywall, we had to tape, mud and then sand the seams. It's a lot of work. Trust us.
Cover It Up

A lot of factors go into picking an interior paint color–how it reflects light, its ability to hide flaws and, yes, its aesthetics. Most people paint their garages white, and that’s a great idea: White bounces and diffuses the light, yielding a bright workspace. But it wouldn’t work for us: White walls show dirt and dust like crazy, and they make proper photo exposure difficult to achieve. We decided to take a different approach. Light gray walls should cut down on overexposed backgrounds without introducing anything distracting, we figured. How do we make up for the lost light? Easy: more light. We scored a dozen 8-foot fluorescent light fixtures for free from a friend’s warehouse that had just been converted to LEDs. We plan to hang them all. Yes, that’s overkill, but for garage photography it’s hard to have too much light. We chose a satin finish for those walls, too; flat paint is harder to clean, but anything glossier is tough to photograph. So, how do you get gray satin paint? Sure, you could go to your favorite paint supplier and have it mixed, but that’s no fun at $37 per gallon. No, we took a different approach, rounding up 4 gallons from the mis-tinted paint rack at $9 each. After some time with the mixer and the drywall bucket, we got a slightly greenish gray. Total cost: 75 percent less than we would have paid otherwise. We painted the ceiling white and then slapped the gray paint on the walls. Finally, we were feeling like our garage was almost finished. We still had to paint the floor, though. Concrete needs protection to be durable, and we wanted a coating that would lighten up our dark floor, repel our abuse, and keep our concrete from literally turning to dust. Back to the mis-tint rack! We scored 5 gallons of concrete stain and sealer for $40. The color wouldn’t have been our first choice–we’re not sure if Lowe’s was aiming for red or brown, or if they were actually trying to make pink garage floor coating–but the $100 discount looked beautiful in our eyes. We’re officially calling our garage’s color palate Zombie Video Game Hospital. Once the coating was dry, we painted some one-by-fours the same color as our walls and nailed them down as baseboards and trim. A few outlet covers later, and our garage was move-in ready. We’ll cover that process–as well as our overhead lighting installation, our lift, our compressor and more–in future issues.

We're on the homestretch: Time to paint the walls, seal the concrete, caulk the gaps and install some baseboards.


Now it's really looking like a shop. Next installment, we'll discuss tools and equipment.
“HEY, THAT’S NOT LEGAL!”
We built and finished our garage to code, but before you copy ours step by step, research your own building codes and stick to them. Every municipality is different, and what’s fine in our town may not be okay in yours. Also, note that we didn’t tell you what size wire we ran through the backyard trench. That was intentional. If you’re going to take on this project, you need to do the math yourself, as there isn’t a one-size-fits-all answer. We found tons of free calculators and tables online that make properly sizing things quick and easy.
Sources:
Master Garage Builders:
garage kit
[mastergaragebuilders.com](http://mastergaragebuilders.com)
(352) 369-3033
Swisstrax:
garage flooring
[swisstrax.com](http://swisstrax.com)
(866) 748-7940
Thanks, Everyone
Now that our building is complete, it’s time for some proper thank-yous. Without the friends and family listed here, we would have never finished. We especially need to thank our dad. He went above and beyond a father’s normal doghouse-building, lightbulb-changing duty, and instead helped us construct an entire building from start to finish. Thanks, Dad; we can’t wait to help you build your next garage. Chris Tropea
Derek Bennett
Doug Buchanan
Kevin Rajkumar
Lise Forte
Nicole Tropea
Pat Tropea
Phil Lawing
Sam Votaw
Shane Samuels
Steve Eckerich
Tim Suddard
Read the Whole Backyard Shop Series:
Project Backyard Shop: Planning the Building
Project Backyard Shop: Building The Building
Project Backyard Shop: Wiring and Interior (This Article)
Project Backyard Shop: Moving In and Organizing
Project Backyard Shop: Solving Our Storage Problem
Project Backyard Shop: Walls of Specialized Storage
Project Backyard Shop: Installing a Lift
Like stories like this? You’ll see every article as soon as it's published by reading the print edition of Grassroots Motorsports. Subscribe now.


