
 Photography by Carl Heideman
Sloppy driveline swaps have a few telltale signs, but there’s one you may not even recognize as a problem. Have a stiff clutch with a very short friction point? Feels kind of racey, right? Well, it shouldn’t–not unless it’s an actual race clutch.
For daily driving, a soft, smooth pedal with a decent friction point works best. In fact, setting up the clutch actuation is one of the most important details of a driveline transplant. Doing it properly will make your driving experience a lot more comfortable. Trust us, it’s worth the planning.
If you’re just joining us on this project, we’ve been swapping a 1.8-liter Miata engine and gearbox into an MGB. Now it’s time to make sure the clutch feels just like a fresh-from-the-factory Miata clutch.
Both cars feature clutches that operate hydraulically, so there was the temptation to just plumb the MGB clutch master cylinder to the Miata slave cylinder. A few measurements and some quick arithmetic made us realize we’d be better off just doing it right.
The MGB’s master cylinder, while only 0.125 inch larger in diameter than the Miata’s, was also coupled to a pedal that gave a 43 percent longer stroke. On top of that, the MGB’s pedal ratio was smaller than the Miata’s, which would have resulted in a stiffer pedal.
The MGB’s slave cylinder explained it all: With a bore of 1.25 inches compared to the Miata’s 0.75 inch, it needed roughly twice the volume of fluid to move its pushrod the same distance. We’ll detail our calculations later, but here’s the bottom line: If we’d pushed this “easy” button, we would have had an awful clutch–one that could easily break from over-travel.
When we began this project, we set a rule for ourselves: Stick to parts from only the MGB and the Miata. When we’re making a repair five years from now, we don’t want to struggle to remember where a part came from. To keep that goal–and, honestly, to keep things simple–we decided to use the Miata clutch master cylinder and change the MGB’s pedal ratio to match the Miata’s.
After about an hour of math and another four hours of light fabrication and welding, we had all the bits we needed to make our clutch move like a hot knife through butter. Follow along to see how we did it.

It looks like an old Miata clutch pedal, but really it’s a blueprint for engine swapping success. To properly mate a Miata drivetrain to an MGB body, we used the Miata clutch pedal assembly as our reference point.

We compared the Miata’s master cylinder (on the left) to the MGB’s. The MGB’s 0.75-inch bore and 1.25-inch stroke could move 0.55 cubic inch of fluid at a time, while the Miata’s 0.625-inch bore and 0.875-inch stroke could move about half as much: 0.27 cubic inch.
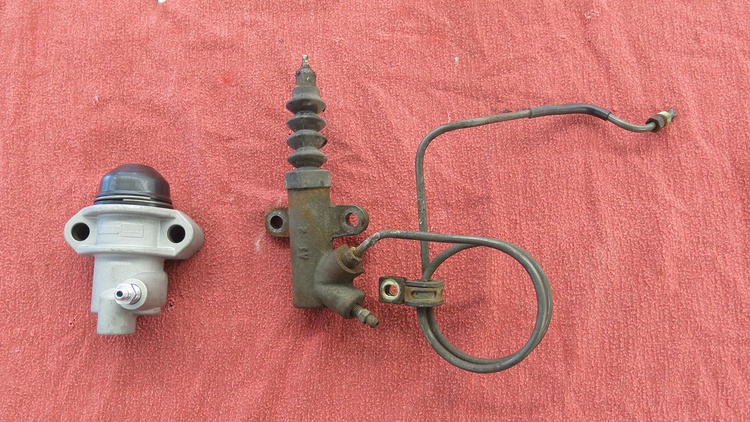
The mismatch was more drastic when it came to the slaves. The MGB’s 1.25-inch bore needed 0.55 cubic inch of fluid to move about 0.45 inch. The Miata’s 0.75-inch bore needed only 0.27 cubic inch to move just a little more: 0.61 inch.

We compared the pedals’ key measurements. The Miata pedal had a ratio of approximately 6.5:1, while the MGB’s was about 5:1. This is why the MGB pedal stroke is 1.25 inches–a whopping 43 percent longer than the Miata’s 0.875 inch.

Our math showed us that if we re-drilled the MGB pedal 0.625 inch lower, we could get to a 6:1 ratio. We’d have preferred a little more leverage, but lowering the hole any farther would have led to some packaging issues. We’ve done this swap before and have found the 6:1 to work very well, so we marked our hole with a center punch.

Then we drilled an 8mm hole for the Miata pushrod and clevis pin.

Next we cut the excess material from the pedal. Since neatness counts, we smoothed the edge with a sander.


The final piece looked like it came from the factory.

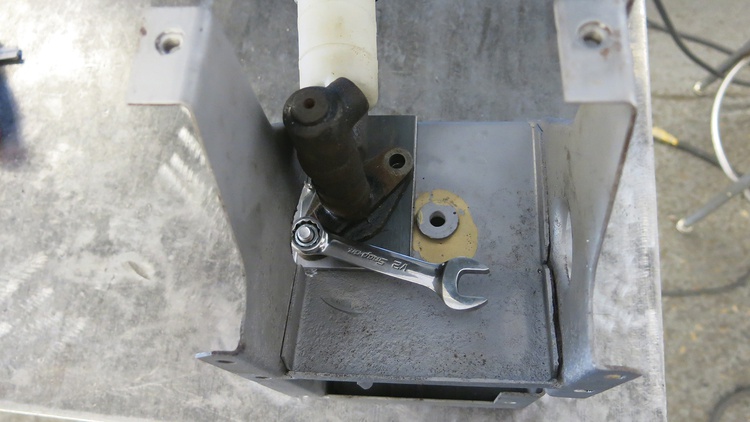
Once we finished the pedal, we needed to mount the clutch master cylinder. We arranged the Miata pedal assembly (left) next to the MGB’s to get a good idea of the work to be done. By the way, now’s a good time to fill you in on our plans for a future mod. We’ll be updating this 1967 MGB to dual-circuit power brakes. Installing a clutch and brake pedal assembly from a 1975-’80 rubber-bumper MGB is nearly a bolt-in swap: We’ll just need to drill a single hole and add a little clearance in the firewall for wider pedal spacing.

Our first step in mounting the Miata master cylinder to the MGB was to make a template.

Then we transferred the appropriate dimensions to some 3/16 x 21/2-inch flat stock.

We went back to the drill press to cut and drill some holes.

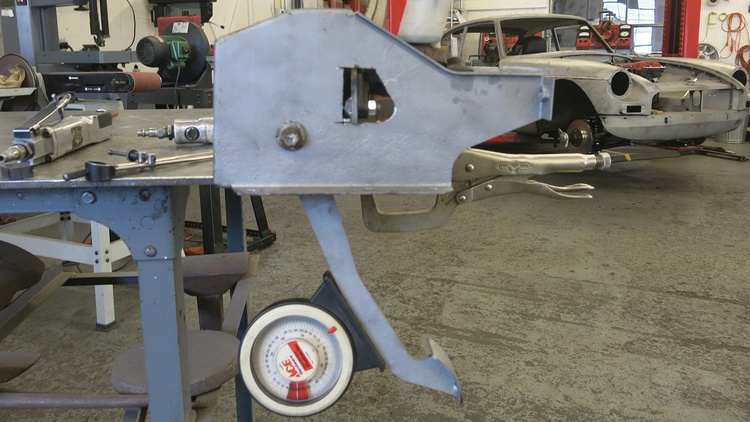
Then we made some ugly, rough cuts into the pedal assembly with a die grinder to start fitting our flat stock.
As we refined our cuts, we checked to make sure we’d be able to get a wrench on all the hardware. There’s nothing worse than finding out later that you can’t tighten the fasteners.

We then tack-welded our flat stock into position.

Finally, we could test-fit the new assembly in the car and ensure that there was enough room to service the clutch master cylinder. We checked to see if we could fasten and remove not only the hardware, but the cap, too.

Satisfied with the fit, we finished welding our piece.
With our master cylinder mounted and our pedal modified, it was time to connect them via the Miata pushrod and clevis. We mocked up the pedal assembly with the pedal at its approximate rest angle. Then we determined how long the pushrod needed to be.

The pushrod was approximately 2 inches too long, so we simply cut it with a hacksaw. We also cut a step into the portion that fits into the master cylinder. Our “machining” process was really just spinning the pushrod in a drill against a bench grinder, measuring until the step was approximately 0.25 inch in diameter.

Before and after: The top pushrod is our modified piece. The stock one, below it, still has its stop. The stop was redundant in our MGB pedal assembly, so we cut it off. A bonus feature is the adjustability of the Miata pushrod. We could be a little sloppy with our dimensions knowing that we could fine-tune them later.

Measure twice, modify once, and then double-check. We made sure we had the right amount of pushrod stroke at the master cylinder, and came out just fine.

After a few hours of measuring, planning and fabricating, we produced a hydraulic clutch setup that met our goals: Not only did we give the pedal a comfortable, stock feel, but we did it using only Miata and MGB parts so we can repair it easily in the future.
Eclectic Motorworks
eclecticmotorworks.com
View all comments on the GRM forums
You'll need to log in to post.


