


In a race, drivers rely heavily on situational awareness. Their eyes, inner ears and other senses provide most of the information needed to succeed in a race, but it’s all limited to a first-person point of view. Adding an in-car radio to the list of tools at a driver’s disposal opens up a whole new channel of information for making decisions.
A second pair of eyes and ears outside the car can provide drivers with real-time information about caution flags, their current position in a race, the pace of competitors and much more. A radio is helpful in a sprint race, but it’s utterly critical in an endurance, where the coordination of things like pit stops and passing opportunities can make the difference between a great finish and running out of gas.
For the NASA 6 Hours of Buttonwillow in California on June 7, 2008, NASA driver Sam Rothschild invited us to share the driving duties in his Honda Challenge CRX. The car was equipped with a Sampson Radio Communications setup, so we contacted Sampson and ordered one of their $140 Helmet Kits with earbuds. We also secured a NASA to IMSA adapter ($47) so we’d be ready for nearly any radio type in the future.
Installation was straightforward, and the directions that came with the kit were adequate to get us going in the right direction. Obviously, each helmet is a little different, but as long as you’re careful to see what’s on the other side of any hole you might drill, you shouldn’t encounter any problems. If you also need to adapt the helmet to a HANS device, we’d recommend installing the HANS anchor points first; their placement is more critical than that of the radio wires.
Here’s what we used:

The Sampson Racing Communications Helmet Kit comes with the microphone/microphone jack/earbud jack harness (left), some quality hearing-aid-style ear buds (upper left), rivets, washers and P clips. We also ordered the NASCAR to IMSA adapter (lower left).

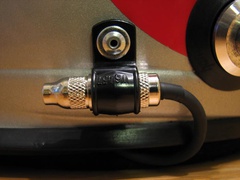
Our car had the NASCAR-style plug (left), but if you spend any time driving other people's cars, it pays to get an IMSA-style adapter (on the right) so you're ready to go no matter what you're driving.

Step 1: Use an awl or other sharp object to punch a hole in the fabric and foam in the mouth area of the helmet. It's wise to offset this hole slightly from the center so the microphone ends up in the center of the helmet.

Carefully slide the microphone into place through the hole, with the microphone boom between the shell of the helmet and the padded fabric liner.

Figure out where you want to locate the first P-clip bracket. This will hold in place the wiring that goes into the microphone boom. Make sure you drill no higher than three inches from the bottom rim of the helmet to avoid compromising its integrity. A piece of masking tape will help protect the finish on the helmet, and a piece of cardboard slid between the helmet shell and the foam will prevent the drill bit from biting into the soft bits.
Initially, we installed the large P-clip around the plastic merge block where the wires all come together. Shawn Sampson, the man behind Sampson Racing Communications, was checking out our article and noticed our incorrect attachment. He pointed out that the proper mounting subject was the metal headphone plug jack. He was concerned that the plastic union area we secured would not provide the same durability as the metal jack, and he recommended that we make the change.
It was an easy fix; all we needed to do was carefully drill out the rivet and re-fasten the P-clip with the metal headphone jack in the proper position. The extra wire and the plastic merge block were then tucked up between the helmet shell and the liner.

We had removed the microphone sock to make it easier to slide into place; with the sock back on the mic, it's nearly invisible. Some contact cement helped sandwich the mic boom between the liner and the shell to hold every component in place.

The rivets that came with the kit were both fairly long, and after drilling our second hole toward the back, we came to a realization: The rivet wouldn't fit all the way into the helmet without removing the rear inner shell, which we had no interest in doing. A trip to the hardware box turned up a shorter, 1/8-in. rivet that would eliminate the need for deeper drilling.

With the second rivet in place, our helmet is ready to go. The second rivet bears most of the wear and tear that comes with getting in and out of the car. It's shown here with the earphones plugged in to the proper jack.

CRX owner Sam Rothschild helps us strap in to the CRX before the race; our freshly wired helmet served us well during the race, giving us the lowdown on fuel stops, informing us of a penalty incurred for a fuel spill, and keeping us in touch with the pits after an on-track incident sidelined us for a few laps. Once you race with radio contact, you'll never want to go back.


hjj
have any idea where we can get a P-clip like the one in the picture?
nvm
In Racing Communication is very important so you can use voice chip also, it's easy to apply and easy to use.

Paddling along in my Canoe in 6 year old thread
Displaying 1-6 of 6 commentsView all comments on the GRM forums
You'll need to log in to post.


