


Wow! I am excited to see this process.

Wow! I am excited to see this process.
Progress today on the mounts and on the intake.
I verified my trans and diff were in line within a few degrees and installed my transmission crossmember. I'll set their vertical alignment at the differential, since I still need to add the last mount for the differential. That means until that mount is added it's flapping in the wind.
Keep in mind I'm pretty new to the casting process, so none of what I say should be taken as gospel. Also I don't know all the proper technical terms.
I started making the patterns for the throttle body portion of my intake casting project.
I made drawings of the design, and took section views cutting through the part every 3/4".
The drawing was scaled up in an attempt to account for shrinkage. The final version I used was scaled up by 2%. I'll check it after casting to see if 2% turns out to be the right number or not. There's all sorts of claims of shrinkage rates on line, but 1.3% and 2% are the numbers I've seen most. I'll use my measurements from this part to tell me what scale to use on the intake plenum. That part is much bigger, so shrinkage rate will be much more important.

I printed out the drawings at the correct scale, and used them as templates to trace out on my 3/4" pine I used to make the patterns. The top board has the male pattern pieces traced out on it. The bottom board has the female core pattern traced out on it.
 [/url]
I cut these parts out carefully, and glued them together in halves. This way the patterns will be in two pieces so they can be separated when the two halves of the sand mold are made. Here you can see the two halves sitting next to each other after gluing.

I used the edges of the cut pieces as a guide for how much material to remove when sculpting the outside and inside of the patterns. I checked the dimensions against the drawing in a few places using calipers as well.

I added on the pieces that form the shape of the mounting flange. I also insterted dowels into the two halves of the pattern so they would index with each other. Then I sanded and sanded and sanded. Last I started painting the patterns. I've put several coats on after taking this picture. I want to have a relatively smooth finish on the patterns, but I'm not going to go crazy trying to get it glassy smooth. It's a casting, its going to have some rough surfaces.


My air compressor and die grinder got a work out carving out the inside of the female core pattern.
Hopefully next week I'll get to work on making a furnace, and possibly working on a sand pattern.
For those who are curious about casting, I've been watching videos by Myfordboy on youtube. He's got a lot of good information in the casting process.

The crucible arrived today! I’m going to try to leave work early enough Thursday or Friday to go get some good aluminum scrap to use for some trial casting

In reply to aselmike :
An alloy wheel or two should do the job.
In reply to NOHOME :
i’m hoping for wheels or cylinder heads or something. There’s a scrap yard on my route home, so whatever they have is what I’ll use
Brace yourselves, this is a long post. I set out today with three goals in mind:
1. Build the furnace
2. Cast something (doesn't have to turn out well)
3. Don't get burned
So I started off by gathering supplies. I drove all over and picked up my parts for the furnace, sand, charcoal, and scrap metal.
When I got home I started with the trash can furnace. For my "refractory" I'm using sodium silicate mixed with play sand. After mixing it, I rammed it into the bottom of the trash can furnace first. I made a little pedestal in the middle of the bottom for the crucible to sit on. I made a ring around the bottom of the pedestal for the air to blow in and be distributed to all the charcoal. Or that's my theory anyway. After ramming it, the sodium silicate has to be cured to harden. It's cured by CO2. It can cure in open air, but it takes a long time. So I put the whole trash can furnace in a trash bag, and filled the bag with C25 welding gas. I let it sit for an hour or so while I worked on other parts.


This worked OK, and I did this after each step. Next I rammed in the sides of the furnace, and the lid. I put in self tapping sheet metal screws into the top to give the sand something to hang on to. I was afraid it would fall out otherwise.

While all my refractory was curing, I cut up three rims I bought this morning. I used a circular saw to cut it up. It sucked, but it worked.
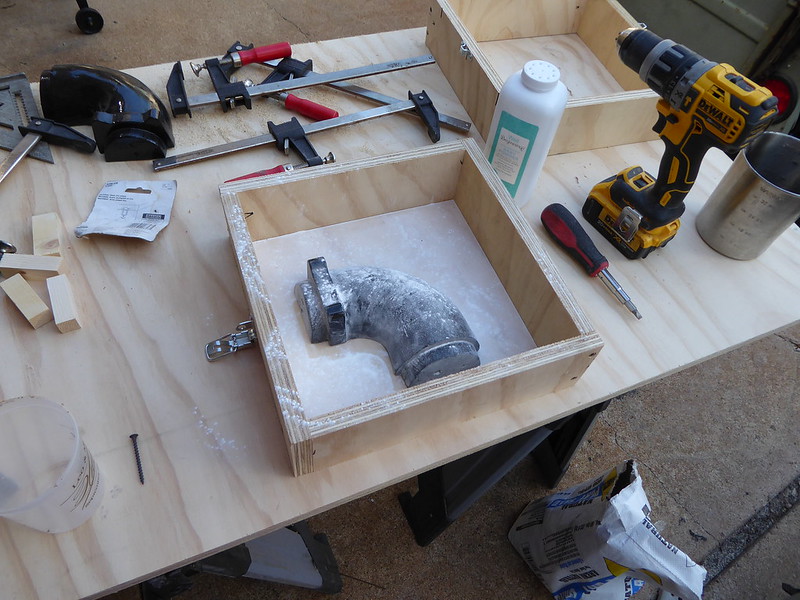
Also, while other parts were curing, I tried making my first core. I tried curing it in the female mold the same way as the furnace. When I tried to take it out of the mold, it came apart.

From this I learned 2 things:
1. Use a release agent (baby powder) before filling the mold, so the sand will let go.
2. Curing using the C25 in a bag doesn't work very well for thick parts.
I went to harbor freight and got a blow gun for an air compressor with a long needle thing on it. I set it up on the C25 bottle and used that to inject the C25 into the sand to harden it. I saw this on the SV seeker youtube channel and it works great.
After using baby powder and the blow gun, the second core came out much better!

At this point, all the sand had cured in the furnace, so I lit a load of charcoal in it with the crucible, and let it burn while I worked. I wanted to slowly heat up the crucible and sand since they'd never been heated before. While it was heating up, I made the forms for the two halves of the mold, then I started working on the sand molds.

I covered everything in baby powder, and started packing the sand/ sodium silica mix into the mold. After it had been rammed in I injected it all over with the C25.
When I flipped it over, I cut the runner, sprue, and a vent into the sand.

You can see the molded area came out very nicely, but my runner and sprue look like crap since I hand cut them. This was the next place I learned a lesson. On the next one, I'll make wooden forms for the runner, sprue, and vent.
When I rammed the upper mold, the pattern didn't come out cleanly. I decided to try to repair it, just to see what would happen. I don't think there's a problem with the form. I just ham fisted it when I removed the pattern. I need to be gentler on the next attempt.
When I put the core into the mold, it needed some tuning up to fit just right. After I got it fit nicely, it kept wanting to fall too far into the mold, so I inserted pieces of aluminum welding filler into the core to support it.

At this point the furnace had preheated for about 2 hours, so I gave it more charcoal and turned the hair dryer up to 11. I put some aluminum into the crucible and let it start to heat up while I got other stuff ready.
I quickly whipped up some "tongs" to remove the crucible from the furnace. I also whipped up a holder for the crucible to pour it with. They're pretty ghetto, because I completely forgot I needed to make them, until I put aluminum in the crucible, and remembered.

After making those, the mold was ready, and the aluminum was melted. So I made my first pour.

This first pour turned out pretty much as expected considering the upper half of the mold was totally screwed up.
So you can see the upper half of the casting looks like crap. The surface finish is very poor, and there's sand in the casting.


The bottom looks much cleaner, with a nicer surface finish. On the bottom you can see there's sections of the casting that the metal didn't make it into. I think I can help avoid this by re-locating my runner and sprue. If that doesn't help I might have to modify one of the patterns to make the walls thicker.

The bottom half of the casting is very encouraging!
I think today was a huge success. All three goals were accomplished, and I learned a lot that will help me on my next attempt.
In reply to aselmike :
I can not see the final picture of your 1st cast part. The other photos up through the closed core box do show. I am reminded of a story from the MG racing department in the 1930s when they cast experimental parts with an alloy they called "pistominium". Engine shop had lots of raw material! They drew straws to decide who did the pour, because they were leery of moist sand instigated explosions which never did accour. One of the pistominium final drive casings is still in service in a vintage racing R type.
In reply to TurnerX19 :
Pistominium must be some good stuff!
In reply to TurnerX19 :
Fixed it!
In reply to aselmike :
Well....You fixed the pictures. I think more wall thickness is a good idea as well as runner/sprue relocation. I have never done any metal casting, it is the thought of how thin the finished part will be even if perfectly cast that pushes me that way. What are you doing to prevent the molten alloy in the crucible from burning? I.E. "flux".
In reply to TurnerX19 :
The impurities on the scrap form a layer on top of the molten metal that I remove just before pouring.. I'm not adding anything as a flux right now. I think the layer on the surface is probably enough right now while I get my patterns and such figured out. I'll take a picture of what I'm talking about during my next attempt.
Also, the sprue and runner relocation is the direction I'm trying right now. I'll post some pictures of my 2nd attempt. Changing the way the runner and sprue were set up made a difference on the second attempt. I'm probably going to set up the casting to feed from multiple points rather than just one, to try to get the aluminum to the far side of the cavities. After I've done more experimenting with the runners, then I might work on increasing wall thickness. Increasing wall thickness will definitely be the hardest solution to the problem, since it will require remaking the patterns.
I decided to make a pattern for my sprue, runner, and to add a riser. That's the first thing I worked on this morning. I wanted to clean up these parts to help eliminate them as a source of errors.

I made a new set of molds using my new patterns. This time I focused on a few key things:
1. Compacting the sand really well
2. Not sending my air gun tip as deep into the sand, so I don't hit the pattern. (Last time several spots on the mold were damaged because of this.)
3. Putting plenty of gas into the mold each time I pierced it to make sure all the sand cured.


I was also much more careful taking the patterns out of the sand today. I still had a small area of damage on the top section of the mold after removing the pattern. I might need to add more taper to the flange area of the pattern, to make it easier to get out of the mold.
I cast this second attempt. It's still not perfect, but it's moving in the right direction. The previous attempt is on the right for comparison.


This attempt was better in almost every way. I can still see there was some loose sand in the bottom of the mold, and that shows on the surface quality of the bottom of the part. I still had issues with the aluminum reaching all areas of the mold. Next time I'm going to try having 2 runners coming off the sprue. They'll be at opposite ends of the mold to try to get the entire thing filled.
You can expand your wall thickness by adding multiple coats of heavy paint to the pattern without having to start again. Or a layer of thin fiberglass and resin. For finished parts I would seriously consider buying fresh aluminum so you know what alloy you have. Back when MG made pistominium there wasn't much choice/variety.
I added a runner to feed the far end of the part, to try to get the mold filled up. It made a big difference in getting the mold completely filled. From far away it doesn't look much better, but there's no fusion issues on the far end of the casting. I think this is a big step in the right direction.


I moved the vents on this one, and it hurt me on the inside of the curve. On the next one, I'm going to add a third runner to feed the center of the outside of the curve. I think putting the vent back in the original place, and the third runner will be a winning combo!

2nd attemp with fusion issues.

3rd attempt with no fusion issues
I got up early for attempt number 3 today. It was much more fun, since it wasn't berkeleying hot out.
I added the 3rd runner, and moved the core slightly inside the mold to help increase wall thickness slightly in the outside of the bend. It helped alot! This attempt is just about usable!


I'm going to remove the paint from my pattern and add material to the pattern in the areas you see thin spots. After modifying the patterns, I'll give it another pour! I think the next one will be it! Hell yea!
6th try is the charm!!!!! I DID IT!!!!!

I've got some clean up to do, but its definitely good to go!!!!


That's really impressive work, and exceptional persistence. I'm enjoying this whole build a lot, but this really takes it up a notch or two.
In reply to 02Pilot :
Thank you very much. This is definitely challenging me to really pay attention to details. The next casting will really test what I’ve learned on the first one.
Now it really is time for clean new aluminum of a known alloy. Very impressive work.
This is very impressive! Thanks for sharing your build.
In reply to TurnerX19 :
Most rims are made of good quality aluminum. I think that is good enough considering we’re not making something structural like pistons, or a suspension component .
MOAARRR PROGRESS!!!
The construction of the molds for the full intake has begun!


Amazing! Great build, love the casting, very cool. Keep at it!
Today I ran my die grinder and compressor like a borrowed mule! I laid out some of the features on the patterns, and rough carved them.


On these patterns I'm being much more careful on the dimensions to make sure I don't have the same wall thickness issues as I've had on the elbow piece.

I stopped for the day after the initial smoothing on the male pattern, and with the female patterns roughed in.

On a side note, my wife just brought home this decorative pillow. I'm taking it as her silent support for the rambler. She denies it, but we all know its true.

A good source of aluminum is any automotive machine shop. They tend to have barrels of worn pistons that they wont mind parting with. Pistons are a lot easier to add to the melt since they are about the right size already.
Pete
You'll need to log in to post.


