Bonus points to whoever can correctly guess what's going on here...


Hint: there are two unrelated things happening here in parallel.

Bonus points to whoever can correctly guess what's going on here...
Hint: there are two unrelated things happening here in parallel.

In reply to Duder :
Well, that's Romer style CMM. What ya measuring?

Setting up the gauges and measuring for a custom 3D printed something. HVAC vents? Glove box stereo mount?
I should've known that would be too easy.
Alex was manning the Romer arm, measuring for a new duct that will connect the stock fresh air inlet hole in the cab to the intake of the HVAC fan, though a cabin air filter. That has now been designed and will exist soon in plastic.
Karl was simultaneously recalibrating his Arduino converter for the fuel level and coolant temp gauges. Apparently the offset changed wildly when the gauge pod was reinstalled in the cluster, allowing less heat transfer from the hot wire gauge needle setup. The joys of creating a system to get 2008 senders to play nice with 1960s gauge technology.
Bed things have happened. More details in the hours and days and weeks ahead.

You guys are all putting so much into this truck. And who specifically owns it? It's rapidly passing a scab-it-together body swap and well on the way to a full blown restomod. I'm so impressed with your work.
Thank you for the kind words. I guess we all have a vision of what the truck should be, and are pursuing that by reasonable means but while taking our time. In my mind it would be amazing if this thing could approximate something like an ICON Derelict at 1/10th the cost (making assumptions there). Our interior won't be OMG mind blowing, and we won't have a fully custom built chassis, but I think the spirit of the thing is the same. Keep all the modern stuff hidden and preserve the old timey character.
Technically I own the truck (according to DMV) but there are 6 of us that will end up splitting costs and sharing it once it's back on the street.
Work is progressing but I don't have a lot of fab details to add right now, other than the bed is being mounted via new rear frame horns and a custom front bed crossmember. The original Vic framerails kicked up pretty severely in the rear which didn't jive well with our bed sub-floor, so Alex cut them off and made a simple flat rear frame section that the bed now bolts to. I think we need to just finish and weld a front crossmember on the frame to give the front of the bed a secure mount, then we can tie up a few other loose ends and start driving it.
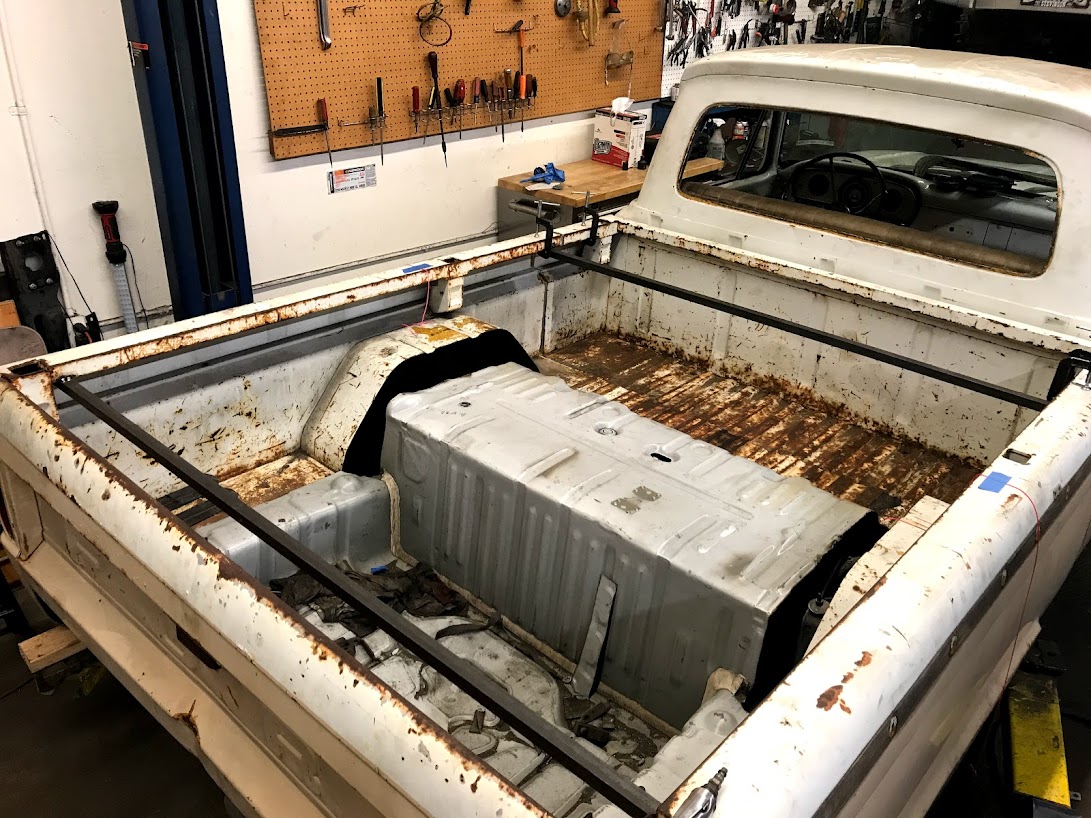
I had some free time on the project yesterday but didn't have all the intel on the next fab steps we want to take, so I proceeded to clean the crap out of it.
After sitting for a year in our shop getting dusty, collecting greasy hand prints and oil drippings from cars stored above it, it felt good to clean it up. I used an industrial degreaser (Zep / Purple Power style), microfiber rags, and water. If you look up above a few posts you can see how nasty it was starting to get. A regular car wash wasn't going to cut it. So now it's clean, but needs another round of degreaser to get rid of some more stubborn stains. Then we can do normal car wash, clay bar, buffing, etc to it.


Big updates about the Viccup!
First of all, we have a 1967 Opel Kadett "Kiemen Coupe" Lemons car in the shop now, which is being added into the fold of our Black Iron Racing team. I've been helping get that prepared for its first race with us coming up at Sonoma in early March.
The truck had been sitting mostly idle for a while as a result of the Opel and other projects. But I wanted to get it on the road, and realized that the annual employee car show at my work would be the perfect motivational opportunity to make that happen. There would be low consequences if we didn't make it, but high reward since the truck would be legally and safely drivable if we did succeed.
To that aim I sent out a fire-up email to get myself and the other guys pumped about doing a bunch of work. I took care of the insurance and registration, then started in on the physical jobs. Here's what we were up against with 1 week to go:
I started with bed welding. The seam where we shortened the bed between the cab & axle was lightly tacked but needed to be stitched together for good. I went very slow with additional tacking, filling in the gaps and moving around a lot. I used a wet rag to cool the panels after each weld. Tried not to lay too much of a bead anywhere longer than about 1/2". Despite all of this the seams did warp a bit and pulled inwards. So they will need some bodywork before we blend the paint back in. Not too terrible though and I was fairly pleased with the results.


I was behind this a few weeks ago and thought of your truck, you can see the crown vic underneath
Nice! For a second I thought you had snapped a pic of our truck. Then I remembered that we don't have snow on the ground in LA, although there was a day last week where it did snow in Pasadena and that area very briefly.
After the bed side welding was done I moved on to the rear structure. Viccup teammate Alex had built a simple 2x3" tube frame structure at the rear to replace the Vic frame which kicked up too high for our purposes. It was partially welded so I finished welding all the joints and frame caps, then primed everything. This is where the rear of the bed is mounted. It's bolted solid with no bushings.
That's the rear bed mount, but the front had been sitting on some 2x4 wood blocks for a few months and needed a proper crossmember to tie into the stock bed bolt hole locations and secure the front of the bed. Alex whipped up this nice crossmember which is similar to the one in the rear of the cab. It has some crush sleeves welded through the tube, and sits up off of the car frame with angled stand-offs. He and I finished this job one night including the clearance notch for the driveshaft.

The bed is bolted solid to this crossmember as well, with 1/2" bolts that are about 5 inches long.
Then came the night of the big push, which was last Wednesday. Dan joined in early and had to leave but Alex, Mikko and I stayed until 3:00am finishing all the little jobs necessary to get it on the road.
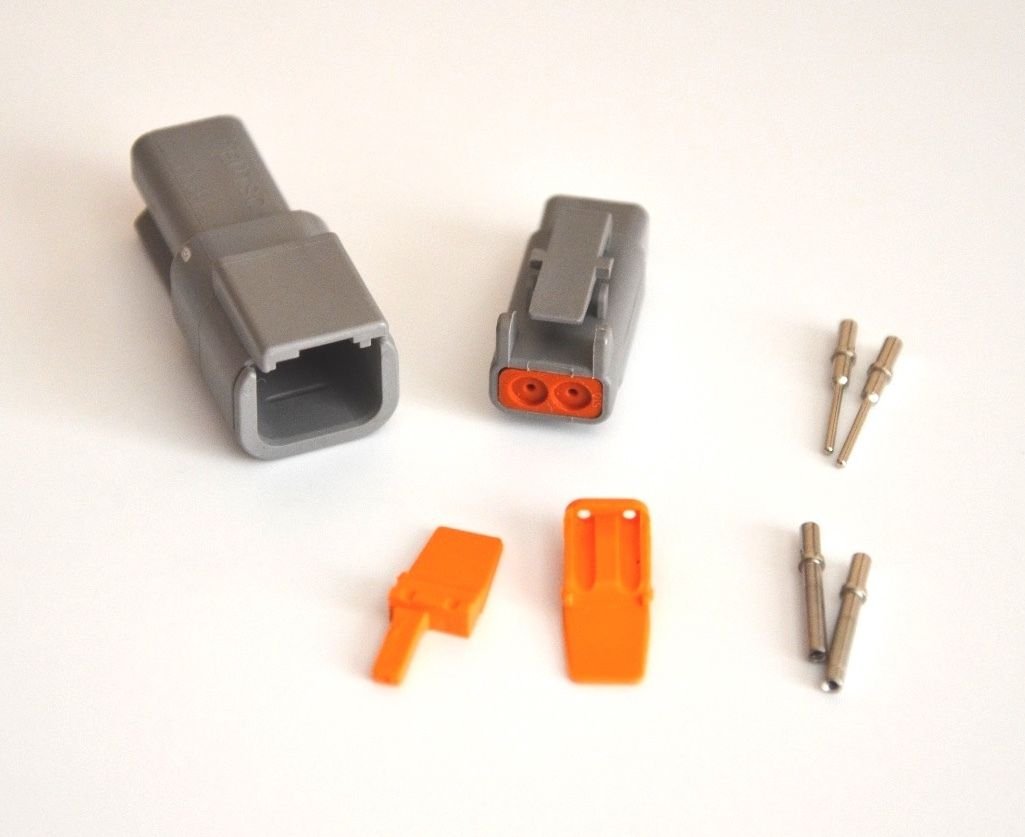
Tail lights were high on the "legality list" and were pretty straightforward. Karl had left a nice pigtail of 4 wires at the rear of the bed which needed to be terminated in connectors, wrapped with heat shrink, and routed. Dan and I confirmed pinout and Mikko did the dirty work of wiring it all up. He used DTM connectors at each light housing and Raychem DR-25 along the whole length (it would've been rude not to)...
Wiring pinout was as follows:
We found the original license plate mount & light from the factory were still hiding under the rear edge of the bed and had never been used, since the truck had one of those monstrous dealer-installed diamond plate step bumpers. Mikko cleaned up the housing and glass, replaced all the bulbs, and viola. The soft glow of the '60s was back.
Seen in the photo above is the temporary fuel filler mount that Alex made that night. I don't have a great picture of it so this description will have to suffice for now. He shortened and re-clocked the filler neck using sections of steel tube and hose, to get the cap oriented straight up as shown. Then he made a nice little sheetmetal bracket which is just tacked to the side of the bed for now. Once we finalize the bed floor, we'll run the filler neck under the new higher load floor, and splice in an appropriate filler door on the driver's side of the bed.
We didn't take photos of most of the small jobs. But the batteries, instrument panel, and seatbelts all got reinstalled. Rear window went back in with a new rubber gasket and the help of some handy twine and soapy water. I rolled the front driver's side fender with an Eastwood roller tool, which helped alleviate most of the rubbing due to the damage on that side. Also made some relief cuts in the rear fender lips to clear the tires as the rear axle articulates. Straight vertical bump was no problem, but an angled surface or single wheel bump would cause the axle to tilt and rub on the fender lips.
Last job of the night was exhaust tips and new hangers. We had to chop this stuff off when shortening the rear of the frame, but just used the stock Crown Vic parts again to terminate the pipes and hang them from the frame, further forward than the stock location.
Then it was time for a 3:00am test drive! On the street legally for the first time!
We drove around the neighborhood a bit and confirmed a few things:
A) it's frickin' awesome
B) Smooth, powerful, quiet (compared to an original '60s pickup)
C) Front driver's side wheel still rubs the fender at full lock (oh well, we'll fix that)
D) It's disorienting to drive because you have the big thin-rimmed steering wheel and squishy bench seat, but there's no steering play, no dead zone, and no wallowing. The brakes and throttle respond instantly and the truck goes where you point it. Success.
I filled up at the closest Arco station, then went home and passed out! Work the next day was total zombie mode, but worth it.


This is so awesome! You guys should start your own Singer Viccup company.
Very impressive. High fives all around. ![]()
Thanks guys - this has been a fun process for sure. Singer Viccup Co. would be an amazing excuse to quit my day job, but would anyone pay $100k for one of these....uhh...maybe even half that?
After our big push to get the truck on the road I started driving it to work to shake it down, and did successfully display it at the Engineer's Week car show at my employer's place of business. It was pretty cool seeing people's reaction to the truck. Most folks thought it was just a lowered pickup, which means we did our jobs right. We didn't want it to look like some unholy Frankenstein car. A few of the fabricator/technician guys knew what was up and got a big kick out of it. "Cop shocks, cop brakes, cop tires..."
Here's a smattering of photos from those few first days with the truck on the road.

1. that stance is so dialed. low enough, perfect rake.
2. if those amber front lights are add-ons, please move them to behind the grille. that is my only complaint.
3. build something else! i really enjoyed following along with your problem-solving process on this build.
AngryCorvair said:1. that stance is so dialed. low enough, perfect rake.
2. if those amber front lights are add-ons, please move them to behind the grille. that is my only complaint.
3. build something else! i really enjoyed following along with your problem-solving process on this build.
1. Thanks! We may have to "body lift" the rear of the bed like 1/2 inch or so, because it isn't perfectly aligned with the cab. But the suspension is still stock P71. The reduced weight in the rear vs. the car gives it a bit of natural rake.
2. They do look tacked on, right? Those lights are actually stock for 1964.

Ford changed the grille every year in this generation. In 65 they moved the marker lights up above the headlights for a cleaner look. I found this handy reference guide:

3. We are humbled by your praise, but rest assured this build isn't over yet! The bed is pretty far from being finished. Still lots of room for problem solving and fun with fabrication.
My next project is a 4.6L 3-valve V8 swap with twin turbos in a Volvo 240 wagon; it's in the early stages. I could start a GRM thread on that too if people are interested! So far I've kept the Volvo content contained to Turbobricks.
Duder said:[edit] I could start a GRM thread on that too if people are interested! So far I've kept the Volvo content contained to Turbobricks.
"If people are interested..." [raises hand] Yes please.
BTW, some of the pitchers in the previous post are showing as road closed. Please look into that. I don't want to miss any important stuff...
No way man, post the Volvo stuff here too! I love this truck and I'd love to see your other work too. Thanks for sharing.

My next project is a 4.6L 3-valve V8 swap with twin turbos in a Volvo 240 wagon
I would like to subscribe to your newsletter. Also, the truck looks awesome!
Duly noted!
Here's a teaser on the 245 V8TT:

From my "State of the Fleet" address on DailyTurismo last year:
(http://www.dailyturismo.com/2018/02/help-us-decide-which-cars-to-blog-about.html)
"Another Volvo 240? But of course. This one is an '84 wagon, originally built in the Volvo factory with a VW diesel inline six, the D24. That was a 75 horsepower gutless wonder, but it did have character and chooched along for over 200k miles. I found the car in Olympia, WA and drove it back to Los Angeles with good buddy Alex (who bought our old white 242). The reason? Well, it's a mid-model 240 and it's smog exempt, being a pre 1998 diesel in CA. That means it can have whatever drivetrain IT wants. I just so happened to have a complete 4.6L 3-valve V8 from a 2005 Mustang GT in my garage, with twin GT2860RS turbos already mounted on it. You can see where this is going. Engine test fitting will commence soon, but I went and threw a wrench in the plan by buying the DTM5's AC Schnitzer wheels back from the new owner of that car, and now have to figure out how to get them to fit this blue wagon. Many nights of head-scratching and test fitting of E36 parts to follow..."
In reply to Duder :
Volvo threads are always good.
You'll need to log in to post.