


What tank is that?

What tank is that?
Keith Tanner said:What tank is that?
Not sure what your asking. Fuel tank will be stock, the fuel pump hanger will come from Tanks INC. And a few pics cause why not.
Defiantly gonna have to move the A/C compressor, goal would be to put it where the P/S pump is and leave everything else where it is. But I dunno if the alternator is too high either. I know the alternator can be relocated to the P/S location, infact you can get a kit from west coast fiero to do it. Also got a proper factory tach to replace the mess of a tach someone made for the rotary. I also have a sweet board coming to convert that stock tach. Right now it would hook to the power side of the coil and it reads current. The board im getting converts it to a normal tach that will work on the neg side of a coil or form an ECU signal/square wave.
]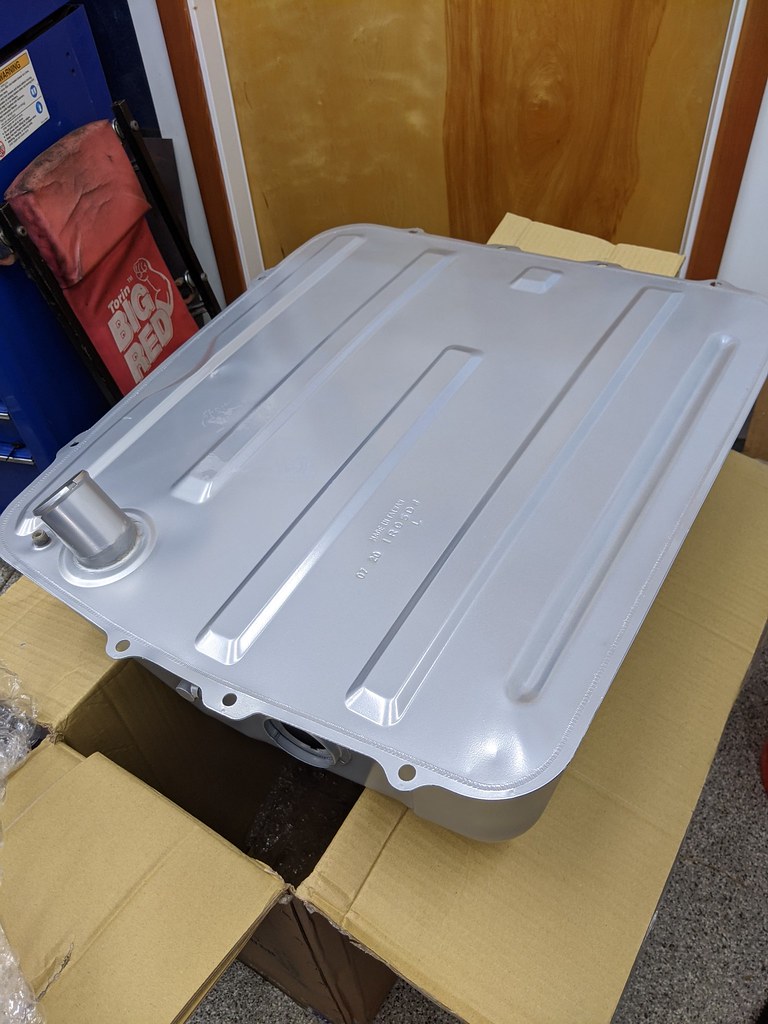


There are a few different stock tanks as far as I know. I was curious as to which one. I'll look into Tanks Inc. My fuel solution could be better.
For a tach, I would think it would be easy enough to find a Smiths for a 6 cylinder. Heck, the MGC had one. Some of them can read off modern electrical systems, my LS1 drives a factory MG tach with no intermediate translation.
Depends on the tach. The RVI tach reads current and they are pretty hard to do much with. The RVC is pretty standard and easy to feed any signal. Didn't k ow bout different tanks. I just ordered a stock replacment from rock auto.
Tanks Inc makes pretty sweet setups for using your stock tank. Holley does as well. They have one that just cut a hole and drop it in, tighten the bolts. All of these however will require cutting a hole in the floor for the top of the assembly to pop up from
The tanks vary with venting and internal baffling. The big canister was feeding the charcoal canister. I suspect yours is the same given the application range and I can see the charcoal canister vent. Fun thing about that baffle - the sender is on one side and the pickup on the other, so when you get close to empty the pickup will suck the main part of the tank dry but there will still be fuel in the section with the sender.
So you might find some interesting things inside when you open up that tank for your fuel unit! The earlier tank is non baffled and non vented.
https://mossmotors.com/mgb/fuel-intake-emissions/fuel-tanks-pumps-lines-senders/fuel-tank-fittings
I had to replace my tach with an RVC unit. I know the "if all you have is a hammer" tendency might be popping up here given your background, but would it not be simpler and more reliable (ha) to use a 6 cylinder RVC Smiths tach? Might be difficult to match the faces if it has to come out of a Jaguar or something, though.
I was hoping not to go in through the top of the tank, but my exhaust runs really close to the stock outlet so that's probably the better choice. If I go that way, there are certainly a number of options.
Another Rube Goldberg option is leave the stock tank and pump alone but have it fill a swirl pot mounted up in the engine bay which feeds a high pressure FI fuel pump. You can still whack the stock pump under the car with a mallet when the points inside hang up, so bonus points for authenticity? Its got some appeal for those less skilled in fabrication and working with the original tank.
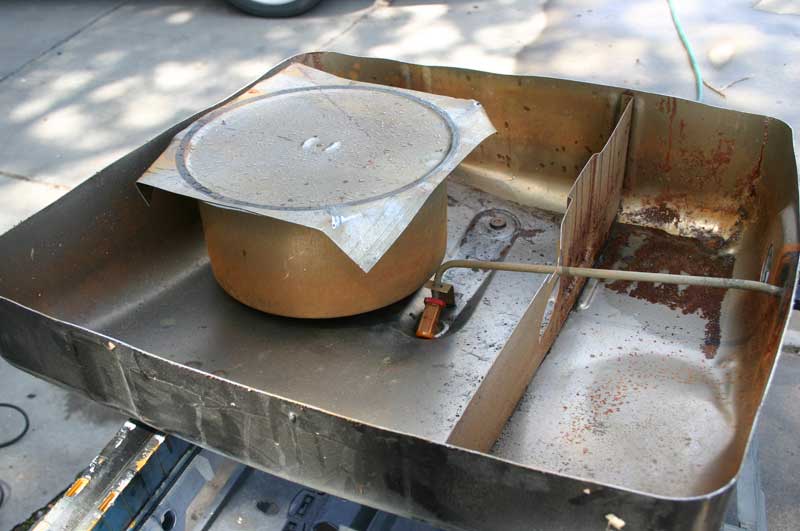
Well I havent been able to stab the engine and trans yet cause of reasons. So Ive been doing a few other things. This is one, RVI tach upgrade. The Smiths RVI tach for those that dont know is an inductive current triggered electronic tach that worked off of the primary side of the ignition system. The coil 12v wire was looped either internal or external to the tach to get a signal. A company called Spiyda Ltd makes a conversion board to convert it to a RVC tach which would be more more typical coil - triggered tach. This board however has a selection of inputs. High energy ignition, standard ignition, 12v square wave or a low voltage input which would come from an ECU usually. Priced right, super easy install, requires no internal modification, and comes with a calibration cable to use with anything that can play an audio file. After all, a tach is just a frequency meter. So it can be precisely calibrated with a tone played at a specific frequency.
Anyway, the car had an old 8k tach stuffed into the smiths can and it was done very poorly. So i picked up a stock 4 cyl tach to convert. I would have preferred a 6 cyl tach cause it says 6 cyl on the face, but the 4 cyl tach actually has a matching redline on it for the 3800, so I went that route. Stripped it down, installed the new board, soldered all of 5 wires and it was done. Hooked it up to my laptop and played back some tones at 50hz, 100hz, 200hz, and 300hz. On a 6 cylinder ignition system this equated to 1,000 2,000 4,000 and 6,000 RPM. There is only one adjustment on the board, so I set it up at 4k rpm and well I was disappointed.
Super inaccurate. 1k and 2k read really high, and it would only goto 5k or so. More I played with it the wackier it got. Ill say not this was not a fault with the board. I was fearing junk maybe on the shafts I couldn't clean out, or maybe the hair springs were worn out. You cannot lubricate the shaft on these, oil in a moving coil meter is a huuuge no no. So after much fiddling, staring and head scratching I realized the clearance between the moving coil and the back of the magnet is minimal. There was a film/mold on the magnet surface. Not enough to make the moving coil stick, but enough to put a slight drag on the moving coil. So a few min of alcohol, q-tips, and a screwdriver with paper towel wrapped on the tip and I had the magnet nice and clean. Recalibrated the tach and holy crap. Accurate to within 100rpm and really its much closer than that. Im impressed. And it was very easy to calibrate. Well worth the $$ to do this instead of gutting the gauge completely to strip for a modern movement. Mainly because getting a new tach to use its guts, calibrating to the scale to match, it wouldn't quite work because of how the numbers are layed out. 3500 isnt dead center, the scale layout is not linear. If I could reprogram/calibrate a modern tach to be accurate thats a different story. But either way, this was the easiest most cost effective way to make it work properly with what ever signal I throw at it.
So connections on the back are 12v as the original and a standard ignition signal input and I have a calibration/low signal input as well. This way I can take the signal right form the ECU output. If thats a problem, I can use a pull up resistor like you would on an LS swap and use the standard ignition input.
And a video of it moving. It does bounce a bit but remember this is an abrupt huge change in signal. It wont be this drastic in the real world on the engine.


Old board. This had the wires with the bullet connectors looped through that big coil for the pickup.

New Board


I did a thing!
So Engine is in the car, well its on blocks sitting there with the car around it. Using a FWD engine with the FWD top end does pose challenges. Few of the main ones is the upper hose outlet points at the firewall, as does the throttle body. Gonna have to do a U pipe on the throttle. Ive seen this done for RWD L67 swaps in pics, so shouldn't be a big deal. I also have a buddy with a plasma table so that makes it even easier. Not sure what ill do bout the upper hose outlet yet. The other issue is the oil pan. This of course depends on what your engine came from. This was from a park avenue. The front of the pan was part of the engine mount bracket support. The front of the pan is straight and square. I couldn't get the drivetrain in without unbolting the crossmember. So I pulled the crossmember and cut out a section. So the regal pan or the camaro pan (the steel pan) has a sloped front section and started a little farther back. It should make this fit much better. Looking at another members 3800 swap it looks like he hacked out almost all the metal in the middle of the crossmember. Ive seen pics of V8 swaps and maybe an inch of the crossmember is left and its boxed in. What would be the safe minimum I can go removing metal? I need to get the engine down 4 or 5 inches at least from where it is, part of the issue right now is that pan, but i think the pulley will have to drop down more as well.
Exhaust, as it stands getting a pipe down the passenger side not going in the inner fender shouldn't be an issue. And it looks like it may also be doable on the drivers side as well, not sure yet. I don't wanna go through the inner fenders if I don't have to. Also the stock manifold on the rear of the engine is stainless and more of a header, cut the log off so it gives me a really good place to start from. I can get another one cheep, and stick it on the other side and do the same. We will see once the engine is settled and bolted in.
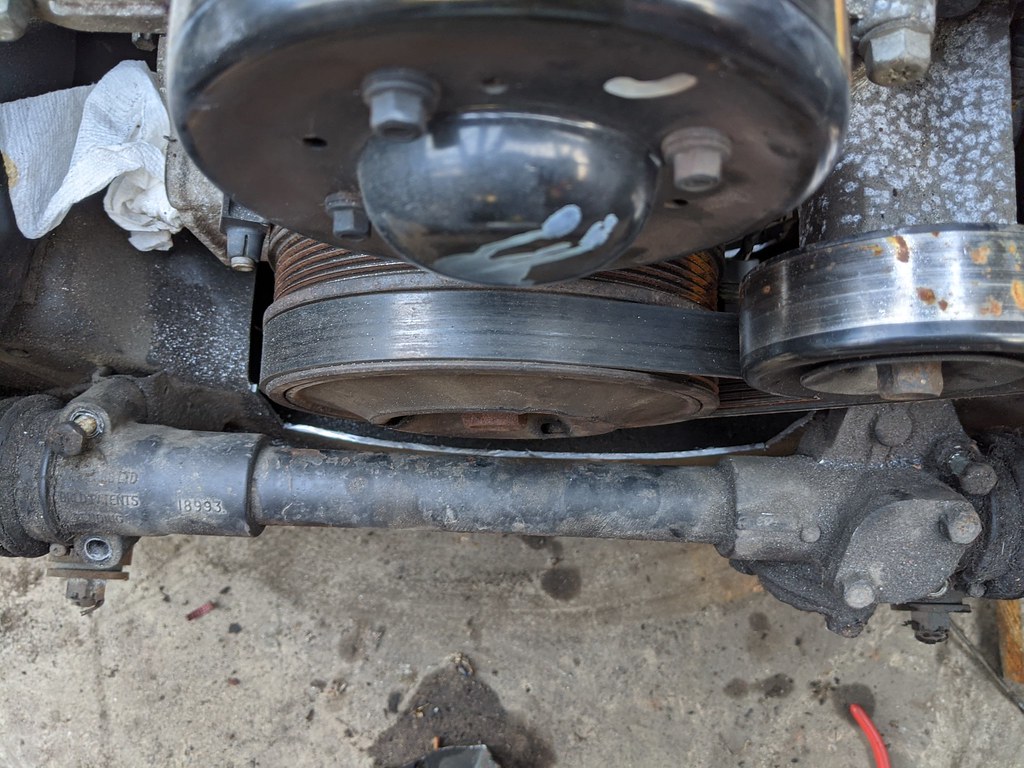
Accessory drive. Well the blower belt fits pretty well. I think it will still clear once the engine is lower, but we will see. Im hoping I can get the engine low enough to clear the alternator. Moving that will not be fun. And if i have to mount it lower I have no idea where the stupid A/C compressor would go. I need to see what the smallest compressor I can find will be.
So thats where its at. Ill take recommendations on the crossmember or throughts to get the most clearance possible. Also Ive seen people cut the support off in the middle of the car by the trans tailshaft, and weld on a few flanges so it can be bolted back in. Im pretty sure this would be fine. It would make it way easier to get the engine in, part of the reason I had to move the crossmember is cause I had to get the trans over this brace to go in farther

You can see the tubular manifold in the bottom of this pic


This is fantastic, I am really interested to see how you progress with this. Is there a rear sump oil pan available? My quick search didn't turn up anything conclusive. Also to clarify, does the crank pulley need to drop below the crossmember surface?
Because its supercharged it has a long crank pulley it will need to sit in the space where the crossmember is. Its common to notched quite a bit when doing a V8 swap. Also the camaro oil pan should fit much better, notched quite a bit in front compared to the aluminum pan. This Im pretty sure will make it so I dont have to take too much more out of the crossmember to get it low enough to be happy. I need to get that alternator low enough to clear the hood cause moving it and having A/C, there is no option for relocation. This may make the oil pan the lowest part of the car, but I dont have much option. Also I need to get a different oil filter adaptor. The park avenue one is the worst one to use as it puts the filter down low. The grand prix goes straight out and 90 deg down, the camaro is straight out. That may be the one I need to pick up. I forsee a junk yard trip in my future...
They ran this engine in Australia in rwd configuration in the Holden Commodore. It has the u turn throttle body and coolant pipes in all the right spots.
In reply to ill_climber :
What are the chances I'll find those parts though, I'm in the states
Rough day and now I feel a bit overwhelmed. Ill get over it. Crossmember carved out bout far as I can without issue, im not worried about it, pretty common to go that deep. Camaro oil pan installed temporarily. Plenty of clearance with that pan. Gonna pic up the camaro oil filter adaptor, hopefully it clears the steering rack with a filter on it, but im not optimistic. So a filter relocation kit will be needed.
Alternator still wont clear the hood. I dont know if the camaro alternator bracket would put the alternator any lower. Every MGB Ive seen with a 3800 uses the camaro bracket. But as it stands where the motor sits right now the oil pan is over an inch below the crossmember. I dont wanna put the motor any lower in the engine compartment. Also I still need to put an ac compressor in there which should fit far on the passenger side, similar to the high mount LS a/c kits. If I dump the stock bracket I should be able to make a single plate that I can build off from to attach the compressor and alternator. Then I need to figure out the heater hoses. They normally connect to the bracket and run into the head and intake via plastic 90 degree push in fittings. Not a lot of meat to make threads, not sure the solution there and I may not bother with one till there is a compressor and alternator mounted. Things are gonna get tight.
Looks like I can do motor mounts off the crossmember as well instead of the frame rails. Simple hot rod style with the round donut bushings. Think old school. I also have to try and find a GTP coil bracket. It pulls the blower idler pulley and tensioner in farther for more clearance. Right now its pretty much on top of the drivers side inner fender and frame rail.


Nice progress - 3.8 sc with a small pulley should be fun in that platform.

On my fwd engine swapped to rwd and stuffed in a miata, i had to custom build all the brackets for accessories. I also relocated the coils to the firewall.
Can you strip everything but the water pump and blower pulley and crank pulley off the fornt, then make a simple 1/4 inch engine plate style plate, mount your accessories to it, and whittle the plate down to bare minimum from there? It helped me to do it that way, as it took away the mental constraints of the factory layout, as well as reminded me im not married to the factory holes in tbe block and heads except insofar as needed to mount the plate.

Oh yes! I actually wanted to do this swap before finding my Camaro and boosting it instead. One thing you risk running into is the ECM. It's not really similar to the LS stuff like you said. HP barely supported mine, and PowrTuner was needed to take care of all the missing charts. That might only be a problem specific to the NA ECM though. Also, if you want a really nice shifter for this beast, I'll sell my Pro5.0 for pretty cheap. I'm swapping to something stronger, so I don't need T5 parts anymore. Good luck! I'll be following this one.
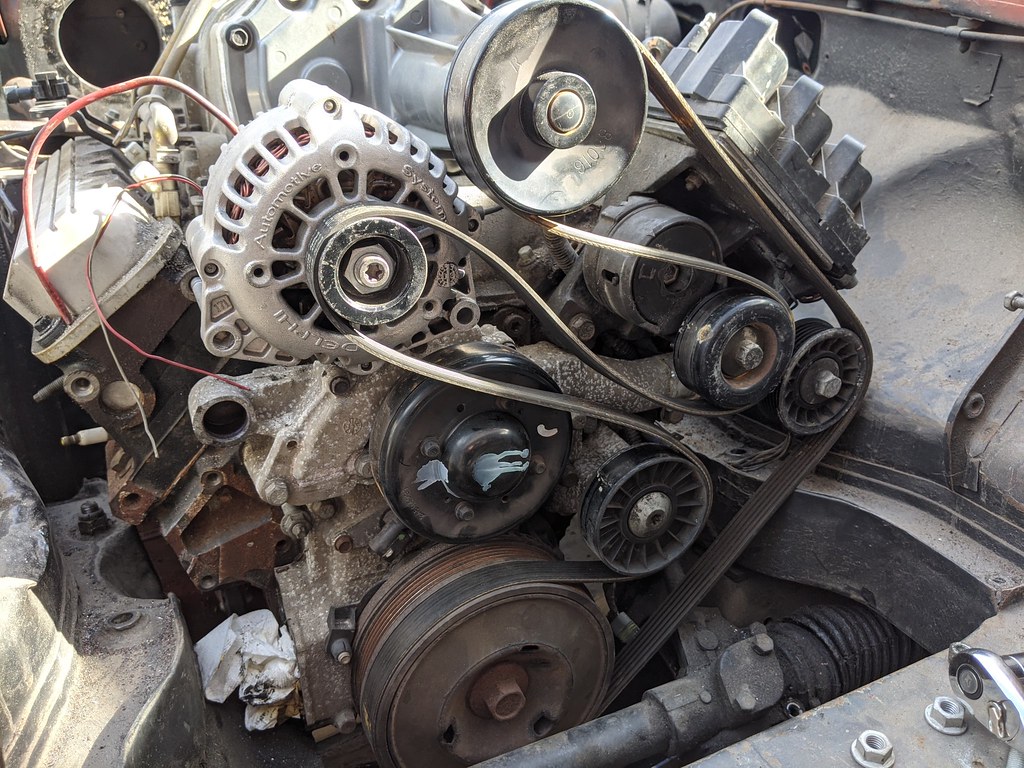
Yeah I've decided to dump the alt bracket and just fab up custom ones. Junk yard trip tomorrow for an alternator and hopefully a GTP or Regal coil bracket to pull the blower tensioner and idler in closer. Also waiting on a sanden 508 and some generic fab brackets for the compressor. That will be a good starting point. Once I have that I should be able to figure something out. With nothing in front of me I'm having a hard time visualizing bracketry.
Ecu is stock for the park avenue. I got an engine pull out so it was 100% complete, not 1 wire cut, not one part missing. All I should have to do is turn off vats In the ecu. Maaaaaybe some MAF rescaling due to a u pipe on the throttle and open air filter, but there shouldnt be much more than that. Tuning was the last thing on my mind as that should be very straight forward with a stock sc ecu. Once I know I can get the alternator low enough which shouldn't be an issue, I have to make the motor mounts. I wanna get that motor up an inch or so to clear the cross member better with the Camaro pan. Also, the headers will have to go out the fenders. Pass side, plenty of room. Drivers side, it would be on top of the starter but getting around the steering shaft....no reason to fight it. Especially when there is already a hole for the last engine that was in there through the inner fender.
No plans on more power. 240hp in this car is pleeeenty, really 170hp from a 3.4 would have been sufficient. But I couldn't do this easy, and I wanted it to stand out. And I had to have AC, and a blower. Cause an na 3.8 wasn't fancier looking than the 3.4. I'm not looking for the biggest numbers. When it comes to this stuff IMO, I could care less about numbers. If it's fun, it doesn't matter how much or little power it has. But I won't lie, this will be stupid fun with the power haaaaaa
V6Buicks said:if you want a really nice shifter for this beast, I'll sell my Pro5.0 for pretty cheap.
Shoot me a PM or email. Admin hasn't approved me yet even though it's been a few weeks, I can't send PM's. Also yeah, a pro5.0 is a nice shifter. Had one on my volvos when I t5 swapped it.
Feel like I made some progress today. Hit the junk yard, nice and quiet there right now, few people, was kinda pleasant. Grabbed a camaro oil filter adaptor, a grand prix blower tensioner and idler bracket, and a caviler 2.2 alternator.
Ill start with the bad. Even without a filter, the camaro adaptor wont work, no way I can even think bout getting a remote adaptor on the end of that thing, just hits the steering rack. So, ill probably end up shelling out the $$ for the Intense remote filter plate which takes the place of the whole adaptor.
Starting with the alternator I started to play with it on the inner accessory drive belt. Trying to line up one of the ears with one of the holes in the head. Just wasnt gonna cut it. It was slammed onto the intake making it no bueno, so I pulled it out to the blower belt level. Grabbed the stock long accessory belt and bam, had an alternator location and a fairly easy way to make brackets. Then I slipped the stock ac compressor in there for visual reference to try and figure out belt routing, and well, not so bueno. There is no way to route the belt back to the compressor on the upper side without hitting the alternator or making a maze of pulleys. So I made a quick off set bracket for the alternator to kick it up a little and went back to the inner ribs for the alt and compressor, and well that will work. The clearance around the alternator is good with it slightly offset up. I see pick up points I can use to make a bracket for it. And I think if I do this right, I can keep the stock 90 degree fittings for the heater hose fitting, or make something thats Oring related, or something. I dont wanna tap the timing cover and intake, not much meat there.
So Ill need to put an idler to pull the belt down between the comp and alternator to get some wrap around on the alternator, and not sure about a tensioner yet. Either Ill keep the compressor adjustable for manual belt tension, or figure out how to do a tensioner somewhere. Also, You can see where I wrapped the belt around the lower blower idler bracket. Ill have to make a bracket to accommodate 2 pulleys. This gives me an excuse/reason to get a lathe. Ive been wanting a mini lathe for little stuff like this.
So next update may be a while, Im waiting on parts from USPS, and well holidays and other reasons USPS isnt exactly operating at peak efficiency. And Ive got a little work this week, which is much needed.
I also finally got the stupid right angle drive on the back of the speedo apart. Wasnt broken, it was just stiff and gooey. So gotta get that all clean and reassembled and then find the correct speedo cable end so I can make a new cable. Its getting a speedhut speed box. The t5 has a speed sensor, not a cable, and I need a speed sensor for the ECU. I dont feel like modding the trans for a cable, and by the time im done doing all that anyway, and correcting the speedo to be accurate, I can put the speedbox in and be done. And they were on sale, and I needed one for my bugeye sprite anyway so I bought 2, lol.


AutoComMan
Glad to see (took my advice?) and moved here. Alot more appreciation for your build here.
That other site getting not what it used to be...
Glad your making good progress on your build. Keep up the posts, alot of good info for anybody thinking of an Ecotec project.
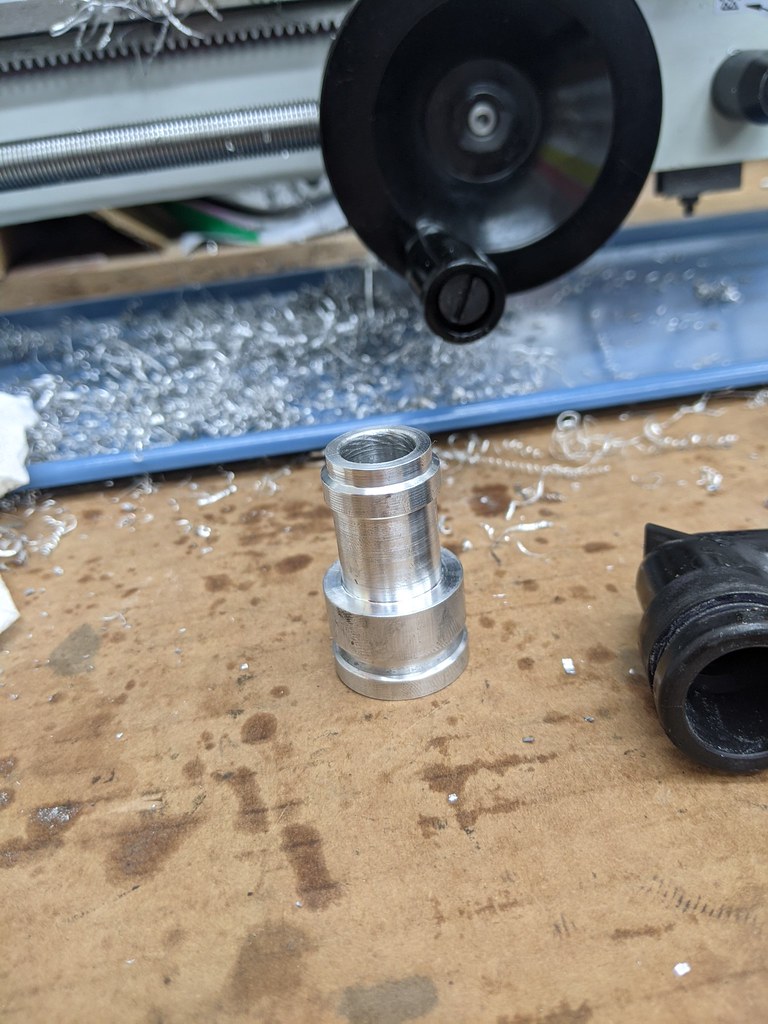
Happy holidays to me, little gift to myself. Solving some problems that I dont like the existing solutions too. Removing the huge alternator bracket that the coolant passes through to the heater isnt uncommon in a Fiero swap, but i didnt like the idea of tapping the thin timing cover and thinner intake manifold. All I should have to do is make a hold down bracket and these custom fittings should do the trick More to come tomorrow when I actually make some progress now that I have an A/C compressor and alternator. Some teasers


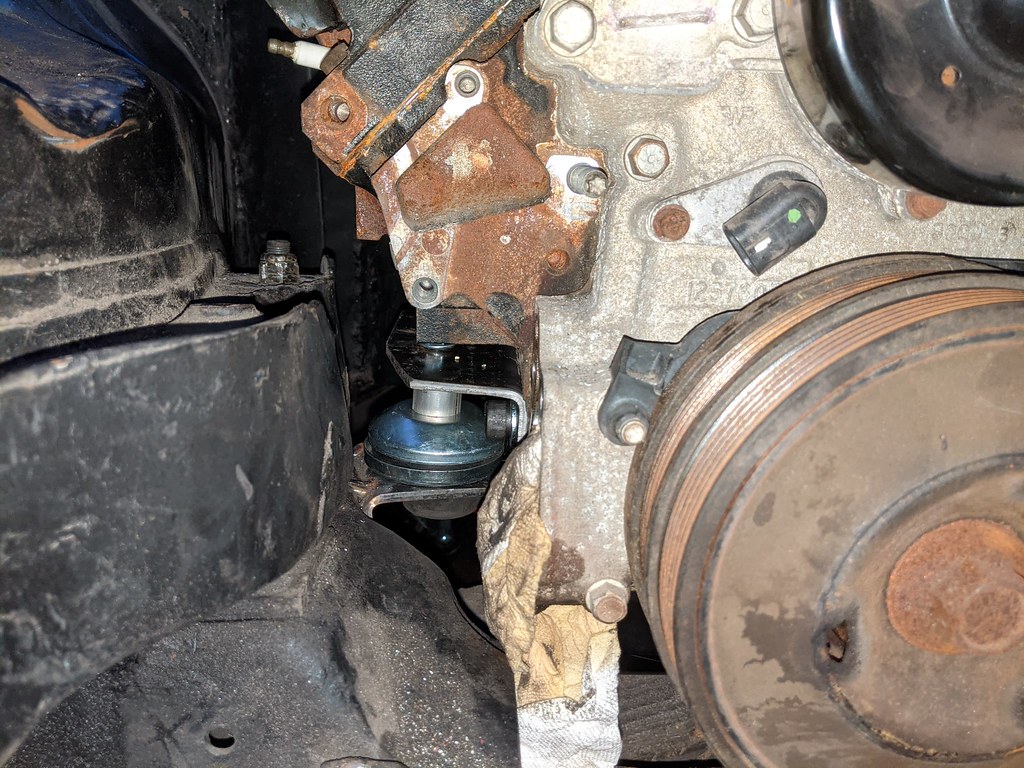
Well the motor is not longer on hte ground supported by 2x6's, its mounted in the car. Welded the brackets to the subframe. Needs some finishing on the brackets, and finish welding, brackets are just solidly tacked right now, but its in there. I was able to get the motor up about an inch, but any more and the trans hits the tunnel cause its at an angle. Because for what ever reason tilting the T5 was common and thats just the way it is. Thanks engineers! Oiy...anyway...still need to build a trans crossmember, but this is a pretty big accomplishment. I hope it comes right out without having to drop the crossmember. Also my sweet heater fittings are done, pop right in with the stock orings, and with a hold down they wont pop out.
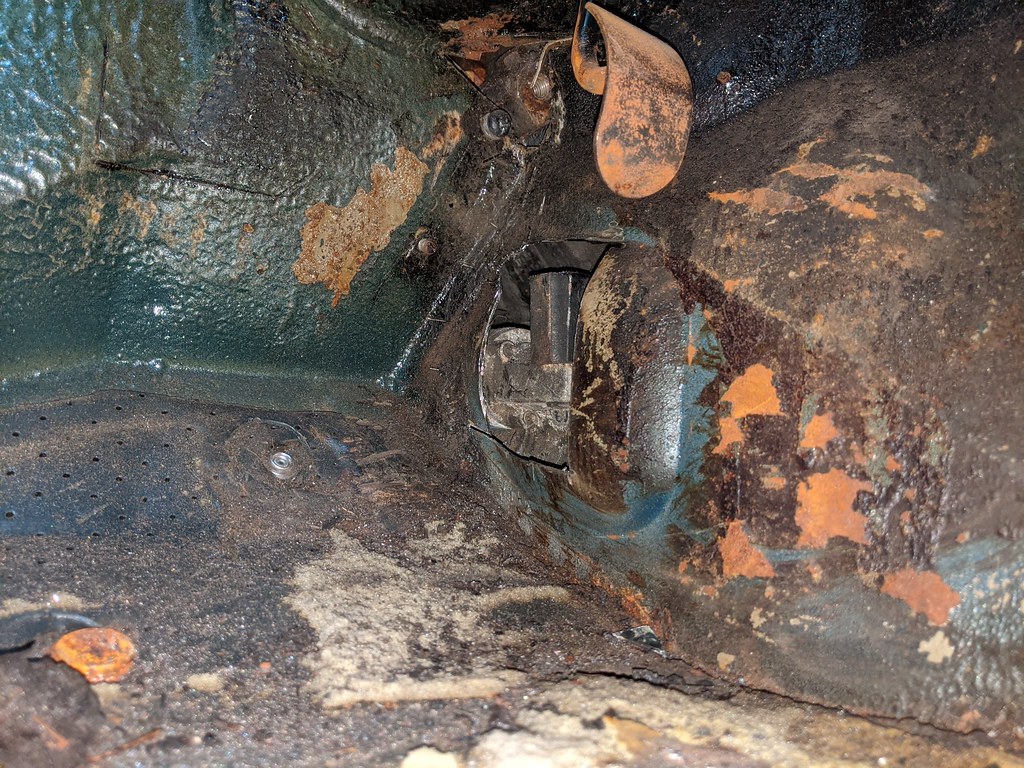
Then there is hood clearance. Its tight, too tight. I dont wanna drop the motor any cause of how the pan hangs below the crossmember. Right now Im ok with where it is, id rather clearance the cross over brace in the hood. But this wont be the hood I use anyway. I need to pick up another one, this one is trashed. And I had to clearance the drivers side area near the gas pedal. Fortunately this wont interfere with anything. And there will need to be a bit of clean up of course. But this allowed me to center up the motor and get it as far back as I could without removing or cutting into the heater shelf.


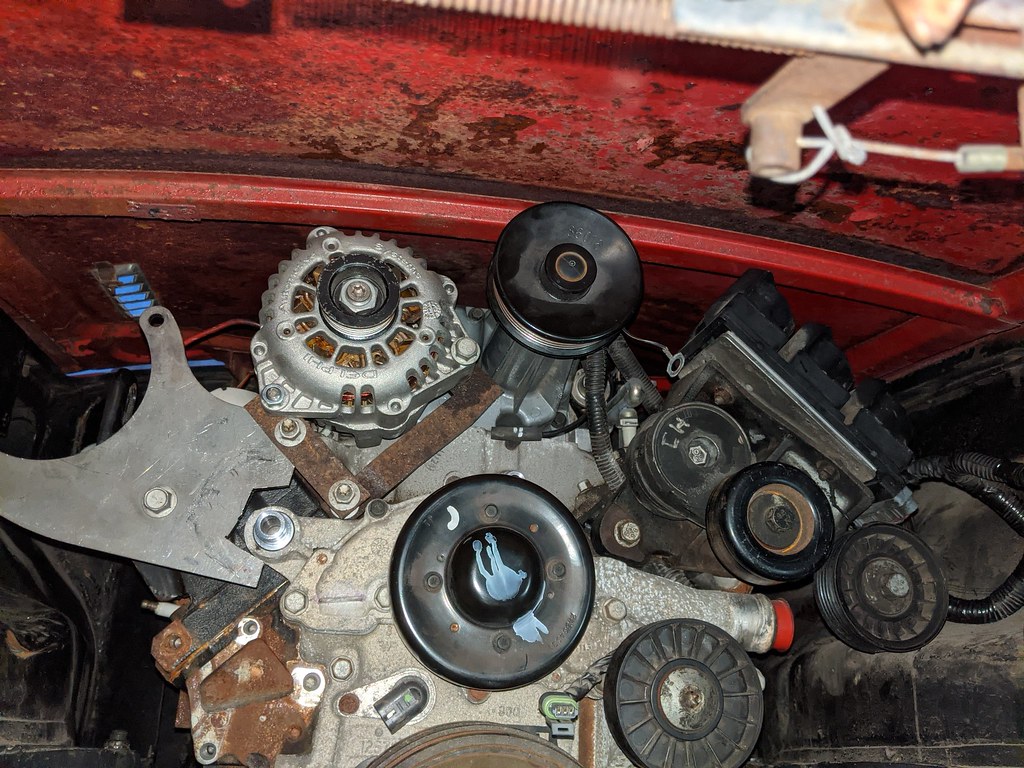

Trans crossmember done and the engine is sitting in the car now, not on blocks of wood with the car around it. Also got all the accessory brackets done. Beefed up the alternator bracket, made spacers for eveything, and added the second A/C bracket. Everything is rock solid. Also made my double idler on the LH side of the engine. The accessory belt and the blower belt have idlers on this now. But becuase of the design/space available the position of the idler has to move slightly from the original. Trying to put the stock blower belt on, well its too short by 1/2 inch. I can get the belt on, but the tensioner as pretty much maxed out, that wont do. So I need to bump the blower belt size just a little. Still an easy to get off the shelf belt. Im happy with how its all come out. Not sure the path of the heater hoses. I dont want them to run through the belt, but im not sure how it will work yet.
Next is exhaust. Im ordering flanges tonight, Already have collectors and a bunch of J-combo pipes coming. I dont wannna go through the fenders. There is tons of room on the RH side, but the LH side with the starter and steering shaft there is no option but to go through the fender. And I dont want it to look lop sided. So ill have to go through the fenders. Its a bummer on the RH side cause I need to run heater and A/C lines across there. Again, not sure where ill run those now. I might go into the channel in the body right there and pop out closer to the compressor. I also need to move the radiator forward. I got such a good deal on 2 Spal pullers I couldnt pass em up. 1100 cfm 11" fans x2. So ill move the radiator forward and either modify the original bracket or make new ones. So far things are going well. But im not looking forward to making the headers.
I have been looking at exhaust pics though. And I spend some time looking under the car today. Ill prolly make a notch in the brace behind the trans to try and keep the pipes closer to the floor. Im gonna bring the right side over to the left. But honestly I want to being the pipes together soon as possible. The factory GM setup only used 2 O2 sensors, pre and post cat. Not one on each bank. So for the O2 to work properly I need to have it in one pipe with both banks feeding it. Maybe it does make sense to dump the one exhasut down and the other out of the fender. I dunno yet i really need to play with some pipe in those areas. 1.5" primarys to 2" collectors. Those will merge to a 2.5" out the back. For a stock engine thats plenty.


Cool little lathe!
Don't think we're not paying attention if we don't post in the thread, guys like me follow along just watching what you're doing but usually nothing to say.
In reply to NOT A TA :
I figured, but I appreciate ya saying so :)
You'll need to log in to post.


