


Wow .....that sure is a lot of belt flyin' round in there....hey what are your plans for the front shocks.....staying with the lever arms? Looking great and Happy New Year!!!!

Wow .....that sure is a lot of belt flyin' round in there....hey what are your plans for the front shocks.....staying with the lever arms? Looking great and Happy New Year!!!!
Yeah, you should have seen the belts before I changed things. Belts everywhere. Since I'm trying to keep this car in a budget I will keep the levers and have apple hydraulic rebuild or exchange them. If money was less of an issue if go coilovers.
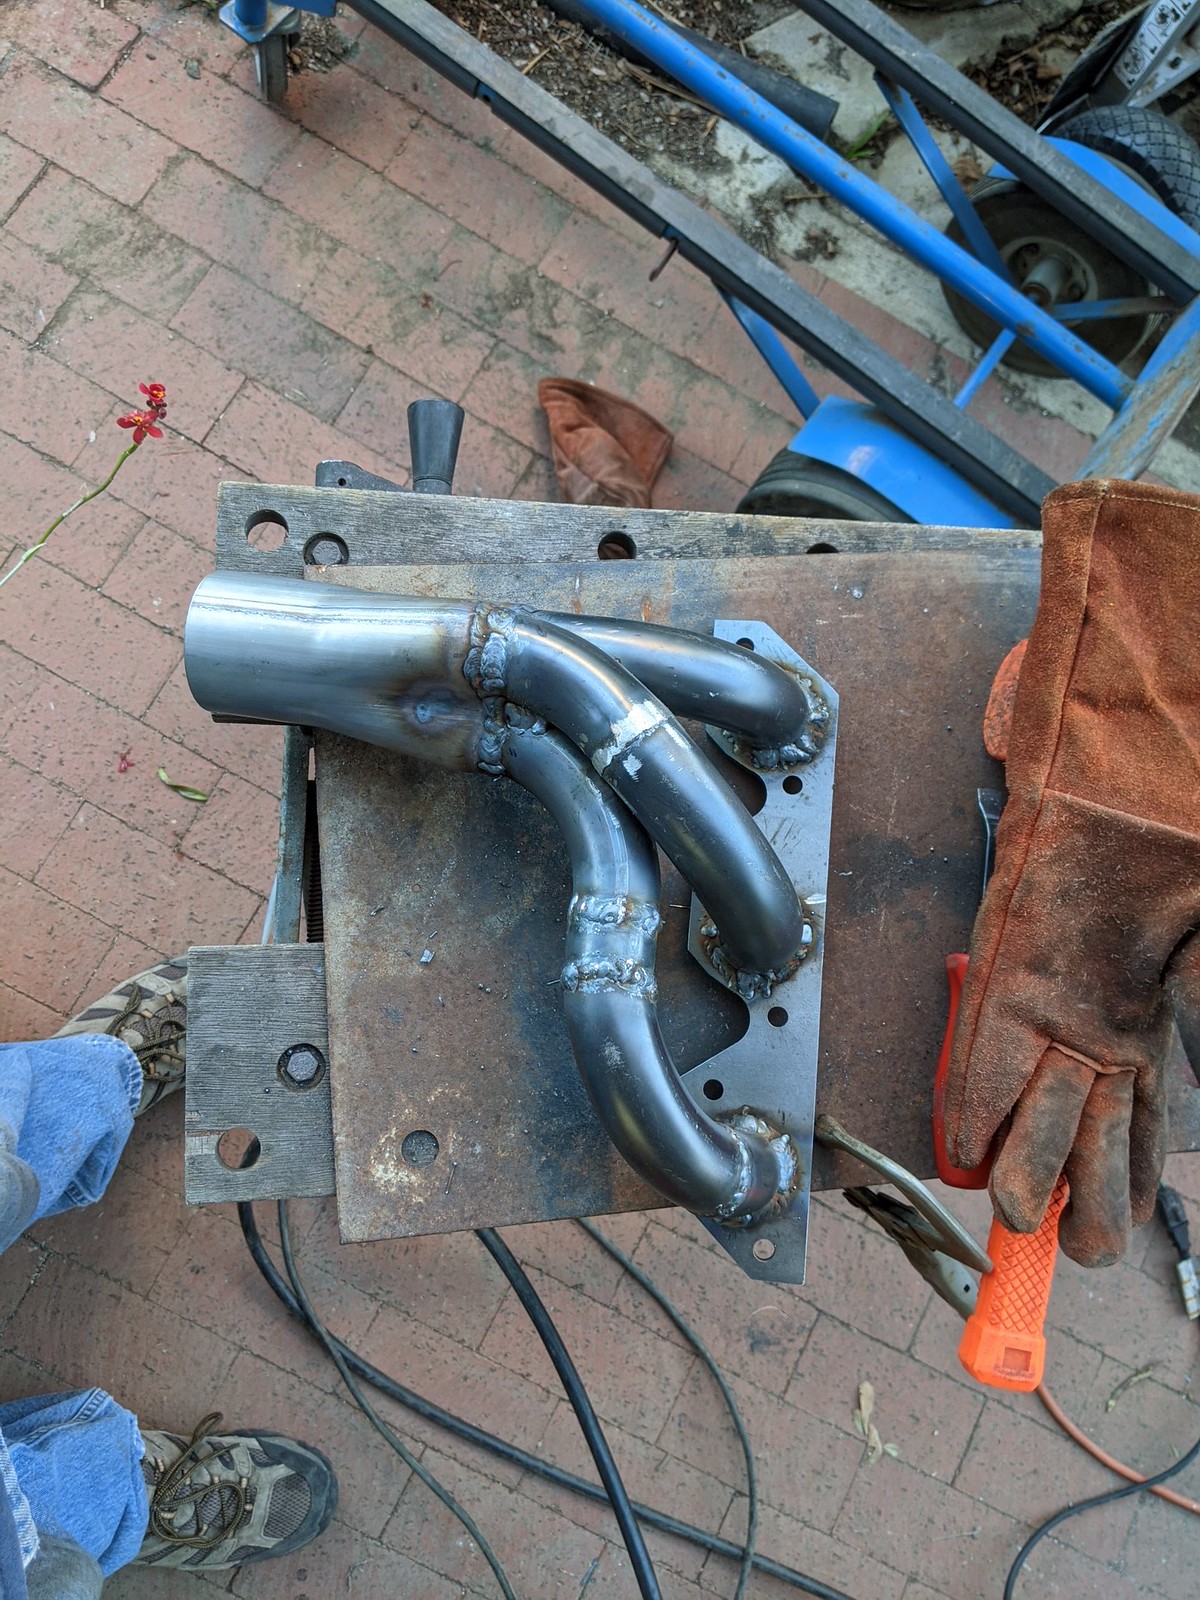
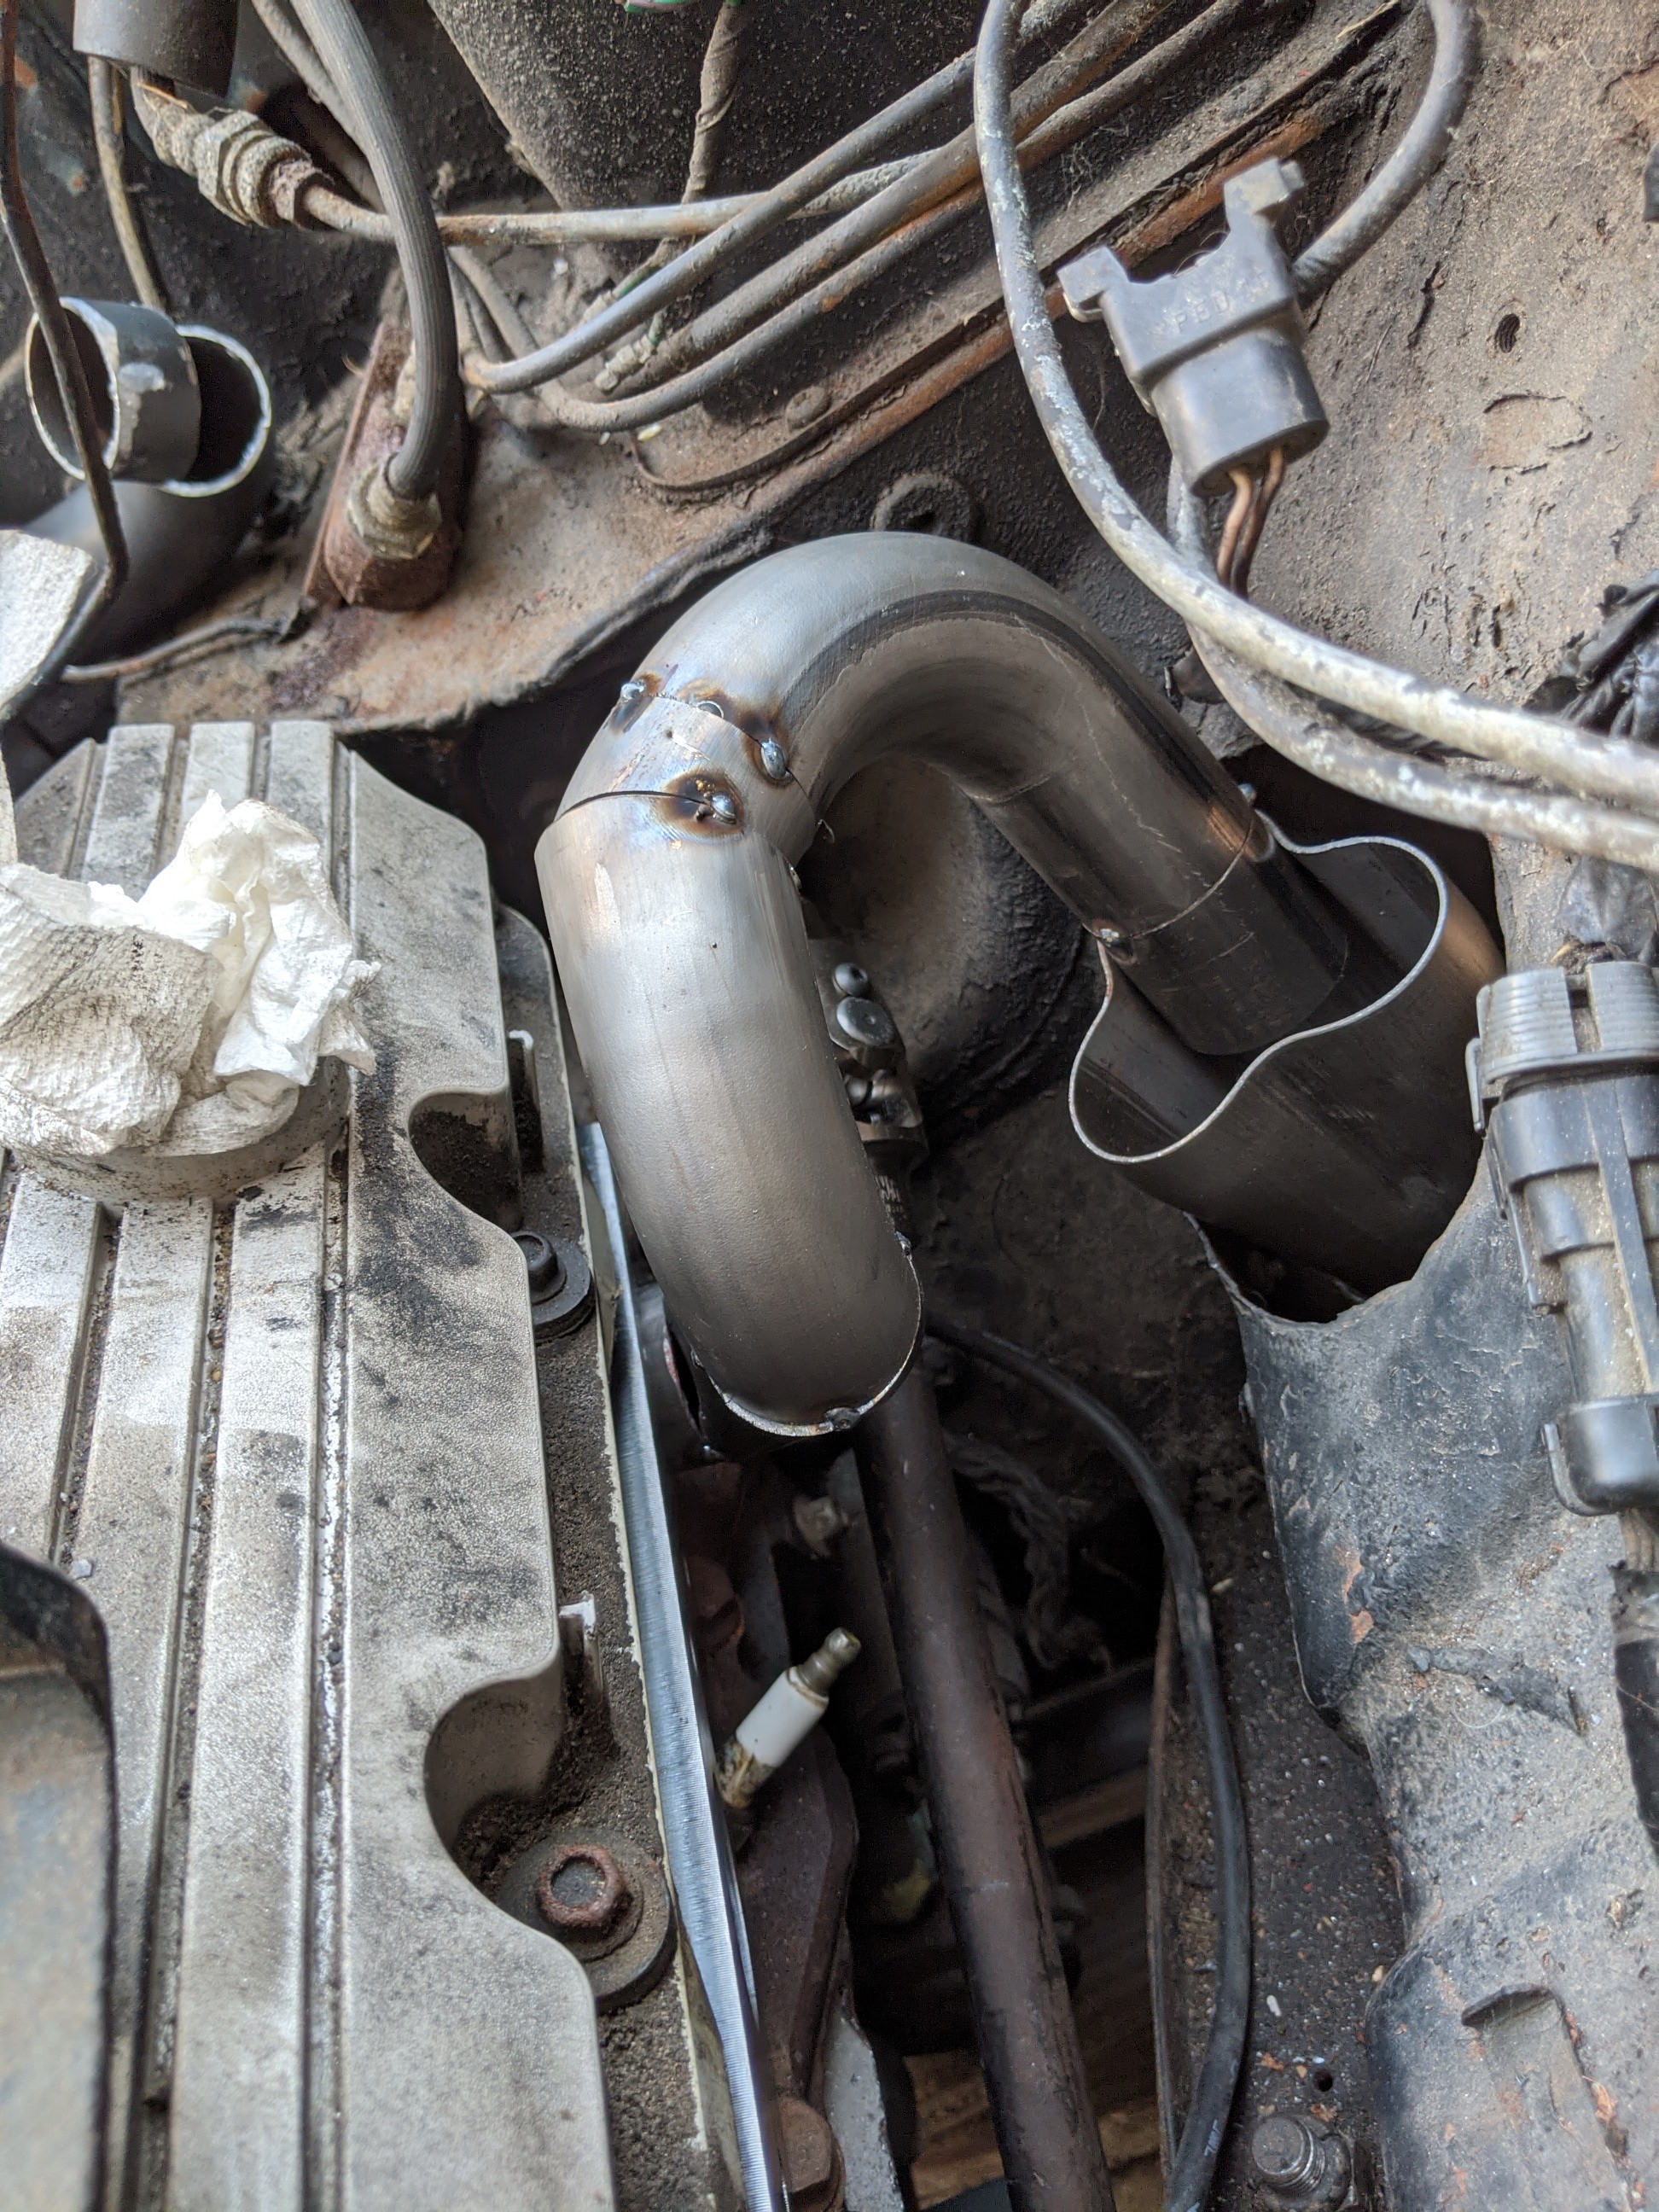
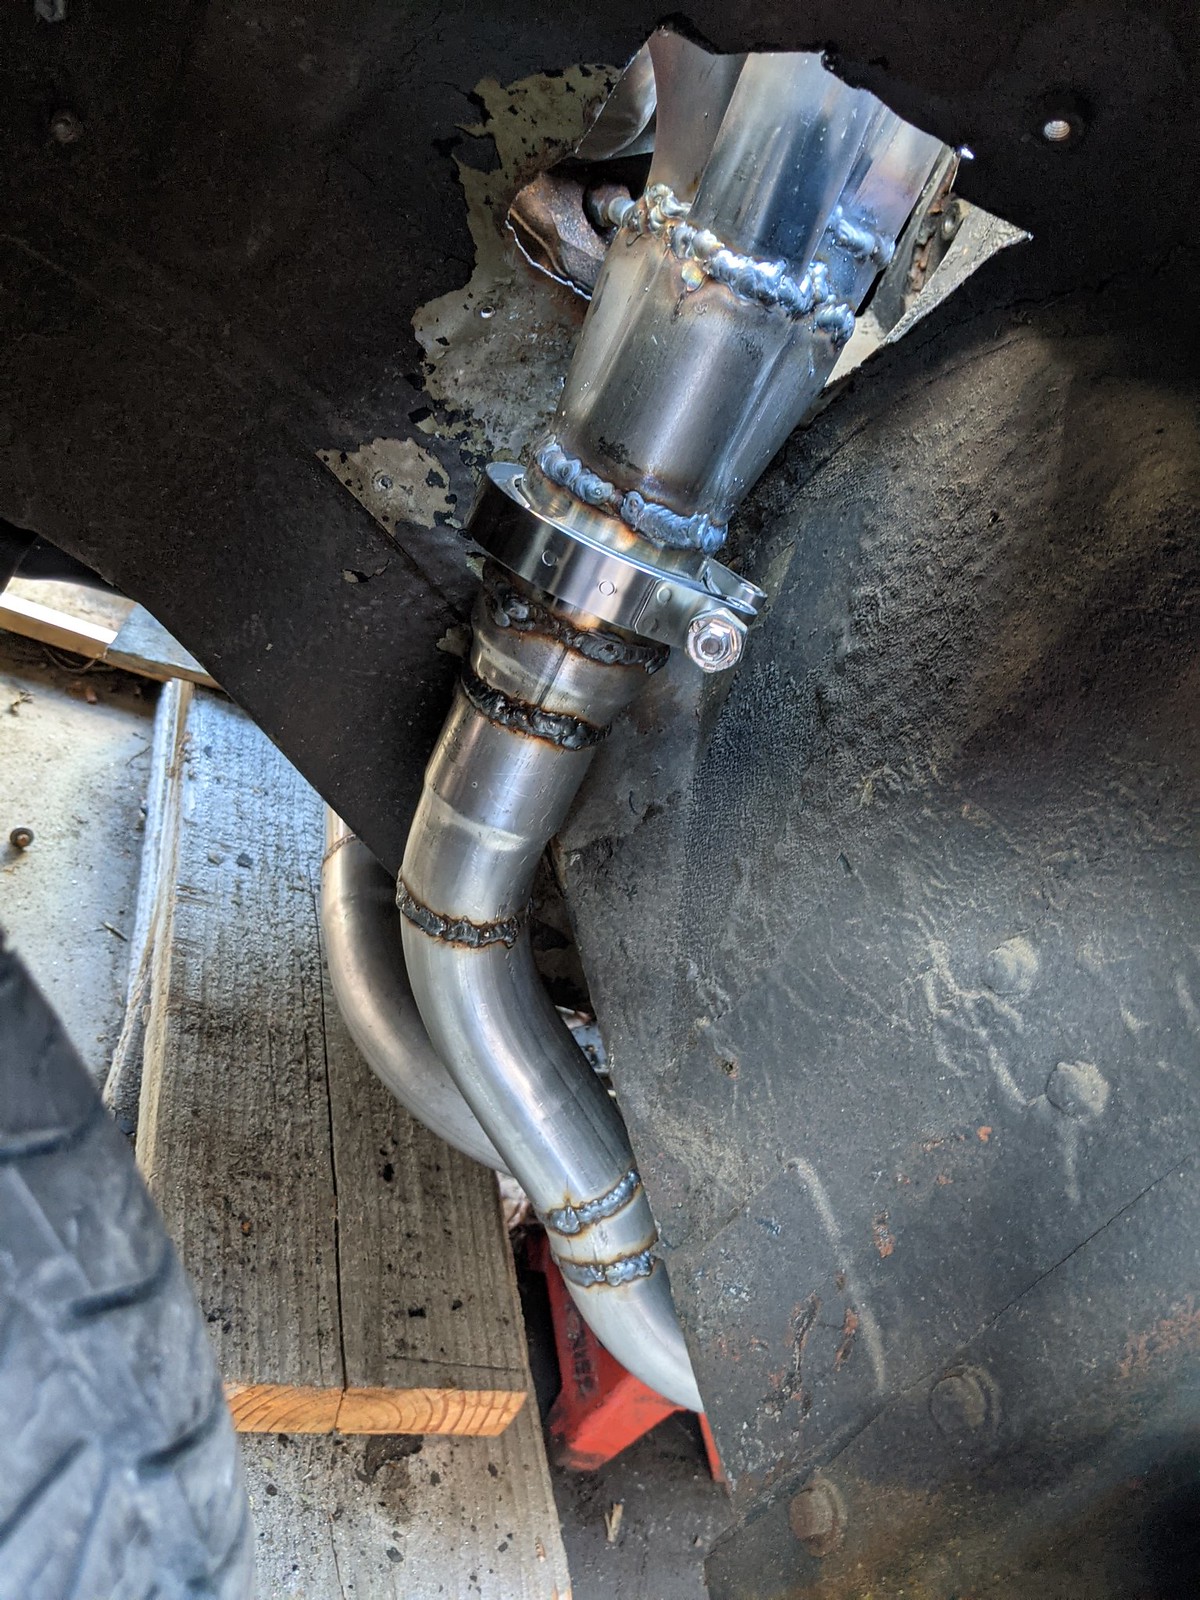
Exhaust! Ive done simple exhaust and never been happy with the results. So why not build headers! Cause ya know, ive never done that before. Easy side first. RH side down and over to the left side. Header went pretty damn easy honestly. But, the LH side, well thats gonna suck. It has to go up, over and down into the inner fender. My issue is the back exhaust port. The stock steering coupler is huge, the later ones are smaller so I need to get one of those. I think that will give me enough clearance. But its still gonna be tight. I think I can pit cut one of the bends I have to make a much tighter radius. Only way im gonna clear on that back port.
Im open to suggestions


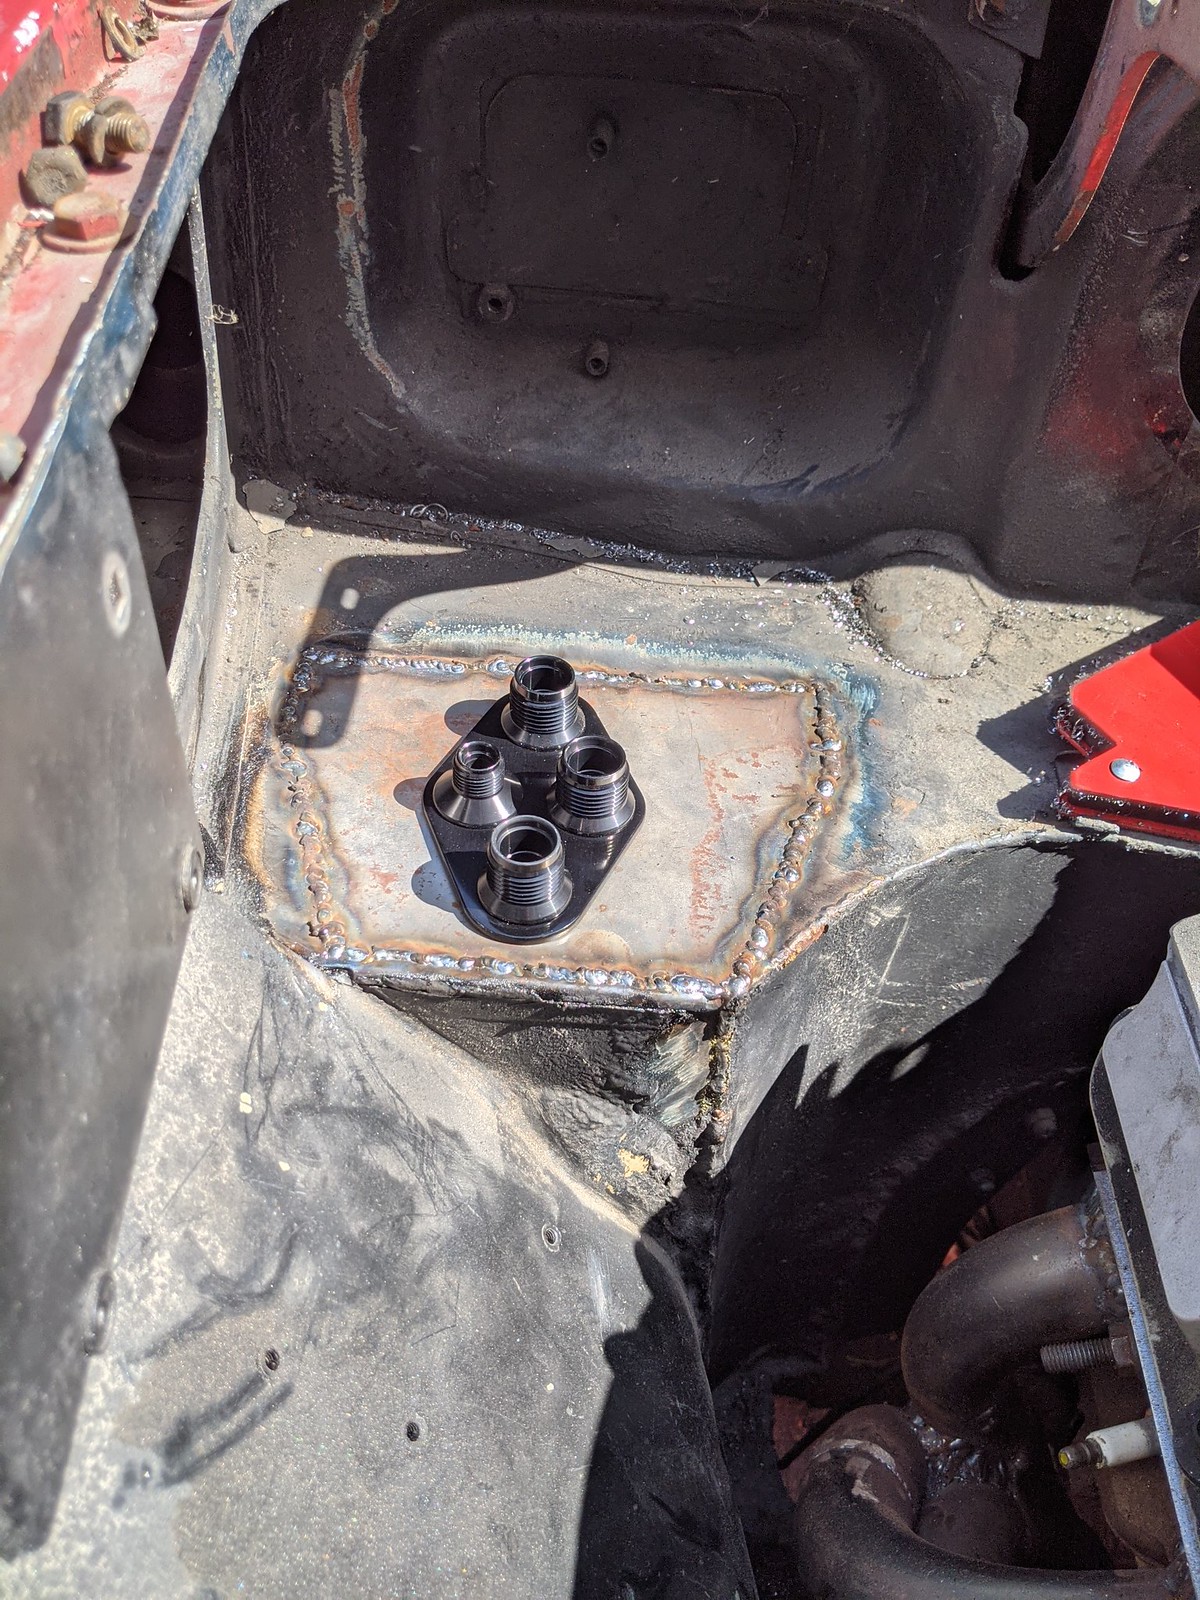
Fuel tank done, Tanks INC FTW. I did the same setup on my turbo bugeye sprite, works great and only takes a few hours to do. Hole in the trunk and ill run probably hard lines in the trunk so they stay shallow and will be between the trunk ribs. Also where the pump is coming through the trunk floor it doesn't hit the spare, and with a small cover it will be all hidden away.
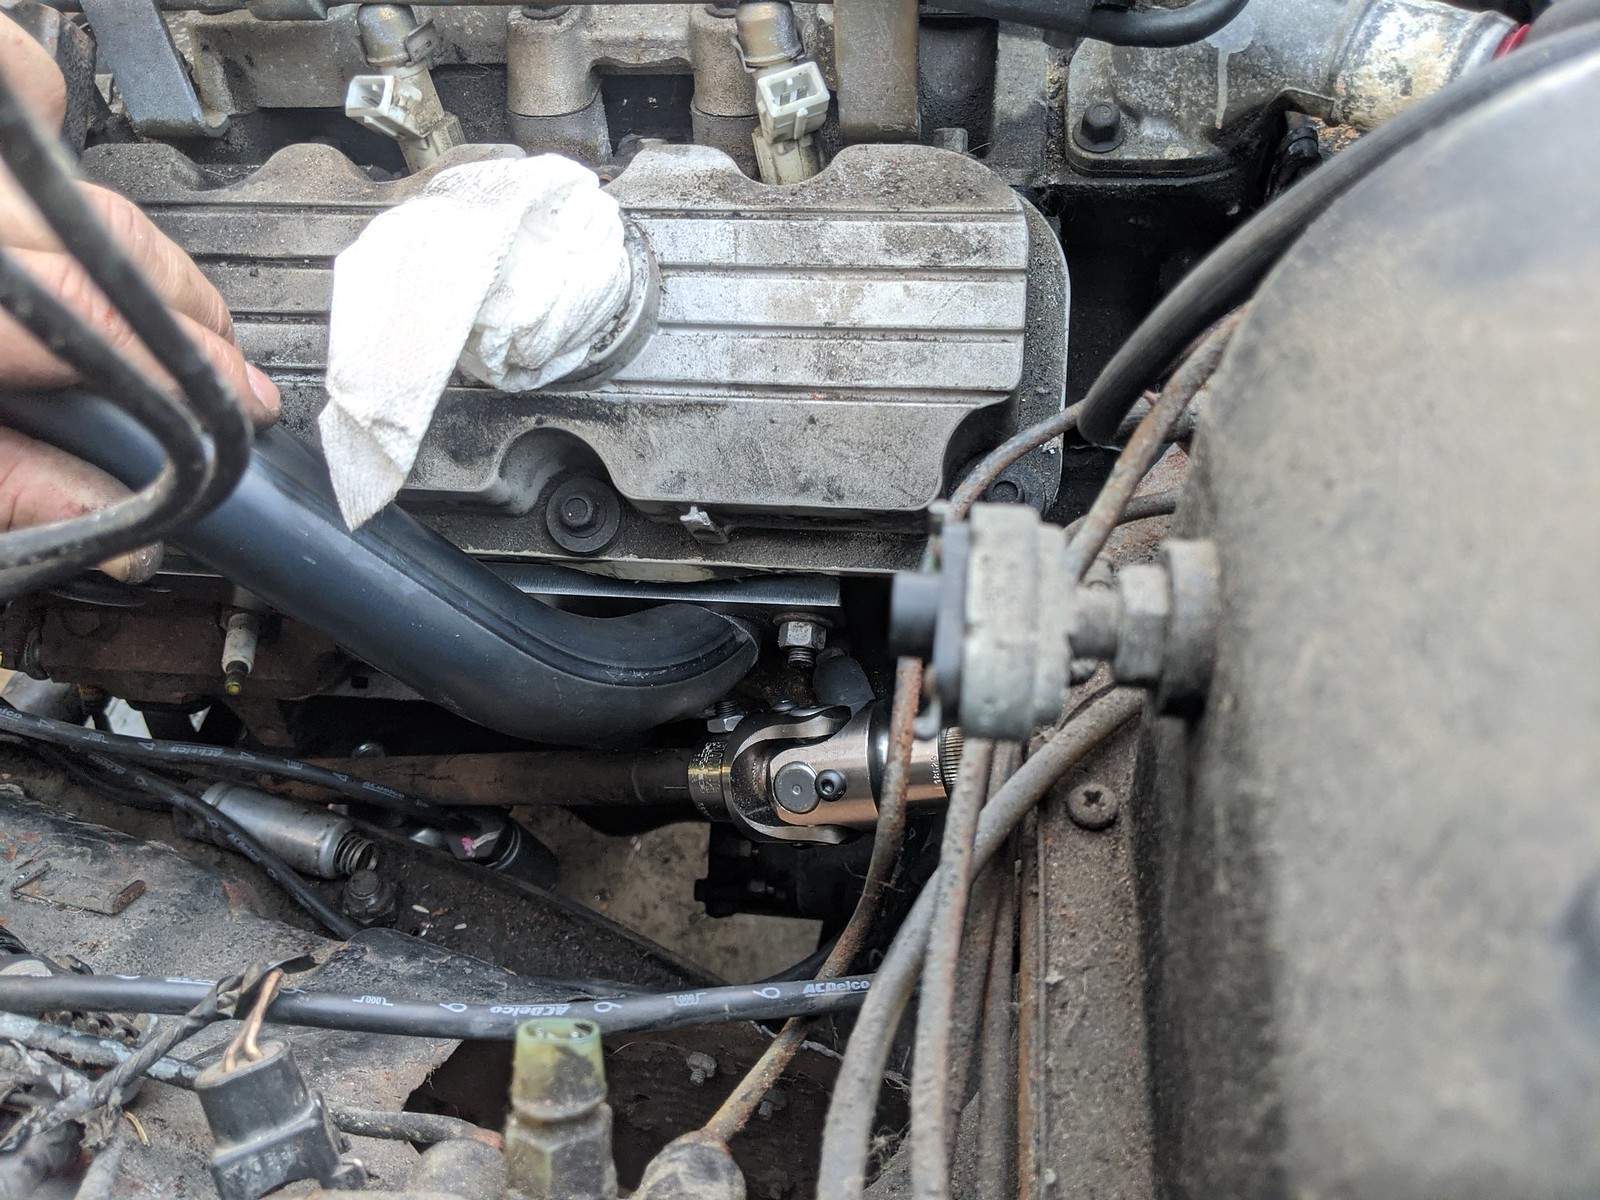
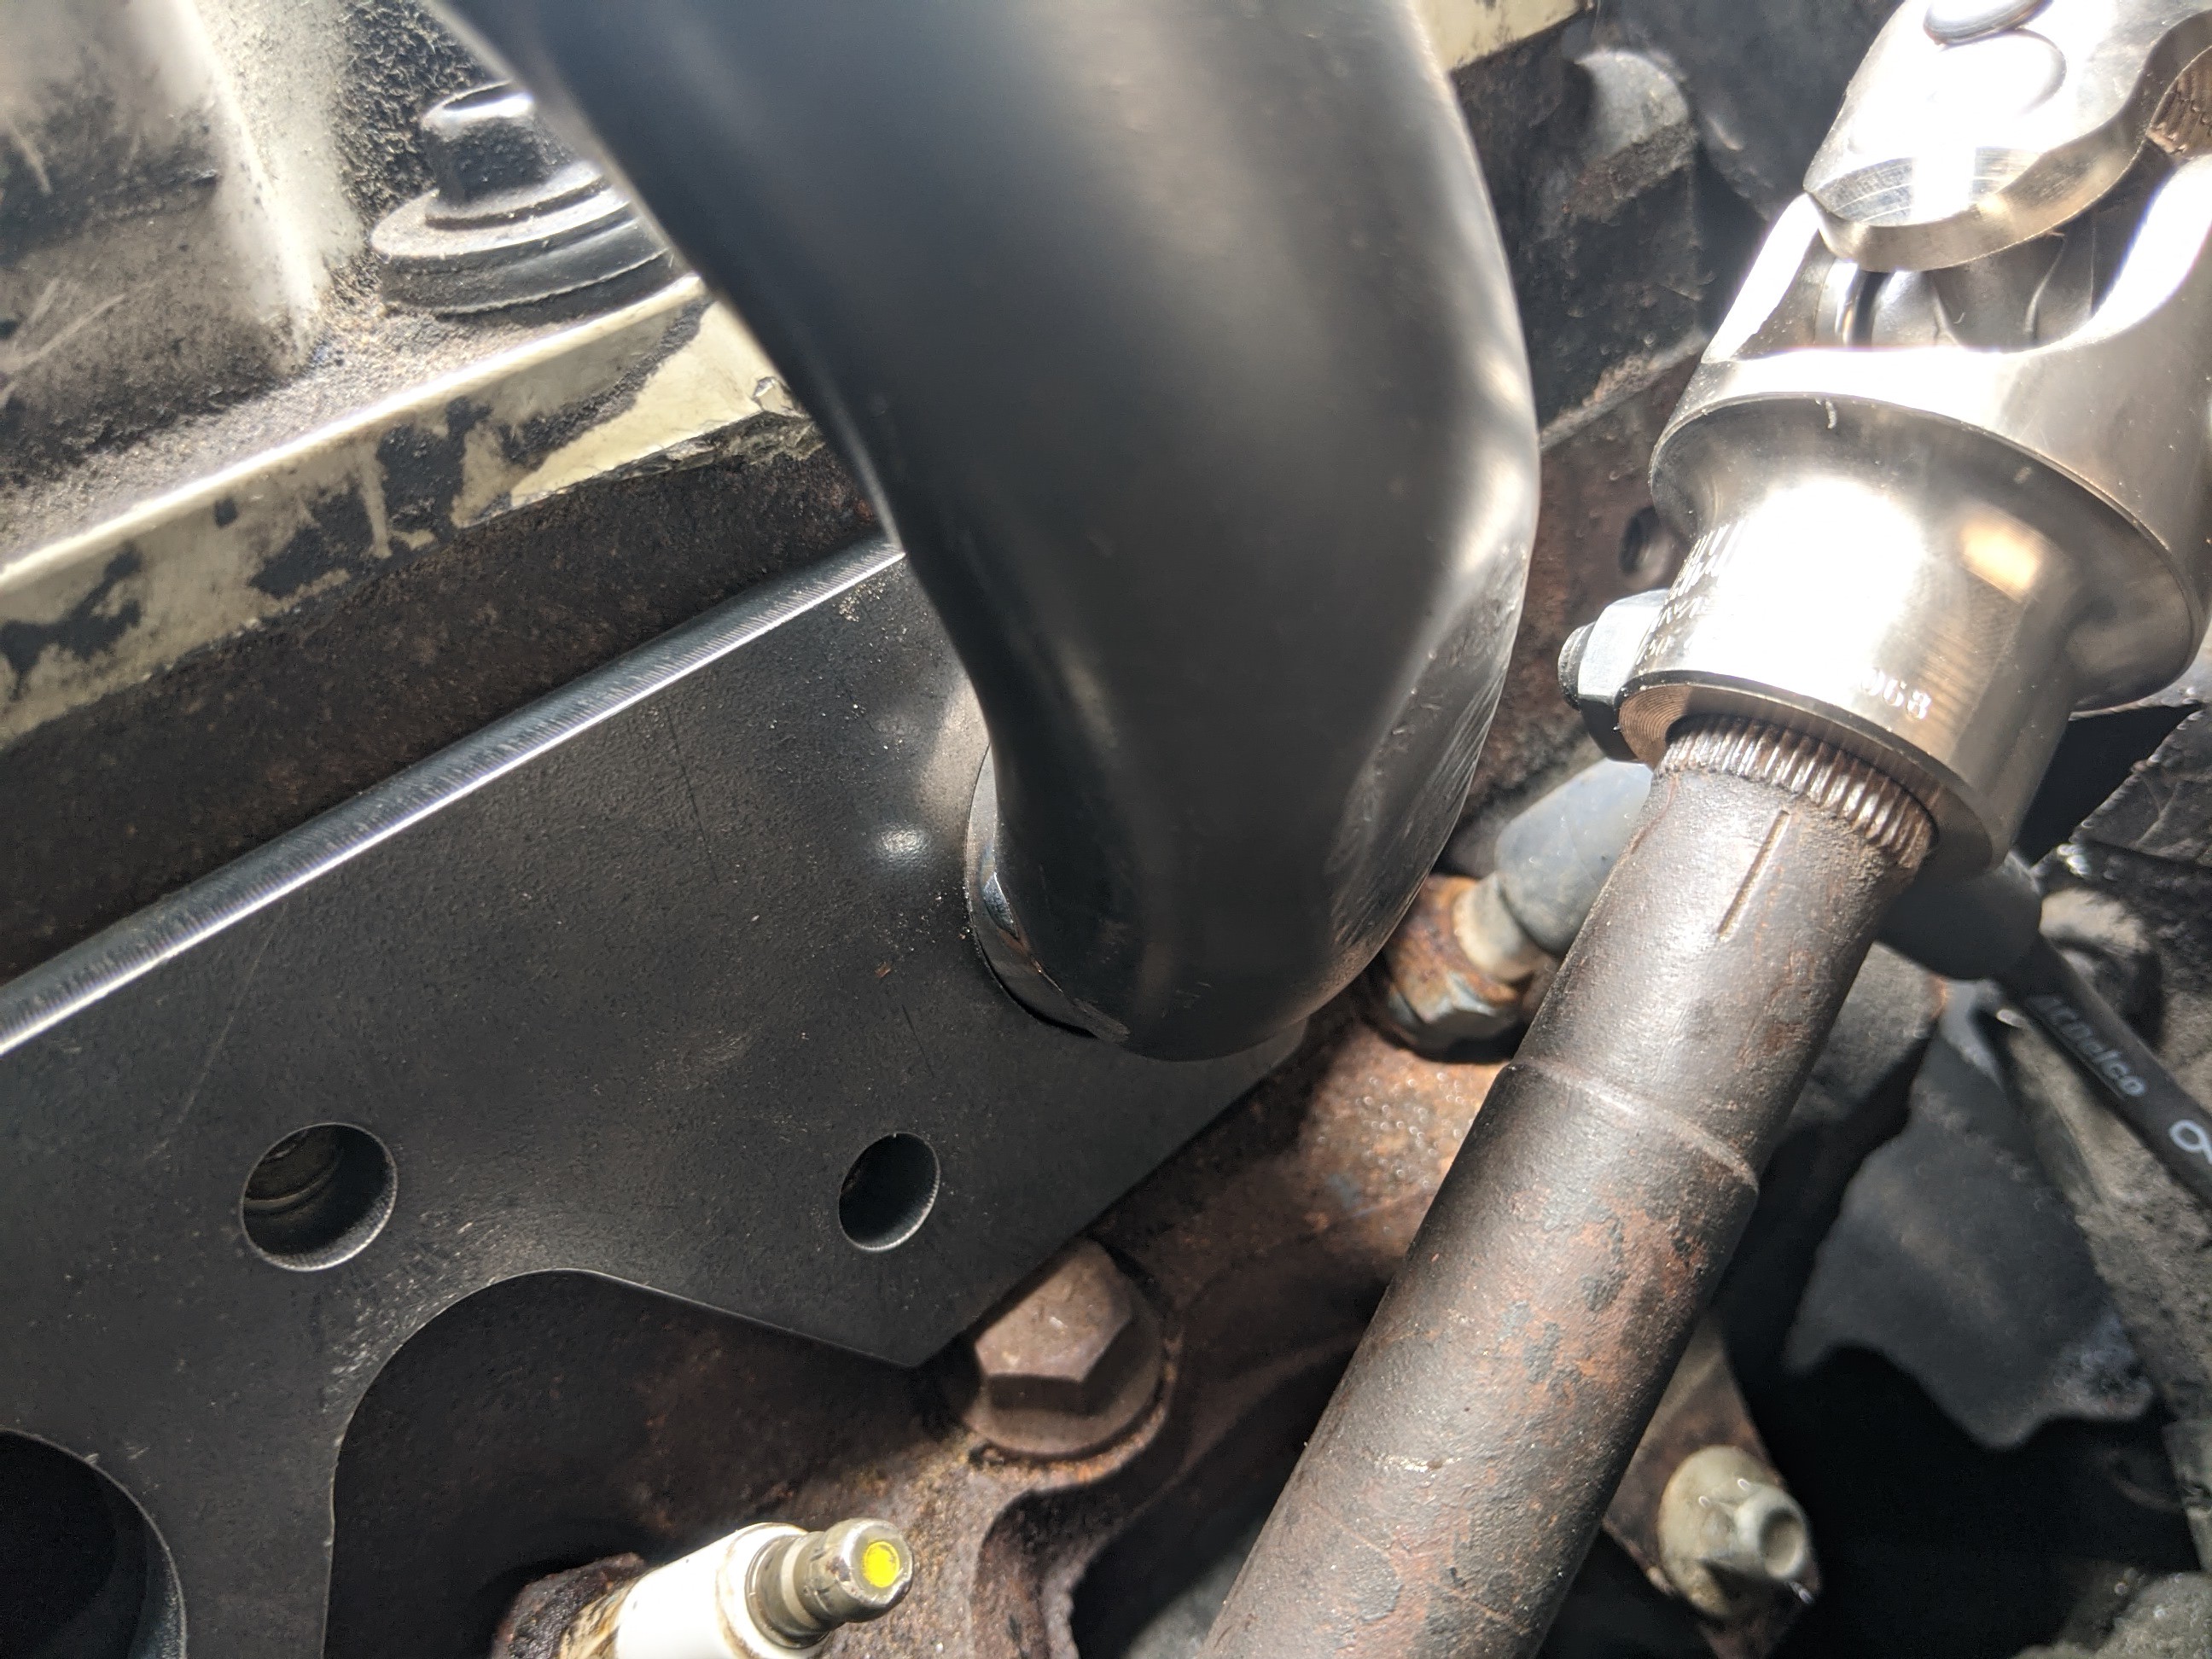
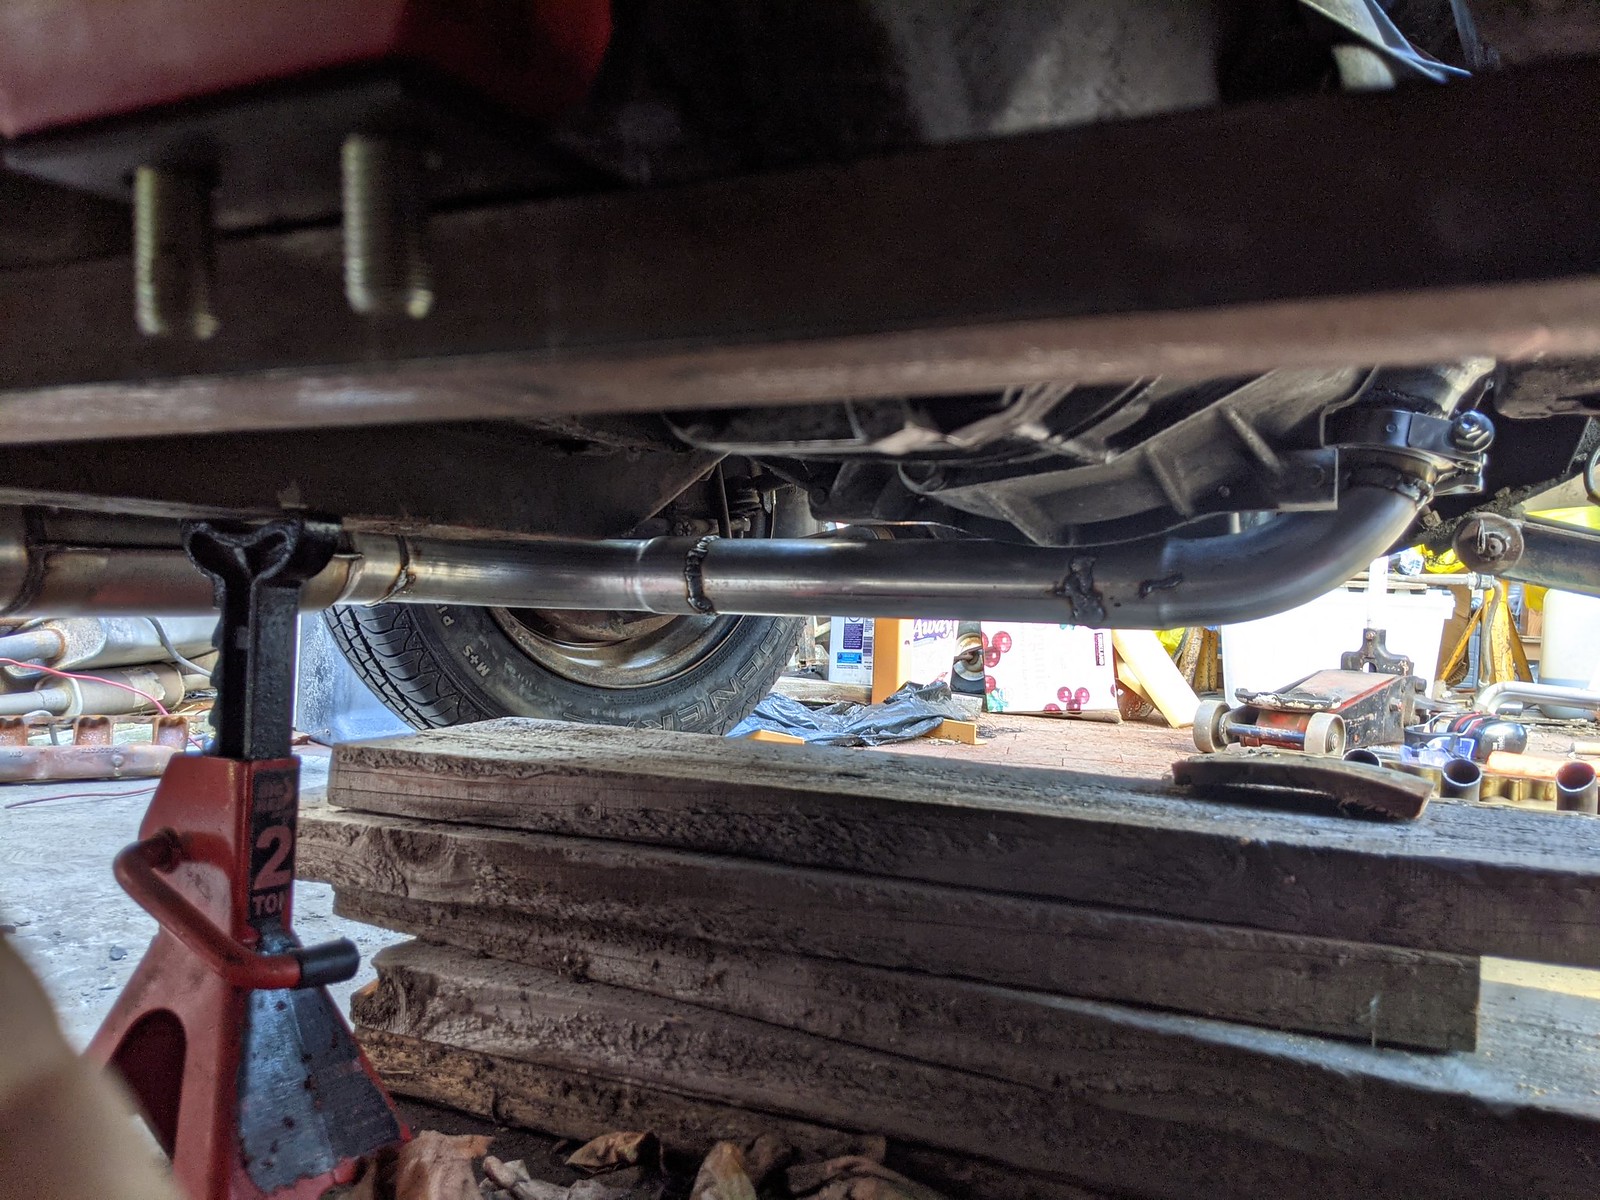
Then there is the exhaust/steering shaft disaster. I swapped out the huge stock ujoint for a flaming river, but then the steering column is short. So i disassembled the column. This has a collapsing column. Once the shaft is out of the housing its an upper and lower shaft. The 2 sections are insulated from eachother and locked in with injected plastic from the factory. This keep the shaft from collapsing normally and takes up the slop between the upper and lower shaft. The plastic tends to break down over the years and you end up with a sloppy column. For this reason I wasnt worried about modifying it.
Redrilled holes and made a new groove to retain 2 section where a filler can be injected to take up the space and keep things tight, and I pulled it out 1 inch from where it was. Not too hard to do, 1 thin cotter pin and if its smacked it will still slide easily to collapse sheering that tiny cotter pin easily. I put it in there to keep things in place. Well, the ujoint while it is much smaller still is much to close to the pipe. I can get away with it, but over time when the mount rubber settles it may contact, and under decel it still has the chance to hit it, just too close for me.
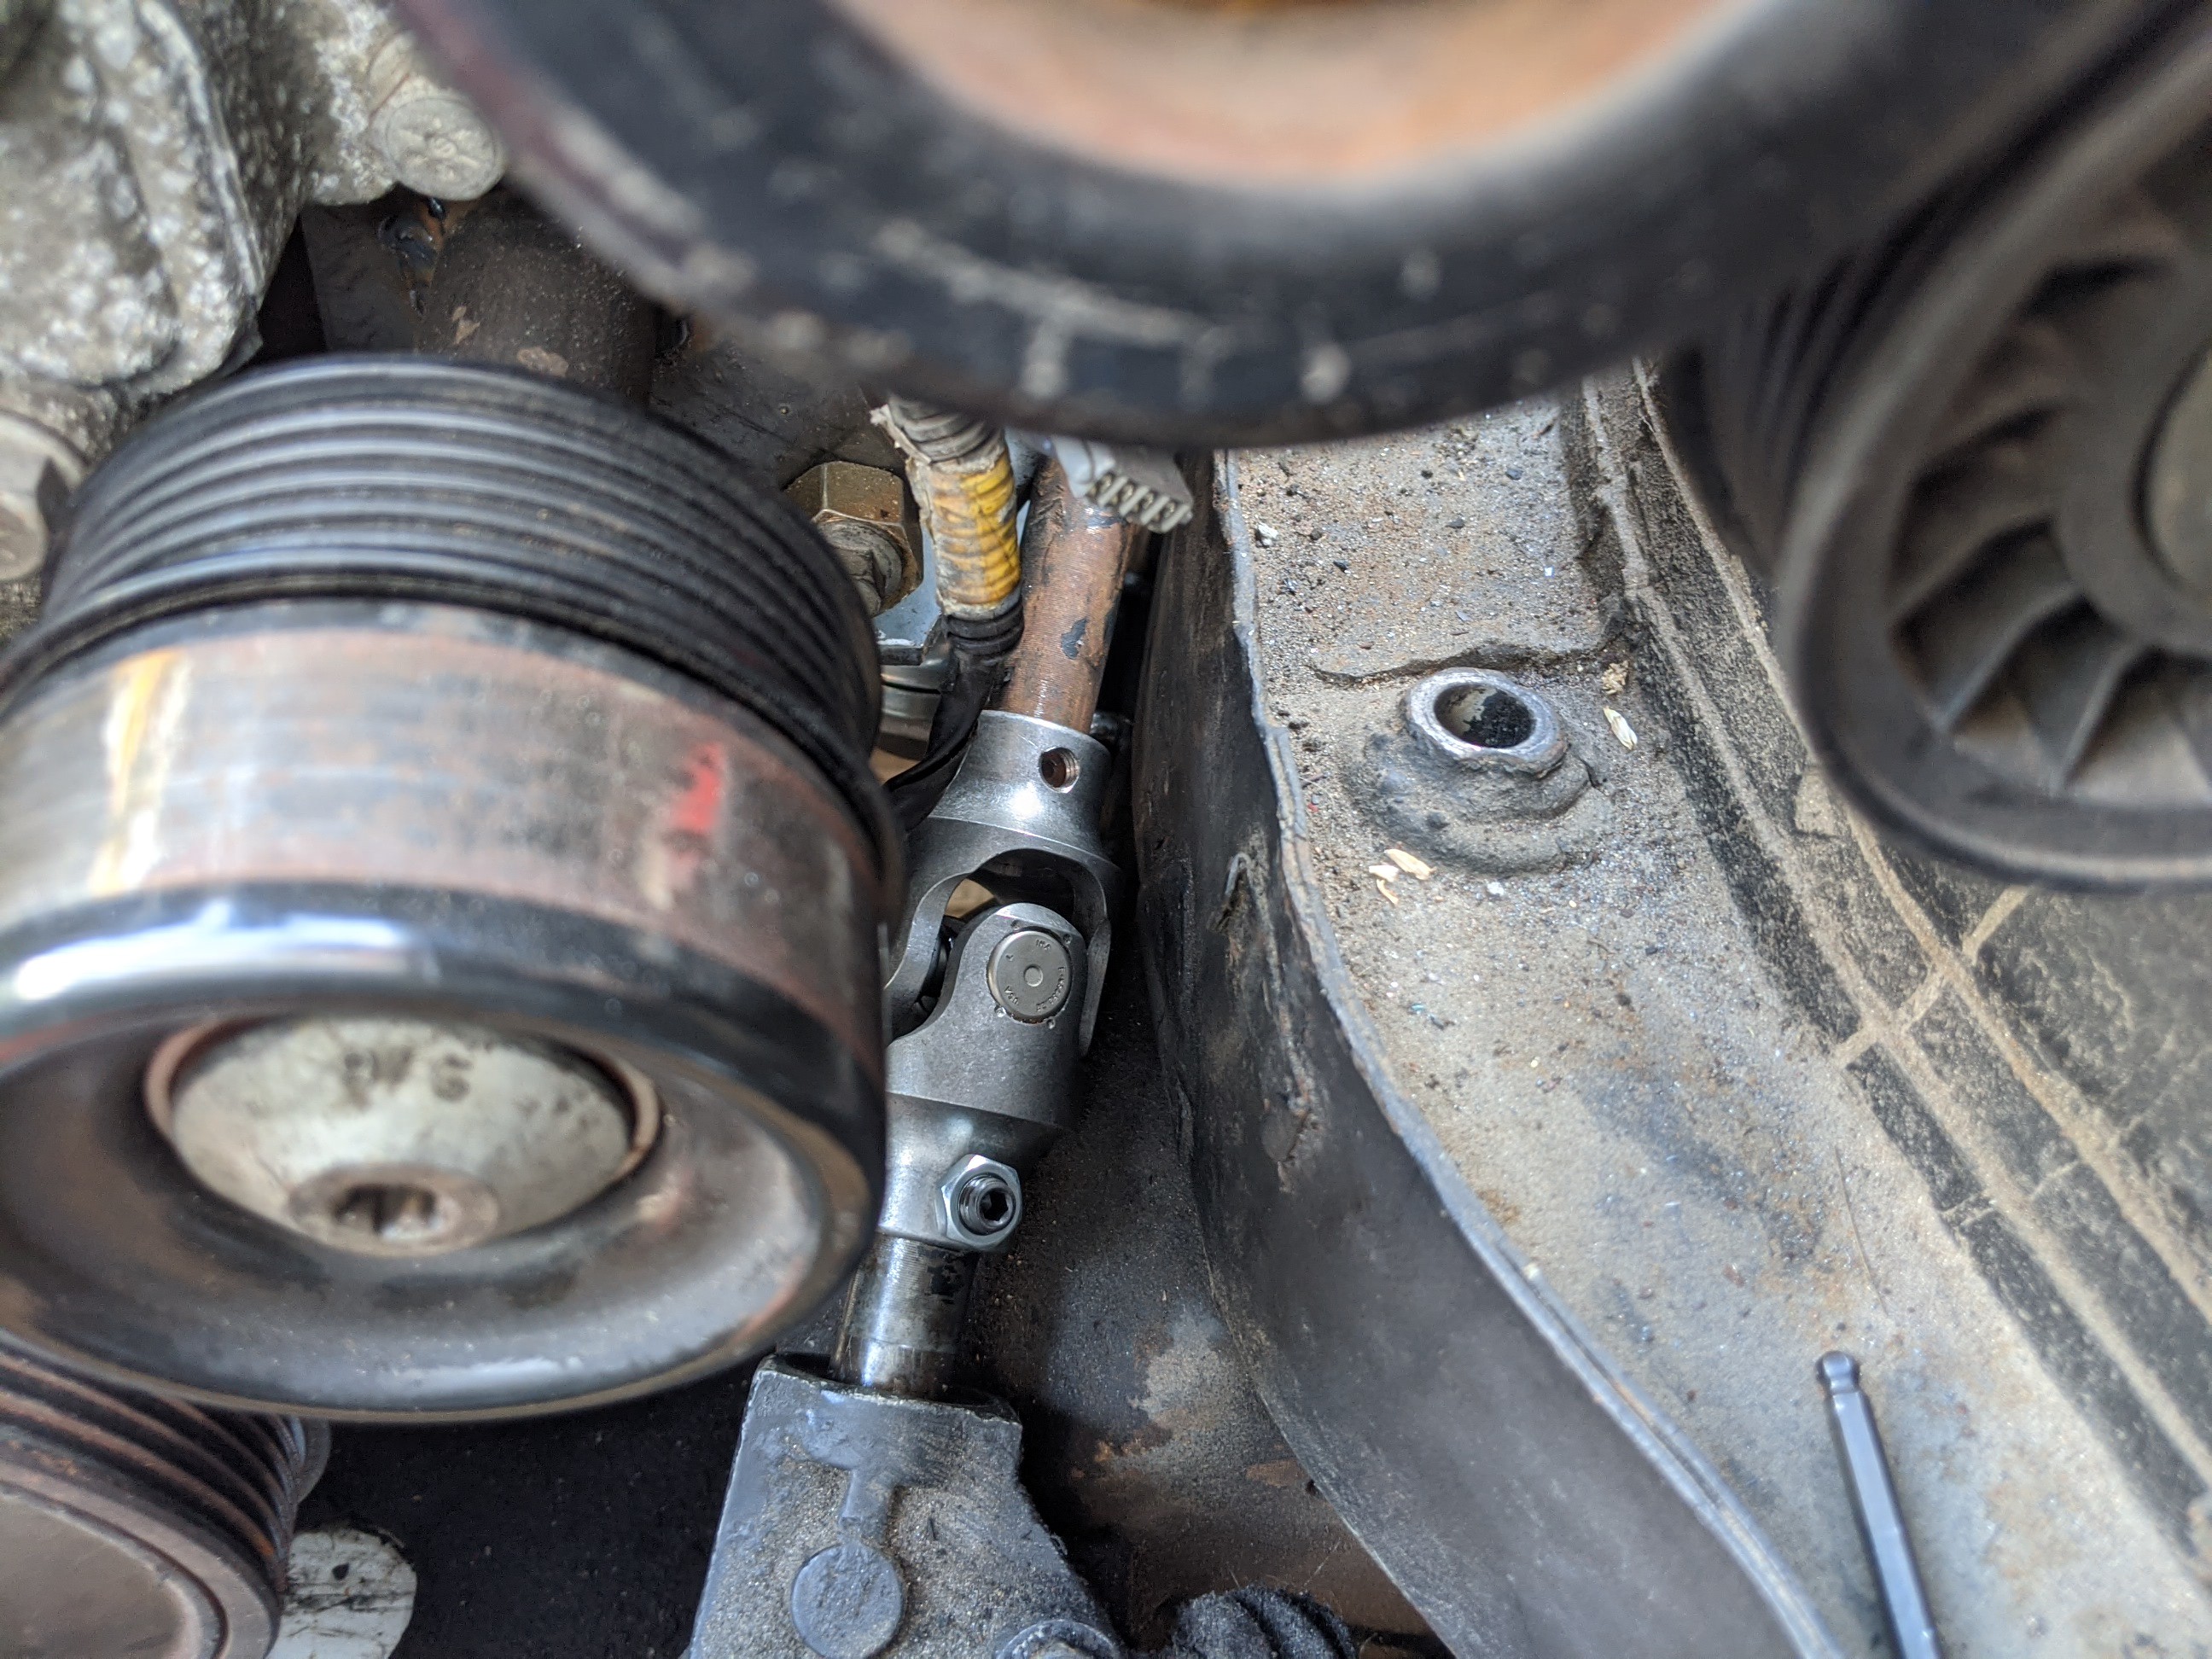
Solution, cut the pinion shaft on the rack and install a second ujoint down low. Clearance the subframe for it. This will give me a few more inches in length and remove and chance of the steering shaft being out of alignment. The stock rack has a super long pinion shaft and just the one ujoint. There is a procedure to shim the steering column with special tools to line things up before the ujoint is installed. The addition is the lower Ujoint will eliminate any issues there. With the added length I can then push the upper ujoint as far in as possible, pushing the lower steering shaft into column, still leaving plenty for collapsing. I also need to get all the bolts back into the subframe and the steering rack to be sure everything is where it needs to be. All this should allow me more clearance with the steering shaft and allow me to move on with the exhaust.
The factory V8 cars had the column set deeper into the firewall, the column was slightly shorter, and the ujoint was higher up with the shorter column. I think it may have also been moved lower slightly as well. The rubber bumper cars had a subframe that raised the car 1 inch and different mounts for rack that set it farther out to correct for the steering angle of the new subframe, and a longer pinion in the rack to compensate for all the new parts.


Happy to hear Apple Hydraulics on Long Island is still at it. They rebuilt the lever arm dampers in my 72 back in the mid 90's.
I understand heat rises, but do you think that steering column joint is to close? Is there enough room for engine rotation on the mounts during acceleration and compression braking on downshift? I remember the T5 was 15 degrees from vertical, but for the life of me can't remember which way. Could you make the driver's side engine mounts(s) taller and the passenger side shorter to rotate the engine slightly for more clearance? Or offset the engine/trans to the right an inch (assuming enough tunnel clearance)?
A more complicated option would be an intermediate shaft on the steering linkage like option "B" pictured here on the Borgeson site:
http://www.borgeson.com/Designing/collapsibility.html
Lots of good technical info there as well. Love the build. Keep up the great work!
(**Edit I looked at the photos and missed the part where you share the same concerns regarding the steering, the photos are where you are at now, not the final fix. Gotcha. **)
Also the steering column is collapsible so im not to worried about that, Ive retained its collapsibility, a safety feature that id never remove. And I can only move the engine left to right maybe 1/4 inch, it cant move forward or back, and up...ive already got to remove bracing in the hood to clear, so up isnt an option.
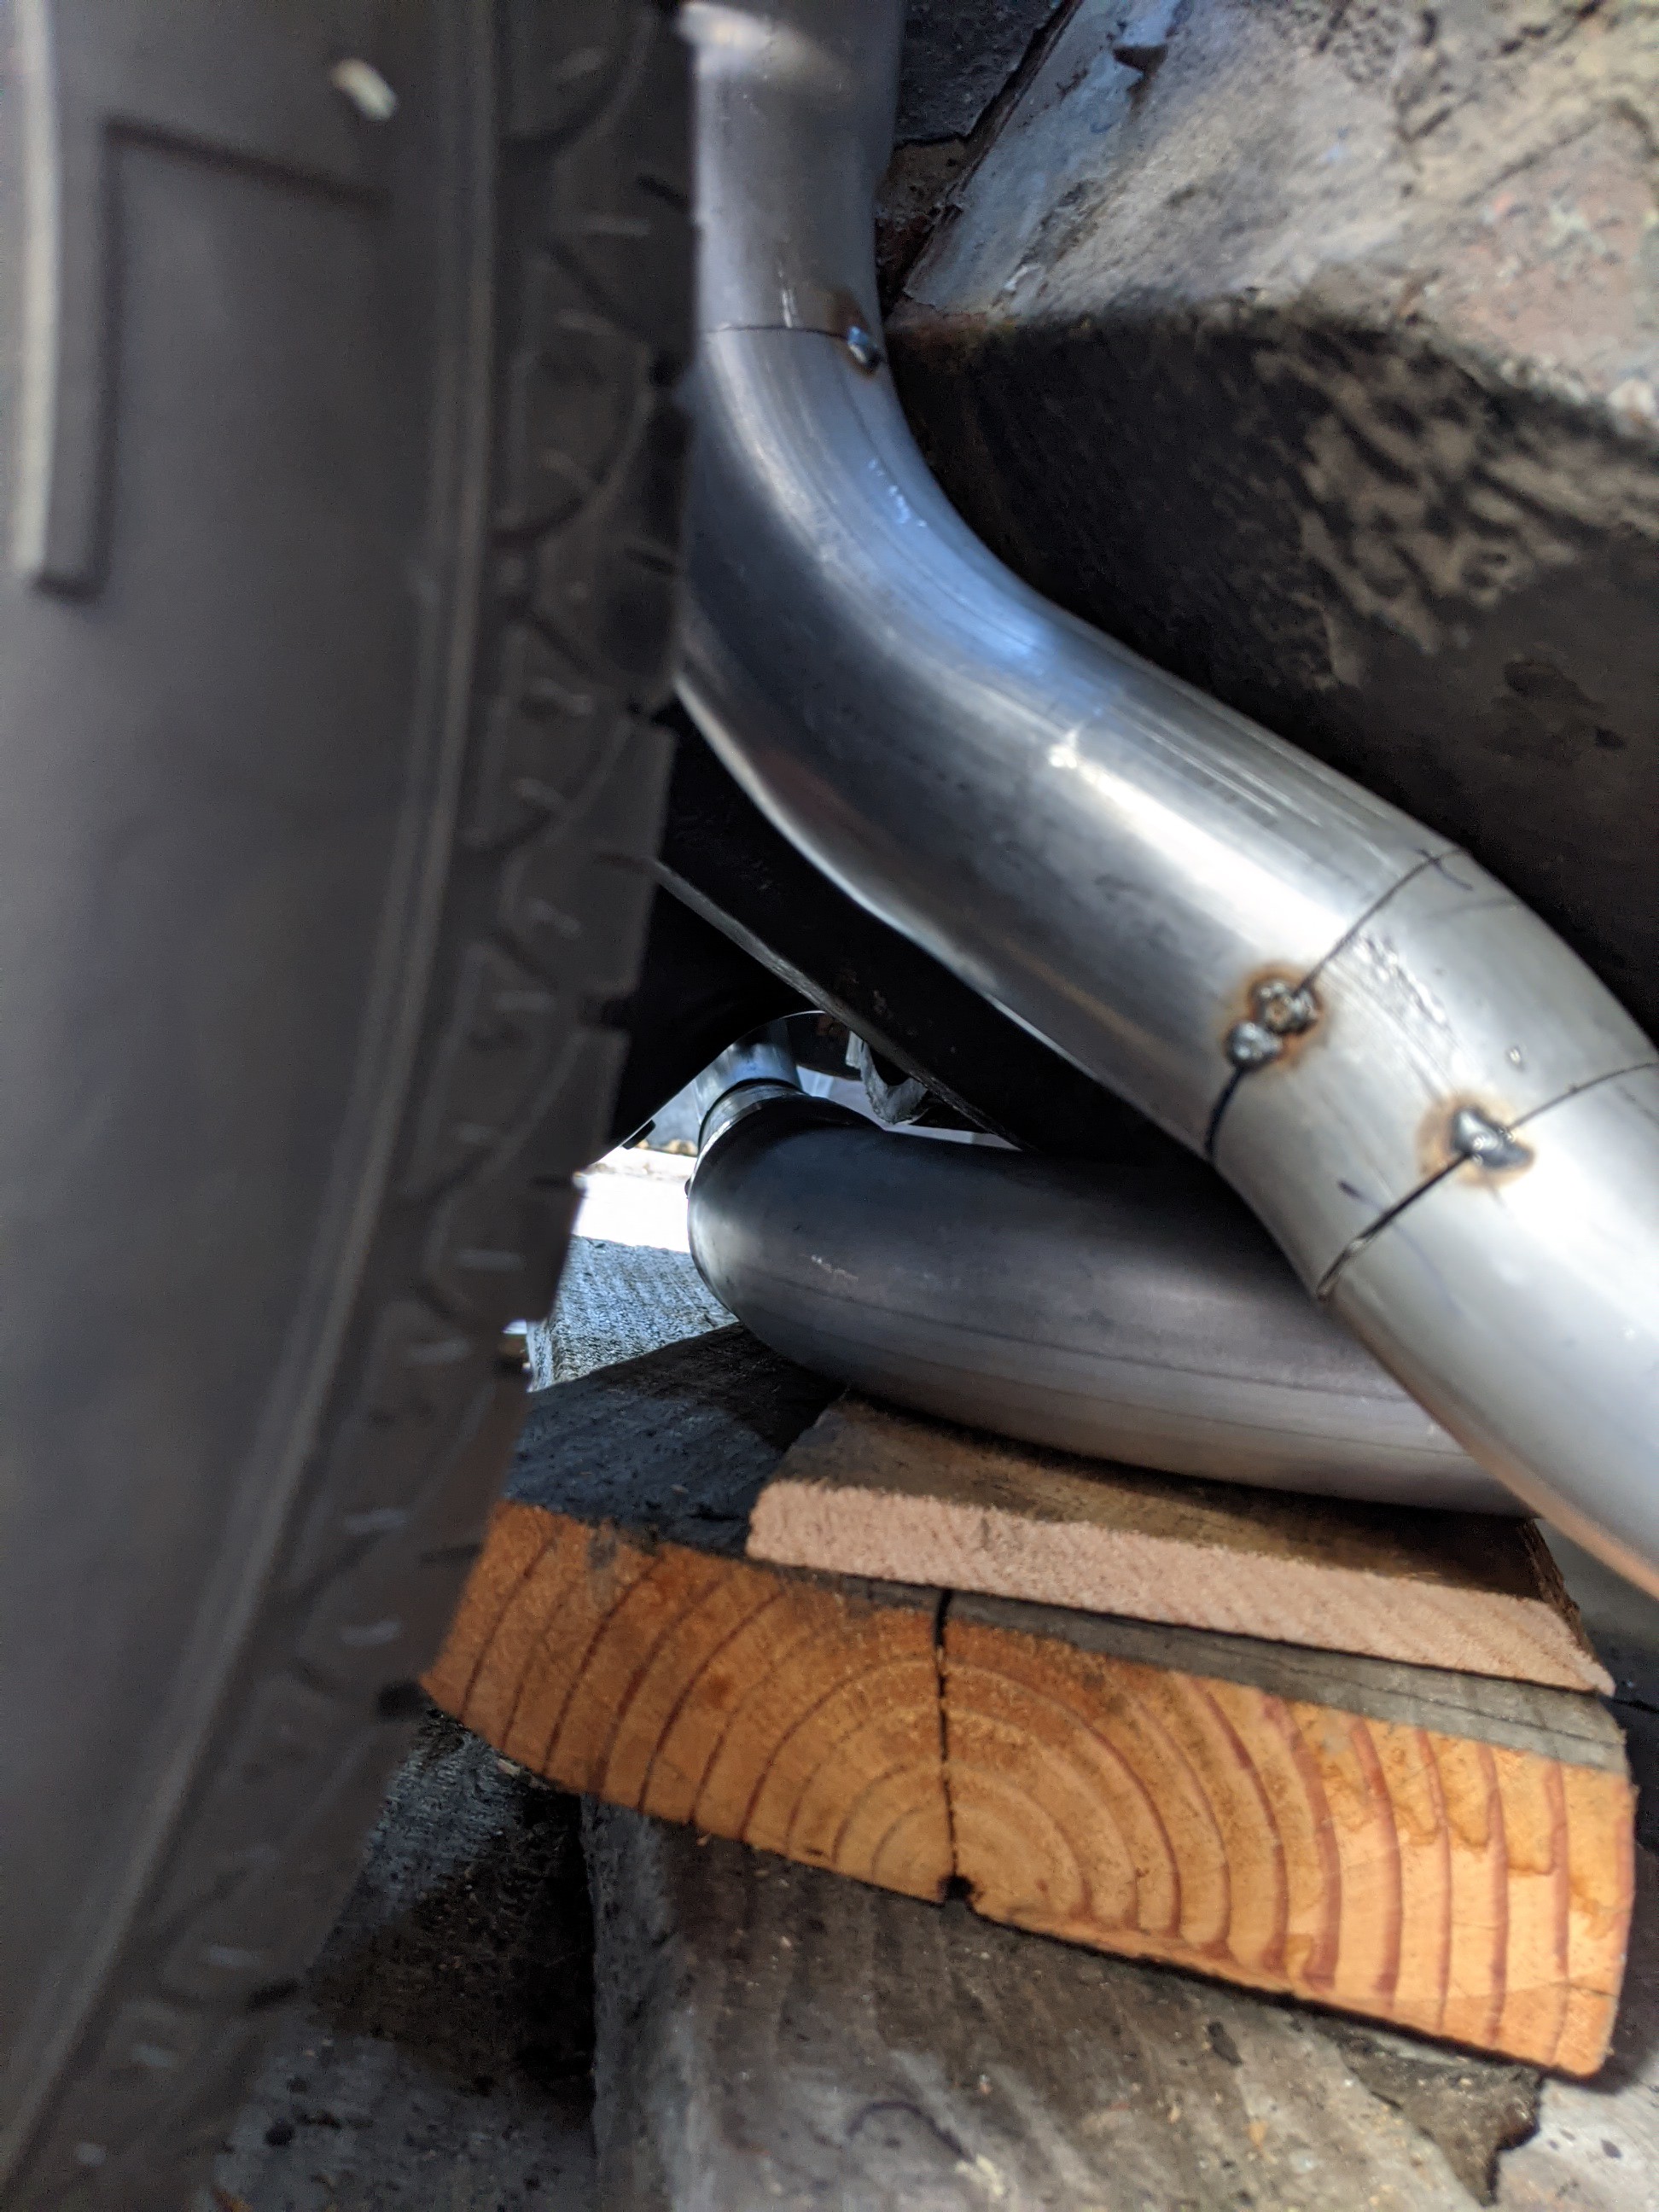
Woot!! Steering shaft handled. The ujoint clears the frame, the set screws do not haaaaa. So I have to massage the frame in that corner, oiy. But, that pushed the upper ujoint out of the way of the pipe. Now with clearance I worked from the passanger side over to get the collector in place for the drivers side. And mocked up one tube, the problem tube. Frekin success. I am however not so happy wtih how the tube loos, sharp bend at the top there, I will probably rework it after I finish the other tubes. But Y collector in, pipe is pretty well tuckd agaisnt the body, clears the tire at full lock and droop, I need to pull the spring and cycle the suspension to see how much clearance I really have. I need to put the V-band in on the drivers side, and I dont know if there is room to clear the tire. If not it will have to go down low, and im not sure how easy the header would come off if I do that. I also need to be sure I have room to do an air gap aluminum heat shield to keep the heat out of the floor and toe board. Also thoughts on how much sheet metal to trim around the header collector to avoid paint burning off??
Looks like I also have a cooling hose solution too. 03 silverado, hose is huge with lots of useful bends. I should be able to use that hose almost as is, but thats a problem for another day.
Anyway, Im happy with the results so far honestly. Pics will do the talking. Shes all wrapped up for a few days though, rain is a comin here in socal...a rare occurance


How about 3ft. long - 3/4" dia. flexible shaft?
They're rated min 270 ft/lbs (OEM are rated to 175 ft/lbs)
Example:
Flex shaft for what....
Flex shaft in place of the solid steering shafts.
Run it down along the inner fender where there's more room.
In reply to GM > MG :
Your not serious are you? Lol. Never ever anything but solid shafts to connect the steering, with the exception of a collapsible section, still...
Yup... Serious...
Not thinking the Flex Shaft you get w/ a 9.99 drill bit kit. This would be an industrial level product.
You have splined shafts connected with U-Joints so really your half way there. I considered this when I was thinking LS for my MG.
If this sounds scary, you don't want to know the control systems of small aircraft...
![]() LOL
LOL
Heh fly by wire, I get it...just not something I've ever seen or heard anyone consider in a car
Drivers side header done. Tire clearance good at full lock and wheel tucked up with the suspension on the bump stop. I need to add the Vband now. Started on the hoses, but I need to order parts there. So I did the throttle body. Pretty straight forward. Just gotta order a filter. The tilt is so the cable bracket clears better and so I could angle the pipe low as possible for clearance.
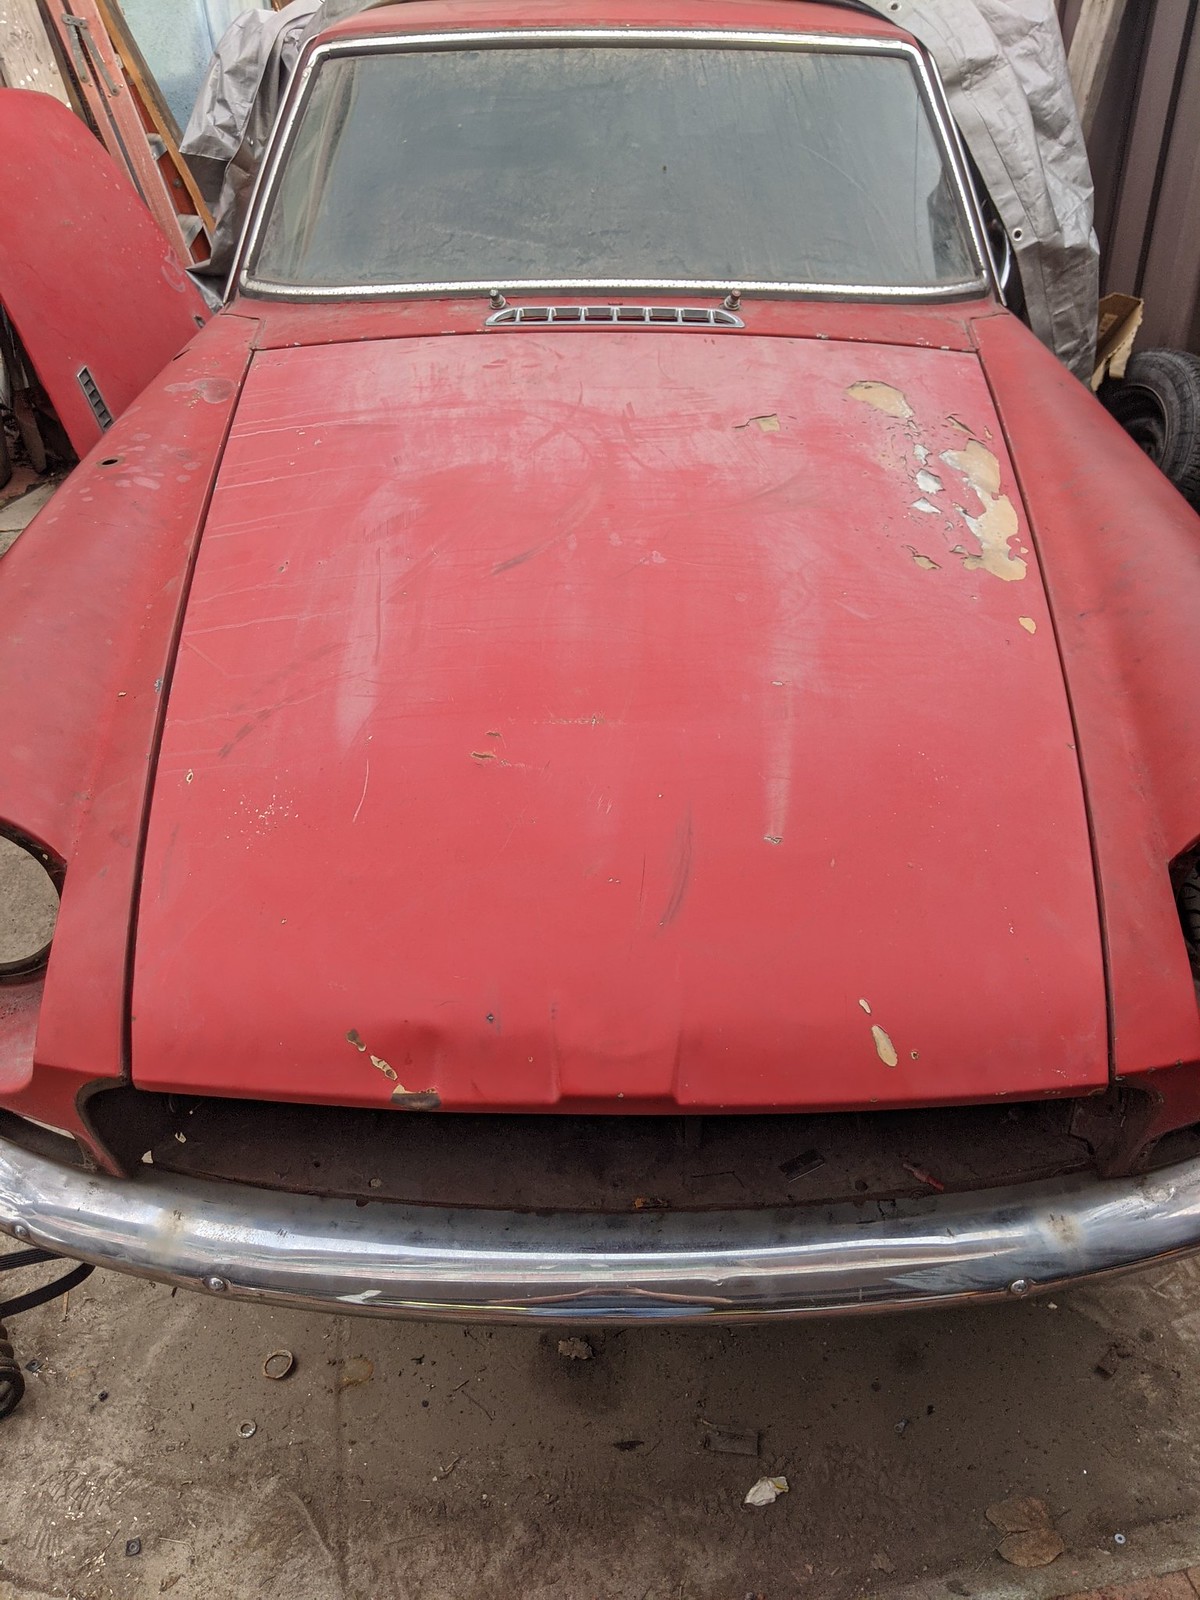
New tailgate has a good glass frame, but is rotten at the bottom seam. My tailgate has some rotten sections in the window frame, but the rest of it is perfect, so Ill just repair the original one with the donor. Also the new hood fits well, needs a little tweaking, and 2 dents pulled but overall a good fit. Pulled lights and other trim today as well. Im gonna delete the side markers. They always looked like they were just stuck on there, well...cause they were. Eariler cars didnt have em. I dont like em, if someone wants to put em back they can, but Im dumping em.
And gotta get a chevy t5 shifter, cause the ford t5 has a different bolt pattern. Stinkin chevy. Need an A/C bulkhead, etc etc. Mechanical is almost, done, im finally having to start a list of what I need to finish before it comes apart for paint and body. So far though, im pretty pleased. Lots to do once its apart. Lots in the engine compartment to grind smooth from the previous engines modifications, and holes to fill, etc etc.

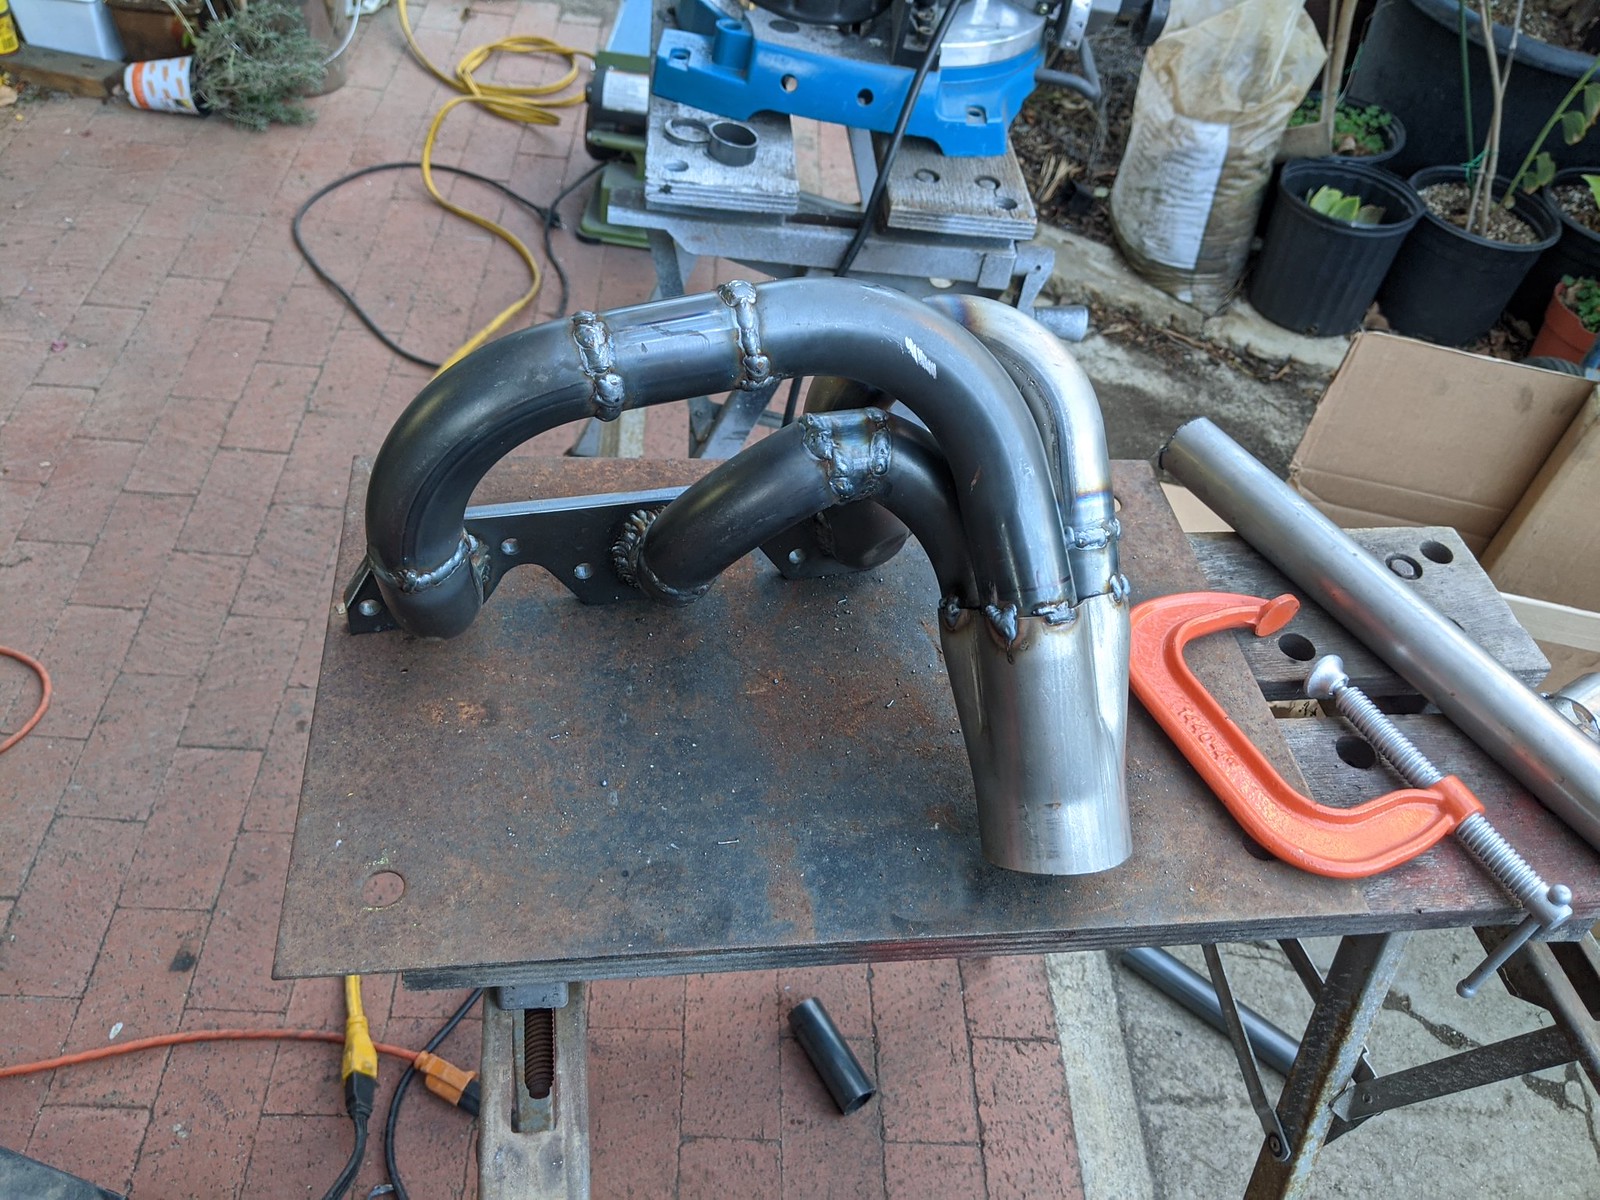

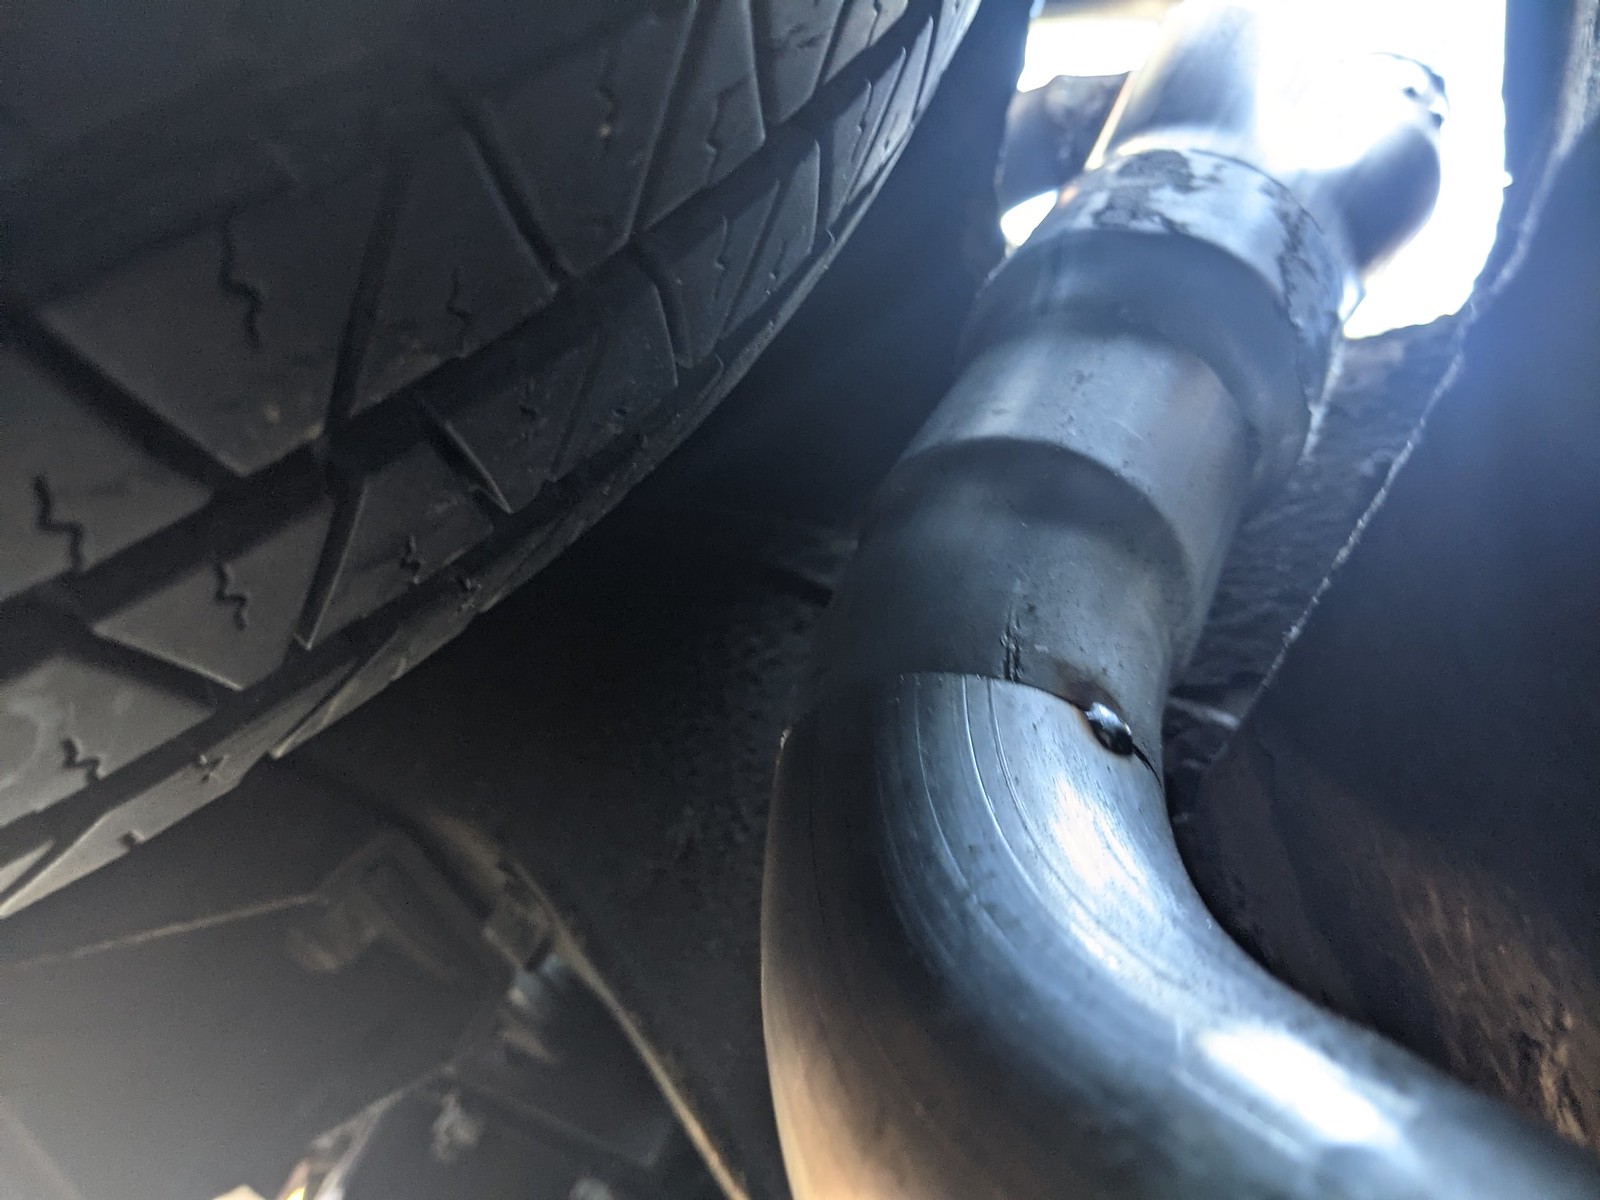

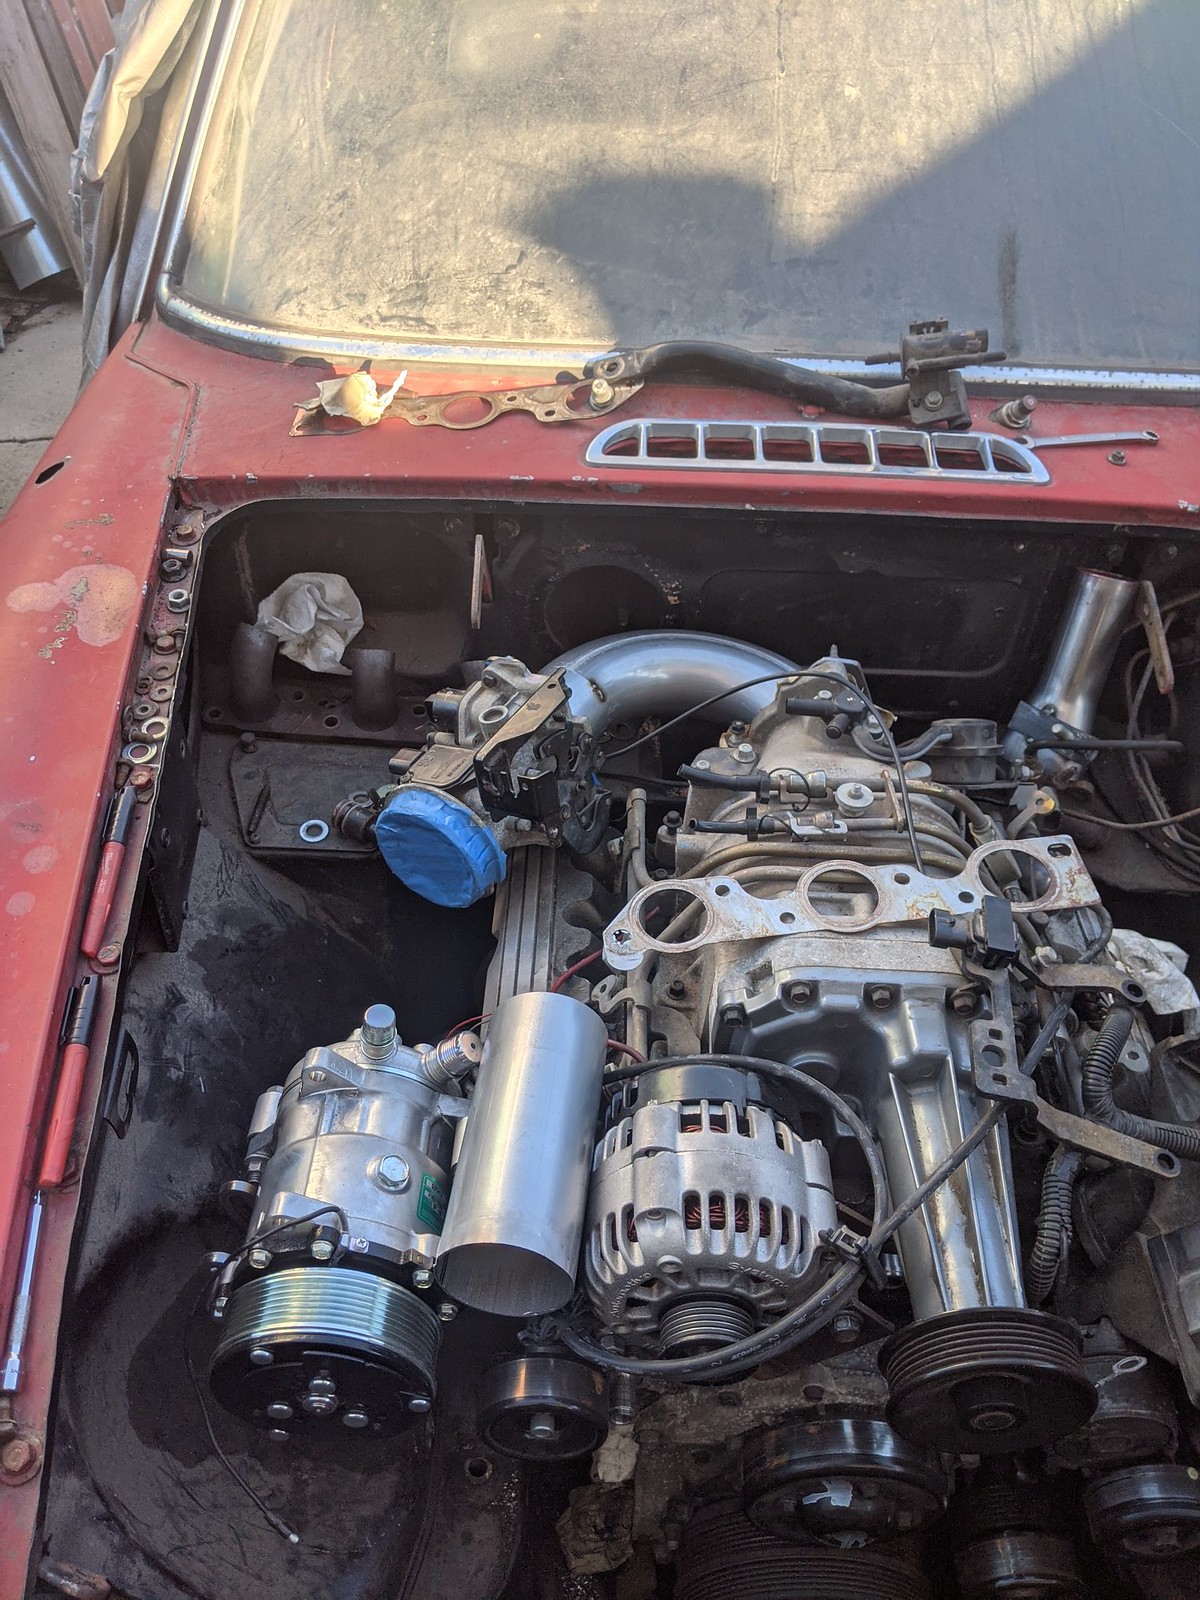


Exhaust done, as least as much as I will be doing. Ill have an exhaust shop finish it up and deal with anything else. It came out good, but eff me still a PITA. Clearance is good, routing is good, im happy. Got an air filter, and found a hole, welded the hole and installed more holes! HVAC bulkhead done.
Good news but not engine related, my tailgate has no holes in it...little bubble corrosion, but after popping the glass out its in really good shape. Im still lookin for all that rust people were telling me the car had...cough cough. Though I have made the decision to get a couple engine stands and do a simple rotisserie. Strip the undercoat. Im still in budget to make some $$ on this project if I really do it right. And for it to be right, gotta be stripped. I wanna enjoy this car for a bit after I build it, then move it on. So the bottom may be linex, or ill do a spray on bedliner myself...it wont be straight painted. A car like this that will be driven wont have any kind of life without protection. And since this has all of its OG sheetmetal underneath, and its still in great shape, I wanna protect it. Also I have pics of frekin everything. So if anyone says im trying to hide something, ill ask them to point out what in the over 300 pics ill have of this build.
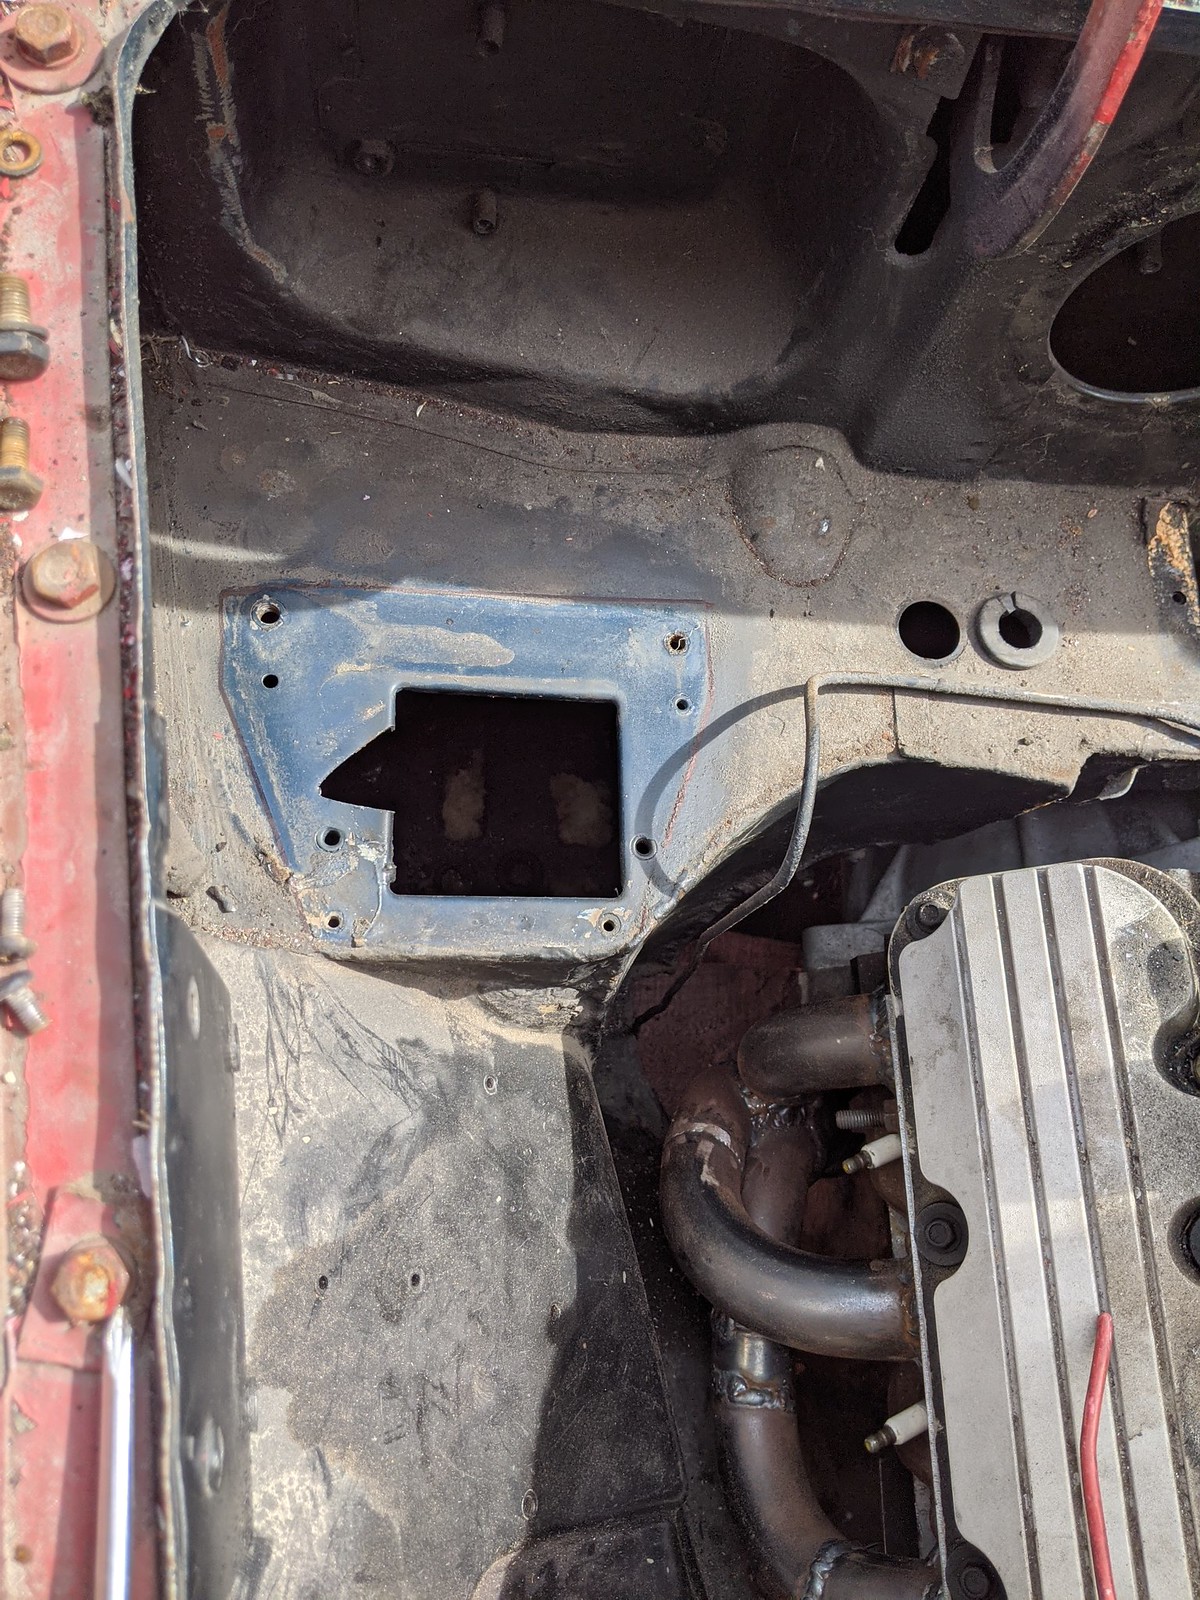
Not much more left to do before the engine comes out and the car is stripped for paint and body. Waiting still on an oil filter relocation plate, hopefully that comes in soon and need to mount the relocated filter bracket. I do need to finish up the radiator brackets, and make fan brackets, mount the condenser, drier etc. Gonna try and redrill that new shifter I have and chop the plate down. Apparently common for guys that have a fancy ford shifter and wanna use the GM T5. Also I have all the dash goodies now, vent, switches, HVAC control. I wanna have that mocked up before it goes to paint and body, much to do there. Oh, and waiting on a bracket for the ECU, and I need to sit down with the harness and figure out exactly how many wires ill need for a pass through, so I can figure out what im going to do for a bulkhead/wiring pass through. The factory harness for the rear ran out the front and down under the length of the car, not a big fan of that. Ill run it inside the car, but still i want a nice EFI bulkhead and another for the lighting and what not, or Ill do a sub harness off a single bulkhead. Decisions decisions.
https://grassrootsmotorsports.com/forum/build-projects-and-project-cars/1970-mgb-gt-supercharged-beast/179010/page1/


Nice work with that exhaust! Are you going to build a box around the air filter to feed it cool air?
In reply to autocomman :
When I was doing my V8 Stag the right side I was able to the block header heder but he right side I had to fab up. It worked OK but was probably pretty in effective.
You are doing really nice work on you headers.
dude! this is awesome! I can't wait to hear it rip!

Excellent build!
I'll grab up some kinda heat shield for the header...there just isn't much I can do with the ac compressor right there. I imagine when it's moving it won't be too bad, but in traffic, especally ac on its gonna cook a bit. Plan too is to coat and wrap the headers to keep heat down in that engine compartment and Into the cabin, and heat shield things. I've seen from experiance what the combo of those 3 things can do as far as temps. I know wrapping headers can be controversial but in the end there should be at least 5 good years of regular service out of em. They are 16ga steel too which should take much longer to rust through than your typical cheep 18ga. And the flanges are 3/8 steel.
And thanks so much for the comments. I've never made headers, and not having a mock up kit I was pretty nervous about it all. I will also admit the 5 years I spent at Icon I absorbed up a ton of info on fabrication. And yes, that Icon 4x4, the place that builds the broncos and FJs, derelicts etc. I was their electrical engineer for 5 years. I updated/redesigned the harness Ilin all their production stuff. Was the first guy there to build an FJ40/60/62 harness from nothing using all factory toyota colors and layouts. I'm not even sure anyone ever has done something like that. My design cues are in various parts of nearly everything and I'm super proud of that. But that's a story for another time. Point was seeing how things need to be done to be done right. Take your time, don't be done till your happy with it. None of it is hard, just gotta go slow and think logically. I spent over 15 years in the service Industry too, so seeing and dealing with OEM cars and what not, how things went together and were designed gets pulled into fabrication as far as servicibality and longevity, operation, and what I've started to adapt from being at places like icon is the form, not just function. I could have made the headers work, and not look right, but they would have worked. But I can't do that. Gotta be a balance. So yeah...tomorrow I'm hoping to get a shifter in, radiator brackets done and maybe fan brackets? I'm being pretty ambitious...

autocomman said:Fuel tank done, Tanks INC FTW. I did the same setup on my turbo bugeye sprite, works great and only takes a few hours to do. Hole in the trunk and ill run probably hard lines in the trunk so they stay shallow and will be between the trunk ribs. Also where the pump is coming through the trunk floor it doesn't hit the spare, and with a small cover it will be all hidden away.
...
Hope you don't mind revisiting the tank/FI pump. Using this setup, is there any issue w/ starvation in corners at low fuel levels? In an old Camaro at less then half tank on herd corners, the engine would fall over when the engine starved for fuel. I was using an external FI pump at the time
In reply to twentyover :
I know your concerns, but im not too worried about it. Im not going to be cutting the tank open to build a baffle, if your running the tank that low to be an issue youll only do that once ;). It probably wont be an issue unless it gets below 1/4 tank. as that pick up is a hair above the bottom of the tank. If it is an issue ill deal with it. But for now I dont wanna re-engineer it. The best solution would be a long tray with small holes to keep fuel around the sock. I did that with my sprite, but I question how much it really helps anything cause its small to enable getting it inside the hole. Also with your camaro, you'd be suprised at how far up the pick up tube might actually be from the bottom of the tank.
This was the tank setup for my sprite. Its carbed so if there is any starvation issues it will be masked by the float bowl, and the fact it only runs 2 or 4 psi fuel pressure at idle, and I think 11psi at max boost? I cant remember its been so long since I set it up. But really im gonna run it and see what happens. If its an issue ill deal with it then


The Camaro is FI, so if the fuel runs away from the pickup, I know it right quick...
So you are kind of replicating Tanks in-tank module, strapping a mini-sump to the pump /return hose.
Thanks. Good food for thought
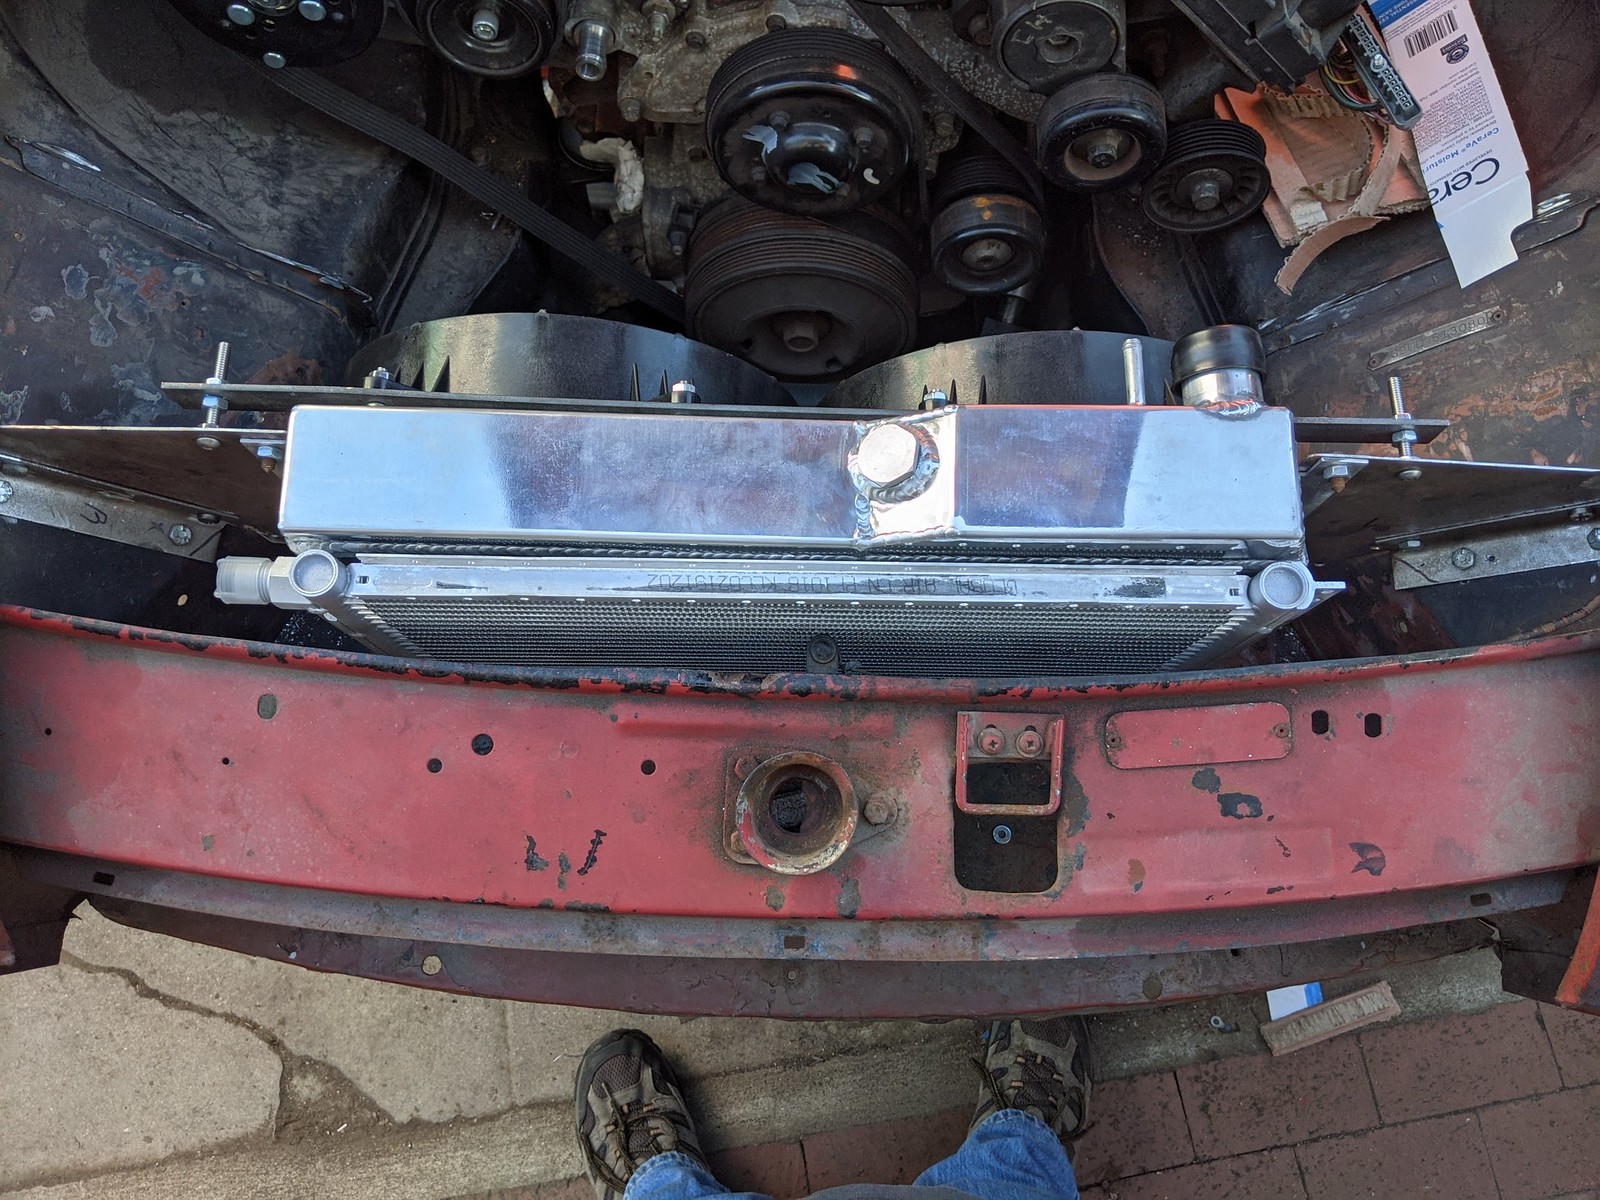
Small update. I knew in the back of my head the stock 4 cyl radiator was probably not gonna cut it. It would probably cool ok in normal temps, but when it get hot, or you loaded it down goin up hills or something I could see it being an issue. Especially with the A/C. So I picked up a factory V8 radiator. Not the late one with the stupid hole for the temp sensor. I could see that just exploding out of the radiator at the 13 or 16 lbs that this system will run at. This was a 73 or 74 radiator. 2 huge tubes inside, quality looks pretty good too.
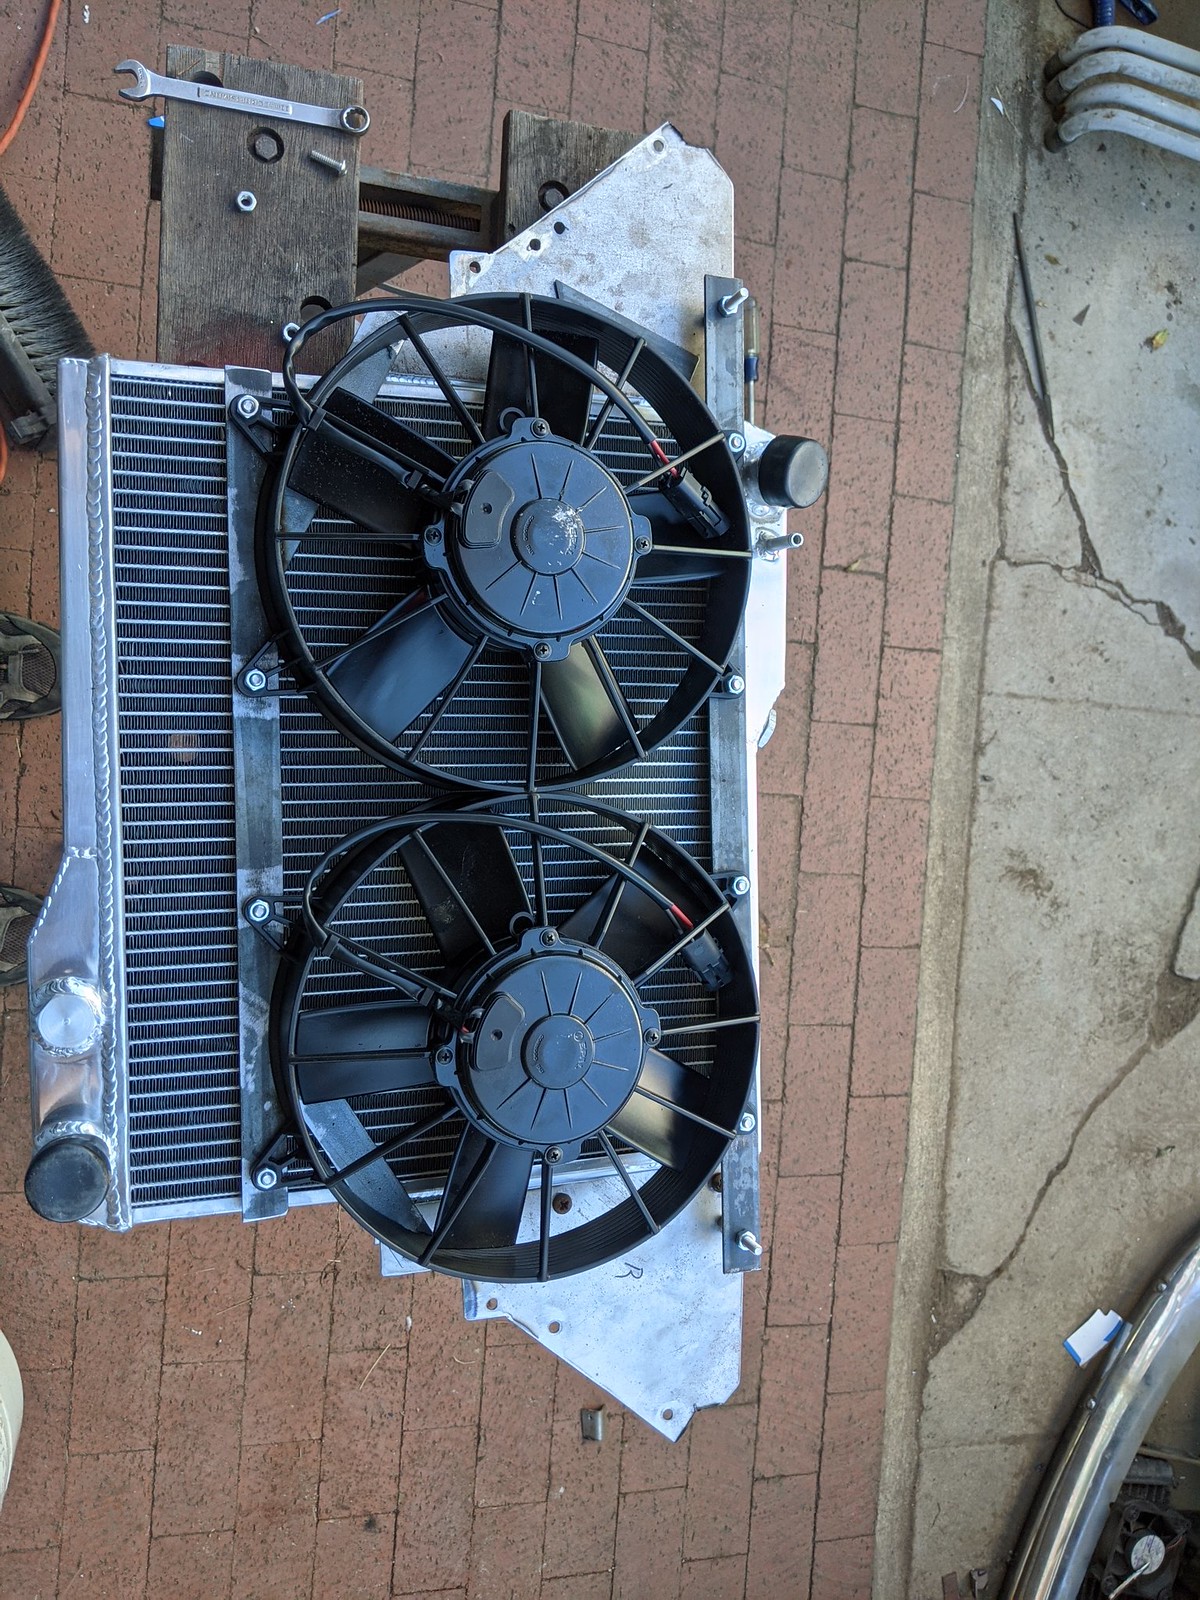
Mocked up new brackets for the radiator and the fans. These are legit spal 11" fans, 900 or 1000 CFM i think it was each. I dont think I need a shroud, if I do I can be made up with some aluminum sheet cut to fit in around using existing hardware on the brackets. I need to make up some spacers so things won't double nutted like they are in the pics. And I need to push the whole assembly forward slightly to give a little more clearance for the condenser. It fits, but its really close. And with the weight of the fans on the radiator brackets I need to make one more small bracket to keep things 100% stable.
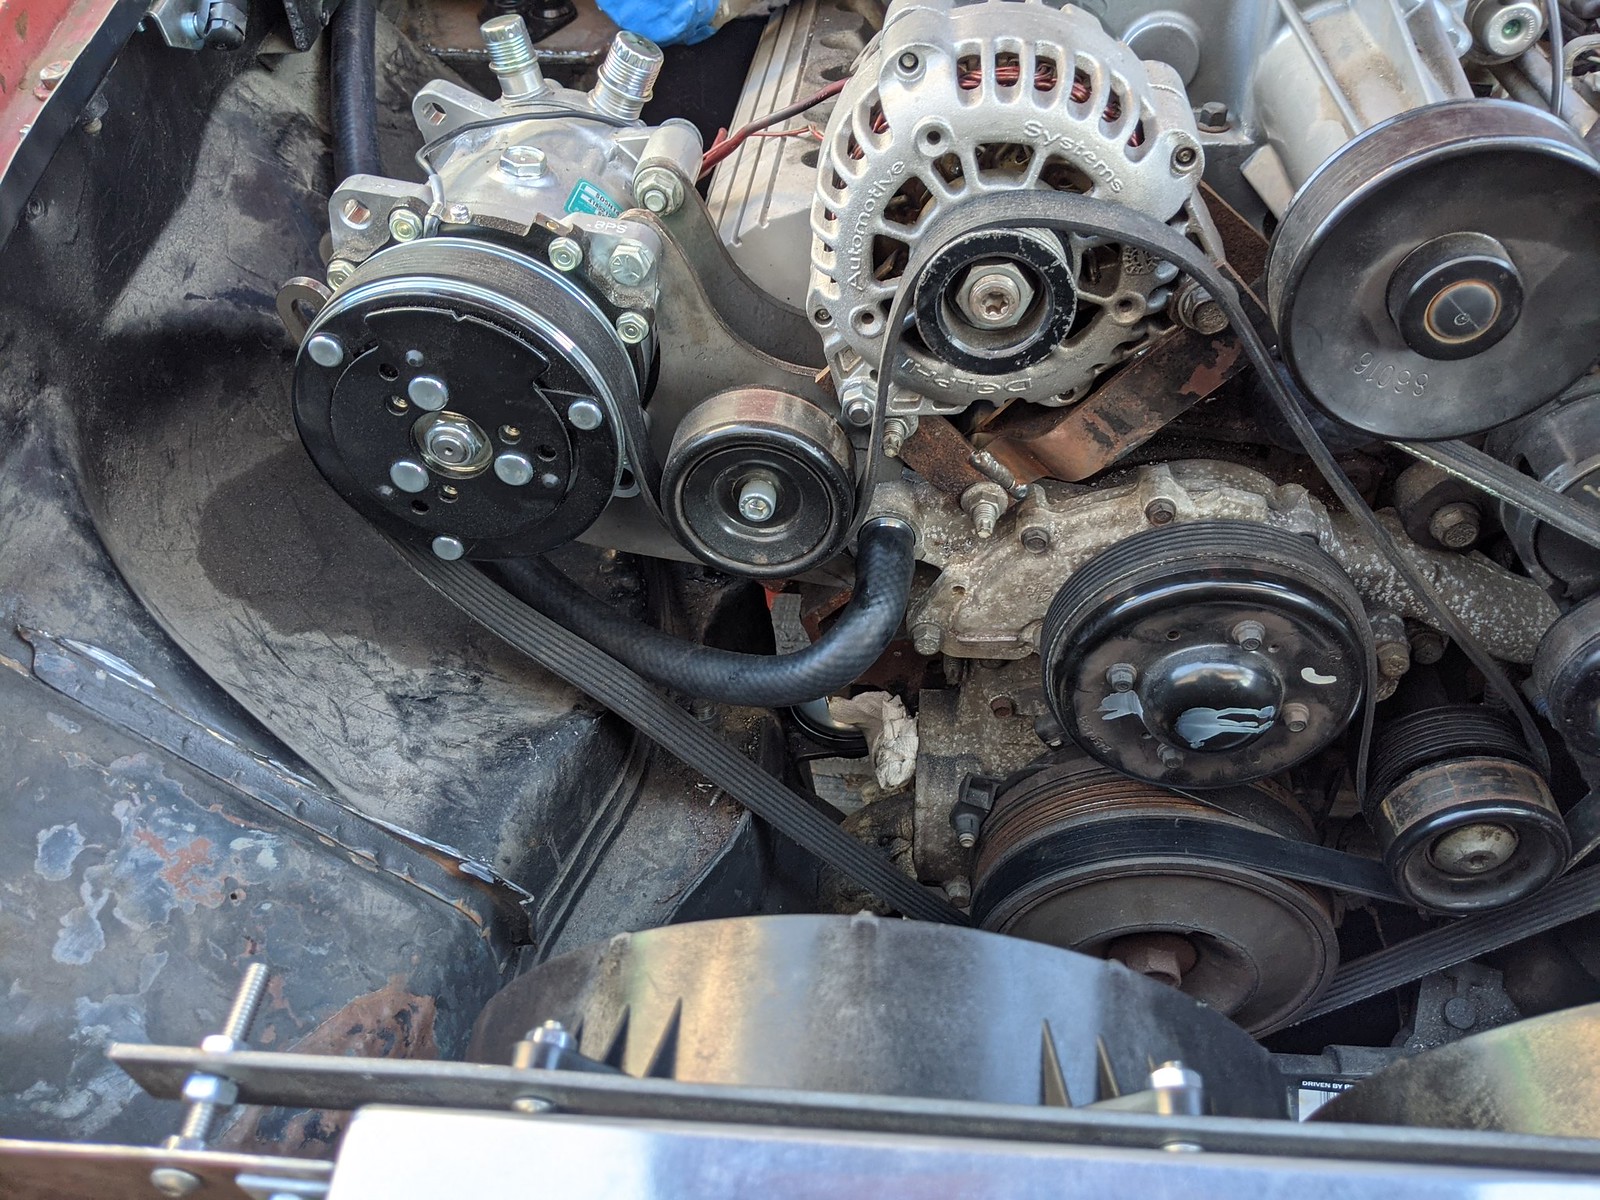
Got the heater hoses routed too. A few clamps will hold it in place so it wont chafe or hit the belt. I tucked it behind the A/C bracket cause if I didnt it went through the belt. How much would it suck to have to pull a heater hose when you wanted to remove the belt...oof. The heater/AC bulkhead installed as well too.
I also able to shorten the plate for the shifter and redrill it so that works well now. Just need to make a new handle so its not hitting my leg
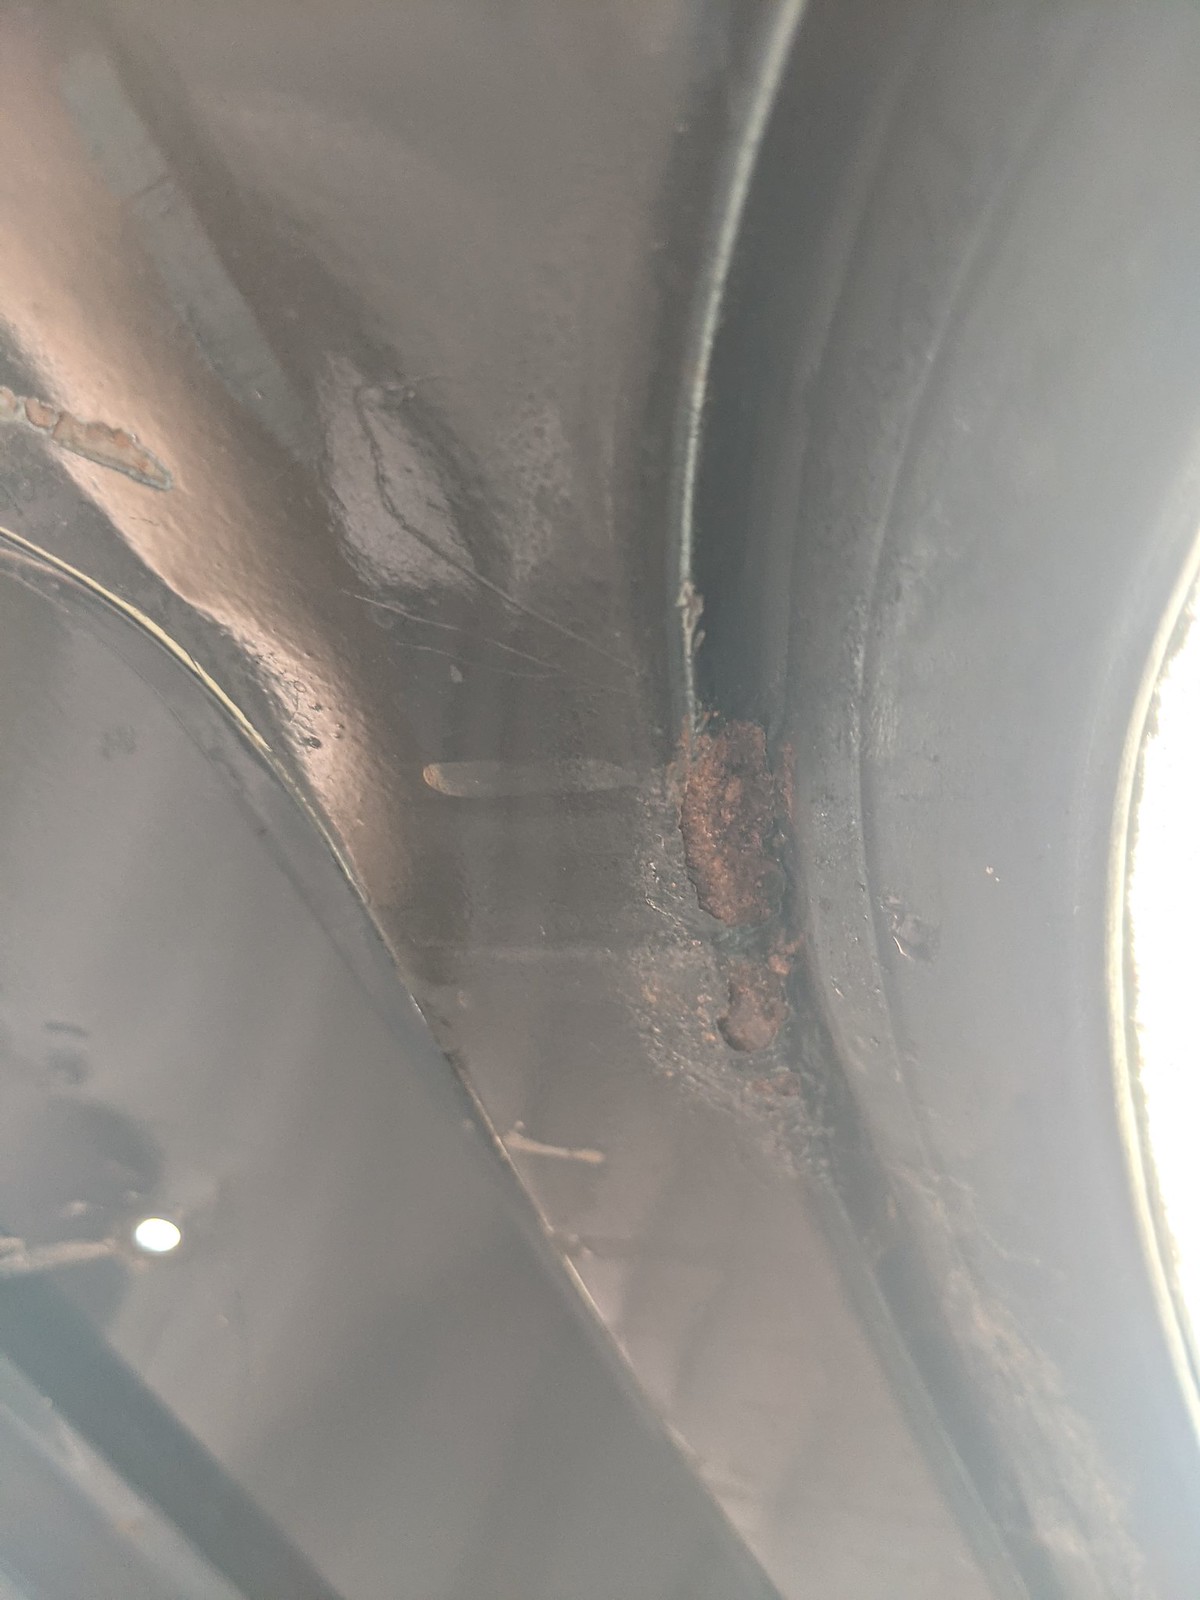
Also no rust in the inner body behind the fenders


In reply to autocomman :
I thought they were rustier than that coming off the assembly line![]()
In reply to TurnerX19 :
Right? The worst spots are the dog legs, which arnt that bad thought I do have patch panels for em. And the front corners of the doors which is super common. Everywhere else its unbeliveably good
You'll need to log in to post.


