


This thing is going to be so much fun to drive. Nice work.

This thing is going to be so much fun to drive. Nice work.
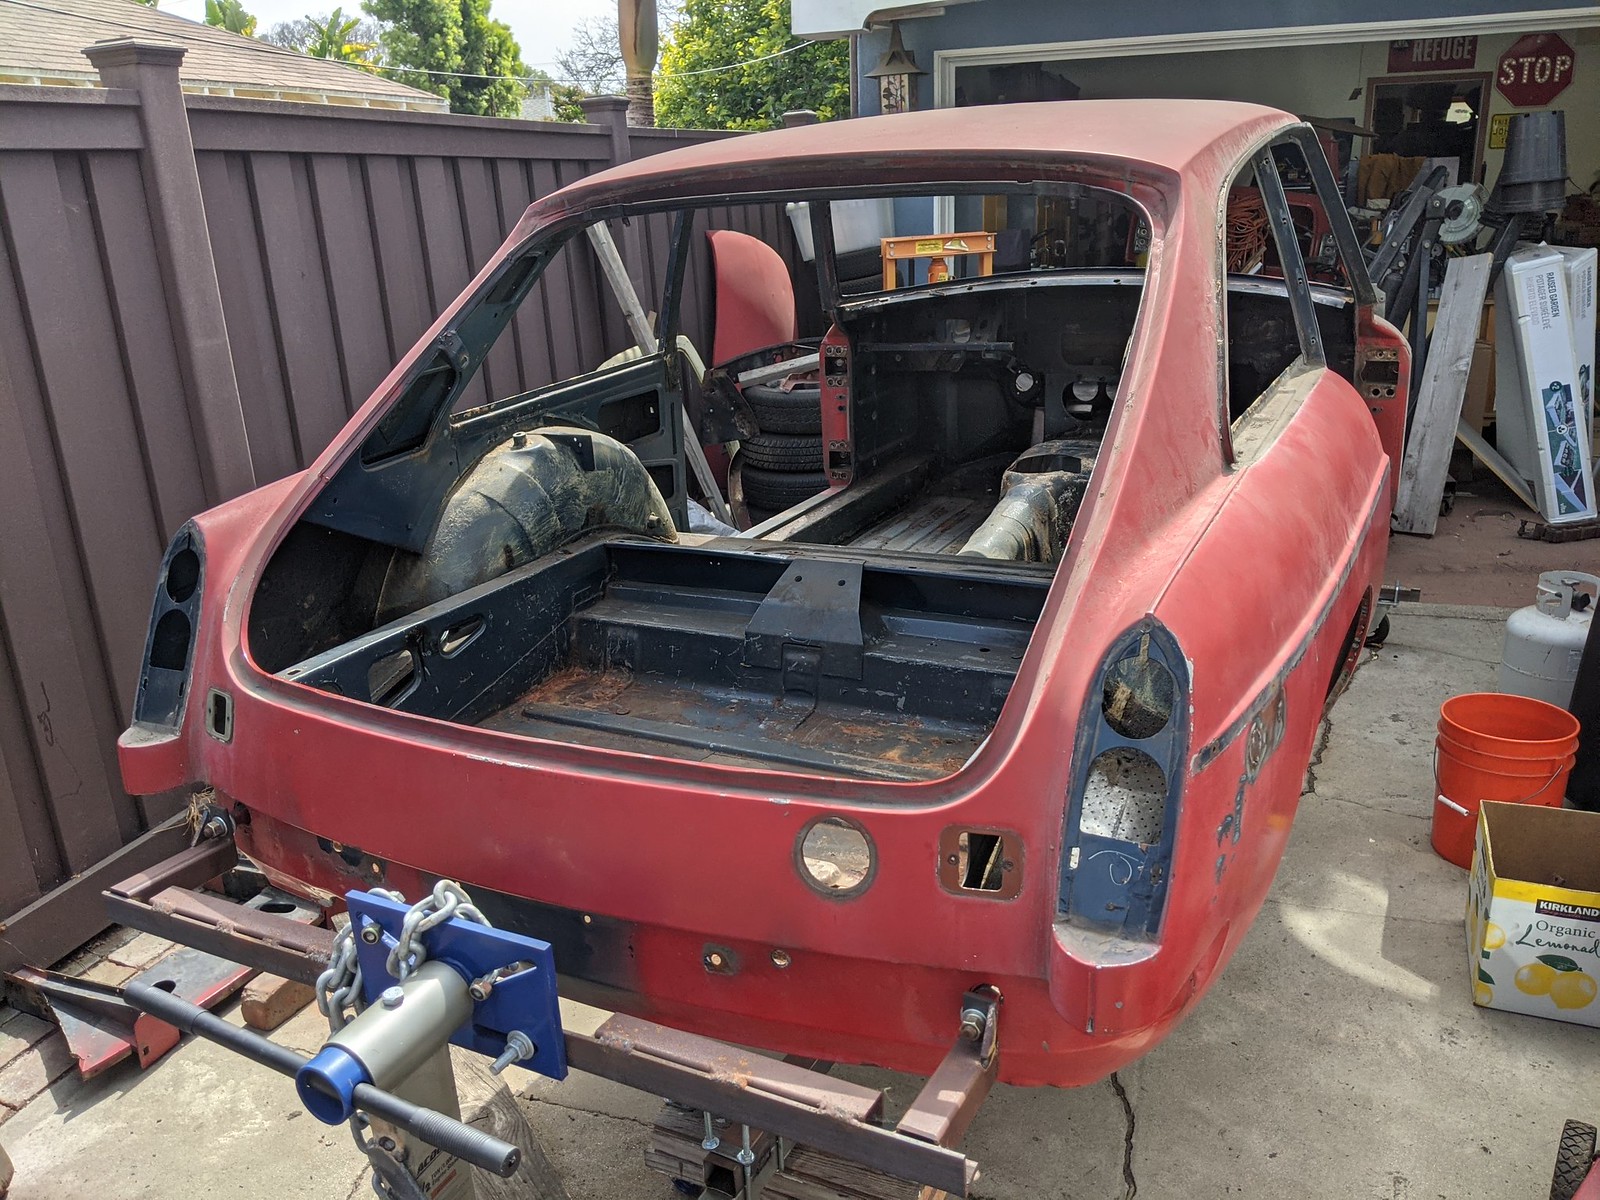
Been a while. I've had to shuffle engines the garage. Get the mini engine assembled enough to get it off the stand and clean up a bit so I could yank the 3800 from the MG. Had a buddy take care of the rust in the doors. Ive been stressing the metal work on the dog legs cause I havent done much as far as sheet metal repair, that will be out on display like the body. So, I tore into it today, lets just dive in.
I have 2 patch panels, an orange and black, its just what I could get when I ordered the parts. Orange one came from Moss motors, it fits for crap. Its not a good repop at all. So I started on this side. Pics are self explanatory. I sectioned the cutout so I didn't have to use the whole repair panel. The inner panel has holes, that I made up quick with some sheet I had lying around. Came out pretty damn nice considering my limited experience with this kinda thing. Not gonna grind the welds down all the way cause well it doesn't matter, is an inner panel. Ill do the rest of the panel in a few days, then do the other side.
I attacked the RH fender today. After puling it of I realized it was never on correctly. The gap between the cowl and fender was huge. Never put back together correctly. The bolts dimpled that area so I pounded them flat and tweaked things a bit more and got it to sit pretty flush. Fender needs some dolly work still. And I was able to get the fender moved back more to correct the door gap. Door needs a bit more dolly work but things are much better. Though half the fender bolts don't line up now. So those will have to be slotted. What ever haha. Its on par for quality control or the complete lack there of for British Leyland...I dont have a lot of metal work experience, so im not gonna get too crazy with that, ill leave it for the paint body guy.
Ive also decided to build an engine stand rotisserie and strip the bottom of the car. It will most likely be line-x on the bottom. Yes im selling the car, but im shootin for bigger numbers than the engine swap/respray numbers. Im doin this right, and I think it will pay off. And if the money isnt there yet, Ill hold on to it and just drive and enjoy it. So that it for now. Once its ready to go for paint and body ill start on the engine reseal and dress up. Only thing i not sure about yet is the blower case. The snout has been replaced and its shiny gray, the blower case is dirty old aluminum....


The dog leg work reminds me of the last few weeks. I have a pair of panels waiting for me at the post office, I wonder if I too will get an orange and a black one. Do either of your panels have a steelcraft sticker on them?
No, the orange panel came from moss, the other came from Victoria british before the closed up shop. The only had the left side when I ordered em, so I had to get the right from moss.
Boooo! If your gonna repair something, then seriously...i mean, can it be more crappy? Im guessing something smashed the hood in and it pulled down the cross brace and pulled in the inner fenders, maybe a truck backed into it, who knows. Nothing else is damaged but the fronts of the inner fenders. The cross brace has black paint under the red, every other panel has blue paint under the red, which is the correct color. Either way, gonna splice in some nicer inner fender sections and get the cross brace where it belongs. It 1/2" farther back on the LH side. Doesn't effect anything honestly, but its crooked. and well, there is so much missing metal on the LH side there is no where to put the front fender bolt.
RH fender also I got fitting pretty sweet, till you have to put the 3 lower screws in, and you have to push it up hard enough that it bows out and doesn't line up. There are strange things going on with the RH fender, so im gonna grab a used one as well which should solve many issues. LH side goes on no fuss and needs minimal tweaking to fit even better. I gotta get the front of this car square before putting it on a rotisiree. I feel like im just going round in circles and getting nothing done.
But some holes are welded up in the engine compartment. Of course Ive run out of sheet metal, and I need to get more to build brackets to hold the body up anyway. And pics for reference...


Following!
Well life happens, things get put on hold, and waiting for parts. But some progress. Got the front cut off a RB MGB, drilled the spot welds out and separated what I needed. Repeat on the car, cut to fit, weld in place. Much better fit, and its not missing any sheet metal haha. Im pretty sure these are aftermarket fenders. Which would be why they are black under the red and the holes on one fender doesnt line up. Im waiting to get an original passenger side fender which should hopefully fix all the fittament issues it has.
Once I get another fender, and the front end is all squared up with the doors and hood, then Ill get the body stripped and up in the air on a DIY engine stand rotisiree. Gonna strip all the undercoat off, fix the other dog leg and get it off to body and paint. Then ill do the engine tear down for clean up and a reseal. Gonna go through the trans as well. Bearings and syncros. T5's are super easy to do. Last one I did was in my old 240 volvo, remove, rebuild reinstall and drove it home in 8 hours. So thats where thats at.
Also have a basic plan for the audio system. I love the look of a proper vintage radio in the slot. But then you need an AUX input or bluetooth adaptor added. And who is gonna use the radio anyway, and any old radio will likely have issues, or need a recap or something and well screw all that. So, i found these cool bluetooth receivers with RCA outputs that fit in a standard carling switch hole. Lots of flavors, im sure they all come out of the same china factory. So the radio will be gutted, and the bluetooth receiver put inside and the buttons will be activated by the radio push buttons. Thats the plan anyway. I didnt wanna just blank the spot and stick a non matching control panel in the dash. 2 speakers hidden under dash most likely, component tweeters to help the sound stage. And if $$ permits and I feel creative Ill figure out how to get an 8" sub in it somewhere. Small 4 channel amp, nothing special. Ill probably use a Toro audio amp. been wanting to try one of there little ones.


Console just about done and well, its off the ground. Center of gravity is higher than I expected and after much deliberation with a buddy Im gonna make a few modifications to the stands. First join the center legs together with a 10' stick of 2" square tube. Then delete the rear wheels that dont steer with the square tube they are attached to. Swap that with a 5' section of 2" square and some big casters that turn. That will make the footprint a little wider than the car, and should prevent it from tipping over when I rotate it. Right now Im afraid to turn it because its top heavy, and Im pretty sure the stands will go over with the car. Then a few diagonal braces on the back of the stand to eliminate the little wobble and we should be good. Also gonna get a 10.9 if not a 12.9 bolt in the bottom of the stand holding everything together to replace the 4.8 bolt it comes with, yes, 1 4.8 bolt.
Then I can get a 6 foot bar for the leverage in the end of the engine stand to rotate it a bit more safely. Then strip the bottom of the car. Im gonna have it all epoxy primer sealed and the bottom will be coated with bed liner. Roll on or spray on, im torn. Roll on would be much safer on a painted car, but Ive never used either. Always used LineX at the shops Ive worked at, but trying to keep the budget a bit more in control here. So any thoughts brand, roll on or spray on Id love to hear it.


So engine stand rotisserie has been much improved. Widened the stance to 5 feet, just wider than the car. Big casters as well. Triangulated that so there is no wobble as the center of gravity is pretty high. Added a support so both stands are joined together, and spaced the middle wheels. Its pretty solid now. Its heavier on the left side for some reason. I can pick it up and rotate it back to center myself if its tipped on the right, but if I tip it left i need a hand to do it.
Stock fender put on, it fits better in ways and not so great in others. At this point im gonna let the body shop deal with it. Some basic dolly work and it should be fine. There was a weird patch done on the passenger side where the tunnel meets the floor. Not wire why. I think they removed a small brace under the car to clear the driveshaft on the 9". I should deal with that too. Should be a simple cut and weld. Got all the sound deadening crap off the floors. Wasn't too bad. Holy crap it was thick. It just about made the floor flush with the ribs in the floor. Thats 1/4" I took about 40-50 lbs of that stuff off of the inside of the floor. Bottom of the car is a different story. If I had more $$ to work with id sand blast it. But I don't have a way to get the car there other than to call my buddy with the flat bed, which I get charged for. SO a heat gun and razor blade. Took about an hour to do the one section and a little more. Get more of it with the blade, wire wheel in the corners and edges, then some solvent wiped the rest off. It will take probably 2 days to do it all, and its not fun. But im saving about $1000 (factoring in the bill for the flatbed to get it there)
Im glad im back on track again, relieved really. But im not enjoying this part. After the floor is stripped then I need to weld up the last of the holes. The big one to clearance the starter on the drivers side, and the dog leg on the left side. Then little screw holes here and there, clean up work. I really don't enjoy any of this. It was fun to do a little of it but im so very over it. I cant want to get this the body shop. Im gonna have them seal the whole car, top bottom inside and out. Im gonna price linex. Im at the point where I need to start reassembly soon as I can. Im not sure I wanna experiment with bed liners for the bottom of the car myself, on a fresh painted car. But it will depend on what the body shop charges when its all said and done. Mechanically im golden as far as budget. But we all know paint and body can be crazy $
 [/url]
 [/url]
 [/url]
 [/url]
 [/url]
 [/url]
 [/url]
 [/url]
Well the green fender fit for SH*T, so the red one went back on. The green was an OG fender, the red one aftermarket, but it was on the car. Car is totally stripped now, its goin to the media blaster. Im done. The body is pretty solid too so I dont expect much in terms of 'extra holes' once its blasted. The guy im using too is pretty gently on stuff as well. But ive hit the end of my skills with metal work, which wernt amazing anyway. I did get the meat of the welding done. Body shop will have to pound and dolly out some sections, and get the door/fender/cowl alignment better. I dont think it will be too bad. Just need someone with more skill than I have to finish that up. So from media to body and paint. I need to find a linex place in LA that doesnt suck, so it can go from body and paint to linex then back home. I dont have a trailer or truck, so I have to pay a flatbed for every transport. More pics, then well, more waiting. Meanwhile Ill reseal the motor, which wasnt really leaking but since its on a stand its getting all dolled up. Then a rebuild of the T5 becuase, its a T5.
Now I gotta get a battery back in the X1/9 and fire it up to get it out of the way. It always starts though. Go figure, a reliable Italian car.


Awesome project dude! I'm a little behind you on my '62 MG Midget with Duratec/MZR swap, but we had a very similar starting point. I went a little crazy with the suspension, so I'm playing catch up.
Hey- why not get the linex done before body/paint- wouldn't that work out fine? Save you the worries about some 19 year old apprentice blasting bedliner all over your new paint. And who cares if there is a little overspray on the linex? Worst case if you were worried, brush it with vaseline before paint, then powerwash it off once the paint is good and cured.
Let us know what you get quoted for the strip/body/paint if you didn't mind. I'm a few months away from that search, and worry that I'm looking at $10k, for which I'd probably just tent up the sideyard and DIY (again).
I thought about it, but I'm gonna have the entire car sealed first before the linex. And from local shops I work with and their horror stories, it may take me a minute to find a good linex place. I don't know what body and paint will be costing yet, but Im already assuming 8 to 10k, which would suck. But I don't truly know yet. I do know stripping will be 1k, maybe a bit less, but with a flatbed bill prolly 1k. Everything in California is more expensive, especially with this stuff because materials are nuts as far as cost, because California. I'm also going to tape a very clear line as to where I want the lines to come up to on the firewall and inner fenders etc etc.
Even though this car will be for sale as that was the plan when I started building it, I'm doing it right. I want it to be a truly nice car, not slapped together. Cool stuff on the midget, do you have a build thread here? I did a 79 and 75 midget years ago, and I have a 59 Sprite. That's my personal toy. Lots of cars in the fleet but the sprite is mine. And last on the list to be done though. However it is a super reliable driver with it's turbo 1275 ;)
"However it is a super reliable driver with it's turbo 1275 ;)"
I'm a robot self destructing repeating "does not compute" over and over again. I love me some 1275, but for a 120HP lump I figured I'd be at 8-10K, and that was 2003 when I did my first Midget swap (4age 20v). I'll save the 1275 for when I find my 65 Mk1 Cooper S.
This is my current build. It's been a really fun diversion, especially not having to drive it to work on Monday after working on it all weekend like the last one.
I guess my paint cost fears are well founded. I'm outside of Sacramento, so maybe that will be a tad cheaper than LA, but somehow I doubt it. I'll also be adding a fiberglass single piece front end, so I imagine that will compound costs. As it were.
Crazy cool project man, way into the suspension haha. I do love those aluminum wheels too.
Don't other to build a 1275 or a 1380 unless you want a period correct motor for some reason. You can't beat cost and power from a modern EFI engine, not worth messing with the old A series unless you want to. A 1380 will cost you 5k but the time your done for 100hp at the wheels, maybe 110. Now I think this is the perfect amount of power to weight to use all of the power. Not too much ya know, but definitely enough to get stupid. Broad flat torque band too. But pricey. So I went the route of the MG metro turbo. Build thread is below, video on page 13. It's been dead nuts reliable. But it definitely could use a refresh. I know those stock 4 ring pistons are probably on borrowed time. It doesn't leak more than it did before from the rear scroll seal, but I know at some point I'll do a proper refresh. But it does run good, crazy good.
https://www.mgexp.com/forum/mg-midget-forum.3/bugeye-turbo-project.3537511/
Well shes at the body stop. Didnt too bad once it was stripped. A few little bondo patched where things will need to be fixed but overall nothing major. Its already been hit with sanding pads to get it 100% clean and its been epoxy primed inside and out. Dont have pics of that ATM. Its been 'filed away' at the body shop probably for about a month before they get to it, its in the rotation. Next is a motor reseal, trans refresh (bearings and syncros) weld up the subframe, rebuild the seats, weld the holes in the dash and add the vents, pedal box refresh, etc etc etc. Ya know, eveything else.


[url=https://flic.kr/p/2m7JMsA]
[url=https://flic.kr/p/2m7JMqm]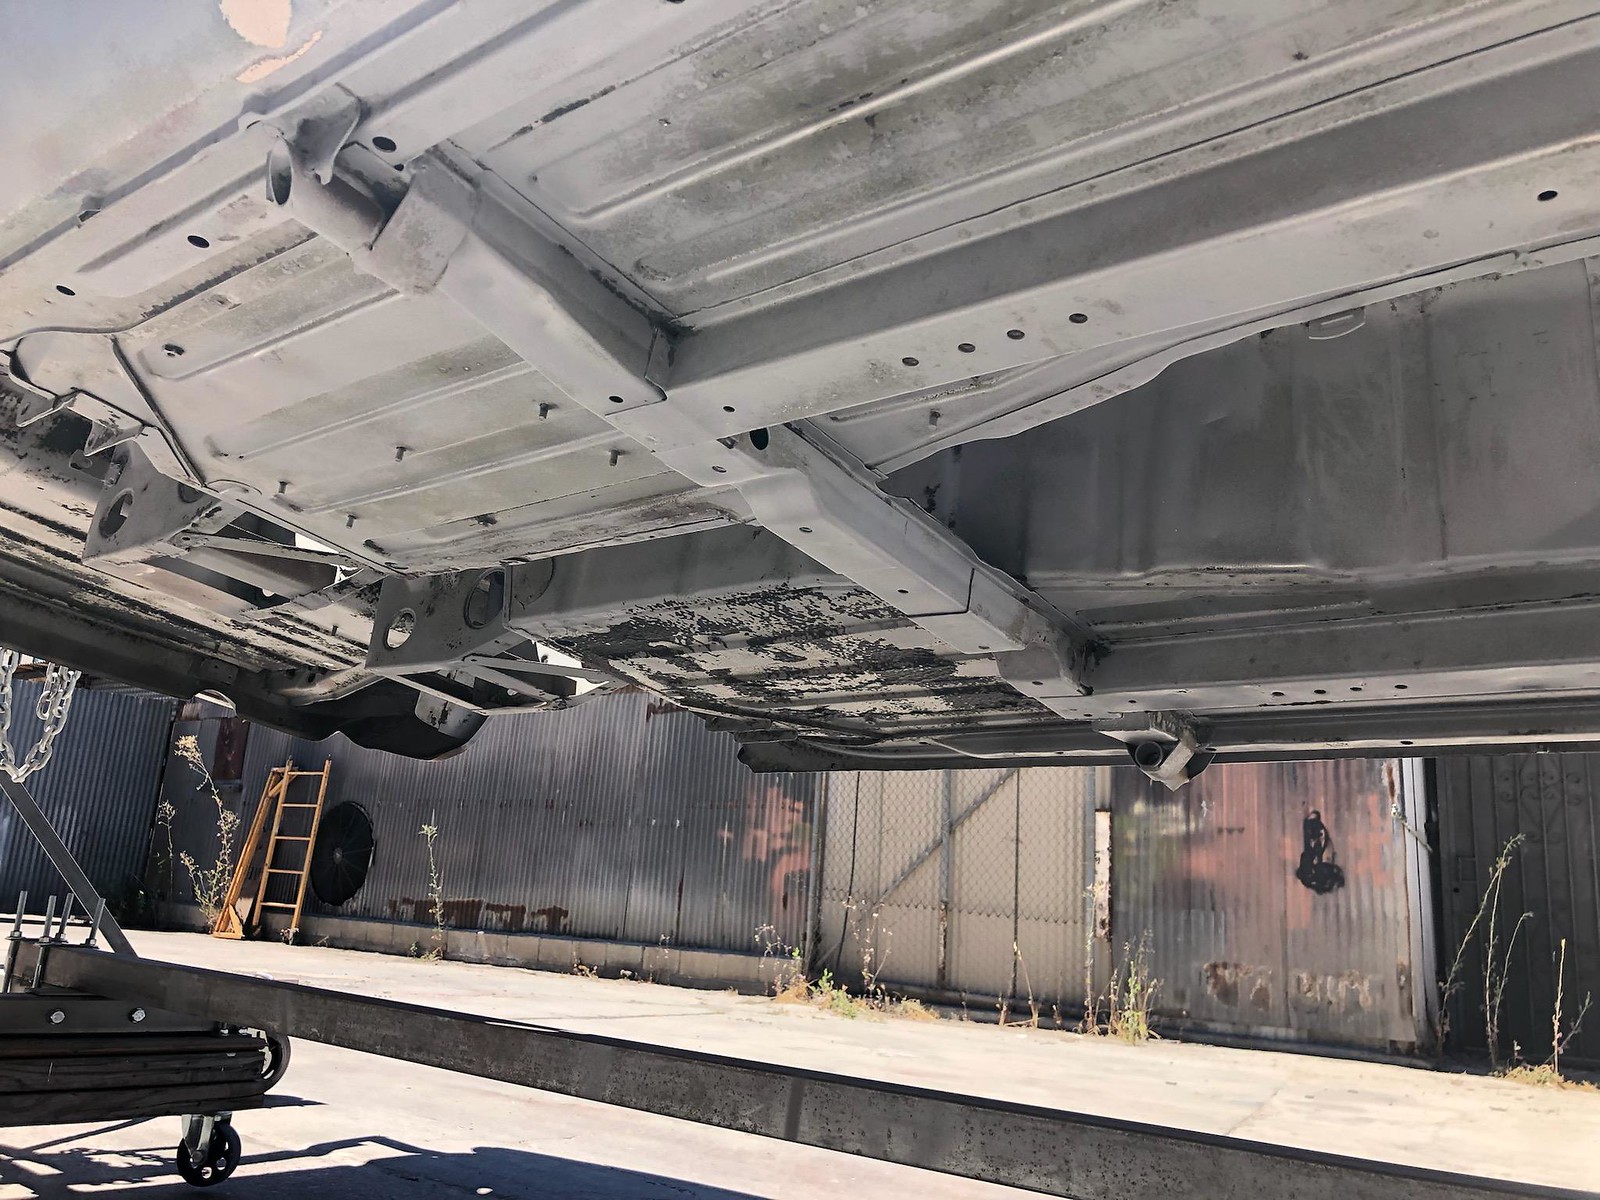
Yarg, should be in the paint booth soon. Body shop is finishing up the body work, and hopefully ill have a sprayout soon. Their computer system actually had a PPG paint code for the factory BU38 Blue Royal color. Im really chomping at the bit to see what it looks like. Meanwhile been working like crazy, had a Wagoneer diesel project fall in my lap (there is a thread here) so dealing with parts has been a back burner thing. I wanted to have everything prepped ready to go to start bolting crap on asap when the car got back. But well, im a bit behind.
Motor is cleaned up, primed and painted. I've had the best luck with duplicolor engine paint/primer, following the can directions. I did an engine compartment in that stuff once, lasted for years with on issues, even dropping tools and everything on it. I was suprised. 2 light coats one medium wet coat all 10 minutes apart. I wait a day then spray the color. Been doin the work at night. Not too cold here, but not warm either, and not super dry out. West coast FTW. So it takes a bit longer for the paint to harden up. But thats ok. Goin for a clean simple look here, nothing crazy. Semi gloss black for the long block. Cast coat aluminum for the timing cover and lower intake. Cast coat Iron for the blower. Thats about it right now. Only 100k on the motor, so no timing chain, or other internal bits. These are easily 250k mile motors on all original bits. So there is no reason to tear it down or go any farther than the reseal im doing.
Blower has had a new coupler done and looks like a pretty new snout put on. The oil looked clean, but holy hell did it smell. Geebus it smells bad. But anyway, need more primer and paint. And some anerobic sealer for the blower bits, along with the fancy grease for the needle bearings and the oil.
 [/url]
 [/url]
 [/url]
 [/url]

Huge progress - looking really good.
I love where this is going. That rotisserie looks super simple and easy to make too. I might have to steal that idea some day.

Somehow I missed this until now. Incredible job with the engine swap and body repair! That's one clean straight MGB body. Looking forward to the paint.
There is a real clean BGT down the road from me in "blue royal". Probably the best colour ever for one. It will look great.
Saw the paint today, didn't do a spray out yet. Goin songle stage on this, and they were sent a water base 2 stage. And it looked like it had flake in it which was weird. So it confirms my suspensions of no one had a proper color formula for this color. But the color looked really good. So they are gonna try to get the same formula in a single stage and we will see what that looks like. The color in it's proper form is fantastic. Spots where they hadn't seen the light of day looked amazing when cleaned up.
The body was in pretty good shape. After sandblasting, eh well it needed some work. The drivers fender was super wrinkles, again, lazy body work from someone else. Get it mostly there then bondo it over. My shop did quite a bit of work smoothing it out and getting things to fit better. Doors fenders and all fit much better than before. It's taken quite bit. Also after blasting there were a number of ok holes to deal with. Nothing too bad. Overall considering how bad it could have been, it wasn't really. I'm starting to get excited about the project again haha.
Almost ready for paint...And the motor mostly back together now. Just a reseal, still, so much time in cleaning, prepping, priming and painting. The nose cone of the blower...stupid crap. I think its powder coated, poorly, or painted poorly. I thought I got all the loose bits off and cleaned the aluminum buts under the loose paint, but there are a few little sections where the primer must have reacted because you can see where it bubbled and lifted slightly. If it becomes an issue ill touch it up as best as I can. I didnt wanna disassemble the whole thing, no point. Just frekin annoying. Its a driver, not a show car ;)
But everything looks good so far. Fingers crossed that rear main/cover doesn't leak. Its lined up properly, and it was clean and flat so it should seal well. Rear main went in ok too. But ya never know. Also these have a coolant pass through on the back of the intake manifold, little bulbous cover. They tend to warp a bit over time and seep. I flattened mine and it looks good. But its in a place where I don't think I can ge the bolts out if it leaks. Its right up against the lip where the heater used to sit. I also need to figure out what Im gonna do with the fuel rail. The zinc on it is tired. I guess I could have it re zinc plated. I need to do the door strikers and a few other bits. Aftermarket rails that are not a huge frekin spider mess of tubes start at like $160 but it has a braided hose that connects the rails, and I dont know if it would clear the hood. Aeromotive makes rails, $300 cant use the stock regulator, so Im in for even more $$ for a regulator. I found a place that sells powder coated rails, but I dont know if the baking at 400 deg effects the pulsation dampner, or if there is anything in there that can be damaged what Id consider excessive heat (way more heat that it would normally ever see). Either way I gotta do something with it because it looks like old crap and its huge and in your face when you open the hood. i may spring for the powedercoated one and see how it looks.


Can you recap, in small words for us folks that aren't too bright, what it took for a rwd supercharged 3800? What amalgamation of parts and donors? I have a project planned in the not too distant future that this package may be perfect for, but i thought it wasn't feasible until now....
In reply to Dusterbd13-michael :
It's mainly just the engine and transmission of your choice. The problem isn't finding the parts. It's making them. The supercharger inlet typically butts up against the firewall of any RWD application, so cutting up the supercharger case and welding on an elbow or running a tube through the firewall is going to be the big deterrant for most. Then there's little stuff like making an upper rad hose/pipe combination that goes to the back of the engine, custom throttle cable since the throttle is in a funny spot now, ect.
In reply to autocomman :
Since you were already in there, did you consider hogging out the coolant passage across the back of the intake? That's a restriction known to be greater than a fully open t-stat and super easy to do with a dremel.
Disregard the fact that this intake is flipped backward. lol

You'll need to log in to post.


