1 ... 4 5 6 7 8
autocomman
autocomman Reader
2/3/22 1:36 a.m.

In reply to V6Buicks :

Yeah, I bought a lathe for 2 reasons, I wanted one, and to make these fittings among other things like all the spacers for the accessory brackets.  I have minimal experience and holy crap did they come out nice.  I do wish I made the hose part longer by about 1/4 inch, but I think it will be ok.  I need to make little brackets to hold them in still, because right now they are just in there with the factory o-rings.  If your familiar with the FWD 3800, the alternator bracket has the heater hose fitting on it, and they pass through plastic elbows that normally fit where the little fittings I made go.  Since the OG alternator bracket is long gone, and the RWD manifold isnt setup for a blower, well this is what I did.  Fiero guys sometimes plug the one in the manifold and have the thermostat housing modified with a return port, and/or tap the manifold and timing cover.  But they are thin, and the manifold has very little wall thickness for threads.  Didnt wanna risk a leak or over tapping/tightening a fitting.  Ive got the bracket design in my head, just need to get around to doing it.

The other part that sucks doing it this way is you can push the fittings in too far, which will stop/restrict coolant flow.  This engine was designed to have full flow through these hoses all the time.  I even have an H-pipe going in the heater hoses because of the vintage air heater valve that shuts off coolant.  The more Im talking about this the more I think I may end up pulling the lathe out again and making new ones to correct all these issues.  I can make the hose part longer to accommodate the bracket that will retain them in, and I can machine it so there is a flange that will prevent them from disappearing too deeply in the hole.  Dammit, lol.  At least I have more aluminum round stock ;)

bgkast
bgkast GRM+ Memberand PowerDork
2/3/22 2:27 a.m.

Wow. I just caught up on this thread. The engine looks great and the paint color is fantastic. Can't wait to see it together!

autocomman
autocomman Reader
2/11/22 2:47 a.m.

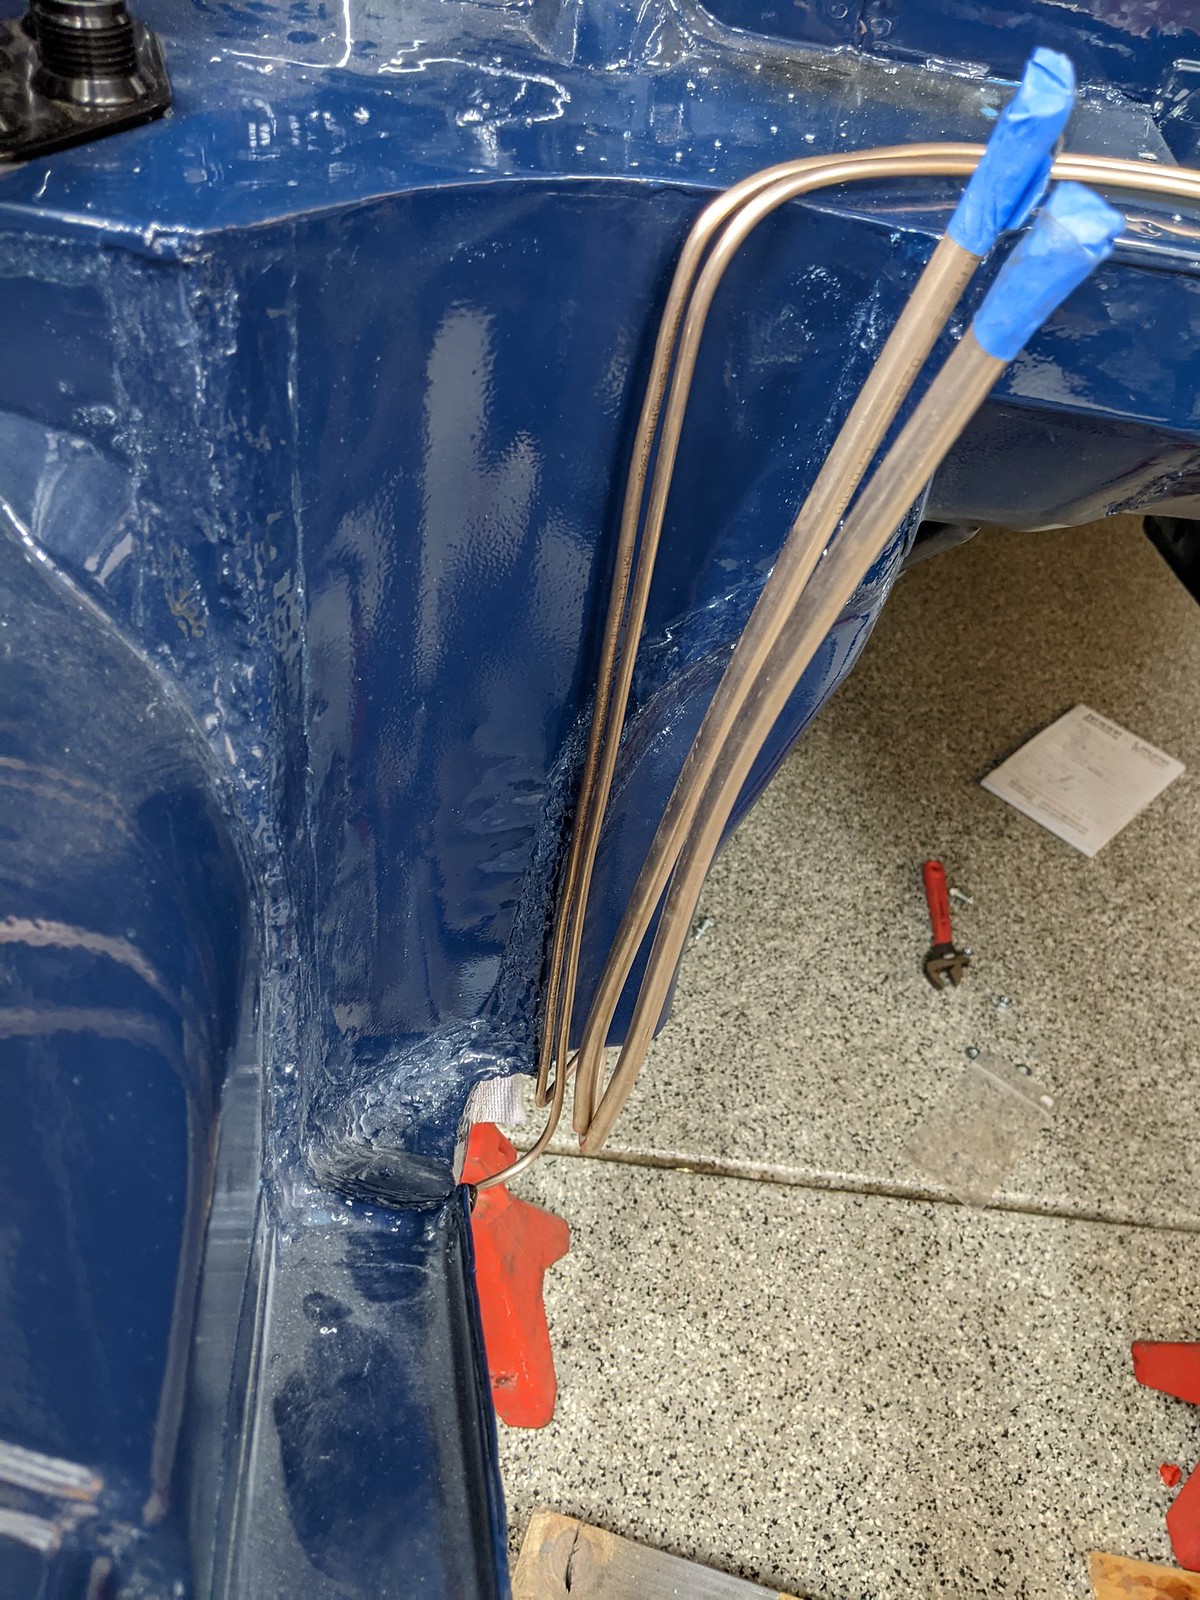
Well I'm stuck in the middle of trying to get a bunch of stuff done and I can't get anything finished. I've got most of the brake lines done, but stuck on a lack of fittings. Got the fuel lines run, and again I need to make a huge plumbing list.  Cant put the glass in the tailgate, cuz I have to remove the tailgate to install the seal, and I'm not going to do that with the glass installed.  I went to take a bunch of parts to zinc plating today, they had some overspray on them from the paint shop, and the zinc guy told me I had to have all that stuff stripped off. So all the parts are clean now and then I got to take them back to the plater.  (I'm not gonna complain about having to clean the parts for the price I'm getting)

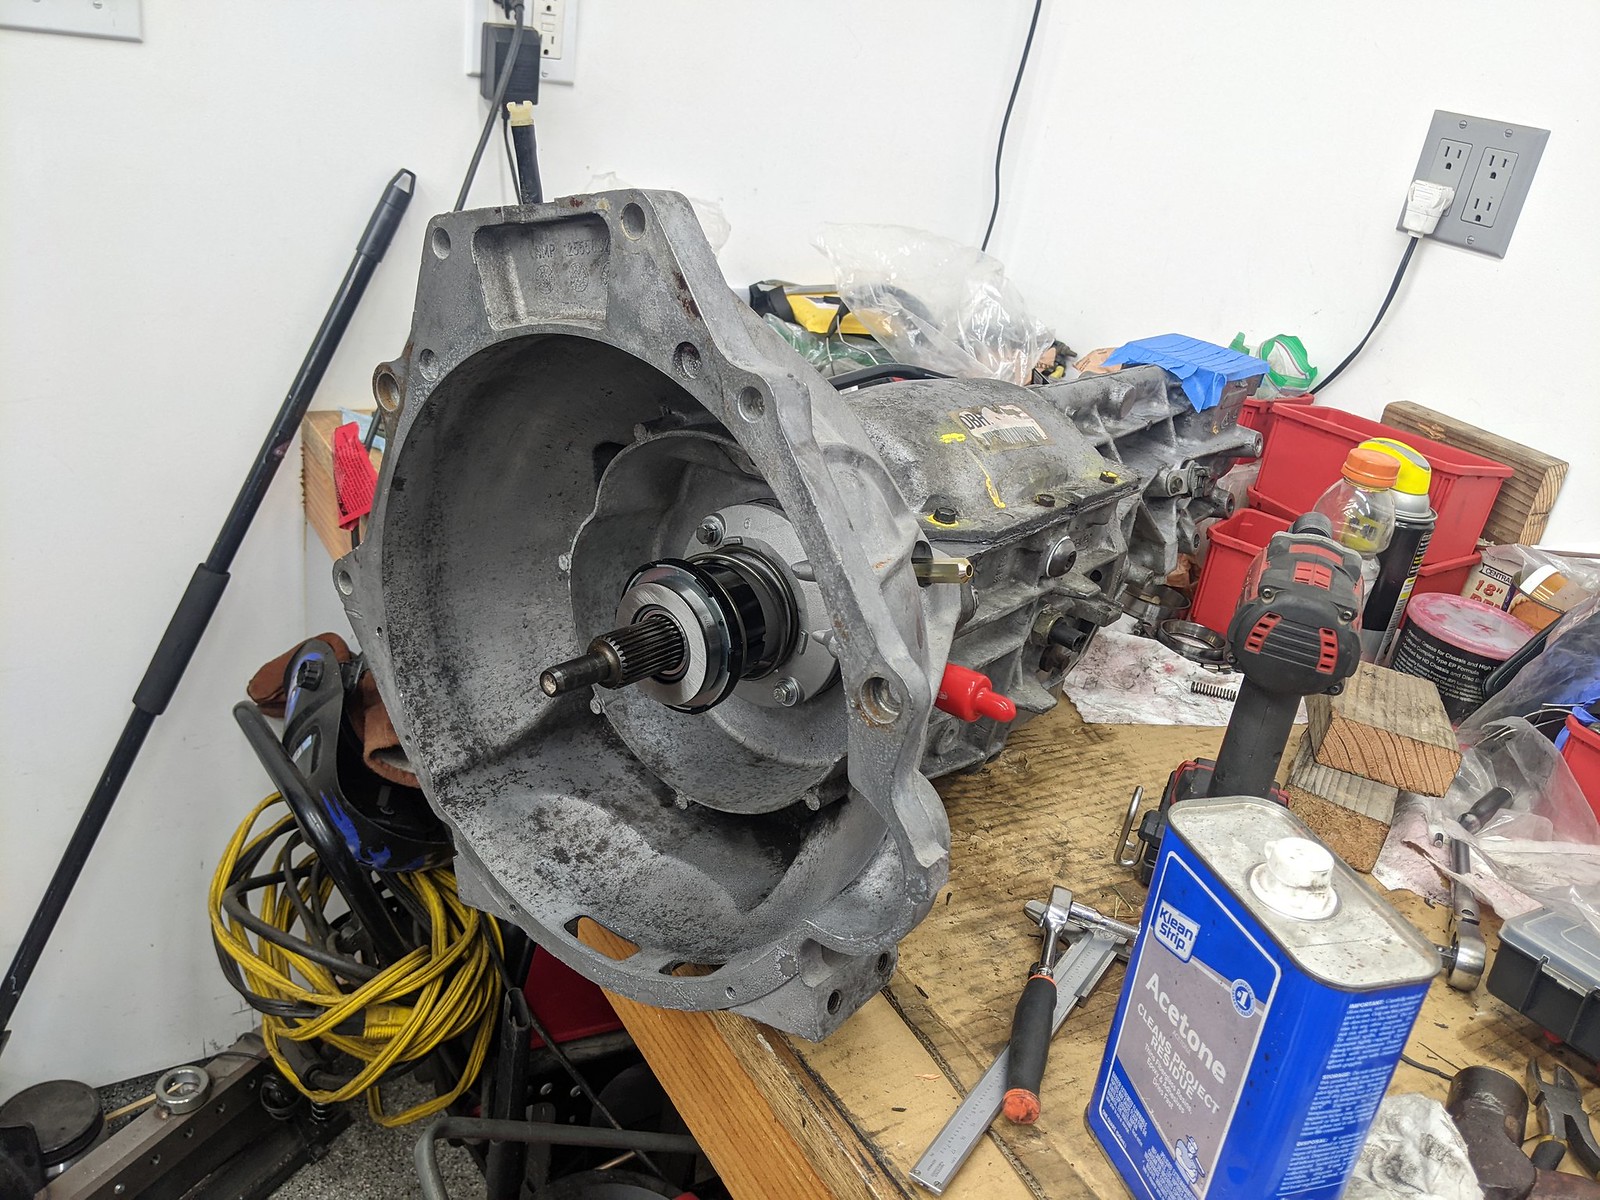
Can't put the engine in, cuz I have to rebuild the transmission first. They have to go in as a unit. Waiting on the rebuild kit from Hanlon Motorsport, hopefully I'll have that next week. Last t5 I did only took me 5 or 6 hours so this should go pretty quick. I also got to hit the Chevy dealer and order the flywheel bolts. And I got to double check my clutch, while I know I have a new slave cylinder, I'm not exactly sure the clutch kit came with a throwout bearing. I remember looking at it before and going, I don't think all the parts are here. What was really kind of upsetting is the sachs clutch box has an exedy clutch in it. Oh well, that should still be fine. I can't start putting the doors together, because the first piece of trim that has to go on I'm pretty sure it's stainless? But it might be aluminum. Either way there's scratches in it and it's pitted pretty badly. So I have to take it to my polisher to see what he can do with it. I can replace it with a new piece, but then I would have to buy two, they're 90 bucks a piece. I want it to look right, but I also got a ring in the budget at some point. This is the molding that goes in the top of the door. Now the molding that goes in the side window is aluminum, I have to double check those and make sure they're good. I'm pretty sure they are and that they can be polished. They are originally polished and anodized. Same with the drip rail trim. Drip rail trim is for the most part unavailable. However somebody is re-popping them. And they are not cheap. Last I looked it was $600 and that was in pounds not dollars, you have to buy a while set.  I'm pretty sure all that trim is good enough to polish and anodize.  I don't want it to look weird with old and new pieces, so it's all going to have a consistent finish all the way around because it's a complete line all the way around the windows from the drip rail trim down the door molding and the molding for the side window. I have new b pillar trim because the originals are damaged. So it's kind of an all or nothing deal unfortunately.  We wont talk about the vent windows and the glazing I tried to redo. I hate doing vent window glazing it's such a disaster. And my first attempt at these did not go so great. So I have to get new glazing, and try different technique. I watched a couple YouTube videos and I got some new things to try

I can't put the side windows in, because of that molding, and because I have to glue some vinyl to the b pillars and the top inside part over the wheel well. It's one of those things where the material goes up and over the lip and then the seal goes on. And since the interior of this car is being changed to autumn leaf (a pleasant orangey tanish brownish?). I had to get a complimenting vinyl to match the new color of the seats and all of the interior panels. On a side note you order a deluxe panel kit which has 8 panels, and it doesn't have the stupid sail panels.  The sail panels are usually the ones that are completely falling apart because they always get wet. But no the kit doesn't come with that lol.  Fortunately I have one sail panel that's still intact enough for me to make a template off of, because they're just mirrored it shouldn't be too hard to do.  I don't know if the autumn leaf interiors had autumn leaf all the way around, or if they still did the gray sail panels and headliner or what. So I have a really nice chestnut brown to go with the autumn leaf, and a sweet tan / beige suede headliner. This is going to look killer when it's all together. But I got a lot of work to do to recover the capping rails for the doors and all of the other bits. And then we come to the dash. The ugly padded dash that I stripped. I have to weld up the holes in the dash, and I talked to a really good custom upholstery guy I worked with on a big bus project. I need to make a lip that goes on the top of the dash to cover the attachment studs and to make it look like it's actually finished. The original material / padding that was on there had that lip, so I need to recreate that.  It's also one of those things that help prevents the gauge lighting from reflecting on the windshield.  See these dashboards with the padding removed, and if you don't do anything to them and just paint them or recover them they really don't look finished. I have ideas on how to do it but I'm just not confident enough, and I'm also weighing my time and trying things and failing and making a mess and needing it done and what that's all worth. It's my same conundrum with the wheels, I love the way the stock rostyle wheel looks, but do I really want to spend all that time refinishing them? No, so it's getting new wheels. Same with a dash, it's not going to be cheap, but it's going to be right the first time and proportion well and I have the utmost confidence in that. And then I'm just going to cover it in black vinyl.  At this point I've kind of written off making much profit. I don't know what I was thinking of getting, haha. If I had a car that didn't need paint and body, I'd be miles ahead right now actually. But in that sense, the cars that have a quick cheap respray, the underneath is still all original aren't bringing the big money anyway.  Anyway the way the market is on car prices who knows.  I'm pretty confident I won't lose any money on this project. But I don't think I'm going to make much at all. I'm hoping I can get some press coverage on it maybe from one of the talking heads, but who knows. I will say you never know who you're going to meet and where you're going to meet them. I've got a lot of good attention from this car so far, it's a unique build, it's something I've done from the ground up. So I'm eager to showcase it. I definitely want to spend a little time with it and enjoy it, I think it'll be pretty badass

But anyway I appreciate all the comments guys. I mean that is the reason we post this stuff up to give other people inspiration and ideas and to hear hey that's awesome I love what you're doing. It's nice to hear, and with everything going on it's just nice to hear. More pictures soon I promise

So that's where everything's at. Not a lot of pictures right now cuz well not a lot to actually getting accomplished. I'm going through the calipers right now, some pitting inside of them, but nothing that I'm really worried about. I have brand new pistons and seals so as long as everything goes together smoothly and they don't bind or leak we have no issues. If they do then I can get rebuilt calipers pretty cheap. But I've already got the bits to rebuild these so I'm just going to do that. And then depending on where I'm at with parts I still have to go through the seats. The seats I don't think will be too bad I have all new webbing foam and diaphragms for the seats in addition to new fabric. So the only thing that I think's going to take time with that is to clean and possibly having to paint the seat frames, I don't remember how much you can actually see. I really just want to get the engine in it, one to get it out of the way and two to make it look like I've actually done something. A lot of frustration, but a lot of stuff is moving in the right direction.


Some of these paragraphs are definitely out of order, I'm sorry for that my phone is not cooperating with me and this website trying to get things cut and pasted in the right way, it's late and I'm tired that is all.  Late night rantings of a tired tech

TurnerX19
TurnerX19 UltraDork
2/11/22 5:13 p.m.

In reply to autocomman :

Sail panels were matched to the head liner, not the door panels,  when the cars were new

RoddyMac17
RoddyMac17 Reader
2/11/22 7:01 p.m.

As TurnerX19 stated they're headliner colour, though some of the late GT's had a split with black on the bottom.  But, I can't recall if that was for cars after they stopped bringing them to North America.

If you need the panels, Rimmer and Moss Europe sell them (plus various Ebay sellers).  I don't think Moss stocks them unless you buy a headliner kit.  I had tried to get them from Mirror Trim, but they wouldn't ship outside of the UK.

Also, I feel your pain with not being able to do anything due to missing something or waiting for things.  I've barely touched my B GT in the past three months, as I started to get burnt out with the whole thing.  Putting the windscreen in was sort of the tipping point for me, it's not in yet, but I have sourced a glazing rubber form an alternate supplier  to see if it makes a difference.


autocomman
autocomman Reader
2/11/22 9:25 p.m.

In reply to RoddyMac17 :

Yeah I'm not looking forward to the windshield or the boot glass.  Reading about the boot glass guys were putting the seal on the boot first, then feeding the glass in, so I'm gonna try that.  I'm gonna attempt the wing windows one more time with a different technique.  The headliner kit is pricey, and I've never read anything great about em.  Now that I have the material I'm gonna spend some time playing with it to see if I can glue it straight on the roof rails or if I need to add foam.  Lots to do, and yeah I'm burned out.  Gonna at least finish up the calipers tonight.  Zinc goes out Monday, also making the trip to my polishing guy in Oxnard (60 miles for me beach way) and drop off basically all the trim around the doors and windows.  Door mouldings and drip rails.  Trans kit has shipped as well, and I'll make my order for plumbing bits to finish the brakes and fuel system.  So I've finally got a plan in place and things in order.  I definitely feel better about it after getting it all out last night haha.  Allowed me to type it up and have some clarity about where I'm at with it all.  

Carl Heideman
Carl Heideman
2/12/22 10:33 a.m.

Autocommon and RoddyMac17, I know your pain.  I own two B/GTs and we restore them at Eclectic Motorworks.  The trim and especially windshield/back glass are a real problem.  We usually try to get good used stuff and have it polished and anodized as the reproduction stuff is pretty expensive and not quite right.  Sportscar Craftsmen in Colorado has a lot of used parts and may be able to help you.

The hardest part of all is putting the trim back into the front and back glass.  It takes a lot of patience and is easiest with a small flathead screwdriver and one of these plastic tools for glass installers:

I usually take 2-4 hours per screen and don't do it in one sitting.  Very frustrating.

Regarding the sail panels and headliners, we've successfully asked Moss to sell us partial kits of only the parts we need.  We also will repaint the main headliner piece with paint matched to the new vinyl.  By the way, the new sail panels are fiberglass, not cardboard, so they should last a lot longer.

autocomman
autocomman Reader
2/14/22 2:28 a.m.

In reply to Carl Heideman :

Good info.  The new trim I have is the b pillar, the side mouldings, and the front and rear windscreen.  Original vent windows, drip rails and top door mouldings.  Original tailgate glass vent windows and side windows, new windshield.  Effing aftermarket parts and fittament, yeah believe me I know.  Even simple things like the wiper escutchons we're not right.  The didn't have the edge taken off so they fit against the curve in the body work lol.  I will definitely be taking my time with the glass. We'll see how the front one goes as well, that's way down the line. And if it fights me too much I'm just going to pay somewhere to do it probably, but maybe not because I don't want it messed up. I've got to get more glazing for the vent windows, and I just disassembled the side glass to, kind of wish I didn't but since I'm going to the polisher and there's some things on the quarter glass frames I want to see if he can fix I just disassemble them. They need a new glazing anyway so I'm just in for whatever it is.  Got the wipers done this weekend, the pedal box is done and closed up, got all the zinc stuff ready to go and all of the trim separated out and ready to go. I got to say all the drip rail trim and the aluminum bits are really straight, there's only one little thing that'll have to be taken care of in the roof rail trim other than that I'm hoping they can just polish it up and re-anodize it clear and that'll be it.  I picked up that heavy card stuff for the sail panels, so I'm just going to use that. Since I have a good one still it isn't completely trashed I can use it as a template. I also kept all the vinyl I pulled off the pillars and everything else that was glued onto the car so I can cut pieces to put right back where they were.

But yeah I'm not looking forward to any other glass work. Just getting the seal in the channel on the tailgate was hard enough. Now I actually have to put the glass in it? Haha yeah right... And then there's the locking strip, and then all of the pieces of the aluminum trim that can dent or bend if you look at them funny.  I waited like 8 months to get that tailgate glass trim from Rimmer Brothers.  Good thing I didn't actually need it right away. Nobody had it in stock, and the stuff I took out was not in good shape.  Anyhoo I do have some more pics I'll post them later this week

Carl Heideman
Carl Heideman
2/14/22 11:42 a.m.

In reply to autocomman :

Regarding installing the glass, I always put the seal on the glass, install the glass/seal with the standard glass rope trick, then install the locking strip.  In recent years, I pay a glass guy to do all of that instead of doing it myself since I don't get as much practice anymore.

 After that, it's the hugely tedious job of the aluminum trim and you are right it dents if you look at if funny. I do that myself as I haven't found a glass guy patient (or stupid) enough to do it.  I'm still stupid enough to do it.

autocomman
autocomman Reader
2/16/22 2:08 a.m.

Pics as promised.  Also the brightwork.  Gonna have the aluminum polished and ceramic clear coated.  Stainless polished.  The top door moldings and wing/quarter glass frames are chrome plated brass.  Gonna re-chrome them.  There is no way around it.  The chrome is worn, and it will be the one thing you see that will divert your eye when you walk up to the car.  Oh well.  If I want top dollar, do it right do it once.  Got the zinc back in one day, haha go figure.  Gold zinc, close enough to the original which was more yellow/cad looking.  But for the turn around time and price, what eves.  Prolly lookin at a month for the bright work, thats fine.

Ordered all the bits for the plumbing, fittings, hose etc. (so much $$) All -6 push lock stuff (russel, aeromotive etc), and since I have a 37 degree flare tool I have -6 tube nuts and ferrules coming for the Nicopp line.  Brake fitting crap also to finish it all up.  Everyone seems to think these cars are bubble flare, they are DIN flare.  I need to invest in something like the eastwood flare tool.  For now, I ordered a bunch of 'bubble' flare to inverted flare adaptors.  I did this on my sprite so I could do inverted flares on the lines and never had any leaks from day one.  So thats the route im going to go here.  Im pretty sure too the line kit I got will leak with how the flares are done.  They are all pretty much inverted flare, not DIN.  I dunno why they are sold that way.  I dont want leaks, especially brake fluid leaks with all fresh paint.  Frekin DIN flare...

And finally hit a local junk yard to grab another engine harness from a 3800.  Issue is the stock harness being FWD is not long enough to be routed the way I did it.  And the ECU in the FWD car is inside the air box, so its not very far from the engine.  With my routing plenty of wires are not long enough, and to avoid splicing in colors that dont match, and having to order a ton of colors, since its getting a bulk head connector, the harness will reach that from the engine as is.  Then I have a whole fresh harness I can hack up from the ECU plug to the bulkhead connector.  All correct colors.  Shouldn't be an issue, motor was from an 04 park ave, this harness was an 03 or 04 grand prix.  And I picked up the cruise control module too.  Wiring should be a cinch, but we will see if I have room or care to deal with it once the engine compartment is repopulated.  It was like $15 so I figured why not just grab it.

And finally a rant, LKQ has bought up all the pick your parts in socal.  Ecology auto wrecking is no more, hasnt been for a while.  And LKQ has raised prices, made 50% off days 40% off days, what ever....they have always offered a warranty on parts, they ask you at the register.  Well I guess they don't ask anymore.  I got my receipt and for the 2 items a 6$ warranty fee was added to each item, 12$.  WTF, I didnt ask for a warranty, you didnt ask me if I wanted it.  The cashier said its automatic, its on the sign and she pointed to this sign in front of me.  This is where it get super shady.  It is on the sign, second paragraph, and you cant read this sign unless you have insane vision or your standing right in front of it.  Cashier said you have to tell me before I ring it up, i said you really think people are reading this??  She said I can come back and I will be refunded the warranty cost for up to 7 days.  Ok, so I can walk out and back in and get my 12$ back?  No, you have to do it tomorrow.  Then she copped attitude.  I put the stuff in my car, went back in, snapped a pic of the sign and talked to the manager.  He was cool, said this is all from cooperate and he would refund me the 12$  He had to refund the whole purchase which would take a few days to be processed (normal credit card stuff) and recharge me correctly.  I was fine with this.  but WTF LKQ???  Shady BS, seriously.  Charge me with out asking me, and tell me oh its on the sign right in front of you.  By the time you show the cashier your parts, shes rung it up, your going to pay and then you read the sign...which you have to read most of to get this particular detail, by the time you read it the transaction is done.  And then your screwed?  I gotta come back the next day?  Eff that.  Raise prices, close locations, 40% off days, ok, I get it...cost of things goes up, but this is shady as f**k

And now, pics

autocomman
autocomman Reader
2/21/22 12:36 a.m.

Made some kinda progress this weekend.  Trans rebuilt.  Not my first T5, but this one did fight me more than the last one I did.  Used every inch of the harbor freight press, and had to pick up a bearing splitter (didnt have one for some reason haha)  but it went together well.  Hanlon motorsport was where I got the kit.  i ordered parts from them years ago and was happy with the stuff so I figured Id just source it from em again.  End play on the counter shaft .0005 and on the mainshaft .0015, no complaints there its right on the money.  No issues going together either.  Case I wish came out cleaner, but im done scrubbing parts, you wont see this from the top, and it will still be clean from the bottom.  There is no grease left on it.

Clutch, and flywheel look good as does the hydro release bearing setup.  The pilot bearing is wrong, go figure.  For what ever reason they give you a large bearing and it takes a small bushing.  I dunno wtf, I feel like the 3800 4th gen camaro is a hodge podge of what they still had available.  Which is kind of is, buick 3800 right off the FWD assembly line with a different intake.  Anyway, gotta order a new  pilot bushing.  

Also ordered some super sweet DEI tunnel shield stuff in november from amazon.  Got the box and went, that seems small, didnt think about it and tossed it with the rest of the parts.  Well, opened it up today and its not a heat shield, its 12 20" 15lb gas struts.  Oiy, got in a chat with Amazon and even though I was out of the return window they handled it and told me to discard or donate the struts.  Told em i have no issues sending em back but they dont care.  They actually cost more than the heat shield.  What ever.

I broke down and ordered a proper brake flaring tool.  Gotta redo all the flares in the system.  The kit I ordered had inverted flares as any other car would.  Which is dumb cause it was for this car, and this car has bubble flares.  So i need to remove all the lines and do this crap over, awesome.  No leaks!!

Goal is engine in the car in 2 weeks, running in a month.  engine can be in in 2 weeks time, but running? I dunno.  If things start to go smoothly maybe.  Friday night I went looking for my 10-32 tap to install the hood secondary latch.  I used this tap not 6 days previous, and it was on the work bench.  Well after 3 hours I gave up and called it a night.  Defeated, depressed and just over it.  Saturday I started the trans rebuild, went ok.  Sunday, today I was bolting the bell housing on and dropped one of the bolts.  This isnt a small bolt.  Couldnt find it, wtf...what ever Ill find it when I do a deep clean of the work area.  Well my vacuum lives under the bench about half way in, small shop vac with the tools sticking straight up.  Looked right down at it and hey, there is the bolt, sweet.  Pulled the wand off the vacuum to get the bolt and there is the tap siting on the leg of the vacuum.  Eff me, I just put my head down and laughed.  Finally....progress

Lastly, the fabric colors that will be in the car.  From left to right, the Autum leaf that is on the seats and door carts.  Chestnut for the B pillars, capping rails, sail panels and the 4 roof rails.  Lastly, caramel suede for the headliner


autocomman
autocomman Reader
2/24/22 1:40 a.m.

Well, new pilot bushing is in.  Im pretty sure if I cut the sleeve off the bearing that came with the clutch it would go right in.  But I dont know who made that bearing....so the bushing will be used.  Started on the fuel lines....and well right off the bat there is an issue at the tank.  The rib in the floor is in the way so I cant get the fitting on.  This is the return side, so i will just use an NPT with the push lock on it.  The disconnect will be at a bulkhead in the trunk area.  I also need a new more fittings to deal with the fuel filter location to avoid crazy bends and sloppy hose arrangement.

Brakes lines are done.  Came out pretty decent.  Broke down and got a proper flaring tool.  Had to pull off all the lines and redid everything with bubble flares.  Hopefully I wont have any leaks.  The lines cross over where the come up the firewall, getting that to sit nice, oof.  But im happy with it.

And finally Ive got a bunch of bits out at chrome and polishing.  I need to get some new screws for the 1/4 window frames and the rear window frames.  #2 sheet metal screws and #6-32, both 1/4 inch lol.  Tiny bastards.


Flare on the right is the proper one


autocomman
autocomman Reader
3/4/22 1:29 a.m.

Heat shall not pass.  DEI tunnel shield FTW.  Engine goes in this weekend, woot!!


84FSP
84FSP UltraDork
3/4/22 8:23 a.m.

Wow that looks really cleanly done sir.  The heatshield should really make a huge difference.

autocomman
autocomman Reader
3/7/22 12:18 a.m.

Well as always 3 steps forward 2 steps back.  Engine is in, went in with little issue with help from a buddy.  But as always when you take something completely apart it doesnt always go back together as intended.  Since clearances on this were tight in a few areas I guess im not surprised.  Frustrated though I wont lie.  I thought I had made enough clearance in these few areas...

Problem 1, the back of the engine where the coolant crossover cover is on the intake manifold.   I notched the firewall to make room for it, but didnt notch it far enough over.  So one of the bolts is well, probably gonna be kissing the firewall.  To add to that issue, problem 2, the clearance between the rack and the dampner, not great.  I swear I had more room, not much but enough...guess not.  Its just to close for me to be ok with.  I think these issues are from doing all the work with worn subframe bushings.  The bushings locate the subframe.  The clearance between one of the blower belt idlers and the inner fender, not enough.  And lastly and probably the worst, the clearance between the oil filter relocation plate and the subframe, which I did make room for, but 1 inch wont be enough for 3/8 NPT to -8 fittings.


Solutions. 

Remove subframe and notch for the oil filter fittings. 

Next solution, smaller idler pulley for the blower belt. 

Finally the stereing rack/damper/rear bolt/firewall issue.  Engines move, everywhere.  Left, right, up, down, forward, backward.  Dont believe me?  Go drive an astro van with the dog house off.  2 solutions.  Drill a hole in the firewall to clearance the bolt.  This would also allow me to access the bolt to remove it if need be.  This wont be an issue because this would be in the cavity where the heater box originally sat.  This is just getting a flat cover on it, and the passengers compartment holes are getting sealed up anyway.  Then split the difference between what space is left and the steering rack and see how it all works out after some drives.  Second option, move the steering rack forward about 1/2 inch and just center the motor up in the remaining space.  This is what im going to be doing.  Ive read about some guys who complain about bump steer being a possibility here.  I doubt that will be an issue for a few reasons.  1, suspension height is stock, car shouldnt be any heavier in the nose.  2, while moving it forward Im keeping it approx the same height.  If I just redrill holes in the brackets to move ot forward 1/2 inch it will naturally move down because of the angle of the brackets.  But I also wont have anything to bolt the lower bolts into if I do that.  So, 1/4" flat bar bolted to the stock holes, and drill new holes 1/2 farther down should keep me roughly in the right area.  I should have enough movement in the steering shaft/column to do this no problem.  Some counter sunk hardware on the bolt that will be under the rack and its done and done, should be easy actually.  Then I shouldn't have to drill the firewall.  Lastly on the coolant cover, I can change the standard flanged bolt for a button head allen to give me another 1/8" or so.  I think in the end we will all be good.  But still, I hated having to pull that subframe back out.  Feels like even with the engine in, im no further ahead that I was when it was still sitting on the stand.


maschinenbau
maschinenbau GRM+ Memberand UltraDork
3/7/22 8:46 a.m.

Wow, really high quality work. I'm learning a lot here, so I have some questions. What kind of brake/fuel line clamps are those? I like how they tuck really close to the body. What is the plating process like? You just ship them a box and pay by part count, weight, etc? And roughly what did all that cost? Does the DEI heat shielding just stick on with adhesive?

autocomman
autocomman Reader
3/7/22 11:26 a.m.

The clamps are from McMaster Carr, just steel clamps with a plastic coating.  The ones holding the fuel lines together at the tank (2 lines in one clamp) are from Fastenal.  I bought those years ago for another project and had some left over.  The ones on the body under the car are factory originals.

Heat shield is adhesive, and it's never coming off.  If you stuck it on a painted surface and had to remove it I'd worry about pulling the paint off the car.  It's definitely stuck.

The plating can be different depending on where ya go.  Some places it's remove from the car and just drop it off.  Place I went to wanted it clean, no paint no dirt as best as I could.  But definitely no paint.  Some places price it by weight, size, but not so much qty because you'll find people like me will sometimes just drop off a bucket of bolts, literally.  The place I went to the guy looked in the box....eh, 75$ it will be a few days lol.  Next day it was done, this is not the usual haha.  Some places will put you in a que for a few weeks.  All depends.  If call around to get the info on it.  I'm in LA, so there are a few places in driving distance for most things.

obsolete
obsolete GRM+ Memberand HalfDork
3/7/22 12:36 p.m.

From what I understand based on all the reading on front suspension geometry I've been doing lately while trying to figure out a rack and pinion swap on my car, with a front-steer rack like you have on the MGB, if you move it farther forward, you will lose some Ackermann. Whether it will be enough to matter, I couldn't tell you.

autocomman
autocomman Reader
3/7/22 3:56 p.m.

In reply to obsolete :

You are correct....more I've been reading moving the rack forward will cause Ackerman issues.  Now I'm doing it minimaly, maybe 1/2 inch, but we all know that can still have great effects.  Ideally I will measure the toe changes when I'm done.  The fix is bending the steering arms.  Crazy I know, but this has been common practice in the MG world for a long time and I've nlhave not heard or read about anyone having issues.  Bending isn't done with heat, it's done in a press.  So there is a solution.  Bump steer is am issue too if I get the angle of the tie rods wrong.  So the subframe will end up back in the car, front springs changed for the new ones to correct the height and we will see where I'm at.  I hate doing any of this, but I don't wanna deal with the engine smacking things once it's all completely together. 

autocomman
autocomman Reader
3/9/22 1:59 a.m.

After another $$ trip to earls and digging through the fittings box I can make this work.  Couldn't just use 90s into the block because they are so close together you cant install just 2 90s.  Youd have to do a straight and a 90 push lock as well as a 90 fitting.  So a brass 3/8 NPT 90 then 3/8 to -8 fittings.  Also there is a reason you check and recheck after cutting things.  If I welded this all back up then id be just as screwed.  Ill be cutting more of the subframe to make sure I can put the fittings in when its all installed.  None of this remove subframe raise engine (which it wont go by much) to remove fittings crap.   The holes in the plate are also really close together so it will only assemble one way here.

Oil filter will live between the radiator and the motor on the frame rail, or further forward on the outside of the frame rail in the fender.  Not sure yet.  Need to get the radiator mounted and the sway bar as those will be the 2 interfering factors.  


Sticks out too far


Just right


Gotta cut more


Chrissmith
Chrissmith New Reader
3/9/22 5:13 a.m.

Following, sounds FUN!!!

autocomman
autocomman Reader
3/14/22 1:45 a.m.

Ok, subframe modified.  I cant remove any more, thats as good as it gets.  And after some plumbing legos, I found a combo that can be installed and removed with the engine in the car.  I have to fit the compressor and the belt to finalize things but thats it.  Front springs swapped out for new ones.  Hole drilled to clearance the coolant crossover cover bolt in the back of the engine.  i had a straight shot thank god.  12 inch 3/16 drill bit, took 3 holes to hit the bolt dead on center for a pilot hole.  Then my dad had a 12" extension with a hex that fit the hole saw perfectly.  1 inch hole, done and done.  Ill put a little paint around the edge and thats it.  The holes i went through inside the car will have the original vent plates put back on and sealed closed.

I feel like even though everything is mounted and done with that, ive still taken 2 more steps back.  Partly my fault of course.  I had the radiator and mounts done, before I cut the nose off the replace the sheet metal in the front.  Well, its really close with the new nose metal, but its just far enough off it dropped the radiator bout 3/8 of an inch, and one of the fans is sitting on the drivers frame rail, yeah there are 2, just over 2000 CFM with these spal 11" paddle blades.  So I have to make new brackets.  Shouldnt be a huge deal, but still.

And the driveshaft, dont have one yet.  Just got the yoke this weekend.  Wont go in the trans.  Im pretty sure I mushroomed the tailshaft bushing when I put it in, which would be weird cause I think I pressed it in, not pounded.  But it will not go.  So to avoid pulling the tailshaft housing, which I cannot do with the trans in the car, which means pulling the whole drivetrain back out...Im gonna get the tool to pull and replace the tailshaft bushing in a T5, which is another $100.  Id rather spend that than risk damaging paint and or body pulling the engine again.  And finally the $35 shifter I bought.  Its a $35 shifter.  I already know even after spending a ton of time modding this one to make it work, its not great.  The ball is a hair too big and binds in the nylon cup at the shift linkage, thats honestly the biggest issue.  So its not self centering and stays to the left or right when you move it in neutral.  not bueno.  A pro 5.0 is 165, used ones if you can find em are around 100 for one of these or a steeda, and honestly I dont wanna pay 100 for a used shifter that may be worn.  Ill just buy a new one.

I had to step away from this again this weekend and reset myself.  I got done what I needed/wanted to get done, engine and trans mounted, oil fittings clearanced.  I have to keep moving forward, and just slow my roll.  Breathe.  Goal #1, get it running, do not go backwards with anything temporary to do that.  Get it right.  Its just, eergh.  At least the more people I talk to think the number I want for the car isnt that crazy with the market the way it is.  Either way when its done Im gonna spend some time with it seeing how much attention I can get with it.  Im still excited, but oiy is it trying my patience.  These issues are all the issues I kinda set myself up for.  It doesnt help Im backed up pretty bad with regular work.  My company Wingnut Wiring has taken off, im booked out at least 4-5 months pretty easy right now.  A great problem to have, but its hard to keep straight sometimes.  I wanna help everyone, its hard to say no you have to wait to regular clients when there is no way I can get down to them to help with a 1 day project I know I can knock out easily...but again, a good problem to have.  Anywho, a few pics...


JoeTR6
JoeTR6 Dork
3/14/22 12:40 p.m.

Ah, but just think about how far you've come from staring at rusty, bent metal.  It's really coming together now.  This thing is going to be a blast to drive.

autocomman
autocomman Reader
3/17/22 2:14 a.m.

Well walked away from it for a few days and came back to it with a clean mind knowing what Id need to do.  So radiator mounts remade.  Raised the radiator up a bit and fan clearance is good now.  Adding a couple of extra supports to help stability.  Then ill remove, clean em up and paint em.  

Next the oil filter relocation.  Got the lines on the one end, and put the belt on temporarily so I could see the clearance, and well...yeah.  Gonna have to make a belt guard to be sure the belt doesn't hit the oil lines.  But the filter location is good.  Gotta clean this one up, its one my buddy had lying around.  And gotta pick up a few more fittings.

Throttle cable on.  Its a 30$ ebay special.  I cant stomach the 90+$ for a lokar cable.  They are nice, but seriously.  This one looks almost like a lokar.  There is some weirdness on how it was crimped, not amazing but what ever it will be fine.  Moves nice and smooth and it had the bit to put in the throttle spool.  But there is a bit of a geo-metri issue.  Not enough throw on the pedal, and with it adjusted how it is it will only fo about 3/4 throttle and the pedal is almost the same height as the brake.  Sooooo I need to extend the part where the cable attaches, and probably redrill the hole, or angle the cable by making a slash cut spacer to compensate for the extra length on the pedal.  But that should be an easy one to fix.

Aside from that, need to finish up the fuel lines at the rail.  Need to get some good sanding belts too so I can finish surfacing the intake tube, and the exhaust manifolds.  I want those bolted on when I fire it up.


metty
metty Reader
3/17/22 11:25 a.m.

looking great man! 

i am in the early stages of doing a 1970 MGB-GT myself, i have a free LNF/AR5 that will probably be stage 2...

what HVAC box did you use? i saw you mention vintage air early on but i didnt see a PN or anything.

i am thinking about cutting out the factory heater box on mine an putting something like this in the middle underneath, then ducting to the defrost vents 

https://www.ebay.com/itm/254629202758?_trkparms=ispr%3D1&hash=item3b49154b46:g:AQoAAOSwItZhaOTC&amdata=enc%3AAQAGAAACoPYe5NmHp%252B2JMhMi7yxGiTJkPrKr5t53CooMSQt2orsSg3Ye8yTWgOW7pmE1t838dsZ9M%252BQK1VrjpB6CjZLIyz3hqzA0wo3sDhNiVRXuCZMdRH33plo6aEj8K2c9imufqZNry1uogBRGhmowxPjOn4wOTzmXu9dDRNJELs96JuycEKWHG66V%252BMytX%252FwIr1qhrMg51fx82HfKHFzYTiCuuIyObbfMgluuBgZENGXhQb9ChEV9nCTGL%252BHKnDvgTaHdd3dzX2BrmObg0pyi3nET16yQLBbWEFs4zdc8pD2Ar5oT10DuuHEypmoeL0GGoFXx13iLeQi1SknvYuUl6n4yb9mW2L6gBVgsYx07CPK92iIMjrrmH8FE9dz2WmdY4gNOPl56HEZVboexBOBn1jXFhjTvX%252BZ3uE%252BmVM7%252BXBeXWQbnRyiOKDksNSslTcQOWPp1L4Owa1nvAe6iZrsD12LD6sw5qrzAdT5w3xO5kmQTNOYDK39vSdgqUx6dvvo334Dpyw%252Ff1Ggm7hwQlx1Wbdn9F0S%252FMIOppZhCAEedSig4OEVDOIs3IHkwgDBaUe8BMVooLoXvJEkTKZ4gptcX5YNOnQMleh0VoaruudPjOtQZ%252BMjhsY%252FN0e5Ih4DERrY%252FLKggdL01st2QdpGjtoR1LXatHL9iYwmjPXwsTDpWUcT%252FJfnsUY6A2aErZ2VEbTxC85g1jAVievrUhfVPuCLjs9DQ1vvv5KuEWc8O9gj27FR072wWVjFbs2%252BJvr5QB%252FVC6t2w42GtxR09ypRiGGWUw6n9OxlJ6y8hRvJnWCLng%252BDTA6kX1FUi%252B0MHUhPRxdcudpZYpMpDtX%252BopC7CK%252FQclI89GdYEZtINzyo6rYCszwLSf%252B4F8aek7inYZvyOhOLR8CDs4g%253D%253D%7Cclp%3A2334524%7Ctkp%3ABFBMiJ3z-fJf


1 ... 4 5 6 7 8

You'll need to log in to post.

Our Preferred Partners
Qxk3P3Ir3wrgEOwcu6vs4EkeigckVXl64F4JgnHwVYJtQ935cB9mGc0vR1Jf5yub