1 ... 20 21 22 23
CrookedRacer
CrookedRacer Reader
10/4/20 3:38 p.m.

Not a problem per se, but I want to know how the oil temps will be during break-in. So I modified a spare oil plug with my new oil temp sensor.

I bought a 1/8" NPT tap and a reamer tool. I've never tapped pipe thread but this really worked out well.

While ordering the sensor online, I was a little confused about what sort of connector goes on this sensor. In case you were wondering:

I used a little teflon tape on the pipe threads, but only one wrap because it needs electrical continuity to ground. I checked that there was zero resistance using a meter.

I swapped the plugs without draining the oil. It was like the tablecloth trick in the Ghostbusters hotel ballroom scene. Almost as messy too. But it meant I preserved the $20 worth of break-in additive that was already in there.

Next I will run a wire to the signal connection on the oil temp gauge.

CrookedRacer
CrookedRacer Reader
10/13/20 7:38 p.m.

On Saturday, October 10, I did some fuel management ground work.

The fuel pump is wired in the stock configuration. This means the fuel pump comes on when the starter is turning and when the engine is running. If the engine stops, the DME cuts the fuel pump off.

I wired a switch in to override the DME so that I can turn on the fuel pump at any time, if I want to be sure it's working or if I want to pump the fuel out of the tank, which is what I wanted to do in this case.

I popped the end cap off the fuel rail and ran a hose to a fuel jug, and switched on the fuel pump. It emptied the tank pretty quickly. There were about 3 gallons of fairly yellow gas in there. I programmed the Holley fuel gauge in manual mode, letting it know that it was in the "empty" state.

Then I bought fifteen gallons of 93 octane and put it in there, along with some other gas I had around. 21 gallons total. I started filling it gallon-by-gallon to see when the OEM low-fuel level sensor's idiot light would turn off:

It didn't turn off after adding the third gallon. I went to fill a fourth, and when I came back it was off. So I guess my fuel-remaining when the light comes on is somewhere between 2 and 3 gallons.

I filled the tank the rest of the way and programmed the gauge to its "full" level. The low-fuel warning light in the gauge itself is programmable. You can set it anywhere on the dial.

Does anyone have any clever ideas for where I should set the programmable one? From a race / fuel management perspective?

Here's a pic of the fuel being pumped out. It had a LOT of air bubbles in it but I think it was being introduced right there through the threads where I pushed the tubing on. I want to get a proper fitting for that so I can do this with more confidence and less mess.


Then today I made a lot of progress.

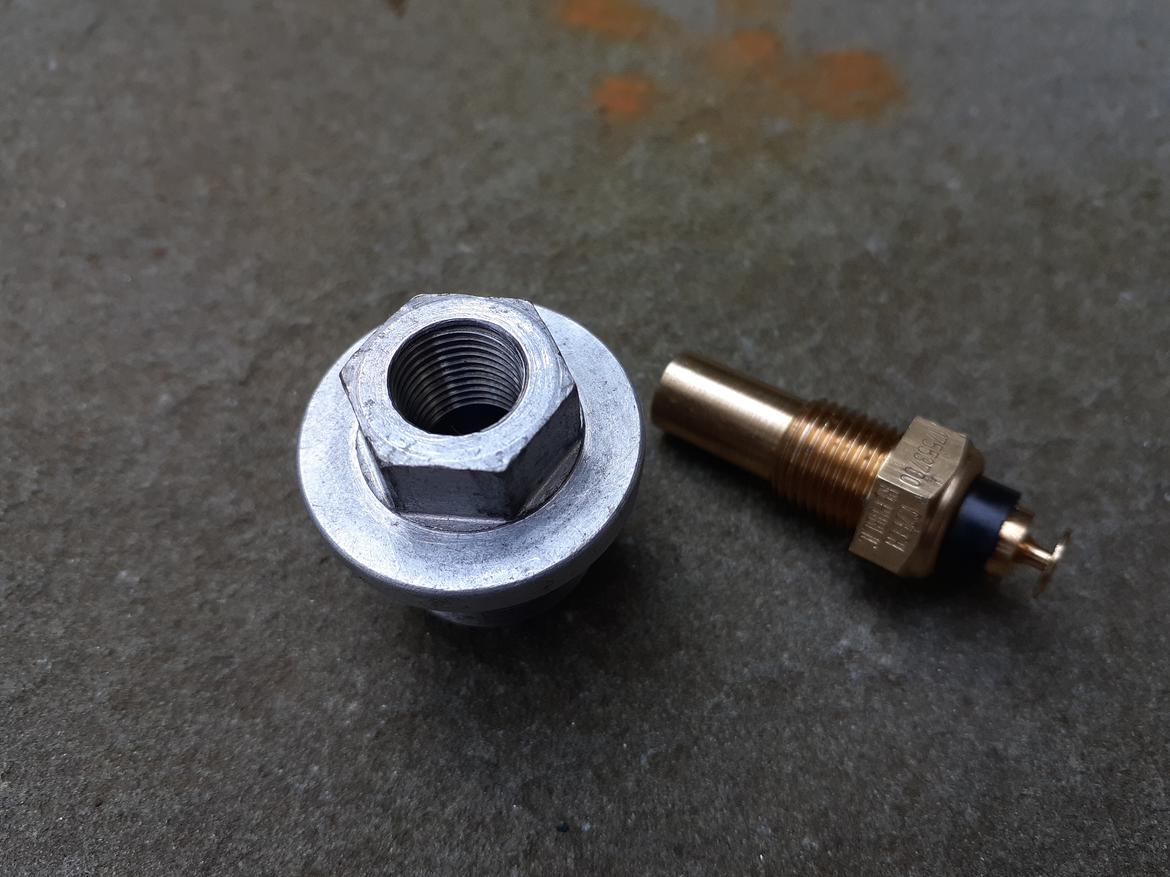
I ran a wire from the oil temperature gauge to the oil temperature sensor. And I permanently installed the fuel pump bypass switch on the console panel.

I connected the power to the MYLAPS transponder. It complained, because my subscription is inactive, but it's done and it did what the manual said it would do. The transponder itself started blinking, so power's getting down there, I guess.

Unfortunately as I was stripping the transponder wire's jacket, I must have been using the wiper switch body for leverage, and I broke something on it. It's wobbly now and I don't trust it. So I have another on order.

I dressed about half the wires behind the dash. All are connected at this time, so it's now just a matter of dressing the rest.

I tested the fans by jumping the connection at the thermofan switch, and somehow I got them wrong. Jumping the slow speed made the fans run fast, and vice versa.

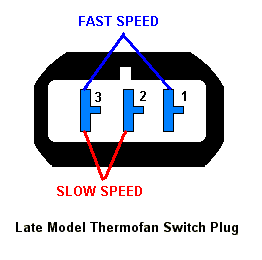
It was easiest to swap the wires at the fuse/relay panel's terminal block, and now they operate properly. The slow and fast fan speeds seem OK to me. I didn't do any RPM estimates based on pitch or anything. I just figured the slow speed sounded pretty reasonable, and I'm happy that they both work! After running the slow speed for a while, I couldn't even detect any elevation in temperature in the power resistors. So it seems to be a pretty happy/relaxed/balanced system.

I fashioned some makeshift grommets in a couple spots on the firewall. That is, I took short pieces of the split-loom and double-wrapped the wires where they pass through from the cabin to the battery compartment. It's not perfect but it should protect the wires from the metal quite well.

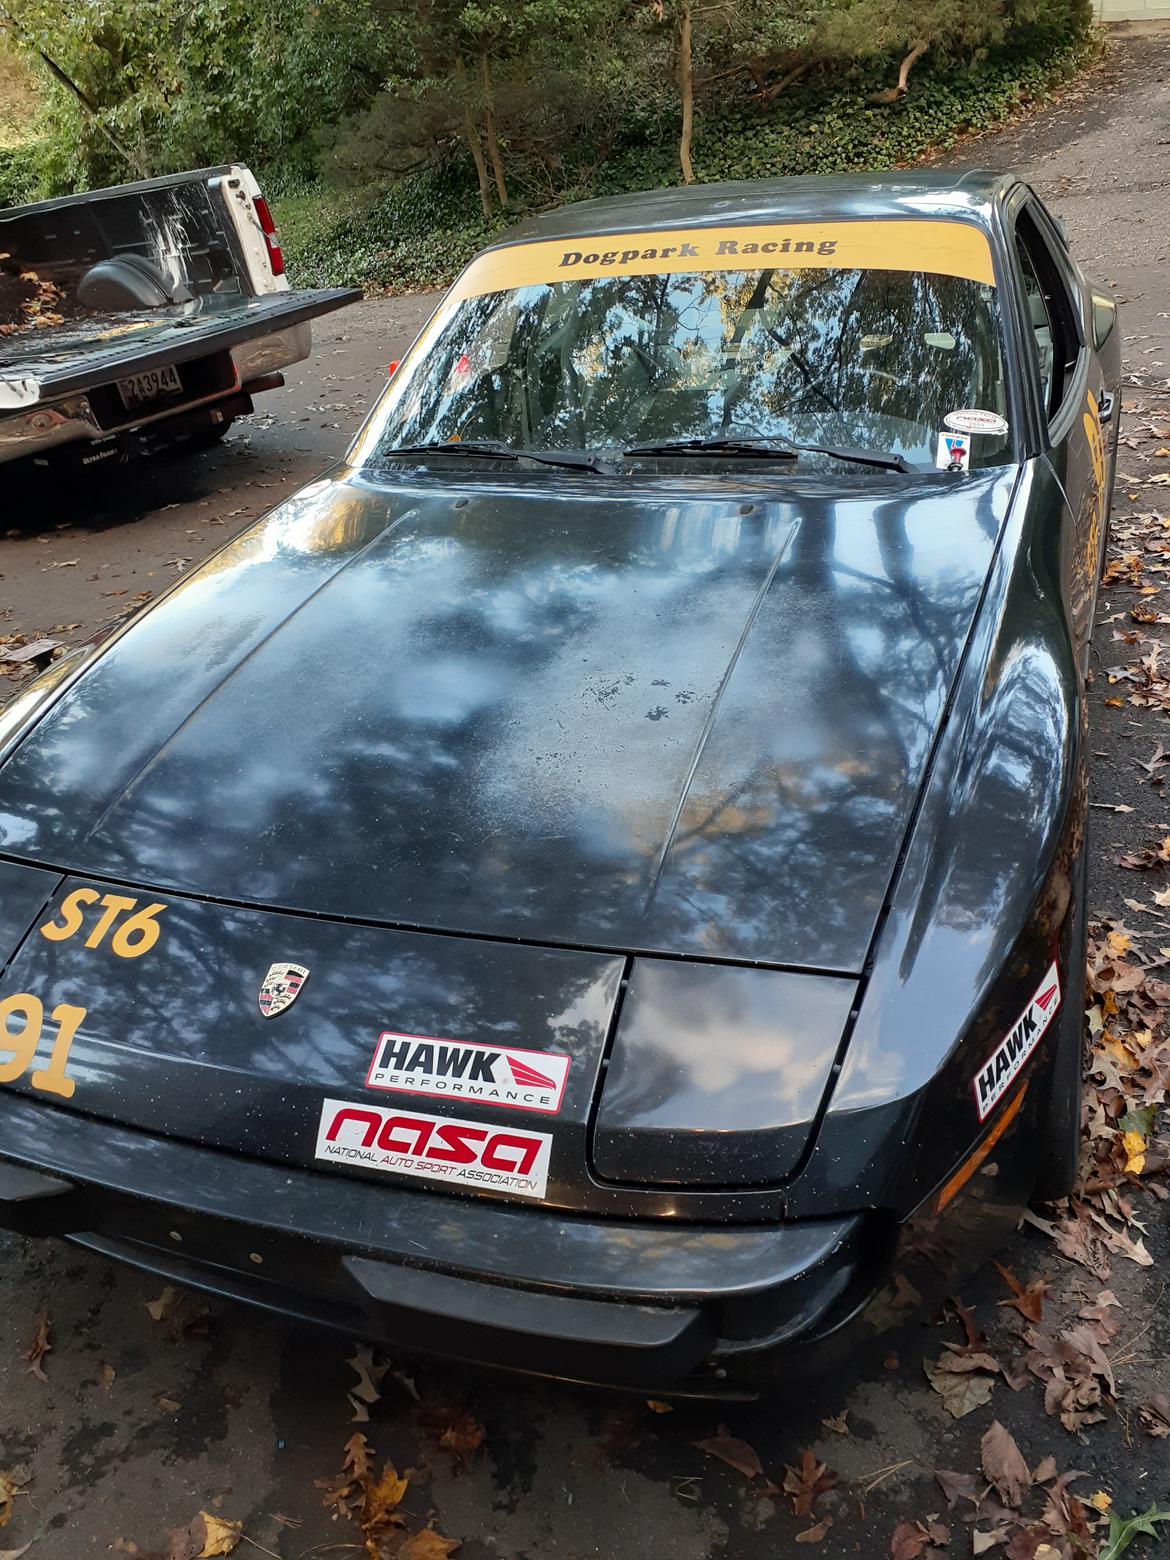
So there's not much left to do! I put wheels on and I put the seat back into the car. I started it up, took it off the stands, and ripped around the neighborhood for a bit, waving to everybody as I went. Everything works!

A minor complaint:  ALL the new gauges have various amounts of condensation inside the crystal. I'm hoping that will just work itself out.

The car is so LOUD! The tires aren't round from sitting, they're covered with stones and OPR, the camber makes it super darty on the crowned pavement in my neighborhood, and everything makes more noise than I remember. Drivetrain, tires, suspension links, etc. Everything is just super noisy. I'll have to get used to it I guess.

But the success of the test drive gave me the confidence to sign up for the last event of the year:  NASA Mid Atlantic Region's Fall Finale! I'm going to do Time Trials, because it looks like I'll get several stints on track to shake down the car, and I want to verify my transponder actually works the way it's wired in there.


SpeedTheory
SpeedTheory GRM+ Memberand Reader
10/14/20 9:31 p.m.

It would be great if we could get one more to show up then so contingency pays.

EDIT: Yes, I am peak lurker. 

CrookedRacer
CrookedRacer Reader
10/15/20 7:24 p.m.
SpeedTheory said:

It would be great if we could get one more to show up then so contingency pays.

EDIT: Yes, I am peak lurker. 

Indeed. Except I'm usually one of the ones just padding out the class so someone else can collect the goodies.

This will be my first time trials! I kind of skipped that step on my progression to racer. You'll have to show me the ropes.

Today, I installed the AeroCatch hood pins that I bought (I checked) in JUNE 2017! They've been laying around for more than three years while I fuss with engine after engine after engine. It's nice to get around to something like this.

I started with a piece of stock steel, giving it two bends, and screwing it down to the frame rail where the pop-up headlight assembly used to attach to it. The frame rail has two convenient floating M6 captured nuts for the job. Perfect.

Then a lighter piece of steel to keep those standoffs from twisting or bending...

After tack welding it in place, I took it out and welded it all up. I channeled my inner Binky and added a CAPTURED NUT to the underside of each BRACKET.. Here I'm about ready to put some ugly welds on this here nut.

Never underestimate how well a grinder and some paint will hide all your welding sins!

Once I had the pins bolted down and lined up with a small pilot hole in the center, I cut out the actual shape of the catches. I also sprayed some primer into a little cup and brushed it onto any exposed metal.

Nice. The captured nuts in the frame rail had plenty of side-to-side float, and I filed the holes into ovals in the forward-to-back direction for some slop in that axis. Once everything was lined up, I drilled the six outer screw holes and assembled the latches in place. I'll get a picture of it tomorrow.

I put an appropriate amount of the bumper tubing around the red pins, and now it's all done. However, I still need to figure out how I'm going to deal with the stock hood release. For now, I'm going to leave the secondary safety catch in place. When the car goes on another diet, I'll cut that out of the front clip altogether. I removed the stock spring pin that actually gets captured by the stock hood latch, but I think as long as the latch is there, I want that spring to open the hood a crack when I release the hood pins. So I'll be putting the spring pin back in, but I'll remove the latch/capture mechanism under it, as well as the pull cable that goes to the driver's kick panel. I like the belt and suspenders solution, but do most people go with just hood pins and nothing else?

CrookedRacer
CrookedRacer Reader
10/17/20 10:06 a.m.

HOOD PINS DONE

So here they are installed on the car!

I had a scare though: A commenter on another forum contends they should be installed the other way around so that the smaller end is forward. Something about the wind being more likely to blow the lever open if it ever popped open or was left open.

There's nothing like cutting holes in your hood only to find it was done completely wrong. But I've seen them installed every which way. And I'm fine with it. If your hood pins aren't fastened down before you get out on track, you have problems no matter which way the wind is blowing.

So then I addressed the OEM latch. I removed the cable and the spring-loaded latch underneath the guide/spring pin. Basically, the more gold-colored bit inside the round hole in the photo below had to go.


And cleaned up and greased the area just for good measure.

I hate it when my phone camera focuses on the wrong stuff.

A couple more pics of the hood pin brackets in their final location and configuration:

Time Trials on Halloween

I'm going to shake down the new engine and wiring on Halloween at NASA Mid Atlantic's Fall Finale. There are SIX TT6 cars now signed up so contingency may be in play.

Next: PAINT?

Now I really want to paint the car. The beautiousness of the hood pins are lost in the mire of failed clearcoat. And that hood needs a HUGE vinyl paw print across it.

I'm thinking of approaching some local body shops for quotes on some basic single-stage black paint. And basic prep work. There is one small dent in the right rear quarter that appeared while I was reinstalling the engine. I suspect a delivery truck backed into it while it was on the jack stands.

I wonder if anyone has any tips on how best to talk to these guys to work out the best deal for everyone involved?

2Girlsracing
2Girlsracing New Reader
10/18/20 5:55 a.m.

Nothing worse than sitting in the starting lane all strapped in with hans device etc and noticing the hood pins aren't latched!! Don't ask how i know!!!

jh36
jh36 Reader
10/18/20 7:32 a.m.

In reply to CrookedRacer :

Looks great John. I really like the hood latch. I will be at SP for Halloween also helping Jim sort out his BMW. See ya there!  

stylngle2003
stylngle2003 GRM+ Memberand Reader
10/20/20 9:39 a.m.

Just read this start to finish.  Awesome build, thanks for sharing.  I was at dominion sunday for a TrackCross.  Good luck at the next event.

TED_fiestaHP
TED_fiestaHP HalfDork
10/20/20 11:03 a.m.

    You might consider the single stage paint that summit is selling, fairly cheap and somewhat easy to use.  For a track car, home paint is typically good enough, and if you do the paint, then you can always do touch  up and stuff.

CrookedRacer
CrookedRacer Reader
11/1/20 7:49 p.m.

Well, I got the car all together in time for the NASA Mid Atlantic Fall Finale. Ready to roll out!

It had been a year and a half since I had driven on track, and the Time Trial (TT) format was the almost-perfect re-introduction. Almost.

It would have been perfect, but our run group's first practice sessions each day occurred AFTER the first timed session of the day. So I got maybe 2 laps in before I had to manage a couple dozen TTU, TT1, TT2, TT3, TT4, and eventually TT5 and TT6 cars as they were aggressively lapping my slow behind.

The mornings were cold and damp and there was no grip at all. The afternoons warmed up a bit, but it took most of the weekend to find my groove again. 


Icy cold.

On the first day, I drove in fear. Fear that my car would blow up, short out, spin out, break down, or otherwise behave badly. I think I managed a pitiful 1:41 lap time on the timed sessions. But that's ok. This was a shakedown weekend, and I had to keep telling myself that. Plus, I had that full tank of gas to burn off. This car holds 21.5 gallons!!!

GRM Reader "jh36" came to the track to help fellow ST6 driver "jimgood" work out some issues with his suspension and handling on his BMW. They made some improvements on Saturday, and Jim was really improving as a result. jh36 offered to drive my car on Sunday, just to see if its setup could be improved. He's got a lot of experience with 944's, with my kind of suspension bits, on this track. I looked forward to that.

He did notice that my driver's front wheel appeared to have more camber than the passenger side. Looking into it, I discovered two issues. The wheel bearing was a bit loose, so I re-packed the outer bearing with grease and put it back in and adjusted it. No more play there.

Issue 2 was the strut-to-knuckle connection (eccentric bolts). I was able to tighten them substantially and the two fixes seemed to eliminate the extra negative camber. jimgood measured it and it seemed pretty even after that. I went out for one more session but I didn't notice a huge difference. Maybe it felt a little less "twitchy"

On the second day, I started to drive it in anger. In a good way. In the first session, I did a better job with just about everything. I felt a lot more confidence in the grip for some reason. I got down to a 1.33 or so. Much better. Then jh36 took it out for a session, and when he came back in, he basically said it was pretty much perfect in balance and behavior. He had no improvements to offer. Chef's kiss.

Now, that made me feel pretty good, but if I hadn't just done a much improved time within a second or two of jh36's times, I think I would have been discouraged about my driving skills.

I still think there is a lot more time out there, both in my driving and in the car, which isn't near its potential in ST6/TT6.

Overall, I was happy to bring the car home in one piece. The car did all the things right, and the gauges were nominal all weekend long. I'm really tickled about that.

I want to thank jh36, jimgood, SpeedTheory, TT Director Scott Blair, Region Director Chris Cobetto, Event Director Jon Felton, and everyone at NASA Mid Atlantic for helping me, encouraging me, and for putting on a great event.

Commence winter improvements!

jh36
jh36 Reader
11/2/20 5:48 a.m.

In reply to CrookedRacer :

Hey John, that was a fantastic weekend, and I plan to show off my new found kielbasa grilling techniques soon!  Your car is fantastic...with fresh tires, you are going to be a top runner in MA ST6. The car feels as good as any 944 I've driven from a balance point of view, and your engine build was perfect. Ergonomics in the cockpit were fantastic and your dash layout logic was intuitive to a first time driver. 
2021 should be fun!  Thanks for letting me play in your sandbox this weekend!

JoeTR6
JoeTR6 Dork
11/2/20 7:16 a.m.

The car's looking great.  Glad you had a good shakedown test and can start tweaking and enjoying it.

SpeedTheory
SpeedTheory GRM+ Memberand Reader
11/4/20 7:03 p.m.

Good hanging out! Maybe some day I'll finish a weekend without issue :).

Now up to you guys to convince me to move from TT to ST...or both :). 


AxeHealey
AxeHealey GRM+ Memberand Dork
11/5/20 9:03 a.m.

Glad to see it back out there!

jimgood
jimgood New Reader
11/6/20 3:46 p.m.

John, all you need is seat time and new tires. Let's hope next year is better than this one!

Mikelly
Mikelly New Reader
11/6/20 8:05 p.m.

John Your car isn't as heavy as You may have thought.  6.2# per gallon, if you registered at 3/4 tank, let's say it was 2690.  Reduce it by 15 gallons at the end of the session/scale reading and you're well into a 2620-2630 range.  Swap that glass hatch and the batter with the one I told you about and you're down 40 more pounds minimum.  You'll get there, along with new tires!!

Mike

SpeedTheory
SpeedTheory GRM+ Memberand Reader
11/7/20 3:15 p.m.

So, hate to jump on this thread for this (and I'll make my own soon for all of my projects), but hypothetically, would we have enough to make 5 folks regularly in Mid Atlantic ST6 next year? Somewhat fixed budget here, and waffling between the expense of having a cage built for the car (and all the other little stuff to make it legal for ST6) versus optimizing it as a TT6 car a bit more (I have a maybe 50-60% prepped TT6 car now). With no desire to take a light boy Miata to Daytona for Nats, the money that would have gone to that will now be going to one of those two things...and since I see all the active folks posting in here...:). 

CrookedRacer
CrookedRacer Reader
11/10/20 4:18 p.m.

Yeah it was a great weekend, and it was fun to see you all in person and to drive IRL (in real life). I've been sim racing all summer, and I'll admit that may have contributed to my delayed return.

As far as ST6 futures, I really don't have a forecast for you. I'll be sad if I'm one of two or three cars. I suppose I will just have fun with my car as long as there's somewhere for me to race it.

Yesterday I got the car off the trailer, backed it up the driveway and put on its winter shoes (some old Nitto NT01's from 2011). I also put in anti-freeze for the winter, so it's pretty much ready for winter.

And as I started the car up I couldn't put it in gear. Or to be more accurate, I couldn't get it out of gear. No matter where I put the shift lever, the car seemed to be in gear. Even where it felt neutral.

So I think somewhere in the process of backing up the hill, rolling to its spot in front of the garage, and changing all four tires, the gear selection mechanisms WITHIN the transaxle became fubar.

I checked both ends of the shift rod, and they were both solidly connected with no play. It's definitely a problem inside the transaxle.

  • It feels like it's in neutral because you can move the lever side-to-side the expected amount and with the expected resistance.
  • You can't push it forward into either 1 or 3.
  • You can't pull it back into either 2 or 4.
  • When you pull it back in what feels like R, it feels like it slots into a gear, but that gear is a forward one when you let the clutch out.
  • When you push it forward in what feels like 5, it feels like it slots into a gear, but that gear is also a forward one. Seemingly a low one.
  • When you leave it in neutral and let out the clutch, the car wants to go forward, like it's in a forward gear.

So I think something's horribly wrong in the transaxle. Has anyone with a 944 experienced this weird behavior? Again, the clutch is good, because I can start the car with the clutch depressed and the transaxle is definitely disengaged as long as I keep the clutch in.

Anyway, that means the car will stay in its parking spot until I can swap my transaxle. Looks like it's a good time to do the limited slip upgrade to my spare open-diff transaxle! I have a freshly rebuilt Porsche LSD ready to drop into it. It even has a lower final drive ratio, which may even help out on most tracks!

I'm just glad it didn't happen on Saturday morning at the track.

TED_fiestaHP
TED_fiestaHP HalfDork
11/10/20 5:39 p.m.

  You might try some painting yourself.  Summit has single stage urethane paints.

    I have had some good luck with a cheap spray gun, typically the flaws are due to a issue with less than perfect prep work, a flaw in the primmer won't go away with the final color coat.

    The paint is farely cheap, so if you are not happy with the results you can always sand it down and try again.


notsafeforwork
notsafeforwork Reader
11/10/20 10:54 p.m.

You're doing some REALLY nice work there ! ! !

Is your oil temp sensor/sender fitted to the oil pan drain plug? I need to find one for the VW powered Fiat 600 that I'm just beginning and thinking of just hitting one of the VW sand Rail sites for it.

jh36
jh36 Reader
11/12/20 7:26 p.m.

In reply to CrookedRacer :

John, maybe double check the set screw at the linkage at the transaxle. I'm wondering if the rod is going back and forth correctly but slipping at the rear shift linkage. 

jh36
jh36 Reader
11/12/20 7:27 p.m.

I had a similar thing happen once. I pushed the car on the trailer at vir and drove 6 hours home to find the locking bolt had loosened up. I've used safety wire there since. 

CrookedRacer
CrookedRacer Reader
1/4/21 2:54 p.m.

Thanks, jh36. I am just going to swap out the transaxles because I want the lower gear ratio anyway.

Today I got out the polycarbonate hatch and tried to test fit it. It definitely didn't just drop in there. I t&ink it will need some extensive trimming, starting with the areas around what may be 968-specific spoiler tabs.

Even with notches for those, I dont think it will fit. So my next task is to build a hatch-holder jig that will firmly grasp the frame while still giving all-around clamping access.

My hope is that a dimensionally stable frame will give me the best possible chance at getting the trimming done right.

The glass is "Shields Windshields" 3/16" Porsche 944 Rear Window Stock Trim Supercoat Both Sides.

I intend to use 3M 08681 Single Step Primer on the frame and possibly on a masked off inner surface of the polycarbonate. Then bedding the glass in with 3M Auto Glass Urethane Windshield Adhesive 08693.

Thanks!

If any of you have tips for me, I'm all ears.

jh36
jh36 Reader
1/5/21 7:55 p.m.

In reply to CrookedRacer :

Sorry...I've never installed one...I've just done full framed swaps. I would go light with the adhesive I think. Getting anything cleaned off that material is tough. 

CrookedRacer
CrookedRacer Reader
5/30/21 4:21 p.m.

Ok sage advice there JH...

So I've been putting this off for too long. I finally tackled it.

First, I took the old hatch off the car just to see if the new one would fit. That was a very good idea because the new one was seriously bent. If I had put the glass in it before truing it,  the thing would have never fit right.

So Kendra held the frame at the right angle while I jumped up and down on a corner of it to straighten it out. It then laid pretty nicely in the hatch. It didn't quite touch the seal everywhere, but that seal is probably 34 years old and it might be time for a fresh one that has some shape to it anyway.

So then I laid the polycarbonate in there and marked in red where I thought it needed to be cut.

With the notches made for the wing trim holders, the lexan was now about right from front to rear, but the side-to-side overhung a LOT.

I'm not sure why the glass didn't fit right out of the box - it had these relief cuts for the wing attachments, but the whole thing had to be trimmed back.

Twice.  This is after the first cut. Ugh.

But once it was all fitted up, I screwed the frame to a jig so that it wouldn't go anywhere. I didn't want the weight of the frame, lexan, glue, tape, and clamps to spread it or otherwise warp it:

Anyway, with the glass in the frame, I marked the top side in blue where I expected the frame and glue to interface with the bottom side. Then I pulled back the protective plastic a couple inches and taped it back up to the blue line. This also behaved as a seal to prevent primer from dripping onto the interior surfaces.

On the top side, I pulled it back and taped it about 3/16" away from the edge. This was because I was afraid if I didn't do something with the plastic, the runny primer I was about to apply to the edge would be pulled underneath the protective plastic by capillary action. I wanted to get primer on the very edge but I didn't want it anywhere else on the top side.

Then I rubbed down the lexan with isopropyl alcohol, and then I finally primered the bottom side edges and the outer edges with this stuff. 

So I didn't take too many pics between primering and clamping because I wanted to do this in one process and I didn't have time to stop and take pics. But I put down a large triangular bead with a v-cut on the urethane tube tip, and Kendra helped me lay it down on the frame without making too much of a mess. The good thing was that the polycarbonate was completely protected from stray urethane. It tends to get everywhere. I think there's some on the handles of every clamp it this picture.

But we'll give that 24 hours and see how it does. Then I'll assemble the rest of the pieces with all the special Porsche hardware I bought (little nuts and bolts costing $1 - $4 apiece).

1 ... 20 21 22 23

You'll need to log in to post.

Our Preferred Partners
0zCe1zNWi3vgWG6JtQ95fJcEG9AvnBv7V0MSqLLlIx7cV3BMKUgGueZkHBbWRbcD