1 ... 3 4 5 6
Slippery (Forum Supporter)
Slippery (Forum Supporter) GRM+ Memberand UltraDork
8/27/20 10:27 p.m.

Moving slowly but surely. I put a little bit of time today. 

- Removed the front sprockets
- Secondary tensioner
- Primary tensioner
- Primary sprocket
- A couple of coolant hoses connected to the head. 

I first marked everything just in case, then removed (4x) E10 screws from the exhaust sprocket and (3x) 10mm nuts from the intake sprocket. 


I used Dykem pens to mark the chain/sprockets. Not sure it will help but it makes me feel better. 

On the intake sprocket there is a plate and a spacer that looks like a giant bellville washer. Becareful when removing the nuts, I loosened them a little at a time each. 


As it all came off, I tried to keep it together and zip tied it all in position. 


Next the secondary tensioner comes off by removing (4x) 10mm bolts. Be careful as it will come apart. 

Zip tied the tensioner together as well:


Once all that is off, the primary tensioner comes off using a 32mm socket. Its on the side exhaust side of the head. 

Becareful here when removing and keep the chain taught. You do not want to mess up here as that means removing the oil pan. 


With the tensioner off you can remove the inner exhaust sprocket. I also marked this one just in case:


Keep some zip ties handy to hold the chain. I zip tied it to the washer bottle bracket for now while I loosen the head bolts. 


Here is the headbolt loosening sequence:


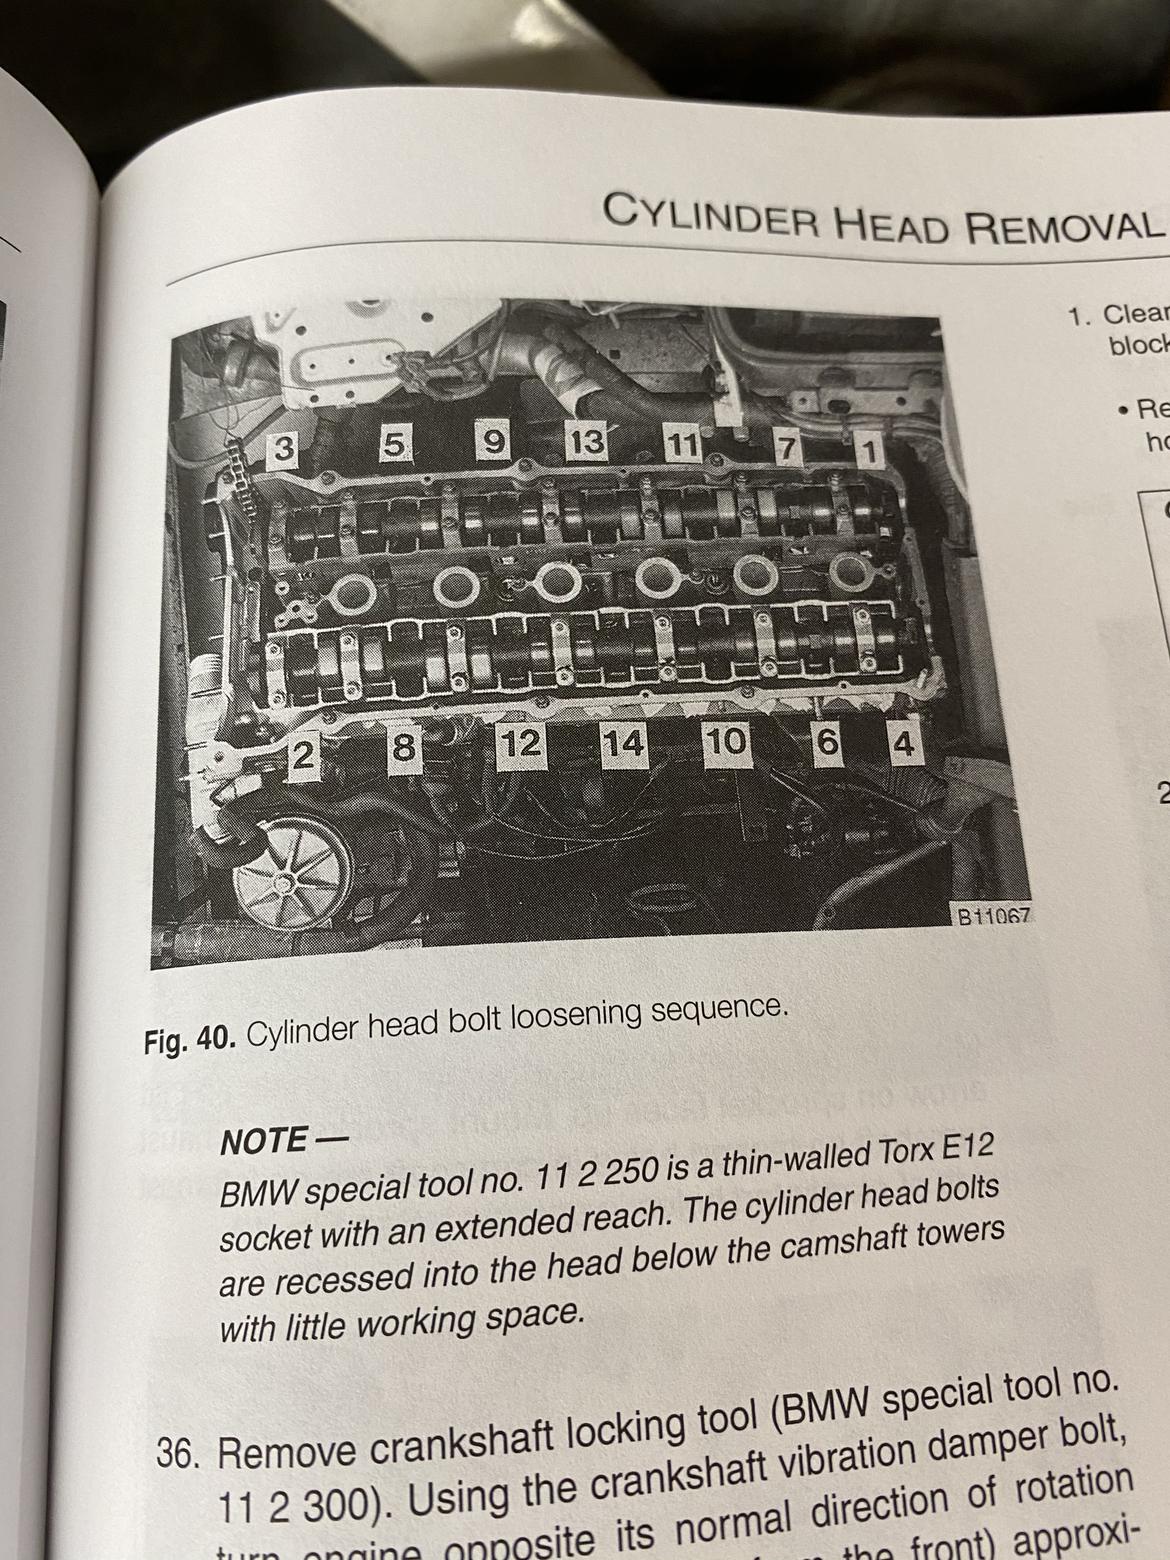
I did the first one and the tool would not fit on the second bolt due to clearance issues. I am going to machine the OD of the tool tomorrow. 

Slippery (Forum Supporter)
Slippery (Forum Supporter) GRM+ Memberand UltraDork
8/28/20 11:22 a.m.

Let's try again tonight:

I like that you're using a "Valve Action Paint Marker" on your cam work.  Seems appropriate.

Fun write-up!  I'm really enjoying the detail and clear pics.

Slippery (Forum Supporter)
Slippery (Forum Supporter) GRM+ Memberand UltraDork
8/28/20 6:17 p.m.

In reply to TVR Scott (Forum Supporter) :

Didn't even notice the pen description laugh. Fitting I guess. 

Slippery (Forum Supporter)
Slippery (Forum Supporter) GRM+ Memberand UltraDork
8/28/20 6:17 p.m.

The tool now fits!

In reply to Slippery (Forum Supporter) :

Lathe ftw!

Slippery (Forum Supporter)
Slippery (Forum Supporter) GRM+ Memberand UltraDork
8/29/20 3:45 p.m.

Woke up early ready to tackle this and get it done ... bad news is the tool broke as it was two pieces:

Good news is that it broke after removing the bolt and when I was removing a different bolt. Also for some reason I messed up and had added two of these tools to my Amazon cart laugh


After spending a good 15' trying to get the broken tool from inside the head onwards we moved. All headbolts removed, btw the tool is an E12. You also need to remove three smaller E8 bolts in the chain area, see below. Keep in mind there is a fourth one that holds the plastic piece in the middle and does not have to come out. 


While removing the washers from the headbolts I realized I lost the little ball bearing from the headbolt tool that broke. It went right into an oil drain back hole. It looked like this one, from the new tool, that I removed as a precaution. 


Went down this galley:


I tried to get it with the magnets in the pic with the headbolts but no luck, so I sat and watched some amazing k-pop on MTV pondering what to do with my life. 

Screw it, I will buy a ton of cheap oil and hopefully it will come out of the drain bolt hole on the pan. Otherwise I will just remove it and get the S54 in there. Whatever. 

Before pulling the head make sure everything is off. There are two hoses, one at the rear and one in the middle, also a sensor towards the front and a 10mm bolt holding a bracket for plugs that need to come out. 

I then called my oldest son and showed him how he needed to hold the timing chain, fish it through the timing case in front and reattach it all without letting it come off the bottom sprocket. He laughed and left. 

Plan B, I zip tied it to the timing chain pad and hoped for the best. 

I started wiggling it until it came loose. Unfortunately for my back something was still attached towards the back on the passenger side. I placed it back down and realized the O2 sensor wires were clipped onto the head. 

Now I was able to pull it off. This thing was heavy. Thankfully my wife was there, not to help but for moral support. 


 The engine bay. 


Slippery (Forum Supporter)
Slippery (Forum Supporter) GRM+ Memberand UltraDork
8/29/20 3:49 p.m.

I could not figurw out were the leak was, hopefully the head is not cracked. 


I will start cleaning everything and then post more pics. 

I did not want to clean the gasket too much in order to find the leak path but given that I cant find it, I will wipe it down and look closer. 

docwyte
docwyte UberDork
8/29/20 4:03 p.m.

Doesn't take much for that head to warp.  Mine ran fine, then one day it pressurized the coolant overflow bottle.  Still ran fine but it clearly needed a head gasket.  Sent the head off to get decked and checked for cracks, had the valve seals replaced etc...

Slippery (Forum Supporter)
Slippery (Forum Supporter) GRM+ Memberand UltraDork
8/29/20 7:27 p.m.

I inspected and cleaned and dried the cylinder bores as well as I could. I also soaked them in WD-40 as they will stay open for a week or two. 

Not sure WD-40 is the right stuff, but it can't hurt. 


No cracks on the bores but the water jackets were full of nasty oily water so I decided to drain them. The drain bolt is a 19mm on the passenger side of the block towards the rear of the car. 


I put a drain pan underneath but the water comes out and goes everywhere. 

Slippery (Forum Supporter)
Slippery (Forum Supporter) GRM+ Memberand UltraDork
8/29/20 9:31 p.m.

I cleaned and inspected the gasket on both sides. 

Top:

Bottom:


The only spot that I can find that looks like a leak path is this one on #6:


I cleaned, bagged and organized everything and put it away for now:


Tomorrow I will remove the cams, trays, lifters, valves ... everything. I have been reading already:


I have three cylinder heads on my workbench at the moment! BMW M20, BMW S52 and Toyota 3S-GTE:

NOT A TA
NOT A TA SuperDork
8/29/20 10:18 p.m.

Been following along. You have CNC machining shop access or something? The seat brackets came out nice.

Buddy of mine runs "The Head Shop" in Lake Worth if you need jet wash and/or machine services on the head. He does BMW's pretty often because he does the machine work for Miami Engines in Boynton Beach who are BMW performance guys. theheadshopsfl@gmail.com or PM me and I'll give ya the phone #.

r3vhappy
r3vhappy New Reader
8/30/20 12:34 a.m.

I love how thorough your documentation is. Great thread.

Slippery (Forum Supporter)
Slippery (Forum Supporter) GRM+ Memberand UltraDork
8/30/20 7:52 a.m.

In reply to NOT A TA :

I think I have that covered, but I will definitely get in touch if I need help. 

In reply to r3vhappy :   

Thanks!

Slippery (Forum Supporter)
Slippery (Forum Supporter) GRM+ Memberand UltraDork
8/30/20 5:18 p.m.

Went to the beach early in the morning and the swung by Home Depot for some supplies. 

Some magnets, a plastic container, wood strip and an iron rod. 

Slippery (Forum Supporter)
Slippery (Forum Supporter) GRM+ Memberand UltraDork
8/30/20 9:50 p.m.

Leave you guys with this for now and will update the thread tomorrow with more info:

Slippery (Forum Supporter)
Slippery (Forum Supporter) GRM+ Memberand UltraDork
8/31/20 10:03 p.m.

Ok disassembling the head to get it ready for machining. 

I used the strips of wood to raise the head from the bench. The pieces of 2x4 I had were too small. You want all the valves to be able to open and close without touching the workbench. 

The first thing was to remove anything on the outside:

- Water neck - 10mm bolts
- Cam position sensor - One 5mm allen screw
- Water temp sensor - 22mm wrench
- Throttle body coolant supply - 17mm wrench
- rear coolant return - 10mm bolts
- Bracket on the pass side for wiring - 10mm bolt


I guess I need to also order a new thermostat. 

Once all that was off, the camshafts were next. Keep in mind these cars have hollow camshafts and they will break in half if not  properly removed. 

This applies for both the intake and exhaust cam:

- Have the #1 cylinder lobes pointing straight down. This is the cylinder closest to the cam chain. The valves should be open. I order to turn the cams you can use the hex in the middle, its a 24mm which I did not have. 


When you do this, the #6 cylinder lobes will be pointing straight up. Like this:


Now you can start loosening all the cam journal nuts, EXCEPT the #2 journal. That is the one over cylinder #1. These are 11mm. 

I started with the impact as they were quite tight and finished with a ratchet. 


Once they are all loose, you start with the #2 journal. I loosened 1/8 of a turn at a time alternating each nut. Once you have only a couple of turns left I turned the cam to release the pressure and removed the nuts. 

Just of note, a couple of my exhaust journals had some ugly scoring. This is common on these engines, whether it has 20k miles or 200k miles. Believe me, they all have it. Its usually on the cam and sometimes on the cap rarely the head itself.


Everything is labeled; camshafts, cam trays and journals. Intake is "E" and exhaust is "A". I guess the letters stand for eingang and ausfhart, entrance and exit. 


Now I took the rod I bought at Home Depot and I cut it to 21". I cut two pieces but only needed one. 


Dont forget to debur both ends:

I used the magnets I bought (12x) and placed them on each lifter, then I placed the rod on top. Once you do that you can pull the cam trays without all the lifters falling everywhere. 


Repeat for the other side and you are left with this:

Slippery (Forum Supporter)
Slippery (Forum Supporter) GRM+ Memberand UltraDork
8/31/20 10:18 p.m.

After both trays were out, I took the plastic container I got and placed the lifters upside down in it. 


Make sure you labeled the box, you want each lifter to go back to the same spot it came out of. 


I then took some oil I had sitting for a while and filled every lifter and around them with it. 


Away they go to a place no one will touch them. 


Next are the valves and associated parts. 

You need a spring compressor, a magnet to retrieve the keepers and patience. I also made this tool many years ago to make the process easier:


My compressor:


The process:


I have a small magnetized tray that is great for putting all keepers in:


Just make sure you are organized and keep track of what goes were. You want all the parts back in the same spot they came out of:


I learned this cardboard trick from Mazdeuce:


All valves out:

The next step is the valve seals, they just pull off. Valve guides exposed:

Off everything goes in the trunk:

Slippery (Forum Supporter)
Slippery (Forum Supporter) GRM+ Memberand UltraDork
8/31/20 10:25 p.m.

I started cleaning the parts in the ultrasonic getting them ready for machining:


The head was too big, so had to do half at a time. 


Came out brand new:


Just for giggles I put it on the granite table and measured the flatness. It came out to .0012" which is not bad but you can really measure every surface perfectly unless you spend an hour there.


Back in the trunk it went:


Havent been this south in a while, left it here for the night to get pressure tested and decked. 

They way back was interesting:

Slippery (Forum Supporter)
Slippery (Forum Supporter) GRM+ Memberand UltraDork
8/31/20 10:27 p.m.

I am getting a list of parts ready so that I can order everything. Probably should have done this earlier, but oh well. Hopefully I get all the parts by the 12th and it goes back together that weekend. 

Slippery (Forum Supporter)
Slippery (Forum Supporter) GRM+ Memberand UltraDork
9/1/20 9:19 a.m.

Got the call. 

Picking up at lunch time. 

Slippery (Forum Supporter)
Slippery (Forum Supporter) GRM+ Memberand UltraDork
9/1/20 4:58 p.m.

Slippery (Forum Supporter)
Slippery (Forum Supporter) GRM+ Memberand UltraDork
9/1/20 9:55 p.m.

Not a lot got done tonight. I tried ordering the parts but got sidetracked. 

I very lightly chamfered and deburred the all the openings in the head's mating surface.

Before:


After:


I had added new exhaust studs and nuts to the shopping cart, but before I go spending $85 on that I decided to clean what I have and then decide whether I wanted to get new ones or not. I removed all the nuts from the studs and tomorrow I will clean up the threads:


This is where I left off for the night. 

Slippery (Forum Supporter)
Slippery (Forum Supporter) GRM+ Memberand UltraDork
9/2/20 10:15 p.m.

Cleaned the ultrasonic cleaner's water and dropped the valves in it. Left them overnight. Tomorrow we'll see how they look. 


Slippery (Forum Supporter)
Slippery (Forum Supporter) GRM+ Memberand UltraDork
9/3/20 4:48 p.m.

Not much change on the exhaust valves, the intake ones cleaned up nicely. 


I chucked them on the lathe and gave them a really good clean using 150 grit sandpaper and then a green pad. 


quite a difference before/after. 


Depending on how I feel, I might set the intake valves on the CNC and cut the necks down a little*. We'll see. 
*Disclaimer: I am a professional and have done this many times, dont try it at home wink


1 ... 3 4 5 6

You'll need to log in to post.

Our Preferred Partners
EUp33us6SlJrli1HRYzuLVqEAcREgy2MH0zYuSfGfiU5FfedcOnvb1p1sK45rWpC