1 2 3
corey_mck
corey_mck New Reader
4/27/18 8:00 a.m.

I'm hoping just the title was enough to get some attention.  Here's the story of why I'm building a dirt track car at all, let alone a Subaru:

I really wasn't into dirt oval racing, or roundy round racing at all.  Our local dirt track, located at Allegany County Fairgrounds in Cumberland, MD, hasn't had a promoter since 2013.  The last promoter left a bad reputation for dirt racing with the county commissioners, community, and even racers.  A new promoter was on board to have the track up and running for 2015, but some miscommunication and apparent mismanagement left it up in the air.  Local racers didn't hear any news about the track for nearly a year, until this article was on the front page of the local newspaper, with an out-of-town consulting firm stating:
“We’re suggesting that you eliminate the racing oval, except for the straightaway in front of the grandstand, which is used,”
Obviously, this didn't sit well with the local racing community, myself included. I had been down to the disused track a handful of times in 2016 at this point.  I had plans in motion to start a grassroots, wheel-to-wheel, folkrace style rallycross series at the speedway.  The local dirt track racers started a loosely organized group aimed at finding a promoter to prove to the county that the dirt track is an asset worth keeping.  I, of course, also wanted to keep the track around, because it's hard to run a race without a racetrack, ya know?  That's how I got involved with the dirt track guys. Anyway, the group turned into some dedicated volunteers, a promoter stepped up, a manager with some racing experience was found, and 2017 was the first year the fairgrounds has seen racing since 2013.  With a full dirt track schedule squashing plans of running a rallycross series, I decided I'd be foolish not to race something at the venue.  I picked up a very used, very abused 2004 Cavalier that was already set up for FWD, 4 cylinder dirt racing.

Yeah, she was rough.  The class called for a mostly stock car, but I found out pretty quick everyone was cheating.  During my ownership, the car had:

-welded diff

-shims under the rear hubs to toe both rear wheels to the right

-some strategically cut springs

-ECU reflash from SBR Performance

-Balance shafts deleted

-Lots of camber in the RF

It was really good at breaking trailing arms, falling apart, and overheating, but it limped through the season to a few podiums, all top 5s, and 3rd in points.


Cavaliers and Cobalts dominate the local 4 cylinder classes, but I'm just not a fan.  I also didn't like the cages or general safety of the builds of the rest of the cars in the field.  I threw some ideas around, including a Saab 900 w/ a B212 or anything with a 2ZZ (my autocross car is a 2ZZ MR2 Spyder), but cost, local part availability, and oiling issues in the case of the 2zz turned me away.  I bought a FWD 1995 Impreza for my girlfriend and friends to rallycross, and it got the wheels turning on a FWD Subaru for dirt track.  The benefits include:
-Lower COG - the block is 7" lower than the heads of the cavalier, and the intake manifold is 1.5" lower

-Longitudinally mounted engine, moving the weight of the trans more toward the center of the car

-Lighter chassis than Cavaliers and Cobalts

-165hp/167tq from the 2.5

-Independent rear suspension

-Lots of "stock" choices for suspension components

-I already own 3 other GC chassis cars


The first one I found on Craigslist was a 2001 5 speed wagon for $400.  Who wouldn't love a dirt track wagon?  Come to think of it, why aren't there more dirt track wagons?
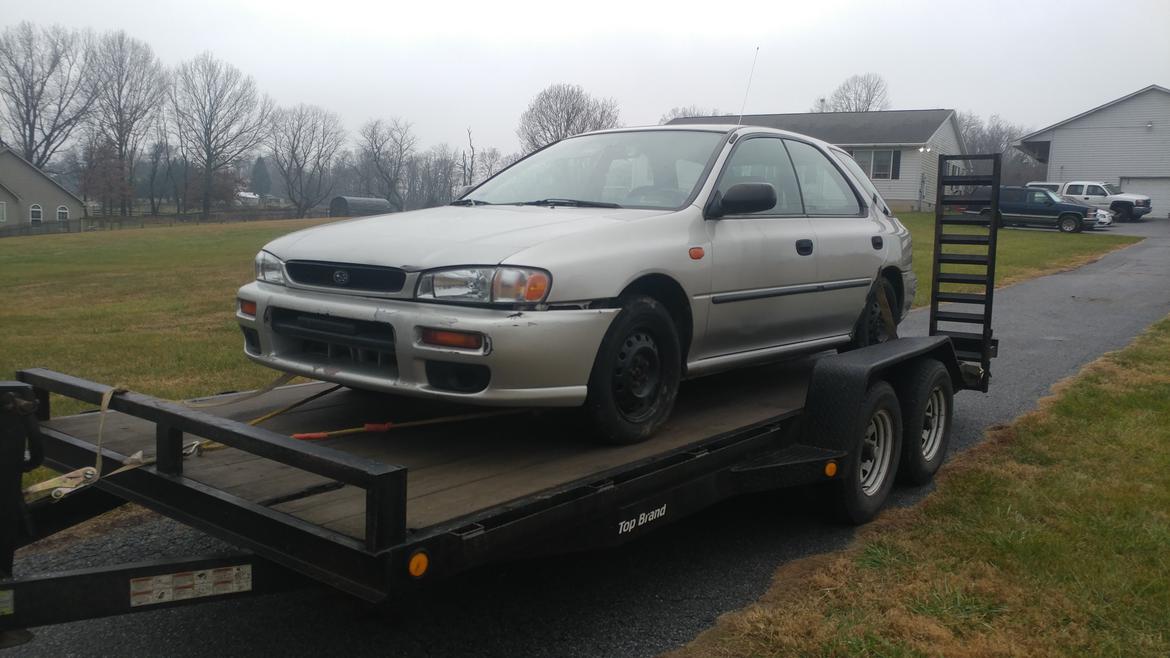
I'm still working on the cage, which is almost finished.  I'll update with pics this evening. I'm already wide open on this project, but who has some input / ideas?
 

corey_mck
corey_mck New Reader
4/27/18 8:06 a.m.

Here is a link to the rules, which I'm sure will be referenced a lot in this thread:
RULES RIGHT HERE. HERE THEY ARE.

The only changes to the rules this year are the allowance of lightweight flywheels and aluminum wheels up to 16"

mazdeuce - Seth
mazdeuce - Seth Mod Squad
4/27/18 8:24 a.m.

I have nothing constructive to add, but I find this whole thing fascinating and will be following closely as a fan. 

Gaunt596
Gaunt596 Reader
4/27/18 12:12 p.m.

I grew up around dirt circle track, my father started out racing his own cars in street stock, but eventually realised he was a much better mechanic than driver, and started building engines and cars for the local guys. I remember a lot of late night weekends putting joes dirt late model back together, or bending the sheet metal back out on glens thunderbird for the 60th time. It's cool to see that the sport hasn't died out.

corey_mck
corey_mck New Reader
4/28/18 11:55 a.m.

Onto the cage build!  I'm putting the last few bars in it right now.  If anyone has any input on something I did wrong, let me know now so I can try to change it.

I started out stripping the interior just enough to get main bar measurements.

Most of the 4 cylinder (and even hobby stock and modified cages) I saw had some things that just didn't make sense to me.  Most 4 cylinder cars had the roof cut off and the stock pillars chopped up to weld a cage in.  I wasn't a big fan of it.  The designs I was seeing didn't have any type of triangulation that made sense, and most tubes intersected wherever it was easiest to place them, instead of at nodes.  So, after a bunch of researching FIA, NASA, SCCA and other rules, looking at NASCAR cages, and going through every thread I could find with failed or bad cage design, I decided on a general design for my cage.  I also taught myself CAD just enough to rough it out and visualize each bend in 3D space.


(This wasn't the finished drawing, just the only one I could find to upload)

I decided against the halo design that most 4 cylinder cars use.  I didn't think it was the safest, and I wanted the experience for the next cage I build.  I planned on using a sill bar and 3 NASCAR door bars on the driver's side, and X bars on the passenger side.  I want to do an FIA a pillar bar on the passenger side and a variation of it that works with NASCAR bars on the driver's.

I also bought a Rogue Fabrication bender, which I've been super happy with.

The first few bends I did on ERW to test it out, and they looked a little flat on the outside.  Once I got my 1.75x.095 DOM in it, the bends looked awesome.  One of the main reasons I bought the Rogue Fab was because it bends vertically, which I thought was nicer for lining up separate bends and taking up less room.  It turned out to also be the only downside - I started bending the main hoop on my table, and realized the tube was hitting the ceiling.  I was pretty motivated to get it done that night, so I muscled it onto the ground and finished the bends.  

It turned out spot on perfect, so I was pretty happy with myself and the bender.  I rewarded myself with a beer, using the bender's built in bottle opener.

The a-pillar bars (front laterals, front main bars, whatever they're called) were the toughest bends to figure out.  They come off the main hoop at a slight downward angle, then bend down and out to follow the windscreen, then straight down to the floor.  I'm an electrician, so I've ruined plenty of pipe making bends, but DOM is a little more expensive than conduit.  I wanted to get it right on the first shot.  I tried figuring it up with math, which I wanted to measure, calculate, and record for every bend in this car.  Complete and total overkill, but I wanted the experience of doing it, so I knew I understood it.  After figuring it up, I ended up using two chunks of tube, a Swanson bevel, and an angle finder to find the angle between the roof line and the windscreen / a pillar.  This angle included both the downward bend and the outward bend.  Once this bend was made in the bender, I laid the tube on the bench, rolled it until it had the proper outward offset where the bottom of the windscreen would be, and made a bend to angle it straight down to the floor of the chassis.  I was holding my breath, but they turned out pretty good.  I duplicated the procedure for the driver's side, and the main bars for the cage were finished.

I spent the next few evenings stripping the rest of the interior and gutting the wiring.  Everything in the dash that didn't involve the gauges and ignition switch was de-pinned and simplified.  Subaru wiring diagrams suck.

Back to the cage. After consulting some friends, I decided to build boxes for the cage to set on.  I was going to plate the floor with 16g sheet metal, then place the boxes on top.

Boxes were placed, bars were notched and ready, main tubes were welded together.

More bars mocked up:

Welded in with the roof diagonal:

The dash bar is low, yes.  However, it's around 9" from my knees.  I don't love the placement, but I wanted a bar there and I wanted to use the stock dash, as well.  I think (hope) it's in a good enough spot.

I'll post more cage progress later.  Input is welcome!

adam525i
adam525i GRM+ Memberand Reader
4/28/18 2:39 p.m.

Love the idea for the car and the cage fabrication is very impressive. 

Keep up the good work.

Adam

bluej
bluej GRM+ Memberand UltraDork
4/28/18 3:58 p.m.

Link to schedule?

Suprf1y
Suprf1y PowerDork
4/28/18 5:44 p.m.

Nice job on the cage.

Saw the Cobalt in that pic, my first thought was, it's going to be hard to beat a Cobalt on a circle track. Good luck and kudos for helping bring the track back.

irish44j
irish44j UltimaDork
4/29/18 7:56 p.m.

It annoys me that your cage looks better than my cage ;)

You still better get your arse down to DC rallycross in the Volvo here and there!

corey_mck
corey_mck New Reader
4/30/18 8:06 a.m.

In reply to bluej :

http://thegreatercumberlandraceway.com/events/

They run almost every weekend, which is another reason I wanted to get into it.  25ish minutes of seat time every weekend for $20 entry!  

In reply to Suprf1y :

Thanks!  The Cobalts are quick, but some show up every weekend and they'll often get beat by Cavaliers.  A good Cobalt with a good driver IS the car to beat, though.  I'd like to be able to pinpoint what makes the GM cars work so well on dirt.  They are pretty long cars, so maybe that's it.

In reply to irish44j :

Haha I don't know about that!  I'll be down for sure though.  It's been too long since I've driven #uglyvolvo at a rallycross.  Hopefully AWD didn't spoil me.

Mezzanine
Mezzanine Dork
4/30/18 8:15 a.m.

You had me at: "Everything in the dash that didn't involve the gauges and ignition switch was de-pinned..."

Thank you for not being a hack! My process is similar to yours: research, overthink, overplan, then do. Keep up the great work.

corey_mck
corey_mck New Reader
5/1/18 7:53 a.m.

Wiring messes drive me nuts! Plus, I can always take this harness for another project if something happens.


corey_mck
corey_mck New Reader
5/7/18 8:09 a.m.

Seat mounts were next.  I wanted them tied completely to the cage and not to the body at all.


Door bars:

I really don't like the idea of drilling or cutting up the stock unibody if it can be avoided, and I definitely didn't want the weird S-bend door bars you see in most sedan track cars.  Since the door was going to be gutted anyway, I was able to take the door bars outside the B pillar, and still fit it inside the door.


The door bars looked okay, so I pulled them back out and finished the seat mounts.  They're overbuilt, but the weight is in the right spot and I wanted plenty of material for the seat to be moved around.  Once I get this car developed, I'll probably end up letting my brother run it so I can get back to rally stuff.  He's a good bit bigger than me, so having some room to move will be nice down the road.

Door bars back in and welded up:

I then cut and positioned the door bar braces.  A big factor in the position of these was trying to tie my A pillar support into the node of the windshield bar brace, while still being able to get in and out the car easily.  The full containment seat makes getting in and out hard enough, and I knew this support was going to be in a weird spot.  I slid the door bar braces as far forward as I could.


On the passenger side, I wanted to keep it light, strong, and easy to get in and out of when I need to work in the interior.  X style door bars seemed like the way to go.

I saw a picture online of an X door bar broken at the intersection, so I opted for bending the tube and welding / gusseting them together.

A pillar brace:

That was it for tubes in the cage!  I still need to add gussets in some areas.

Yesterday I cleaned up the shop, painted the floor of the car, and removed some more glass.  All I have left is the rear hatch glass, which does not look like it'll be fun to remove.  Anyone want to take a guess what this thing is going to weigh?

Also pulled the engine and trans, then removed most of the rear drivetrain.

Looks like the engine that's going in has new timing components, so I'm going to use them.  Valves adjusted, valve cover gaskets replaced.  I'm waiting on new intake manifold gaskets, so hopefully they'll be in today and the engine can go back in after work.

ShawneeCreek
ShawneeCreek GRM+ Memberand Reader
5/7/18 10:34 a.m.

I've never seen door bars done that way. Very clever. Now how are you going to mount the back door and latch the front door?

corey_mck
corey_mck New Reader
5/7/18 9:40 p.m.

So, the rules say doors must be bolted or welded shut.

You can't really tell in any of the pictures, but I built little offsets on the door bars with nuts welded to the backside.  There will be two small bolts that hold the driver's door shut and also hold the leading edge of the rear door.  The rear door handle will work like normal.

corey_mck
corey_mck New Reader
5/8/18 7:11 a.m.

While swapping everything onto the new block, I ran into a small issue with the PCV system that I didn't account for.  The fitting on the ej253 was different than the one on the 2.2.  The fittings are pressed into the block pretty firmly.  I probably could have used a better setup, but a pair of Vice Grips, a dead blow hammer and some MAPP on the block had them out in a few minutes.

I took my time gathering parts for this project to keep costs down.  I scored this Fidanza 9.5 lb flywheel at a good price from local Subaru builder / tuner Rocksteady Tuning.  It was left over from a project, and I'm pretty sure he's always excited to see Subaru race cars.

One of the pressure plate bolts broke while I was finger tightening it.  I think the PO had them torqued on a bit much.  I'm going to stop by the hardware store today and pick up all new ones.  I buttoned everything up and set the engine back in the car.  It's really nice how easy it easy to pull and place engines in Subarus!

I noticed that the casting around the ports on the intake manifold looked atrocious.  I mean really, really bad.  I was in a hurry and didn't snap any pics, but two of the openings had burrs through it and were substantially smaller than the other two.  I got my calipers, new gaskets, and die grinder out and cleaned them up some before putting it back on.

I also got the rear diff, driveline, and diff support out from under the car, and sprayed it with undercoating.  I was going to cut the rear diff support up and bolt it back to the chassis for some extra bracing, but I don't really want to cut it.  Maybe I'll build a new brace out of 1.5" tubing?  Does anyone have thoughts on this?

I need to take a night off tonight, but I do plan on pulling suspension from a 2.5RS parts car that a friend hooked me up with.  I'm mainly interested in using the springs from the 2.5RS.


Adrian_Thompson
Adrian_Thompson MegaDork
5/8/18 11:55 a.m.

I've nothing useful to add, other than what an outstanding well thought out build.  I don't have any experience of dirt track racing other than watching a few demo derbies.  But what I've seen on the faithful interwebs normally show lousy builds with horrible partially welded cages etc.  Admittedly they are often deliberately pointing out flaws or using it as an excuse to rag on 'red neck' racing, but this is really nice.  I love your door bars that go outside the B pillar.  Watching with much interest.

corey_mck
corey_mck New Reader
5/9/18 7:50 a.m.

In reply to Adrian_Thompson :

Thank you!  There are some sketchy cars at our track, and other tracks are even worse.  We have a new tech guy, and he actually has some knowledge and cares about safety, especially in this class.

When I first decided to get into this, one of the things I noticed was a complete lack of helpful discussion on the internet for FWD dirt track race cars.  That's pretty crazy, considering our class is typically 20+ cars every single weekend, and it's like that everywhere.  There's thousands of these cars out there.   You can find a little bit of outdated info for setup, but not much at all in the way of safety.  It made getting into the sport pretty tough, because I didn't have any friends who did it.  Hopefully this build thread will help someone down the road.

corey_mck
corey_mck New Reader
5/9/18 8:04 a.m.

Last night, I was able to get the trans torn down and plan made for welding the center diff up.  I'm using this guy's procedure:

http://www.914world.com/bbs2/index.php?showtopic=104513&st=0

Here's most of the parts laid out to take care of it.  The short version is, I'm going to weld those two splined pieces on the right together and cut the excess off.  It'll get rid of about 8 pounds of spinning weight, and should hopefully hold up to a stock EJ25's power.

I also got the front diff welded. Almost everyone runs a welded front diff.  I've never driven a FWD race car without a welded diff, but a handful of open diff cars have shown up at our track.  Occasionally they do well, but the front runners are always welded.  I was tempted to try an open diff or a cheap OBX helical, but I don't want to tear the trans down again after one race if it didn't work out.  I preheated the gears and carrier with a torch, then went to town.  Don't pay attention to the welds - I welded on it for a few minutes with no gas.  Duh. 

That wasn't the only mistake I made.  I broke 3 bolts off inside the trans casing - one that holds the rear housing on and 2 that hold the reverse lockout cover.  I'm 0 for 4 on Subaru trans lockout cover bolts. Also, I broke the snout that goes over the input shaft.  It wasn't the smoothest night of wrenching.  I guess I'll be fixing that stuff tonight.  


corey_mck
corey_mck New Reader
5/10/18 6:58 a.m.

Broken bolts replaced, trans halves sealed back together, input shaft sleeve welded back on.  I'm glad that's over with.  The hardware in this trans was pretty corroded. 

Also, it's a FWD trans now!  A friend who welds every day helped me weld the center diff up.

corey_mck
corey_mck New Reader
5/10/18 9:57 a.m.

I ordered a tuner from https://lambdatuning.com/

Donnie at Rocksteady Tuning is going to work with me to bump the rev limit up near 7k and get what we can out of the otherwise stock EJ253.  I'm pretty excited to see what it will do.

MadScientistMatt
MadScientistMatt PowerDork
5/10/18 3:51 p.m.

I'm curious about how the rear doors will get back on. This has been a very interesting build - I don't think I've heard of anyone running a circle track FWD Subaru before.

corey_mck
corey_mck New Reader
6/6/18 8:39 a.m.

Progress has been pretty slow... things got busy with rally crewing and rallycross for a few weeks.

The last thing to finish the FWD trans was to cap off the tail housing where the rear driveshaft went in.  There are a few expensive options out there that didn't fit my budget.  I took the steel sleeve that is on the tailshaft housing and welded a cap in the end of it, then used a liberal amount of RTV and a strap to hold it onto the trans.  This is the best photo I had (my phone was having a slow night):

Trans went in and car fired up, but sounded off.  I hooked my laptop up to check codes; it had every one.  Turns out there are wiring differences between the 2.2 and 2.5 ECU.  I don't know how I didn't realize that.  I pulled the 2.2 manifold back off and replaced it with the 2.5.  The 2.5 manifold had all the wiring I needed between the components and the 2 connectors on the harness, so most of the wiring I had to do was limited to adding some pins between the connectors and ECU.  The things I had to change were (this is going off memory, will update later):

-front o2 sensor needed the plug swapped from a 4 wire to 6 wire

-IACV needed 3 wires ran from B21 connector to proper ECU pins

-atmospheric pressure sensor was added; 3 wires, one new pin at ECU, one spliced to existing wiring, one new wire to the sensor ground joint connector a few inches from the ECU connectors

-air assist valve, new wire to ECU


Engine is now running with no CELs, except for some stuff regarding auto trans.  ECU was from an auto car.  More on that later.

Back to the cage - I wanted to add a few 1.5"x.095 tubes to finish the cage up.  One was a brace between the main hoop and roof:

And the other was to tie the rear stays and strut towers together.  I originally thought about just running a tube between the rear towers.  I ended up using an X in the rear stays.  It added ~6 pounds, but it strengthens the rear towers as well as the main hoop.

Added some A pillar gussets as well:

Window net installed:

Also, I received the Lambda Tuning blueSSM.  It seems to be functioning fine.  I'll buy a tuning license in a week or two and try writing to the ECU.  The first thing will be bumping the rev limit a few hundred RPM.

corey_mck
corey_mck New Reader
6/6/18 1:46 p.m.

So here's how the rear door is going to stay on:

I went through a few ideas, but this was the easiest for removal and reinstall. The two bolts hold the front door shut. There's notches in the door for those two fingers to sit in. So, those bolts also hold the front of the back door in place. The stock rear door latch is still going to be used in the rear.

Also, those tabs are temporary. They'll be built of of something a little more sturdy.

Wally
Wally GRM+ Memberand MegaDork
6/6/18 7:32 p.m.

That’s beautiful work. Is there any reason you ran one bar from the A pillar to the main hoop instead of a halo? I’ve never done one that way and was curious if there was an advantage.  The door bars are a brilliant solution to caging a four door. Make sure you pad that pillar since its inside the cage. I’ve seen drivers get banged up on things a lot further away than they should have reached once they hit a wall. Instead of individually padding each bar I liked using these foam mats like these on the driver’s doors.


http://www.colemanracing.com/Door-Bar-Padding-High-Density-P4329.aspx

1 2 3

You'll need to log in to post.

Our Preferred Partners
NunF8eEBFPvrByxYWszztrNgqUu2Mi9YZe0I6sa2sSaNbJ6BqsiEzylrFGfTb7Kw