1 ... 4 5 6
TED_fiestaHP
TED_fiestaHP Reader
11/11/18 2:55 p.m.

   Good idea but need to add to each end bracket.  You want to add a piece, so there will be a plate above and below the rod end, easy enough, cut up a piece of angle, drill a hole, and bolt it up then weld it.  With it mounted between two plates, nothing can move.

TED_fiestaHP
TED_fiestaHP Reader
11/11/18 2:57 p.m.

  If you need the threaded ends for the tube, Pegasus has those, and a good source for the tubing, aircraft spruce.

paranoid_android
paranoid_android UltraDork
11/11/18 7:15 p.m.

In reply to TED_fiestaHP :

I think I get it- more of a clevis (I think it’s called?)

Nothing is welded yet, so I’m not committed to one design.

paranoid_android
paranoid_android UltraDork
11/27/18 6:58 p.m.

Just over two weeks since my last update.  Sheesh...

Things have happened though.  I’m pretty sure all the front suspension bits I took off the car are now back on the car.  Loosely, many of them, but they are back where they belong for now.

Drivers side:

And passengers side:

New control arm bushings, ball joints and SKF wheel bearings.  The camber bolts (Moog) have me a little puzzled though.  They are different than the originals in that they come with a tabbed, toothy washer to make the cam on the bolt do its thing, but I’m unsure which side it needs to go on.

The bolt head side?

Or the nut side?

I don’t know.

So left to do on this part is source proper fasteners for the lower strut bolt and the pinch bolt for the ball joint (I bought grade 8.8 then learned I should have done grade 10.9).  Press the ball joints and tie rod ends in.  Then start in with the torque wrench.

The strut braces I made are installed too:

I’ll be curious to see how they do.

After all this I’m left thinking about how building a car really can take a village.  Forum help, people I’ve not met in person willing to give me parts and buy some of my old parts, even a millwright at work pressing wheel bearings out and in for me because he thinks my car habit is kind of funny.

I don’t think I would have it any other way wink

¯\_(ツ)_/¯
¯\_(ツ)_/¯ UberDork
11/28/18 6:17 a.m.

My best guess for that tab washer is that it should go on the bolt head side- it's there to keep the bolt itself from rotating, not the nut.  Probably.  I don't know anything about watercooled VWs.

chandler
chandler PowerDork
11/28/18 8:56 a.m.

Bolt head side, alternatively you could use the factory adjuster washers (one head one but) on the new bolts.


edit: it’s not there to keep the bolt from moving but to adjust the camber by running against the raised seam and pushing the bolt (and the strut) in or out on the bottom bolts pivot.

paranoid_android
paranoid_android UltraDork
12/31/18 11:30 a.m.

Thank you guys for the help on the camber bolt.  Now that I’ve messed with them a little more I understand how they work.

It only took me a month, but progress has been made.  The front end stuff is officially together and torqued, aside from the bits that need to be adjusted when I get to the alignment.  McMaster car delivered a good deal on the needed fasteners.

One unexpected problem I had was the fasteners that came with the ball joints.  I put the M7 bolts in place, assembled them finger tight, and tried to torque them to 18 ft/lbs per my book.  After the first two failed I took all six of them out and went to plan B.

They are stamped 10.9, but in reality they are crafted from cheddar.  The hardware store only had M7 in grade 8.8, so that will have to do until I can source appropriate replacements (again).

The bottom of the transmission is back together except for one bolt in the oil pan.  When past me was taking it apart in order to get the control arms off, one of the steel bolts broke off in the aluminum trans housing.  Thanks past me!

It was a hard fought battle, but there is now a hole where the broken bolt was.  No pics of the end result, because it’s embarrassing, but I think a nut and bolt solution will work there.

Otherwise the rear suspension beam is off the car and the salvageable bits are being de-rusted and pained as I have time.  

84FSP
84FSP SuperDork
12/31/18 11:53 a.m.

Great progress here sir!  You can improve your adjustment range by tossing them on a grinder wheel.  If you can track down some camber plates for up top, he trick to improve handling is to increase caster.  This provides dynamic camber preventing you from needing so much static camber.   From memory I’m running 4’ Caster and -1.5 camber. 

paranoid_android
paranoid_android UberDork
2/18/19 9:40 p.m.

The rear beam was de-rusted as much as I could manage, primed and painted.  New pivot bushings were pressed in, and the assembly was put back where it belongs.  New KYB shocks and top hats were installed with the cleaned and repainted stock springs.

The areas I patched in the passenger rear wheel well were primed, seam sealed and sprayed with undercoating.  The end result was not perfect, but it’s in a wheel well.

I tried my hand at filling and leveling the outer part of the same wheel arch.  The end result was actually better than I had anticipated.

The floor pans were declared done some time ago, but it seems I was merely done working on them at that time.  A little more welding got them attached to what I guess is the front bulkhead (I don’t know the correct term), and *now* they are done.  Then primed and seam sealed all the way around, ready for undercoating.

And the best part, this guy —> ¯\_(ツ)_/¯, took pity on me and helped me out with an ultra-hot set of wheels.  On top of getting a rally car ready for an event, he took the time to load these up for me so I could bring them home from the event.  Righteous!

The center bore is a little small, but I think they will work great.

Thank you again, I really appreciate it!

mazdeuce - Seth
mazdeuce - Seth Mod Squad
2/19/19 6:17 a.m.

I love it when this thread pops back up. Watching this become a car again is fun. 

¯\_(ツ)_/¯
¯\_(ツ)_/¯ UberDork
2/19/19 6:20 a.m.

Is the centerbore actually 0.2mm undersized like the internet claimed?  I figured it was just measurement error!

Gunchsta
Gunchsta HalfDork
2/19/19 7:33 a.m.

Those wheels will look super cool! 


Kudos on saving this one, keep up the good work! 

paranoid_android
paranoid_android UberDork
2/19/19 5:52 p.m.

Quite possibly.  I have to try to fit them with the front rotors in place to see if they will fit over they hubs.  That bit of the hub seems to be tapered, so they will start on but not go on all the way.  The rears will need to be massaged to fit on the drums.  Not a big deal though.

I think the offset will work well though.  They are a good bit wider than my stock wheels-

I may need to employ the baseball bat trick to get all that to fit into the fender properly wink

Dusterbd13-michael
Dusterbd13-michael MegaDork
2/19/19 6:29 p.m.

Buy the ebay fender roller. Worth it vs the baseball bat setup.

And those wheels are AMAZING. 

paranoid_android
paranoid_android UberDork
2/19/19 6:47 p.m.

@Dusterbd13- No kidding?  I'd have to buy a baseball bat anyway I guess.

Does it resemble this one?

Dusterbd13-michael
Dusterbd13-michael MegaDork
2/19/19 7:11 p.m.

yessir! have one that i borrow from my tire guy. thing has rolled hundreds of fenders without an issue. 

paranoid_android
paranoid_android UberDork
3/2/19 9:21 p.m.

Tonight's update brought to you by...

Since I haven't been able to make a parts order, I've been after other nagging things that I simply haven't wanted to do.

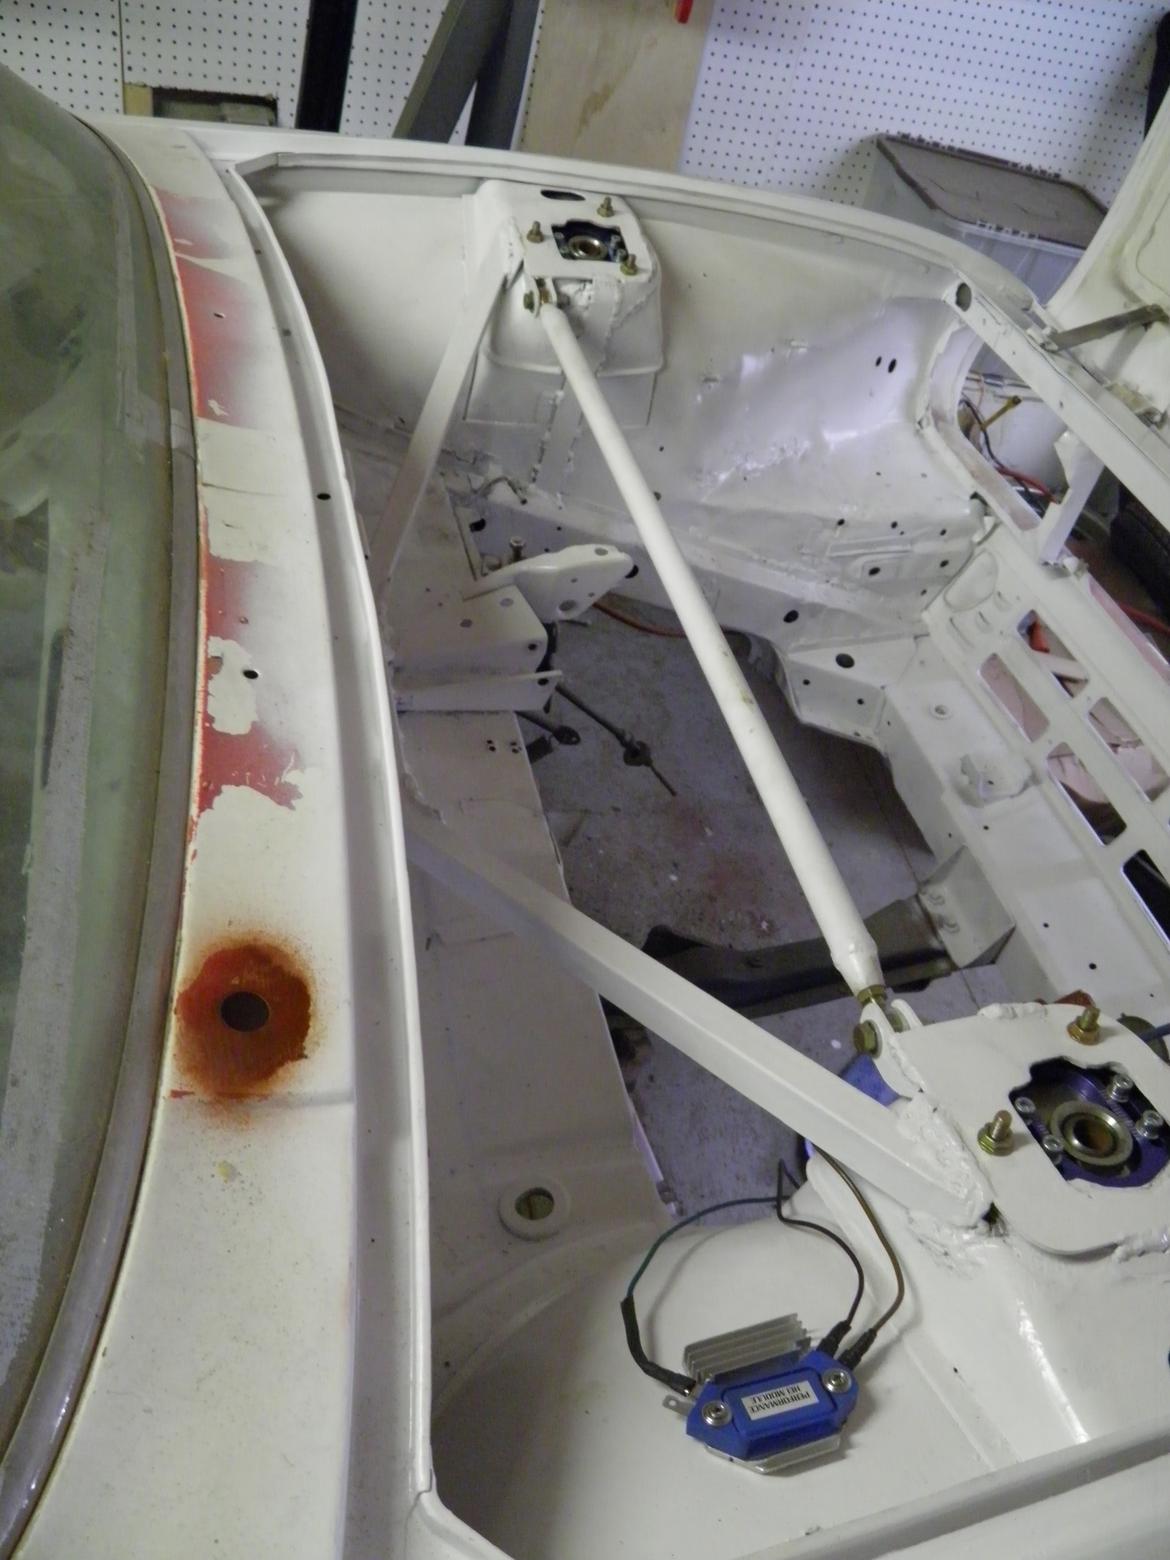
The roof of the car had worked itself free from the interior "cross brace" the factory installed.  It was glued in place, and the glue failed.  So to keep the roof from acting like a steel drum when it's driven, I welded the two items together.  (Camera is on the floor of the car pointed up)

Then after hours of cleaning, removing ever more of the heinous carpet glue, scuffing and cleaning again, the floors are painted.  Two coats of gloss white Rustoleum.  White was definitely the right color to go with, it is so very pleasing to look in there now.

I didn't paint the bottom of the spare tire well because there is a rust hole I need to repair first (hardly a surprise at this point)

There is so much room in there!  This view ^^^^ in particular always brings the following scene into my head...

Three cans of Rustoleum undercoating were sprayed on the underside of the floors.  I didn't take a picture because they look the same, but now they are black instead of gray.

The front bumper was removed, and rust was addressed on the front "valence".  Luckily none of it had eaten through, so no repairs were needed.  But I ended up sanding the whole area, then stripping the paint to make sure all the rusty stuff was exposed.

Made sure it was as clean as I could make it, then primed it with a can of paint from our sponsor.

And that coat will dry for a while until I decide which can of Rustoleum to use on it next.  Quite possibly a layer of the undercoating I used on the floors, as the label says that stuff can be painted over.  So it could then be painted the same color as the rest of the body.

In the meantime I've started considering final colors for the body.  The original paint (I believe) is called Frost Blue, and Rustoleum does not make a color close enough to fake it that I have found.  Neither do the other paint makers in this market segment.  Internet.com searching shows there are some paint codes out there to match it from PPG and someone else.  It seems to me that it would look very nice in white, but a complete color change would require far more effort than I have to offer.  More to think about I guess!

paranoid_android
paranoid_android UberDork
3/23/19 3:00 p.m.

Body work is not an easy task.  Doing it well isn’t anyway.  That's pretty much what I've been up to with this car, cutting out rust holes and patching them up.

The bottom of the passenger door toward the front had a hole, and I tried my hand at bending my own piece to weld back in.  It didn't turn out the way I wanted.

The before from the inside:

The same view after:

And the outside:

In this last image, you can see I didn't get the curve right to match the shape of the front fender.  After making a CADboard template off the other door and farting around with matching it, my piece came out too straight.  If I get over it I'll leave it alone.  Otherwise I have to take the (heavy) door off again and do something with it.  Luckily taking the door off by myself (again) is a big incentive to leave it.

Then around to the driver's side front fender:

The repair piece taking shape:

Welded in:

After a few trips  between the welding department and the grinding department, it ended up being pretty close:

So now prime, sand, fill, sand, fill again, sand, etc.

I got the die cast dealer badge off the rear hatch too, and using good advice I got here made it a little more presentable than it was.

The next adventure will be cutting the rust out of the rear hatch and reattaching the "skin" to the "frame".  Somehow water must have been getting into the hatch, settling along the bottom edge and working its nefarious magic.

EvanB
EvanB GRM+ Memberand MegaDork
3/23/19 6:58 p.m.

I'm at the point in my project where i hate body work and never want to do it again.

paranoid_android
paranoid_android UberDork
3/23/19 7:44 p.m.

In reply to EvanB :

I agree.  For me that ship sailed months ago.  And I don’t have a fraction of what you have to do on the Volvo truck!

When do you plan on painting?  I need to figure that process out for myself.


EvanB
EvanB GRM+ Memberand MegaDork
3/23/19 8:10 p.m.
paranoid_android said:

In reply to EvanB :

I agree.  For me that ship sailed months ago.  And I don’t have a fraction of what you have to do on the Volvo truck!

When do you plan on painting?  I need to figure that process out for myself.


Did the first coat of primer today, hoping for paint next weekend. I still need to figure out how to do it.

brad131a4
brad131a4 Reader
3/23/19 10:17 p.m.

Ok those top bolts on the struts are killing me. Let see if I have the correct ones. If so I'll send them your way to go with the struts. If you have a automotive paint store close they can mix up and put in spray cans the color you want. It's not the best way but you can paint the whole car. I've done single stage and put it on thick and then wet sanded and polished it. Looked pretty good for a dd or track car.

rattfink81
rattfink81 New Reader
3/24/19 2:17 a.m.

I’m following this build as it’s pretty much what I’ll be doing with my 82 rabbit shell that’s been following me around for like 6 plus years now. 

paranoid_android
paranoid_android UberDork
3/24/19 1:50 p.m.

In reply to brad131a4 :

Those are crap grade nuts, I know.  They were all I had on hand when I was putting the struts in.

The proper ones are on my list to get ;-)

1 ... 4 5 6

You'll need to log in to post.

Our Preferred Partners
c2PjXSrKAiQaHPq6e7QXqnT5CJpP8xBVSAULxI2hvHEhZNRjH7zrpbuu3fWhtYnd