Earlier today, after procrastination all morning, I finally bit the bullet, pulled on my shop clothes and went back to work.
Engine was out in an hour or so.


To my surprise, half of each motor mount decided to stay in the car, despite being un-bolted. Turns out they were totally split. Stupid fluid-filled mounts. Seems that they have this issue frequently. Wasn't too happy about that - those things are expensive. Guess I'll be making my own - add it to the list. 
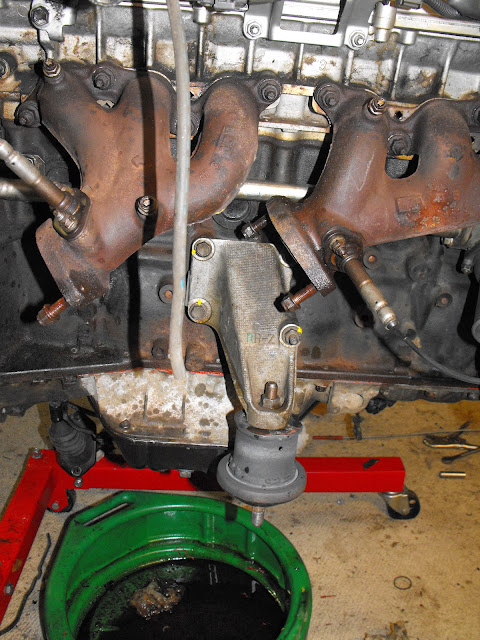
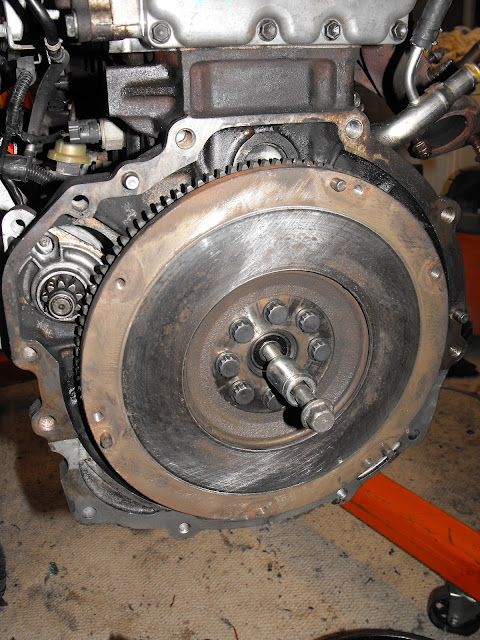
Before putting the engine on a stand, I wanted to take care of the rear main seal since it's tough or impossible to do on the stand. I figured it would be leaking based on the gunk built up on the bellhousing - yep.

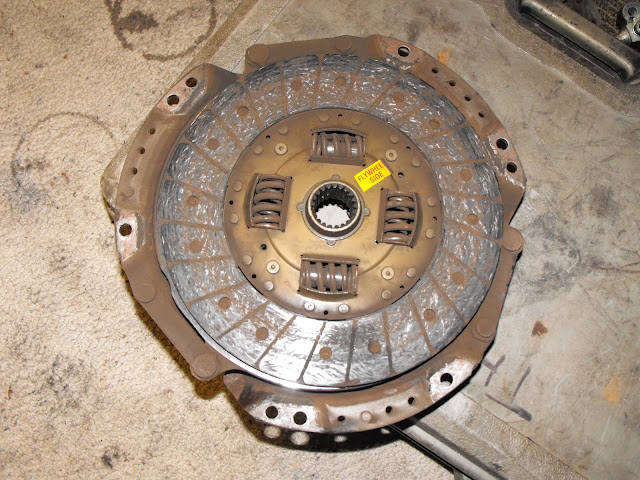
Fortunately, the pressure-plate and flywheel still look serviceable, though not the greatest I've seen, and the clutch has some meat left on it. In the interest of saving a couple bucks, I'll probably just hit the irons with some sandpaper and call it good.


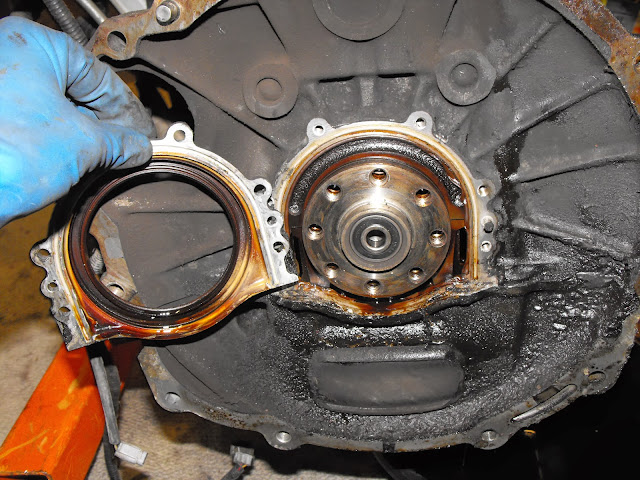
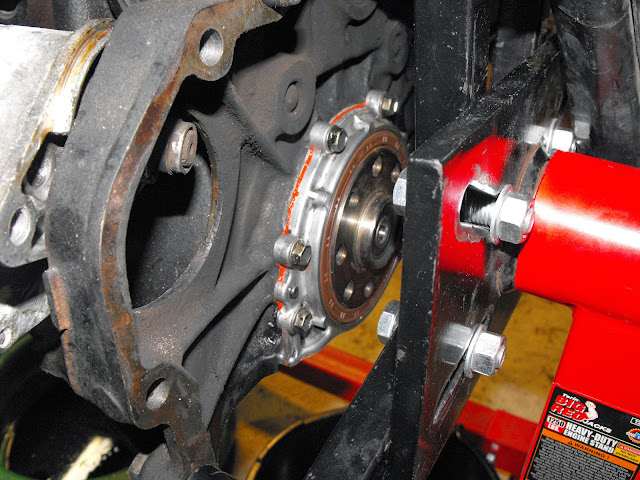
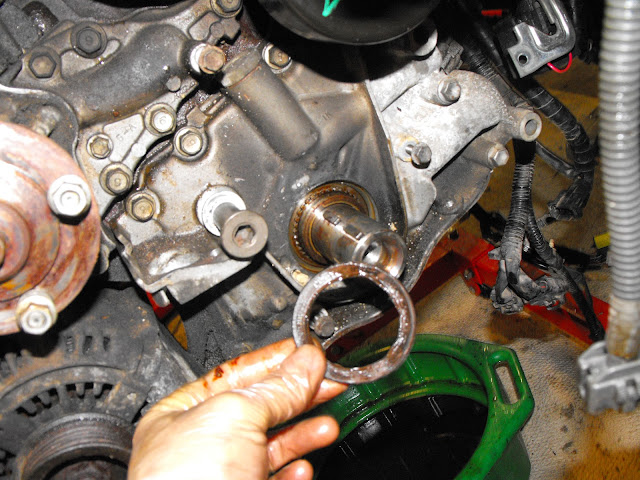
Here's the rear main seal retainer out. You can see where it was leaking oil pretty clearly. I think it was actually coming out between the retainer and the oil pan, not around the seal, but I had a new seal so in it went.
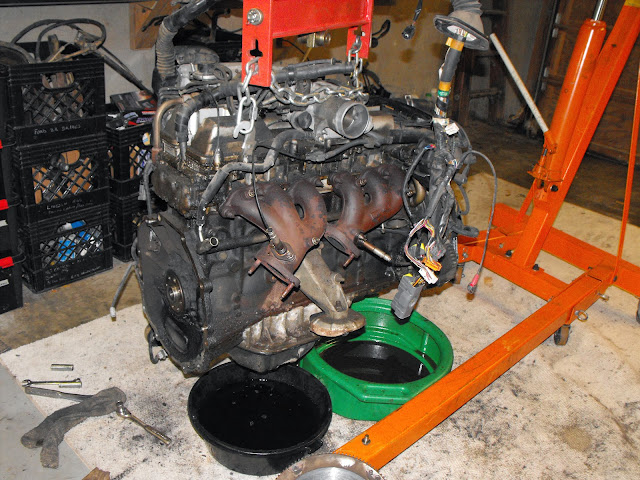
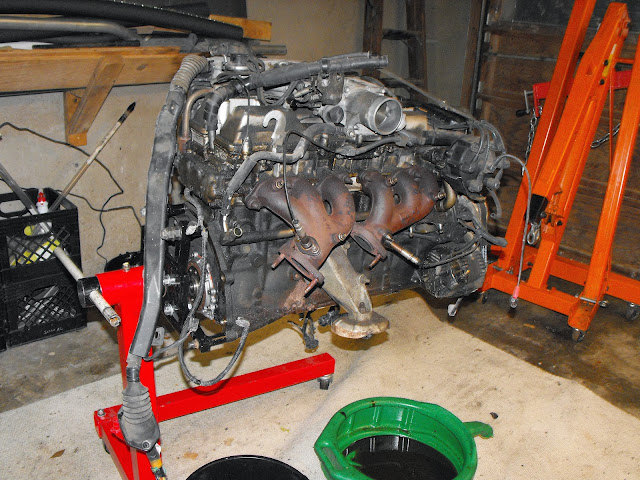
As you can see, after getting that out of the way, the engine went on the stand for the rest of the tear-down.

In order to do the rear main seal, I had to remove both oil pans (another questionable design decision from Toyota). When draining the crankcase the oil had come out with zero evidence of any crud or metal shavings, though it was definitely used. However, when I dropped the pans I found some strange gunk that had me worried. Looked like what you get when water is mixing with the oil.


I took a look up into the crankcase and decided that there was probably some water that had slowly leaked into the case from either the dipstick or the oil level sensor while it was in storage - don't think it'll be a problem

If anyone has some more insight about what this is, let me know!
Oil Strainer was free of any debris - good news here.

Next, I pulled the intake assembly so I could get at the valve covers.

Hard to see in the pictures, but the runners and valves were reasonably clean and free of any major carbon buildup.

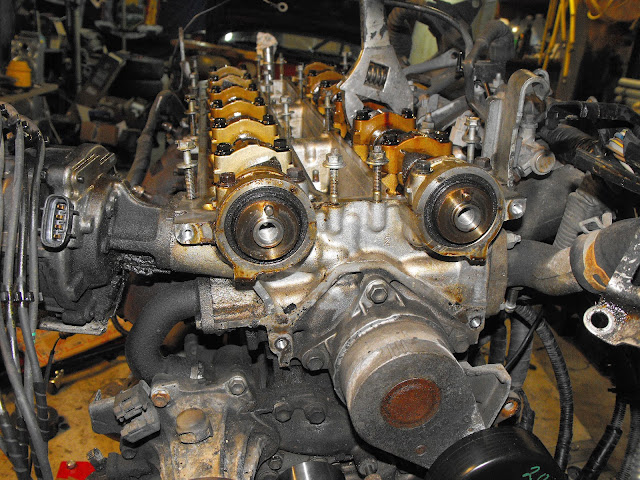
I pulled one of the valve covers briefly to check the condition of the valvetrain.

Looked pretty decent. There was a little minor carbon buildup, but nothing major (and nothing a little racin' and some frequent oil changes won't cure!).
Wear on the came lobes was fine as well. Looked like an engine with 125k miles, but no scoring or pitting.
With that done, I bolted the valve cover back on and called it a night. Later in the week I'll put the oil pans back on and pressure wash the engine before replacing the rest of the seals, gaskets, water pump, timing components, t-stat, etc.
That small bit of an emulsion is from the moisture in the air. I have seen much worse than that without any issue with the cooling system.
If you run the car but don't get it fully warmed up, it will do exactly that. Sometimes you can see it on the underside of the oil cap.
In reply to wvumtnbkr:
Cool - that's what I was thinking, but wasn't positive. Thanks for the confirmation!
Happy Holidays to everyone. One last update before Christmas.
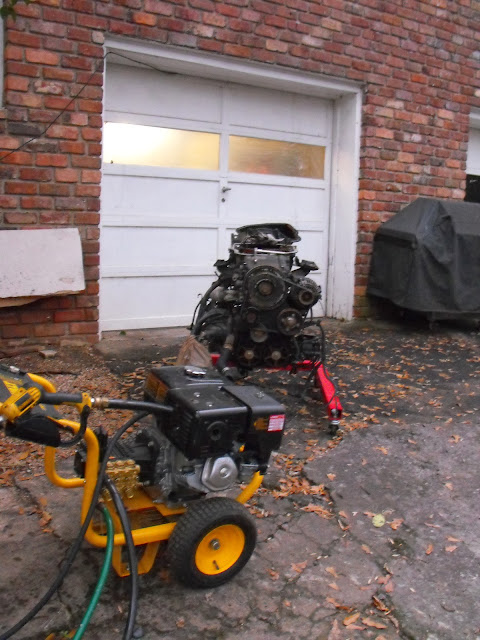
Dragged the engine outside yesterday to blast off the worst of the gunk with my pressure washer.
 Hit the oil pan first before reinstalling it.

Bagged up the ECU connectors and any open ports then blasted the engine.

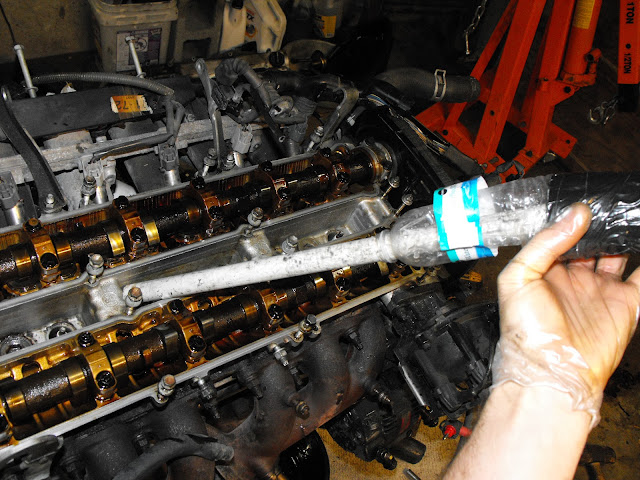
Back inside, wanted to pull the plugs to make it easier to set the engine at TDC and replace the timing bits. The plug valley on this engine is pretty inaccessible and there was some debris in there, so I needed to clean it out before pulling the plugs. I cut an old waterbottle in half and duct taped it to my shop vac hose. Used this as a reducer to a length of pipe and was able to clean out everything even down in the sparkplug holes.
Old plugs came out.
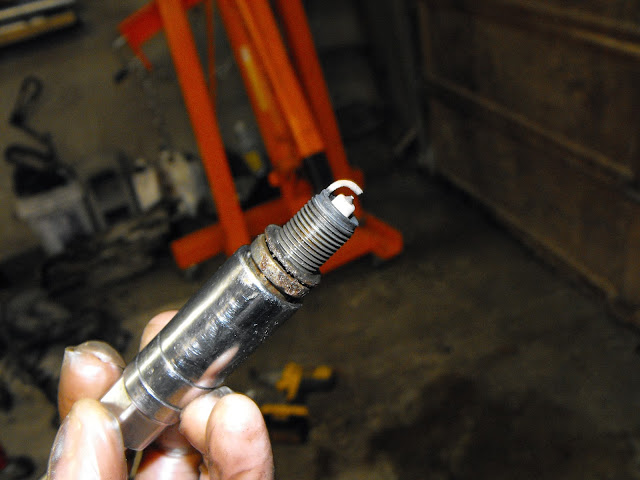
They all looked to be in pretty decent condition and were all gapped at 0.043" (0.044" is factory spec). So I boxed them up for spares.

New plugs came gapped at 0.040", which I figured would be fine and might give me a little room for safety against misfires with the potentially weaker used ignition bits that are on the engine.

With the engine at TDC, popped off the crank pulley, with a little persuasion.

Crank timing pulley was a little trickier. Luckily, I had an old custom sway bar bracket that I made up for the RX-8 sitting around and that was just the right size to use as a puller. Will keep that in with the race tools for this car from now on!

Here's the front main - maybe some slight leakage, though not as bad as the rear.

Carefully pried it out with a small screw driver.
Replaced the timing tensioner pulley, which had a little play, but was still usable in a pinch - into the spares bin.

New tensioner went on as well. I love pulling the little pins on these - something very satisfying about it.

Cam pulleys off - old seals were leaking a little and were replaced.

Then on to the water pump. The old unit looked terrible from the outside, though it spun well with no play.

Turns out the internals were in excellent shape - spares bin for this as well. Comparison with new unit:

New gasket for the water pump and installed the new pump head. Also swapped in a spare alternator while I was in there so I could check if it was in good shape. I also hit the accessory belt tensioner with the wire wheel to clean it up. Timing pulleys went back on along with the new belt and pulled the pin on the tensioner. I re-compressed the old tensionser in a bench vice and pinned that one to keep as a spare.
And with that the front of the engine is pretty much done.
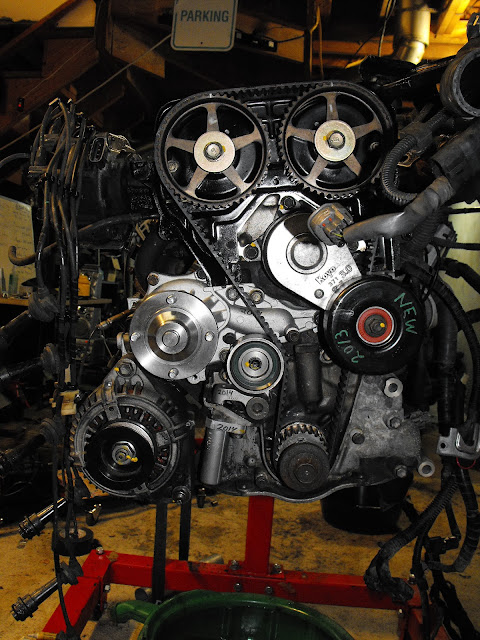
Valve cover gaskets, oil pan gaskets and some other miscellaneous seals still need attention, then it'll be ready to go back into the car.

Cool build. I've had 7 SC's and love the cars. I have two shells and am trying to decide which way I want to go, chump car, 700rwhp track monster or both.
Are you going to pull that AC blower out? It's about 35lbs under the dash. Steering column is 40lbs if I remember correctly. Hood is 50lbs, maybe could cut some vents and the bracing out of it. Doors are 100lbs+ each, door hinge is about 20lbs I believe. Trunk is about 50lbs. Any idea how much your doors weigh now?
ABS is about 15-20lbs, but will probably help with braking, they're a PITA to bleed without the Lexus ABS bleeder and never get the correct pedal feel.
The stock fan and shroud have been proven to be more efficient than 99.9% of the electrical fans. Most people with electric fans overheat. You could get a supra radiator, they're not plastic like the SC300 radiators. On the stock GE motor I had to upgrade the radiator, use ducting and put an oil cooler. May be wise to put a power steering cooler as well. Brake ducting is another thing.
Check your front control arm bushings they are most likely bad. Could get prothane bushings for $50, but may get a penalty for that. Could get some OEM new or used Control Arms. Also the steering rack bushings are most likely shot. Aluminum bushings are best or you can get OEM replacements.
Awesome build!
In reply to fried_rice:
Thanks for all the tips - always great to hear from someone who's really familiar with these cars.
I am undecided about removing the HVAC fan, column adjusting motors and ABS. I think I'll leave them all in for now. They're all nice to have for longer races depending on the driver/conditions. If it were just me, I'd ditch the column bits and ABS, but since there are 5 other drivers who need to fit in the car and aren't familiar with it, I think it's best to start conservative and pull those things after I decide that they're not worth the weight.
Hood, trunk and door hinges are definitely on the list of items for weight reduction. Good to have a general idea of the weight.
As far as the fan. Hopefully it won't be an issue. I've used this same model fan before on my Datsun and it's pretty good at moving air. Also, in an endurance race, it really only needs to be working in the pits for a minute or two. It's rare that the engine is running and the car isn't moving at or near race speed. (Not like a daily driver where it needs to sit in traffic with the A/C running when it's 100 degrees and sunny outside.) I'll keep an eye on it though - good to know that others have had an issue.
Brake ducting is in the plans. I'm trying to get away without using true endurance racing pads, so I'll be doing everything possible to keep the brakes from overheating.
Control arm bushings - I've been hearing this one from everyone. I'll probably take a look at those in the next week or so.
Thanks for the comments - much appreciated!
Why would you not run endurance pads?
In the last few days I've finished up pretty much everything on the engine: oil pans sealed, pickup tube gasket, drain-lug gasket, new oil filter, dipstick o-ring, valve cover gaskets, distributor gaskets, distributor cap and rotor, new t-stat and o-ring, ERG gaskets, reinstalled the timing covers, etc. Still need to bolt the intake back on, but otherwise I think it's ready to go back in the car.


Before that can happen though, I needed to de-power the steering rack, replace the transmission input shaft seal and figure out what to do about the destroyed motor mounts.
Drained the transmission oil first. Came out looking really fresh - mabye a recent change? No steel or brass particulates either, which is unusual in my experience, even for a transmission in good shape. Anyway, pulled the front cover:

New seal and some RTV.

Cleaned everything up with special attention to the throw-out bearing and clutch fork. TO bearing was in good shape (as was the pilot) so it just got a good cleaning and new grease. Same with the pivot for the fork and the input shaft collar.

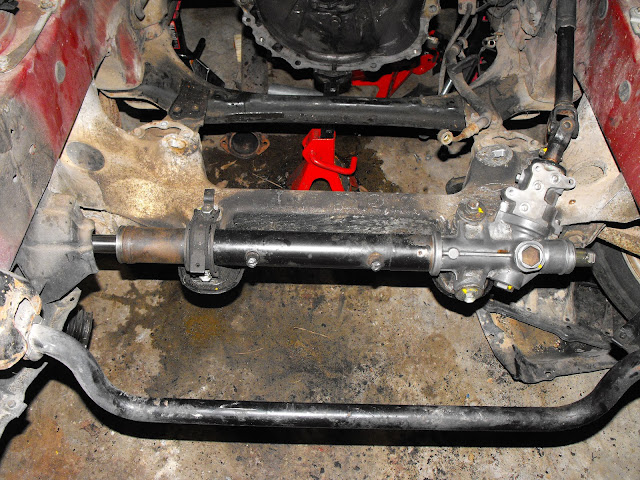
Next, I pulled the motor mounts and rack.
To avoid messing up the alignment too much, I removed the inner tie rod ends rather than the outer ends.

And pulled the rack.

It has some funny electric valve on the hydraulics (maybe to control steering boost with speed?). Discarded that.


To get the preload mechanism out of the rack body a really large hex driver was required. I didn't have one so a large SAE bolt and some beefy vice grips did the trick.

Here's the pinion shaft exposed.

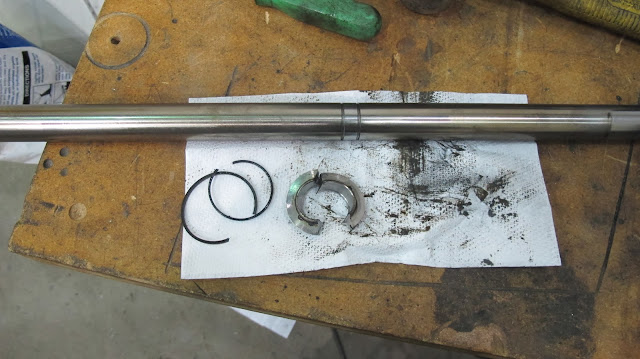
The pinion shaft was removed and a circlip was removed from one end of the rack tube. With those out of the way the rack itself could be gently tapped out of the tube.

Cut the seal off the rack bar.
Cleaned and re-greased all the shiny bits and reinstalled everything. You can see in the picture below that I also removed some of the hydraulic valving that was on the pinion shaft. Probably not necessary, but I figured it was just extra weight and resistance.

Needed to seal up the holes for the hydraulic lines to keep debris from getting inside. I welded up the holes in the aluminum parts because it was faster than tapping threads to put in a fitting.

Cut the fittings off the original hydraulic lines and welded them closed and used them to plug the threaded holes.
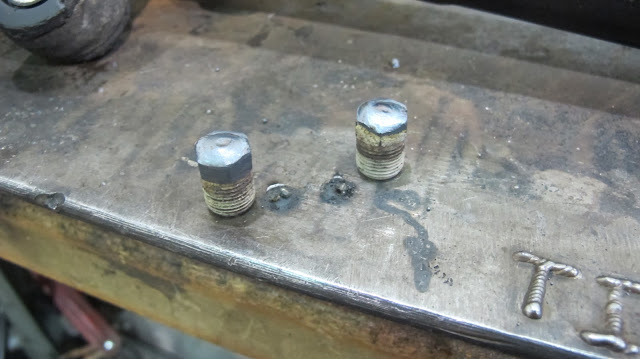
Rack tube holes were welded shut.

Despite what the welding table says, I used a MIG for this. TIG is much pickier about the oil, rust and large gaps.
And, here's everything reassembled and sealed up.

With that, it was on to the motor mounts.
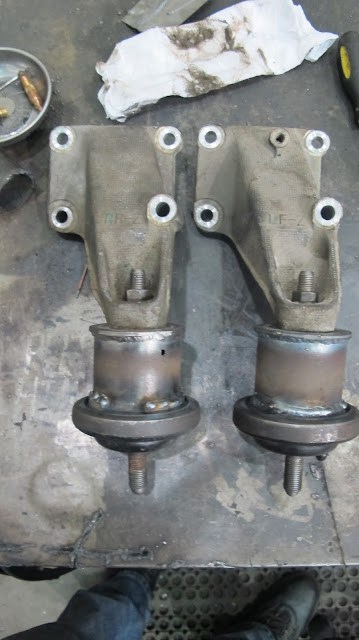
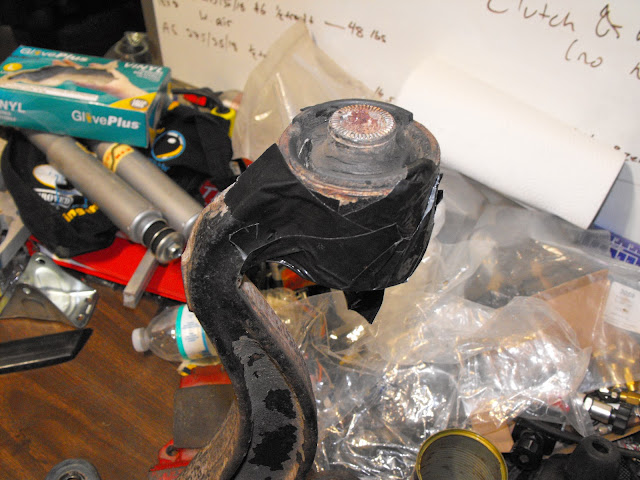
Here's what they looked like when I got the engine out of the car - ouch!

I would have happily replaced these with OE units, except it's about $150 for the pair. I didn't want to get dinged with extra value from ChumpCar for aftermarket mounts or material, so it required some creativity. I decided that making some new solid mounts out of exhaust tubing removed from the car would be a clevar way to go.
So, I cut apart the original mounts and removed the rubber with a wire wheel. Here's what's left after that:
Comparison with un-prepped mount:

There was enough left of one of the original mounts to figure out the correct height of the mount (right around 2 inches).

I then cut some sections of that used exhaust tubing.

And welded it up.

Unfortunately, these mounts were fluid-filled and there must be a porous reservoir in the base of the mount. I drained them beforehand and rinsed them with acetone, but while I was welding damping fluid kept leaking out all over the place - huge mess and a real pain in the butt for welding!  I was concerned about the oil vaporizing and the mounts exploding as I sealed them up, so you can see that I drilled a little hole in each tube to allow the oil vapor to escape. The holes were blowing out oil vapor like a tea kettle on full boil after I was done welding - a little unnerving. Worked out ok in the end though.
wvumtnbkr wrote:
Why would you not run endurance pads?
They're just stupid expensive for this car (like $450 a set for racing porterfields, raybestos, etc). I can get three sets of EBC Yellowstuff pads for that much. So I'm going to give that a try for shorter races. With the much larger calipers, rotors, and ducting, I think I can get them to last ok. There are other teams with slightly lighter cars that get them to work without issue, so I'm hopeful.
When we get to 24 hr events, I'll have to break down and get real enduro pads, but I am curious to see how this will work, and interested in saving the money, if it works.
Also, as a technicality, it's not legal to spend more than 2x parts-store prices on brake pads in ChumpCar for 2014. It sounds like there's something of a gentlemen's agreement with other teams and the officials to overlook pads, but I think a grumpy team could still call you out on it if they wanted.
Wow! That's stupid money for pads. I have heard teams have good luck with the wag.er severe duty pads. Are they available?
Rob R.
With the LS400 brakes up front you'll have pretty good stopping power even with crappy pads. I never had a problem at stock GE horsepower with brake fade and some autozone pads, but at higher horsepower 400+ they start fading after one or two hard laps. I've used the EBC Yellowstuff, they're alright. Better than stock pads for sure but I hear the Carbotechs are in another league(expensive).
Many people have had problems overheating on track while using electric fans. Even specific kits for supras that cost big money. If you go electric you'll need to build an aluminum fan shroud and make the inlet ducting air tight to the radiator. The only electric fans that I've seen proven with real race 2JZ's are the spal fans. I hear the IS300 stock fans work well too. Most of the people overheating are turbo'd and 400-700rwhp, so that may skew the reviews. Once you go turbo you need to V-mount the intercooler setup for any prolonged racing.
One thing I know for sure though is the stock fan and shroud is 100% track proven up to 400hp.
The only reason I suggested to pull the ABS is because it can give you a dead pedal feel if it's not bled via the Lexus dealership tool. May be a problem if you fry the brakes at the track and need to rebleed. I had this problem.
Cool idea with removing the Progressive power steering. It makes the car have really luxurious turning at low speed, like one finger turning, but sucks for the track. I just unplug mine.
Loving the fab skills, make me a cage, that's my biggest headache as of now. Like you I'm not going to spend $4000 on a cage when I have the welding machine. Just got to get a pipe bender.
Intake was bolted back on and associated vacuum lines and wiring were reinstaleld.

Rack went back in.
Couldn't get any new claw washers from any of the Lexus/Toyota dealers or local parts stores, so I had to pull out the old ones and hammer them back into shape.
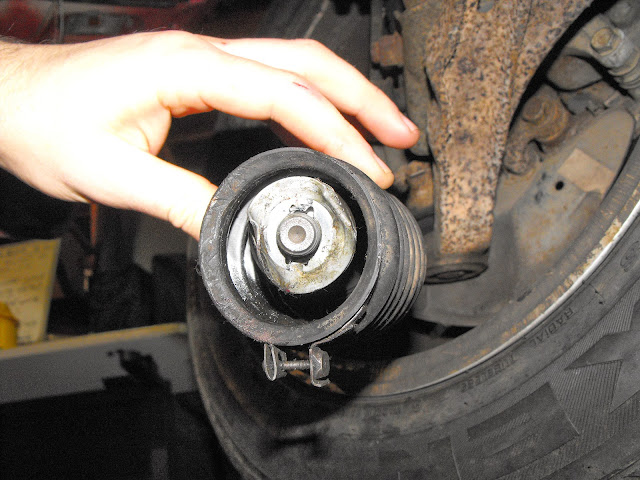
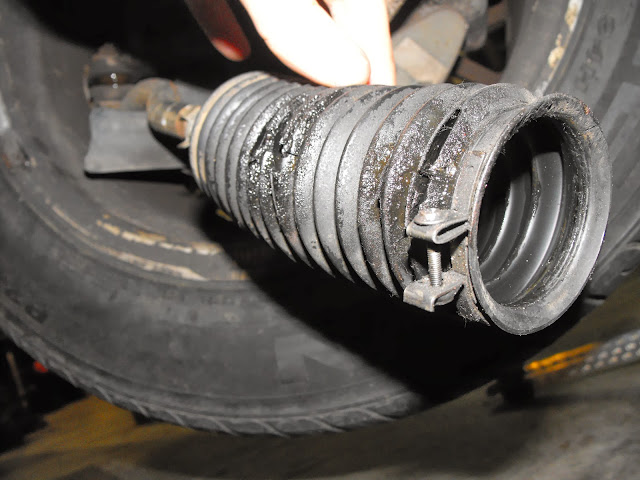
I noticed some tears in the bellow - crap, over looked that before I ordered all the parts. So, I duct taped it up. Should hold until I can get a replacement on there and do another alignment.
Next, needed to get the clutch assembly installed. Rigged up a little "Lexus special tool" to hold the crankshaft.
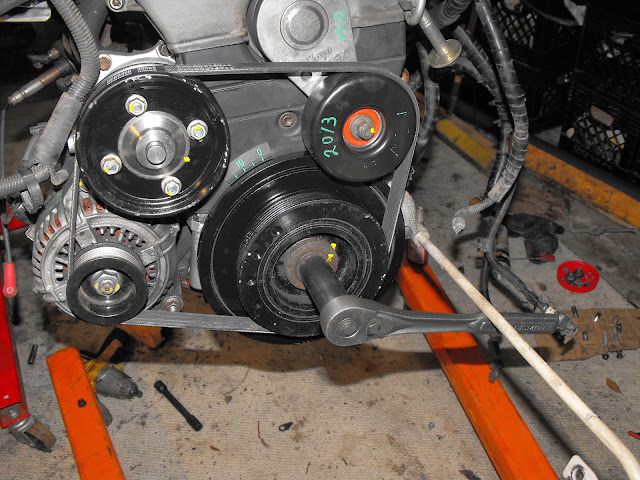
Flywheel went on and bolts were torqued down.
Made another "special tool" to position the clutch - bolt and a socket worked great.

Pressure plate back on.

And finally, engine back in.

I had to mess with the mounts for a second to get everything lined up, then start some of the bellhousing bolts to pull the engine back on to the dowel pins in the transmission, but then it all came together and I dropped the motor down onto the mounts.

Spent an hour or two hooking up all the wiring, plumbing, filling the oil and coolant, etc, and finally fired it up this evening. Looks like I got everything back together OK. No CELs, everything worked just like before. I let the engine warm up and burn some of the anit-seize off the exhaust, then brought it back inside. When I started it up, I thought it was quite a bit louder and thought maybe I hadn't gotten the exhaust bolted up well. But, I realized that it was just the metal motor mounts. The transmission is a LOT louder too thanks to the mount. Just from driving it in and out of the garage I could really hear the gear collars clicking into place when shifting and it whines like crazy in reverse.
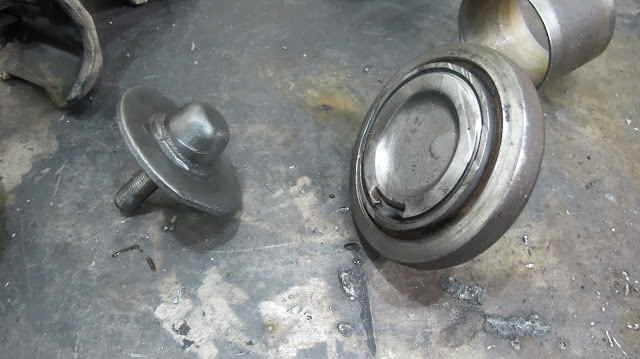
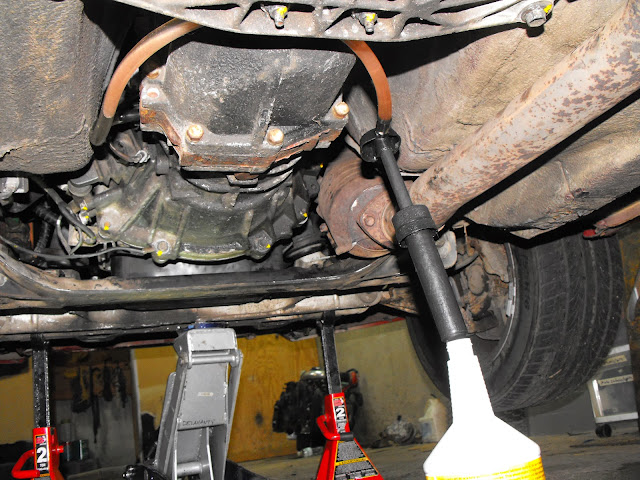
Before driving it any distance, I still needed to fill the transmission and before doing that I wanted to replace the output shaft seal.
Dropped the exhaust again and unbolted the front driveshaft and mount.

Pulled out the driveshaft to expose the seal. Pried out the seal and tapped in a new one.

It's very difficult to get the shifter off this transmission with it in the car, so I couldn't fill it from above and needed to get out the trusty oil pump.

Pumped 3 quarts of Redline MT-90 into the trans, then everything went back together.
So, with that, the drivetrain refresh is done. We've got a track day coming up on the 11th as a shakedown for the car, so the next week will be spent getting the brakes and cooling system finished up, installing at least a minimal amount of safety equipment, and hopefully making some suspension changes (cutting springs and an alignment).
I know when I drove my RX7 up and down the driveway BEFORE I remembered to fill the trans, it whined like crazy! After filling it up, no more whine!
Rob R.
In reply to wvumtnbkr:
Maybe that's it. If it stops raining today I'll take it for a quick spin and see if it's still as noisy with the new oil in.
To follow up on the motor/trans mount noise - the gear whining is mostly gone now that it has trans fluid. Gear shifts are still really loud. Suits me just fine; because racecar!
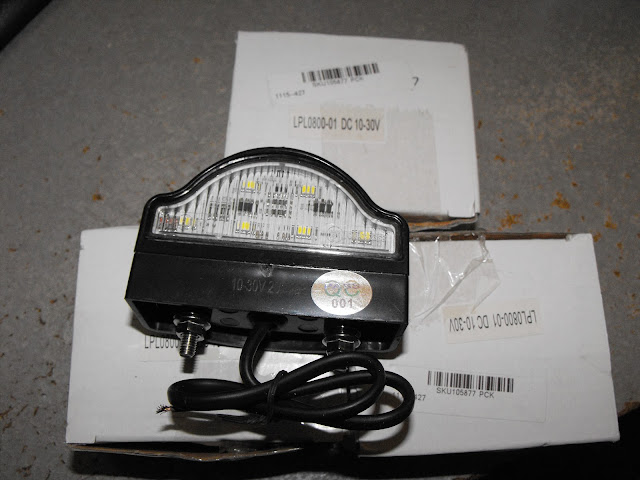
Got in one of the last bits of kit that I'm expecting to need - lights for the number panels. They're required for night races in ChumpCar. I bought three so we have a spare in case we get side-swiped at some point. ChumpCar's supplier for these pulled out to support another series, so I ordered these straight from the manufacturer in China. Was a little bit cheaper anyway, though it did take ~4 weeks for them to arrive.
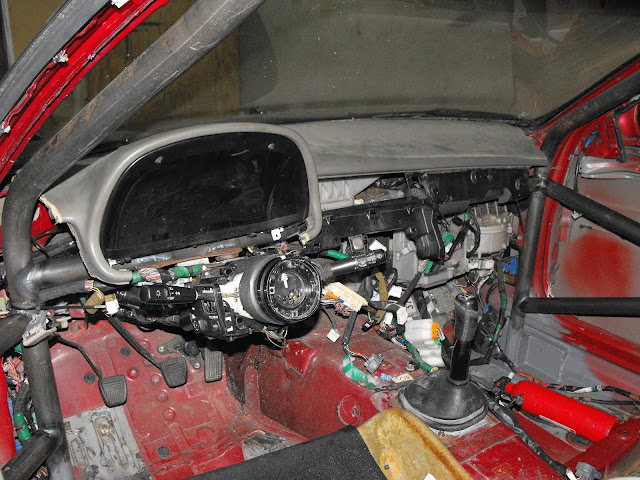
With the drivetrain refresh complete (everything seems great after some test drives), I have a list of smaller tasks that need to be completed in the next week before the first track day.
Having the gauge cluster bouncing around was bugging me, so I reinstalled the dash and mounted the cluster. It's much better and as I mentioned before I like having an OE dash even in a race car; just looks a little cleaner, IMO. It'll need to come back out so I can paint the dash bar and while it's out I'll spray the dash with some bedliner, which gives a nice matte, textured finish.

Next, I wanted to modify the passenger and driver's window rails so that the glass can be easily removed and installed. I want to retain the ability to install the windows to keep out the weather when the car is sitting, etc.
So, I trimmed the window rails so that the glass could be slipped out of the rails and removed.

Pulled out the glass.

Works great. I got the idea after seeing teams doing something similar in some coverage of a German enduro last year.
With those minor tasks done, I decided to tackle some of the suspension work. I am hoping to get an alignment done next week, so I needed to cut the springs and check all the bushings/balljoints, etc. The first few bolts came out ok, but the lower control arms and tie rod ends/balljoints on both sides were really corroded and tough to remove. I don't recall running into this much trouble with bolts since moving down here from NY.
Here's the first tie rod end. Tried banging it out with a sledge first.

No luck. Didn't have a ball joint separator, so tried a pulley puller next. Broke an arm off that.

Got out the next larger puller and the propane torch. Tightened up the puller, heated the joint, then smashed it with the sledge - finally success!

It still managed to bend one of the bolts on the puller though.

After fighting the hardware for a few hours, I finally was able to remove everything from the driver's side. Also got everything out of the passenger's side except the lower A-arm. Turned out one of the eccentric bolts was seized in the bushing sleeve. Nothing to do but drop the subframe - crap...
Subframe with the a-arm and seized bolt.

The offending bolt.

With everything out of the car, I tried pounding out the bolt with a sledge, but no luck; just started to bend the subframe tabs. So, I gave up for the night and decided to take it to the shop and put it in the arbor press in the morning.
So, this morning I took the subframe to the shop and stuck it in the press. Still nothing. Couldn't get the bolt to budge and just bent the frame tabs some more. I decided to just cut off the bolt ends and pull out the arm.
That finally did result in separation of the arm and subframe.

Unfortunately, the bushing and sleeve on the arm were pretty fubar and the subframe was bent up enough that I felt it would be a pain to get it back in shape.

So, it was off the the junkyard for some new/used parts.
I was able to find a '92 SC400, which shares suspension components with the SC300, and picked up the subframe, control arm, a sway bar endlink, spare tie rod end, rack boot, and a full set of eccentric bolts for ~$70.
New subframe.

I stopped back at the shop afterwards to cut down the springs, which needed to be done before everything could be reassembled.
Pulled apart the shock assemblies.


Decided to start with cutting off one coil, which is roughly a 3" drop (a little less, since the spring rate will increase). I had done a rough measurement earlier and though it might be possible to drop up to 4" in the front, but I wanted to make sure that there was ample room for bump travel in the wheel wells.

Busted out the plasma cutter and hacked apart the springs. You can see I wrapped the spring with a wet rag to keep the rest of the spring from being heat treated, though I don't think all that much heat goes into the spring with a quick cut.


Then I ground some flats into the ends of the springs so the load on the mounts isn't too localized. There are also some weird bending moments that are applied to the shock if the springs aren't loaded correctly. This setup isn't the best for that, but in my experience, it isn't bad enough to break anything. More importantly, it's free in the ChumpCar budget. And most importantly, it's free for me!

While I had everything apart, I also swapped in some softer and shorter bumpstops. The OE pieces were hard as rock and pretty long. Didn't see that being terribly well suited to a lowered car.

Here are the complete assemblies back home and ready to go in the car.

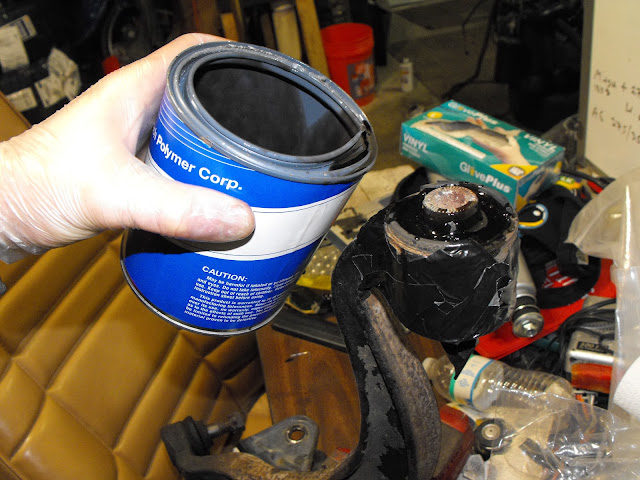
As many folks have informed me, the lower control arms have a bushing that's very prone to tearing after the 100's of thousands of miles that these cars accumulate. Actually, the ones in the original arms were in pretty decent shape, with only smaller cracks/tears. However, I destroyed one removing it from the subframe, and the replacement from the junkyard had a totally busted bushing. Rather than pay hundreds of dollars for an entirely new OE arm, I decided to fill in the torn material with OE-equivalent liquid urethane.
Here's the better bushing from the driver's side arm. Taped it up to retain the urethane.
I had about a half can left from doing my Miata motor mounts, so I mixed that up and poured the bushings. Note that these were window-style bushings, so rather than remove all the OE material, I just cleaned it and poured the new material to fill the windows, cracks and tears.
Passenger's side.

After pouring.

I used the remaining material to cast a cylinder, which I could cut down at a later date if needed for sway bar or other bushings.

While that was set aside to cure overnight, I reassembled the subframe, upper arms, hubs, tie rod ends, etc. Before putting the hubs in, I cut off the rotor heat shields. They don't fit the LS400 rotors, and while they do make mounting brake ducts easier, they don't offer too many other advantages (maybe some consistency in wet-weather braking).

Tomorrow, I'll reinstall the lower arms, torque everything and start work on some of the safety items.
One last bit of work to report. The ECUs from these cars (and many vehicles from this era) are known for having issues with capacitors leaking corrosive dielectric fluid onto the PCBs. When I got the car that was something that I checked and sure enough, there were two caps that had this issue. Fortunately it hadn't caused any extensive damage. I wanted to replace them anyway, so I dropped the ECU off with my friend Josh Symonds (who is also driving the car at the February race) and he replaced the caps for me since he has access to better soldering equipment and happened to have some suitable caps.

And finally, though not related to the work updates, a couple more recent pictures of the car. These were taken right before I started on the suspension work, so the car still has off-road-worthy ground clearance.


what an awesome base for a chump car....phenomenal prep too man..wow! My lemons car got 1/10 the prep!
First of all, that is a very nice find! I would be sorely tempted to, after racing it at a few Chump events, tear it back apart and make it a "nice" track day car as budget allowed after graduation.
However, I must agree with the others about the stock fan. Put it back on. There are Mark-IV Supras out there running four-digit horsepower numbers utilizing that stock, belt-driven fan. There's nothing wrong with it, and it moves a lot of air.