1 ... 7 8 9 10 11 12
JohnyHachi6
JohnyHachi6 Dork
5/31/14 1:02 a.m.
Kenny_McCormic wrote: Its a Toyota, shooting TB cleaner through the IACV when it idles funny is routine maintenance.

Yeah, maybe I'll give that a shot before pulling it all apart. I have a feeling it's pretty shot though. I just wish it were easier to get it out - damn thing requires disconnecting the TB and some hard-to-reach coolant lines and wiring.

Mazda787b
Mazda787b Reader
5/31/14 1:17 a.m.

Your videos are now all private.

JohnyHachi6
JohnyHachi6 Dork
5/31/14 9:51 a.m.

Try that. Silly Tubes. Always messing with stuff.

nhmercracer
nhmercracer New Reader
6/8/14 7:09 p.m.
JohnyHachi6 wrote: Here are the LED spot lights that I'm planning to run for the upcoming race at Road Atlanta. The race ends at 10:00 or 11:00 PM so the last two stints will need lighting. I would run the OE headlights, but I am concerned about the chances of destroying them in any potential contact and prefer the idea of hood-mounted units. These also draw less power and should be somewhat brighter. They did run me a fairly pricey $81.56 for the pair, but that's a deal on LED spotlights with CREE LEDs and I consider it something of a safety item. FYI, ChumpCar has some very specific rules about lights and LED headlights in particular. I was careful in selecting these to be sure that they would be legal.

Where did you get these? How do they perform?

JohnyHachi6
JohnyHachi6 Dork
6/8/14 8:03 p.m.

In reply to nhmercracer:

Ebay, straight from China. Just make sure they're CREE LEDs. I haven't had a chance to use them on the car yet, but tested them out in the shop and they seem very good. I'll write up some more on them when I get them installed (hopefully later this month).

nhmercracer
nhmercracer New Reader
6/8/14 8:51 p.m.

Excellent!

Epic build BTW. I read it one sitting.

JohnyHachi6
JohnyHachi6 Dork
6/8/14 9:07 p.m.

Thanks! It's been fun. Can't wait until I have a little more time/money to do more races.

Seefo
Seefo
10/20/14 5:34 p.m.

So how is the car on consumables during the race? how long are brakes lasting? 12+ hours? what about tires? Can you get 2 hours from one tank of gas?

JohnyHachi6
JohnyHachi6 Dork
10/21/14 11:39 a.m.

To be honest, I don't really have enough data to answer this with a lot of certainty.

Based on the 1 weekend we did, and what I've heard from talking with other teams with SC300/400s, I can say that the OEM tank should get an SC300 through a 2 hour stint without a problem. The SC400 is a little thirstier, with the same size tank, but I think you'd still be OK on all but the most high-speed tracks.

During the weekend at Road Atlanta (sprints, practice, enduro) we used about 1/4 to 1/3 of the EBC yellowstuff pads and about 1/2 the tread on our BFG Rivals. I feel pretty confident that we could get the pads and tires to last for a 12 hr enduro if they're pretty new at the green flag, but it depends a lot on the track and drivers. I haven't done a close inspection, but I didn't notice any cracking of the rotors and expect them to last for at least a couple enduros. That said, I think our team was pretty easy on the brakes. I would expect wear to be much higher if we were turning quick laps for most of the race (which we weren't really, due to the clutch and fuel pump issues).

The nice thing about the car is you can use the bigger brakes from the '95 and up LS400 and be within the rules, so pads/rotors last longer. Also, a lowered SC300 can pick up as much camber as you want, so tire wear is pretty good. We're running ~3 degrees of camber all around on our car and wear was very even.

Seefo
Seefo New Reader
10/21/14 3:59 p.m.
JohnyHachi6 wrote: To be honest, I don't really have enough data to answer this with a lot of certainty. Based on the 1 weekend we did, and what I've heard from talking with other teams with SC300/400s, I can say that the OEM tank should get an SC300 through a 2 hour stint without a problem. The SC400 is a little thirstier, with the same size tank, but I think you'd still be OK on all but the most high-speed tracks. During the weekend at Road Atlanta (sprints, practice, enduro) we used about 1/4 to 1/3 of the EBC yellowstuff pads and about 1/2 the tread on our BFG Rivals. I feel pretty confident that we could get the pads and tires to last for a 12 hr enduro if they're pretty new at the green flag, but it depends a lot on the track and drivers. I haven't done a close inspection, but I didn't notice any cracking of the rotors and expect them to last for at least a couple enduros. That said, I think our team was pretty easy on the brakes. I would expect wear to be much higher if we were turning quick laps for most of the race (which we weren't really, due to the clutch and fuel pump issues). The nice thing about the car is you can use the bigger brakes from the '95 and up LS400 and be within the rules, so pads/rotors last longer. Also, a lowered SC300 can pick up as much camber as you want, so tire wear is pretty good. We're running ~3 degrees of camber all around on our car and wear was very even.

Good to hear. Btw, I think we talked once a long time ago on miata.net. I remember asking you for the models on those seat mounts.

Did you guys do any estimates on the spring stiffness after the cutting? What tire size are you guys running? 225 on a 16" wheel?

JohnyHachi6
JohnyHachi6 Dork
10/21/14 4:49 p.m.
Seefo wrote: Good to hear. Btw, I think we talked once a long time ago on miata.net. I remember asking you for the models on those seat mounts.

Oh, cool. Yeah, I remember that.

Seefo wrote: Did you guys do any estimates on the spring stiffness after the cutting? What tire size are you guys running? 225 on a 16" wheel?

IIRC, the springs had 5 coils originally front and rear. We cut one coil off the fronts and about 3/4 of a coil off the rears. The OEM spring rates are something like 350 lb/in front, 180 lb/in rear. So, after cutting they would be something like 440 lb/in front, 210 lb/in rear.

The soft rears, the fact that we removed more weight from the back of the car than the front, similar camber all-around, zero toe out, and natural tendency for the car to understeer from the factory all point to a car that would understeer a lot. However, we left the rear ride height a little high and put as much weight in the back of the car as possible (battery, fire system, etc). The result: the car is actually very well balanced in the corners. Just a little bit of oversteer. If the rear were lowered any more and everything else stayed the same, we'd need to change something to get the balance back to where it should be.

Honestly, when we were doing the springs, I didn't really consider this stuff too much. I figured we'd try it out and cut another set of springs if we needed to make adjustments. This happened to work quite well though.

Right now, the biggest limitation on cornering is the shocks. OEM dampers just aren't cut out for lower, stiffer springs. ChumpCar just changed the rules about shocks. (Frankly, it probably puts this chassis at a disadvantage.) We'll probably run Tokico Blues in the future. I'm not going to be buying them any time soon though, since I just shelled out for some OE-replacement KYBs.

Tires are 225's as you said. Mounted on 16x8 wheels, with something like 38mm offset (don't remember for sure). The wheels BARELY clear the LS400 brakes. On the lexus/supra forums they generally say you can't get 16's to clear, but it's possible with the right wheels/spacers. We actually had issues at the test day with the wheel weights hitting the caliper due to the close clearance and had to move around the weights.

As far as tires go, if you want to be competitive and don't mind breaking the bank, you can run WAY wider tires. Problem is, they get WAY more expensive too. 225's are the widest available Rivals for 16" wheels at the moment.

Seefo
Seefo New Reader
10/22/14 7:45 a.m.

you may find its not too bad. We are still considering cars, but from my searching TRM has a 17x9+62 that should fit in the rear based on the fitment thread (fronts are a little more questionable, one of our guys has them on his s2k, so we are going to test fit if we go with the SC300...). 245/255 RS-3s are around $150 in the 17" sizes, which is pretty close to the 15" sizes' price. Alternatively XXR has cheap wheels in the area, but I can't speak for durability here. They very well may crack on a frequent bases which is not economical at all. Alternatives would be RPF1s, but those are little too rich for my taste. I guess the initial cost of getting a 17" can be very discouraging though since it looks like you are paying twice as much (since you have to buy wheels + tires)...

You could do 18" and run 275/285s, but that is definitely breaking the bank.

MichaelYount
MichaelYount Reader
10/24/14 7:10 p.m.

I'd upgrade brakes now. As you sort out other issues, lap times will definitely drop and drivers will become MUCH harder on the brakes.

JohnyHachi6
JohnyHachi6 Dork
2/18/15 10:59 p.m.

So, update time... Been a while - very busy with the graduate work.

I had the car started up a couple months ago to work on something and it was smoking pretty badly. Looked like coolant steam. I pulled the spark plugs and #2 cylinder had some steam coming out of it...

I wasn't 100% sure that it was coolant steam and I couldn't find any definitive issue so I just decided I might as well just tear the head off since I kinda wanted to check everything, lap the valve seats, replace valve stem seals, etc.

Head came off without issue. I left my camera at the lab, so don't have pictures of the headgasket right when the head came off. I didn't see any obvious signs of failure, though.

JohnyHachi6
JohnyHachi6 Dork
2/18/15 10:59 p.m.

Head off.

JohnyHachi6
JohnyHachi6 Dork
2/18/15 10:59 p.m.

Needed to take the valves out to send it to the machine shop for cleaning and shaving. Used the OE door bar as a nice lever along with a socket to compress the valve springs and pop out the retainers. Gotta be careful not to slip and send all the little bits flying around the garage!
Used a nice little plastic box I had kicking around to store all the components, labeled for each valve.

JohnyHachi6
JohnyHachi6 Dork
2/18/15 10:59 p.m.

Also removed all the manifold studs and temp sensors. The shop didn't actually care either way, but I didn't want them damaged. Interestingly, you can see that the intake port on #2 cylinder (the one that was steaming when the spark plug was removed) is cleaner than the others.
Same thing here with the #2 cylinder. No serious issues with the head, though there was some pitting between cylinders. I checked it with a straight-edge and feeler gauges, and it was still almost perfectly flat (less than 0.001" from flat).

Close-up. This is after I scraped the head surface with a piece of lexan to remove the old gasket material.

JohnyHachi6
JohnyHachi6 Dork
2/18/15 11:02 p.m.

Don't think I grabbed any pictures of them, but I was careful to label all the valve buckets with a paint pen when I removed them - need to be very careful about this because the contain shim stacks to get the correct valve clearance and if you get them mixed up it's a very involved process to get them back to the right specs. (I have pics when we get to re-assembly)

JohnyHachi6
JohnyHachi6 Dork
2/18/15 11:14 p.m.

Since I couldn't find and cracks, and the head was pretty straight, I took it to a local machine shop to have the mating surface re-cut (shaved) and get it cleaned and inspected. I took it to Will's, which was recommended by some fellow GRMers and is apparently where DIYAutotune (makers of the common MegaSquirt kits) has some of their work done. Seemed like a good shop and they did pretty nice work. I didn't want to pay for hot-tanking, so they just sprayed it down. They also caught that I had left the valve spring washers in place (they stick in there real when due to the oil surface tension) and pulled them out for me when I dropped it off.
They had it done the next business day and the price was pretty reasonable. I hate paying to get work done on my cars, but I've milled heads before and wasn't keen on doing it again. 
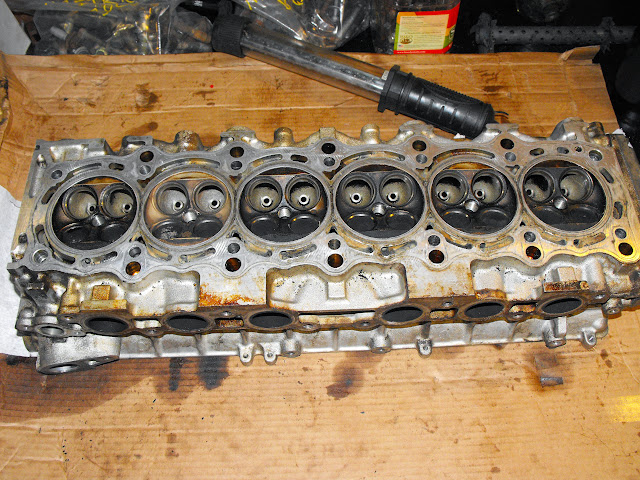
I made a note, when I picked it up, of how much material was removed. Ended up being 0.004". Seemed a very reasonable amount. I had considered asking them to take it down quite a bit to raise the compression ratio, but didn't want to be cheaty and also didn't want to mess with extra timing belt slack and possible valve/piston clearance issues.

JohnyHachi6
JohnyHachi6 Dork
2/18/15 11:16 p.m.

Back from the shop.


Mmmmm... Flat, clean-ish engine bits.

JohnyHachi6
JohnyHachi6 Dork
2/18/15 11:26 p.m.

With the head and valves out, this was a great time to re-seat the valves. Got a little tube of lapping compound and the local Advance parts store and used a piece of rubber hose to connect the end of the valve stem to my drill.
This worked out really well and is something I've done before. I don't have enough expertise to say, but you don't want to take off too much material because this will close up the valve clearance. Just want to clean up the seats. Before (right) and after (left). 
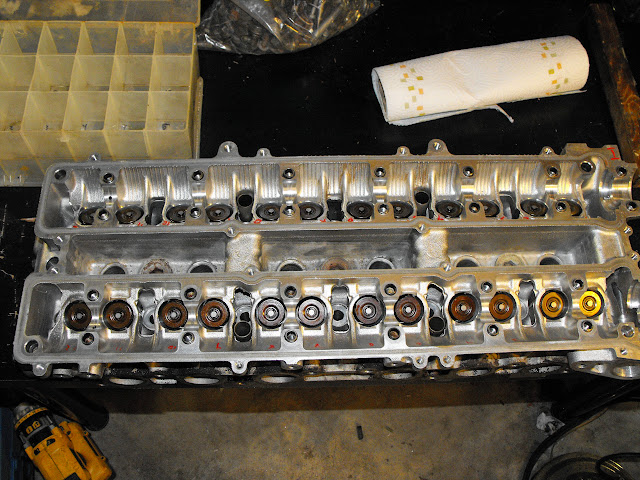
Not super clear, but the lower right seat hasn't been lapped and you can see some pitting and carbon. The upper right port is done and you can see a nice smooth seat.

JohnyHachi6
JohnyHachi6 Dork
2/18/15 11:26 p.m.

Also put in new valve stem seals, which came with a genuine Toyota head kit that I picked up on Criagslist previously.

JohnyHachi6
JohnyHachi6 Dork
2/18/15 11:29 p.m.

In order to get the valve spring assemblies back in, I used the door-bar lever again, but needed access to the retainers, so I cut up an old, extra spark plug socket. I think maybe the GRM guys have done this before too.
Spring assemblies all back in. It was a little tricky and I almost sent some of the retainers flying a couple times, but it worked out fine in the end. You can see I numbered the valves with a paint pen to keep things easy.

JohnyHachi6
JohnyHachi6 Dork
2/18/15 11:29 p.m.

And from the other side.

JohnyHachi6
JohnyHachi6 Dork
2/18/15 11:36 p.m.

Took some time to clean up the block surface.
Also checked the block for flatness. It wasn't perfect. Ended up a little over 0.001", but the spec called for 0.0039" or less, so good enough.

Also spent a couple minutes cleaning up the head bolt threads.

1 ... 7 8 9 10 11 12

You'll need to log in to post.

Our Preferred Partners
qtvKK0JVfCAkDf4RaXtwgWnAGrkh6ZAlamU7YOkHfhKSQdUNu93BXIhfQQ6F3b8x