1 ... 41 42 43 44 45 ... 63
Stampie (FS)
Stampie (FS) GRM+ Memberand MegaDork
11/3/20 3:22 p.m.
Robbie (Forum Supporter) said:

Let me send around some PMs and collect some good availability from everyone over the next couple weeks. We could possibly offer up to other folks on the board to listen in too. 

Can I listen in and nod my head while soaking up the knowledge?

AngryCorvair (Forum Supporter)
AngryCorvair (Forum Supporter) GRM+ Memberand MegaDork
11/3/20 4:03 p.m.
Stampie (FS) said:
Robbie (Forum Supporter) said:

Let me send around some PMs and collect some good availability from everyone over the next couple weeks. We could possibly offer up to other folks on the board to listen in too. 

Can I listen in and nod my head while soaking up the knowledge?

Two outta three ain't bad...

stafford1500
stafford1500 GRM+ Memberand Dork
11/3/20 4:12 p.m.

Robbie, below is the general layup I suggested for another project. Note the foam core will be captive one the carbon/epoxy goes on. The other thing about this is that the outside was intended to be compressed with the off-cut of the cores, as a box around the wing, and then the entire thing vacuum bagged to pull the excess resin out of the cloth (max strength to weight). The idea is to include the main spar as part of the layup and reduce the need for secondary work. The 1st element is an S1223 profile.

RACEC4R
RACEC4R New Reader
11/4/20 10:14 a.m.

I'm down for a Webex/Zoom or whatever to chat aero. 

I would not bring anything meaningful to the discussion, but I'm always down to geek out on car stuffs.

Robbie (Forum Supporter)
Robbie (Forum Supporter) GRM+ Memberand MegaDork
11/6/20 9:01 a.m.

Sorry I've been slow on this guys, I'm sending out PMs to schedule now. 

buzzboy
buzzboy Dork
11/6/20 1:53 p.m.

In reply to stafford1500 :

How do you layup both sides of a wing at once? Would that be vacuum infused? I build surfboards in a vacuum bag but we only are able to layup one side at a time but we're hand laying then wrapping in peelply/breather and vacuuming.

Mr_Asa
Mr_Asa GRM+ Memberand SuperDork
11/6/20 2:33 p.m.

In reply to buzzboy :

Check out my posts on the previous page.  Gives at least one possible way to do it.

sleepyhead the buffalo
sleepyhead the buffalo GRM+ Memberand Mod Squad
11/6/20 3:04 p.m.

In reply to buzzboy :

are you running out of time before the epoxy kicks?

stafford1500
stafford1500 GRM+ Memberand Dork
11/6/20 3:29 p.m.

In reply to buzzboy :

using a form/tool on the outside and bagging the entire assembly. That locks the core in the molded part. Epoxy exit/breather would be a the trailing edge that gets trimmed off after curing. This is intended to be done with pre-preg, but can be done wet with a long enough working time to get everything aligned.

buzzboy
buzzboy Dork
11/6/20 3:40 p.m.

My fiberglass mind is so stuck on surfboards I forget things about other shapes. The ends of the wing don't get glassed? I was thinking more about having a surface that you can handle between layup and getting it into the bag. You're also doing a single piece of cloth that wraps the top and bottom and seams at the trailing edge. We've got a seam along each rail and about 2" of lap onto the opposing side to deal with. I've seen people hold the first lap with staples but that's not an elegant solution. And prepreg makes a lot of sense.

Very cool stuff. I'm super interested in composites and love seeing how it's done in other industries. Techniques from wholey unrelated builds can crossover and lead to some very unique products. 

Robbie (Forum Supporter)
Robbie (Forum Supporter) GRM+ Memberand MegaDork
11/7/20 9:27 p.m.

In case you didnt see it on the main page - I'm hosting a google hangout tomorrow to talk aero. See here:

https://grassrootsmotorsports.com/forum/grm/join-the-discussion-for-how-to-make-project-f-dat-an-aerodynamic-machine/178349/page1/

sedrat
sedrat New Reader
11/9/20 10:50 p.m.
stafford1500 said:

Robbie, below is the general layup I suggested for another project. Note the foam core will be captive one the carbon/epoxy goes on. The other thing about this is that the outside was intended to be compressed with the off-cut of the cores, as a box around the wing, and then the entire thing vacuum bagged to pull the excess resin out of the cloth (max strength to weight). The idea is to include the main spar as part of the layup and reduce the need for secondary work. The 1st element is an S1223 profile.

Thought I'd share an anecdote from my Formula SAE days... Our wings were manufactured similar to what you have here (though only two plies). We tried placing the wings within the negatives (the "off-cut") for a cure once, but that didn't allow us to get even vacuum pressure across the entire surface. Placing the wing directly into the vacuum bag seemed to get us the best parts (with adequate breather, release film, etc). I also would wrap a thin sheet of mylar around the carbon surface during the cure. This gave us a great surface finish with minimal post-work. You just had to ensure the mylar was taut; otherwise, you'd end up with ridges and bubbles on the surface and you'd have to redo the part

I haven't looked through this entire thread yet, so maybe you're aware of this. I just saw the thread for the aero call in General, and thought I'd pop in


EDIT: Actually, just realized... I think we used the Selig 1223 one year. That trailing edge was really difficult to get right IIRC, since the profile is so thin up there. I think we just sent it regardless though

Mr_Asa
Mr_Asa GRM+ Memberand SuperDork
11/9/20 11:23 p.m.

In reply to sedrat :

If you've got any pics of manufacturing, that might be a help.  I thought I had some but they've gone the way of old hard drives.

Robbie (Forum Supporter)
Robbie (Forum Supporter) GRM+ Memberand MegaDork
11/10/20 9:47 a.m.

In reply to sedrat :

thanks for the tips! I'm basically completely new to working with composites, so assume the worst. 

TVR Scott (Forum Supporter)
TVR Scott (Forum Supporter) GRM+ Memberand Dork
11/10/20 10:26 a.m.

One idea to keep in mind - you can practice making parts with fiberglass and get your technique down.  The cloth behaves pretty similarly to carbon, but is a fraction of the cost.

sedrat
sedrat New Reader
11/10/20 1:56 p.m.

Can't find any of my manufacturing process pictures unfortunately, but here's some more info

We had two main layup processes, a two-stage process for the larger elements, and a single stage process for the flaps. 

For the two stage, we'd layup the leading edge after laying up the main surfaces. This allowed us to use a thicker (stiffer) mylar sheet on the first stage surface layup to avoid the ridges you see below. After that cured, we'd layup the leading edge strip in a second layup, with a thin sheet of mylar conformed to the profile. Having this done separately allows you to tape the mylar to the wing surface, so that it doesn't move when you bag it. The leading edge was done as the second stage as the tape would press into the foam core under vacuum without the carbon skin. 

For the single stage, we'd just layup the entire wing with the thin mylar. It was a lot easier to avoid the ridges with the shorter chord length. 

We settled on a two-ply layup for all of our wings, but never really did any testing to validate that. 1 ply was too weak and 3 ply seemed unnecessarily heavy. We'd use a plain weave for the inner skin and a "Spread-Tow" for the outer skin. The idea here is that the spread tow would better distribute the aero loads across the surface and that the plain weave would better handle the local loads. Really though, the spread-tow just looked cool, but we didn't have enough material donated to use it for both plies. We would, however, apply reinforcement patches at the mounting points. We would add a 2 ply patch about 1-1.5' oversized around the mounts.

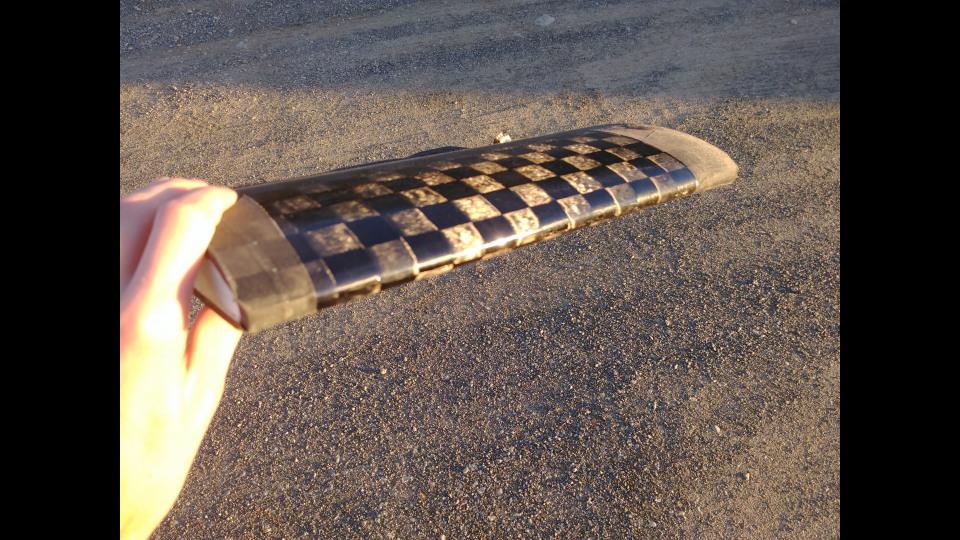
Here's a picture of a front wing flap made with the single stage process so you can see the kind of surface finish you can get. The edges didn't have mylar as the span for the FW flaps is short. 

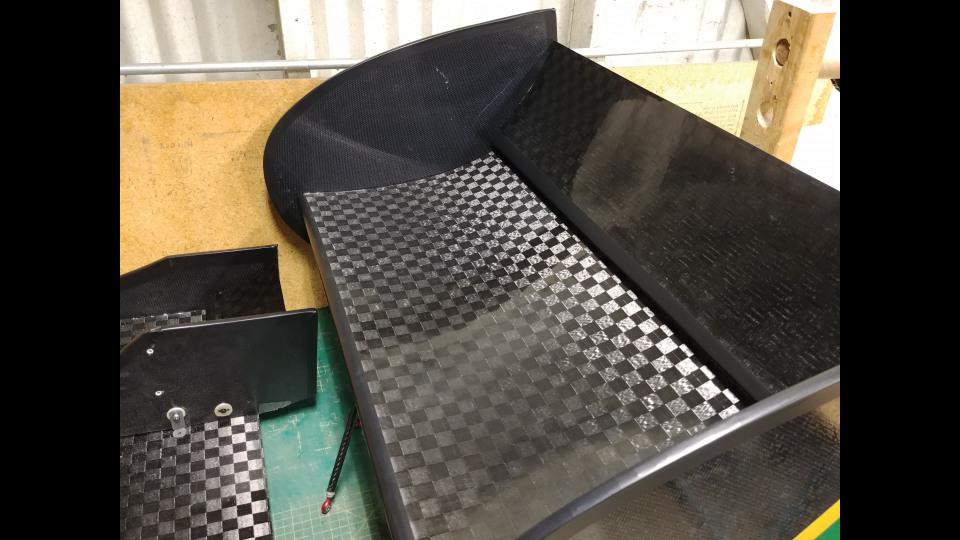
Here's one of the full rear wing assembly. This was made during the year we didn't have the thin mylar, so the leading edges weren't as nice. We ended up sanding them down and taping over them.

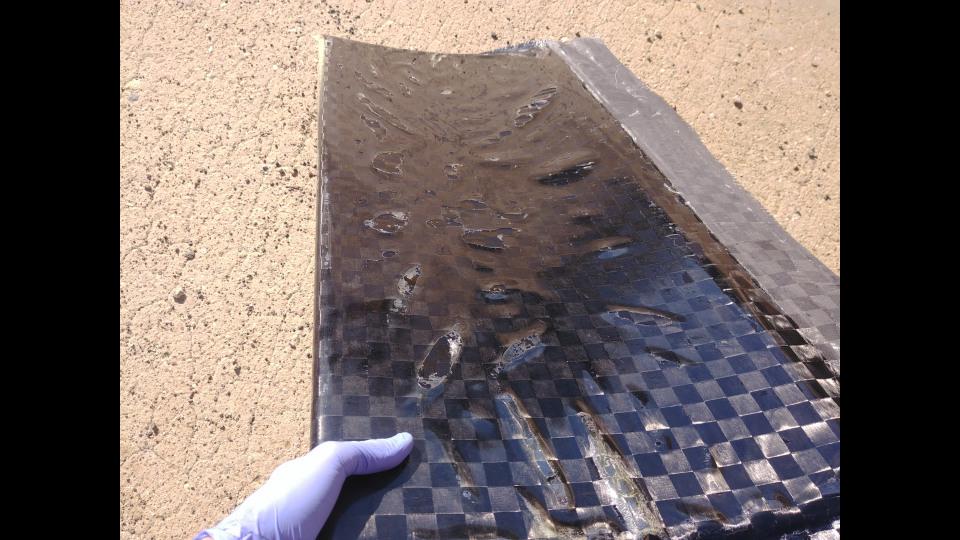
Here's a picture of the ridges when trying to use the single stage layup for the mains. 

Couple more notes. You shouldn't need to apply a release coat to the mylar, but it's good practice and is good insurance to prevent it from sticking to the carbon. We usually used Frekote, but there are many options. You'd want that wrapped in teflon sheets or some other release layer, and that wrapped in breather, before placing the wing in the bag. 

The mylar is kinda finnicky to work with, but you can get great results. Let me know if you want any more details, happy to add

sleepyhead the buffalo
sleepyhead the buffalo GRM+ Memberand Mod Squad
11/10/20 2:29 p.m.

we used mylar in similar way on our AIAA DBF flying wing design; although we picked up the trick from a previous team, who'd figure out to cut the mylar into an 'upper' and 'lower' panel, and to connect them with a bit of packing tape at the leading edge.  You had to make sure it there was a good fit at the nose, into the 'back' side of the tape... but we had good results.

buzzboy
buzzboy Dork
11/10/20 5:00 p.m.

In reply to sedrat :

I'm really surprised the Mylar was sticking to the epoxy. Depending on the work I'm doing I'll throw cloth wet with epoxy straight into the bag with no peelply or breather and it doesn't stick at all. It doesn't allow me to dictate where the excess resin goes though, which the peelply does.

Mylar is nice in that you don't have to come back in and hotcoat then finish sand, right? I might have to pick some up to play with.

sedrat
sedrat New Reader
11/10/20 10:15 p.m.

In reply to buzzboy :

Yeah, the mylar makes it so there's less post work to be done. Now that I think about it, I think that we had the mylar sticking issue when we reused (a somewhat dirty) sheet of mylar. So yeah, if you keep it clean, you should be fine. 

Robbie (Forum Supporter)
Robbie (Forum Supporter) GRM+ Memberand MegaDork
11/18/20 11:08 a.m.

Saving this picture because reasons...

Robbie (Forum Supporter)
Robbie (Forum Supporter) GRM+ Memberand MegaDork
12/5/20 8:22 p.m.

Well. Just scored a VERY large roll of fiberglass cloth. It seems to be 1.5 oz so it is extremely thin, and I'll need to use a lot of layers in any parts I make. 

But holy cow do I have a lot...

This roll is 48 wide by almost 24 inches in diameter. It weighs 460 lbs. If the cloth weighs 1.5 oz per square yard, that means I have roughly 4,800 square yards. Or almost enough to cover an entire football field hahahaha. Anyway, I probably overpaid at $150 and drug it out of a guy's garage for him, but at just a hair over 3 cents per square yard I should be able to fit some fiberglass parts in budget.

Never done fiberglass before, here we go!!


barefootskater (Shaun)
barefootskater (Shaun) UberDork
12/5/20 9:56 p.m.

In reply to Robbie (Forum Supporter) :

That's the way to do it. Plenty of material to practice or make spares or duplicates or whatever. 'Glass isn't too bad to word with, just be good about ppe and ventilation. 
And as you've got so much, ever think about using the Datsun shell as a plug for a really big mold? Shave a hundo or two off your curb weight? Maybe free up some budget too? A bet with cloth that cheap  and even retail priced resin it would cost less than you paid for that shell.

Robbie (Forum Supporter)
Robbie (Forum Supporter) GRM+ Memberand MegaDork
12/5/20 10:14 p.m.

In reply to barefootskater (Shaun) :

Replacing the whole body (and taking it out of budget) would be awesome but I've got to contend with this rule:

"Vehicles may either retain production frame rails or equivalent unibody structures, or they may use a tubular frame provided they retain the production body.

If the vehicle uses a tubular frame, then modification of production exterior bodywork is only allowed provided the end result is substantially similar in general appearance to the original vehicle. Sweet box flares are specifically allowed."

So I've probably got to at least keep the body. But just how much do I need to keep? 

AngryCorvair (Forum Supporter)
AngryCorvair (Forum Supporter) GRM+ Memberand MegaDork
12/5/20 10:30 p.m.
Robbie (Forum Supporter) said:

In reply to barefootskater (Shaun) :

So I've probably got to at least keep the body. But just how much do I need to keep? 

take the muscle car approach: the VIN plate is the body. Many times that's the only original part left in a restoration!

Mr_Asa
Mr_Asa GRM+ Memberand SuperDork
12/5/20 10:33 p.m.

I've heard your thoughts on that matter before, but erring on the side of caution, I'd get rid of anything that is on or was originally on a hinge and replace it with fiberglass.

1 ... 41 42 43 44 45 ... 63

You'll need to log in to post.

Our Preferred Partners
MG3glB3jTaXaMIAertMCQol5dZhd1scBtZeY4n7weK3ZKmVt2my1rgrPkf5bUmMQ