


I love that there is such thing as a backup hot rod. It's also nice to know that I live in a state of emergency as I don't even have one, let a lone a backup.

I love that there is such thing as a backup hot rod. It's also nice to know that I live in a state of emergency as I don't even have one, let a lone a backup.

frenchyd said:In reply to Carl Heideman :
Is it the acorn nuts that cause the problems? Jaguars have acorn nuts and all those problems went away once I stopped using them and went to regular nuts. Yes I had previously run a tap through them.
Usually, the acorns are covers. That's what I'm using, with regular hardened nuts and washers underneath. Everyone swears by copper head gaskets, so that's what I'm going to use. They need some heat cycles and retorques on flatheads and my understanding is leaks are pretty common during this process. I'd rather use a modern composite gasket, but I'm going to stick with the advice from people with more experience for now.

In reply to Carl Heideman :
When I use copper gaskets I use either copper anti seize evenly brushed on or HylaMar

I hope this isn't too off topic - you said you like to buy full wiring harness kits rather than individual components. Can you recommend something for a restomod TVR? I need all the body-related wiring / relays / fuses, but not engine stuff. I'm not afraid to spend money, but I'm happy to hear where to find the bang-for-the-buck.
(Hijack off)

In this picture I suddenly understand why the Flat head Ford engine has only three exhaust ports per side.
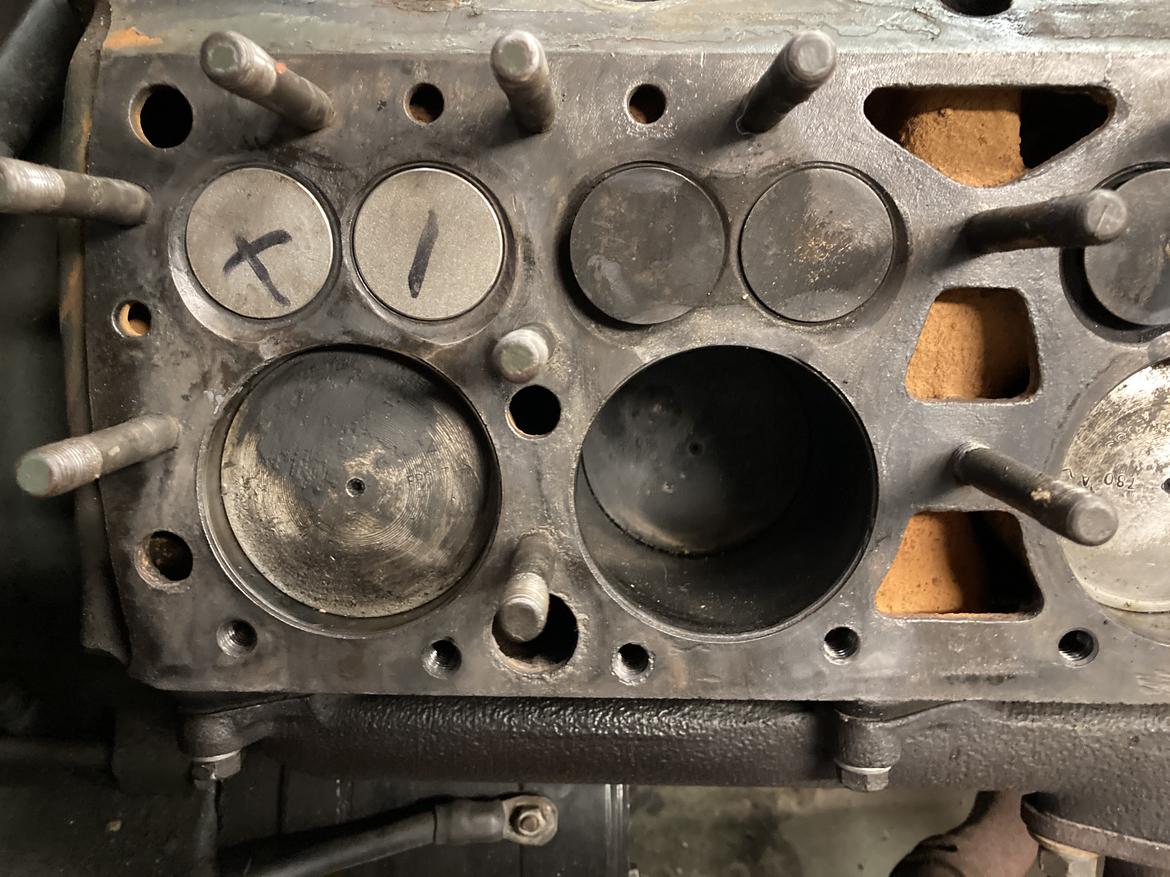
To have 4 exhaust ports the engine block would have to be something like two to three inches longer! I don't agree with the engineering, but Ford didn't ask me.
TVR Scott (Forum Supporter) said:I hope this isn't too off topic - you said you like to buy full wiring harness kits rather than individual components. Can you recommend something for a restomod TVR? I need all the body-related wiring / relays / fuses, but not engine stuff. I'm not afraid to spend money, but I'm happy to hear where to find the bang-for-the-buck.
(Hijack off)
(hijack back on)
I started buying kits because they're convenient--nearly everything is in there--and I found I was either getting nickled and dimed buying wiring and terminals etc., or that I had to buy in such huge bulk that I needed to wire 10 cars to amortize the bulk purchases to a reasonable price. The name brand kits like Painless or Ron Francis etc. are more money, but you're getting decent materials you can trust. Amazon and eBay are full of budget kits that I'm not ready to trust.
For your TVR, I'd probably recommend using the stock body harness if it's not too hacked up or just ordering a new replacement harness from British Wiring or a UK supplier. Use the body harness to control the lights, turn signals, wipers, etc.. It only has a couple of wires for the engine--alternator, distributor/coil, maybe a temp sensor, that's about it. You can abandon those or tie them to the engine harness. Get a 2nd harness for your engine management and tie the two together at the appropriate points like ignition switch, alternator, starter. It's about 5-10 hours to install a pre-made factory harness and 40+ hours to build one from a kit, so that's a big factor.
Lucas wiring gets a bad reputation, but it's really pretty good if it hasn't been hacked up. Lucas color codes are about the best out there and once you memorize them, you hardly need a wiring diagram not matter what car you're working on.
Anyway, that's how we do it at Eclectic Motorworks for resto-mods, like Miata-swapped MGBs. I've actually got a full story waiting to be printed in GRM about how we did that with the latest supercharged Miata-swapped MGB/GT. If you search "MGB Miata Swap Science" you'll see the previous stories posted on the GRM site and I'm sure that one will end up there too. But buy the magazine to so David, J.G., Tim, Tom, Margie, and the rest of the gang can still eat.
I hope that helps a bit.
By the way, I had a 1975 2500M for about 10 years. Fun car!
(hijack back off)

noddaz said:
To have 4 exhaust ports the engine block would have to be something like two to three inches longer! I don't agree with the engineering, but Ford didn't ask me.
Their rationale was both exhaust valves would never be open at the same time so it shouldn't be a problem. Unfortunately, exhaust systems being what they were, there was plenty of back pressure ensuring exhaust gases from one cylinder would still be there when the cam opens the other cylinder's exhaust valve.
Carl Heideman said:Back to the '32:
Here's a picture of the block with the valves out. We cleaned all of the rust out of the intake pocket and forgot to take a before picture--it was about half filled with rust and crud. When the valves and guides arrive, they drop in through the top and get clipped in place from below.
He's the bling shot with a new head and dual carb manifold set in place:
These trucks originally came with 4 bangers since they made more torque than the V8 and someone before me swapped the V8. The front mounts are fabricated and put the block really close to the steering box and column. That became an issue with the Edelbrock head as it's taller than the iron head. I had to notch the column tube and it barely fits--missing the steering shaft by about 1/2".
I'll make it prettier at some point and probably box it in.
The intake also barely fits, which surprised me. The fuel pump standoff is rotated from stock to make room for the carbs and it is really tight to the firewall. I measured the clearance with a feeler gauge--.010".
If it's an issue, I'll put a small dent in the firewall. I hate to do that since it's a pretty cherry firewall, but it would be easily reversed.
Even with these old cars, packaging is an issue...
In my post. The good old days I was asked to do a virtual appraisal of cars for my neighbors kids.
One car was a 32 Ford roadster pickup. In very shabby, not running condition. But no rust holes that I could see. It too had the Flathead V8 and juice brake conversion. I was told it was originally hot rodded post WW2 but looking at it it's obvious changes were made well through the 1950's. I guessed it would sell as is for $15,000 but if a little work was done to get it running and new tires fitted it could sell for $30,000+
In your opinion am I somewhat close or way off?
In reply to frenchyd :
They only made 593 1932 Ford Roadster Pickups, and while that's a low production number, they have never brought the money the roadster's and coupe's bring. So I'd say that's a pretty good appraisal. Sorry, don't mean to thread hijack, but I also do classic car appraisals and thought I'd offer my two cents.
~Peter
In reply to frenchyd :
I'd agree with Peter. With something that rare, it's hard to tell what the top end of pricing is, but your ballpark seems about right. I'd also want to know if was a real RPU or one that had been cut down and made from a phaeton or something. Brookville Roadster repops them now, so it's likely someday there will be more of them now than Ford made in the first place.
I adjusted the two new valves (.012 intake, .016 exhaust) and installed new head studs where they were needed.

I coated the copper head gaskets (from Speedway Motors) with Permatex Copper Spray-A-Gasket and installed them. There were a few head studs that weren't quite lined up with the gasket holes at the top, so I had to carefully coax the gaskets down a little at a time. I also found out that these copper head gaskets have much sharper edges than other copper head gaskets I used and got a bloodier version of a paper cut on one of my fingers. Not quite Monty Python Holy Grail bloody, but enough that I had to put some masking tape on it for a little while.

Anyway, I put the heads on and torqued them three times--30,40,50 ft/lbs. Edelbrock says to retorque after the first three heat/cool cycles, so I'll do that. They recommend 50-55ft/lbs, so I may go to 55 if I have any coolant leaks. I always grease intake gaskets when they're like this one, so I put in position, ready for the intake manifold.
Since the plugs were out, I thought I'd check the compression and see if I've solve my problems. All the cylinders came in between 90-100psi except the one with the water damage @ 45. The one with the two new valves came in at 95, so that problem is solved.

The back intake manifold has a hole where the fuel pump mounts and the oil fill/breather is located. On the Offy intake, the boss for the fuel pump mount is about 1" higher than the stock boss and it's rotated about 45 degree, I assume to clear the carbs. So I'll need a longer pushrod for my fuel pump. I should have a few laying around, although I expect none will be long enough. I'll either lengthen one or buy one.

When I went to check the fit of the fuel pump and oil filler/breather, I discovered my fuel pump isn't going to work. It was a little hard to take this picture, but if I mounted the assembly, the fuel outlet would face the firewall with no clearance for a hose.

So, when I'm going through my parts stash tomorrow looking for a pushrod, I'll see if I've got a different type of fuel pump that will fit. I think a later style without the sediment bowl will do the job. If I can find the right parts, I should fire it up tomorrow too.
In reply to Carl Heideman :
Couldn't you just bolt on a 90 degree fitting and have it pointed the right way?
You have a lot more faith in those mechanical pumps than I do. Now granted this is from back when they were just used cars. A "rebuilt" fuel pump cost $8 But we were putting new ones on all the time on those old Ford flatheads. Sometimes they wouldn't even last 3 months. I think a new one was $18? And they weren't a whole lot better.
Now granted some of this was probably those old 6 volt starters that barely cranked the engine over a few times before the battery died. Because it seemed like if you could keep it turning long enough it would fill the carb enough to start and then once running it would pump enough for the stock single carb to stay running.
Electric fuel pumps seemed to solve that including 3&4 carb versions. That or we'd put a hand pump to pressurize the tank.
Felt pretty darn racy pumping up the air pressure shifting gears and tuning the tube type radios. The really cool guys would do it all while lighting a cigarette dangling from their lip.
I hope the blow by isn't so bad you wind up sleeving that cylinder. ( I don't expect it to be but I suppose it's possible).
CaprockFabShop said:In reply to frenchyd :
They only made 593 1932 Ford Roadster Pickups, and while that's a low production number, they have never brought the money the roadster's and coupe's bring. So I'd say that's a pretty good appraisal. Sorry, don't mean to thread hijack, but I also do classic car appraisals and thought I'd offer my two cents.
~Peter
Thank you. I didn't know the numbers but I knew they weren't common. This is only the second one I've seen. The other was in California parked at the beach with a bunch of surf boards in the bed.
Carl Heideman said:In reply to frenchyd :
I'd agree with Peter. With something that rare, it's hard to tell what the top end of pricing is, but your ballpark seems about right. I'd also want to know if was a real RPU or one that had been cut down and made from a phaeton or something. Brookville Roadster repops them now, so it's likely someday there will be more of them now than Ford made in the first place.
That was my thinking as well. If the number got too high the Brookville would be a serious consideration.
I for one don't know the difference. As for real, I don't know enough to tell a real one from a cut down one. Just the history reported to me. It was reported that work started post WW2 when it would have been just another used car. Nothing I saw raised any red flags.

Carl Heideman said:When I went to check the fit of the fuel pump and oil filler/breather, I discovered my fuel pump isn't going to work. It was a little hard to take this picture, but if I mounted the assembly, the fuel outlet would face the firewall with no clearance for a hose.
So, when I'm going through my parts stash tomorrow looking for a pushrod, I'll see if I've got a different type of fuel pump that will fit. I think a later style without the sediment bowl will do the job. If I can find the right parts, I should fire it up tomorrow too.
Alright, time to stick my neck out and ask the stupid question. Is it possible to remove the top of that fuel pump and reclock it to a different orientation?
Thanks for posting this thread and your '34. I promised myself a real hot rod someday, and I'm now accepting the fact that someday may never come, so it's really nice to see it all happening here.
In reply to DarkMonohue :
And this is why I love build threads. Why didn't I think of that? Thanks!

Carl Heideman said:In reply to DarkMonohue :
And this is why I love build threads. Why didn't I think of that? Thanks!
Hey, alright! I was second-guessing myself all night. Glad that actually worked!
DarkMonohue said:Carl Heideman said:When I went to check the fit of the fuel pump and oil filler/breather, I discovered my fuel pump isn't going to work. It was a little hard to take this picture, but if I mounted the assembly, the fuel outlet would face the firewall with no clearance for a hose.
So, when I'm going through my parts stash tomorrow looking for a pushrod, I'll see if I've got a different type of fuel pump that will fit. I think a later style without the sediment bowl will do the job. If I can find the right parts, I should fire it up tomorrow too.
Alright, time to stick my neck out and ask the stupid question. Is it possible to remove the top of that fuel pump and reclock it to a different orientation?
Thanks for posting this thread and your '34. I promised myself a real hot rod someday, and I'm now accepting the fact that someday may never come, so it's really nice to see it all happening here.
What I love about hot rods is the massive variety. In the late 50's early 60's they still had 1927 roadsters with flatheads. The next thing was a Shoebox Ford with a obsolete 270 Offy all hollowed out and narrowed to use a tubular sprint car chassis with the rear wheel openings radiused to show off chrome reverse wheels and drag slicks
Nothing was wrong. It could be a chopped and channeled Mercury. Or a custom low rider.
I'm getting pretty close. I found a longer fuel pump pushrod in my parts stash, so that was easy.

The truck has always had ugly, stiff, universal hoses with the springs wound inside. They were on it when I got it, so they're probably pretty old, too. Bob Drake's Reproductions makes nice molded hoses, but it seems like every time I went to order in the past, they were on backorder. Anyway, I got a set so they're going on.


The carb setup came with a fuel block and nostalgia red hose. I mocked it up, but I don't like it. And the front one doesn't fit well around the radiator hose (not installed in the picture). I think I'll just do a simple "T" on good old black hose with period correct clamps. Or maybe hard line at some point.

I spun it over for awhile to get fuel into the carbs and then briefly fired it. It didn't run very well. Before I do anything else, I've got to go through and double-check all the ignition wires. They are a real pain on with this style distributor and I wouldn't be surprised if a couple fell off inside the cap (or I mixed them up when I put things back together).
I put a used generator on it without a fan just so I can start it. I haven't been able to find a Powermaster or similar alternator disguised as a generator that will mount the fan on the front pulley like the stock generator. But I've got some ideas.
Anyway, it's close...
I'm liking your red fuel hose. Sorry you don't. To me it's a very proper treatment, but do what you want, you've done a great job so far.
As far as plug wires, that's why the updated distributors on these. I remember all the fighting I did trying to get all 8 lit off correctly. It seemed like I had to redo every one several times. Before it was finally right.

I'm with you on the red fuel hose, it seems out of place. Hard lines would look legit though!
Also, my understanding of flatheads is pretty much nil, is there a reason why the spark plug wire at the front of the engine (5?) is a different color?
In reply to jerrysarcastic (Forum Supporter) :
I've got OEM-style reproduction cloth braided wires on the car and they are color coded for the cylinders. On the driver's side, I pulled them out of their routing tube at one point while I was diagnosing misfires--like many reproduction parts, they're not very good. The passenger side shows how they should/will look.
 I have a set of chrome hot-rod wire separators and may run those instead of the factory tube. Although I'm leaning toward keeping the bling to a minimum, so we'll see.

Plug wires for this style distributor are a pain, especially with iffy reproduction pieces. The diagram below shows how the wires route to each side of the distributor. It's a 1-3 hour job to replace the wires and get them routed nicely. I don't know if I'm a bit dislexic, but I find myself setting them up in a mirror image of the correct way sometimes. In fact, that's what I did when I reinstalled them, and that's why it didn't run so well on the first start yesterday.

This diagram shows the whole ignition system, and what makes the plug wires so difficult is the outer, domed cover that goes over the terminal plates. The wires make 90 degree turns in tight quarters and so they have to be just right to make everything fit.

Anyway, this evening I got the wires on the driver's bank installed correctly, put the last coolant hose on, filled it with water, and it started on the first try. It's idling great and has a nice, snappy response when I blip the throttle, so it's looking promising. I ran it for about 15 minutes and only have one small leak at a head stud (1 out of 48 isn't bad, I guess). Hopefully, as I go through the heat cycle/retorque work it will seal up. Otherwise, it's a stud I replaced, so I should be able to pull it out, goop it up, and put it back in without pulling the head.
In addition to removing the red fuel lines, I've got to make up a choke linkage, make a better bracket for the coil, finish dealing with the plug wires, and a few other underhood details.
But the next thing I'm going to do is get the fenders back on and make it driveable again, as I can do those underhood things a little bit at a time during the sorting process.
Fenders are back on.


So is the headlight bar.

Nick stopped over just before the first test drive, so we took a picture.

The first test drive was a great success. It's smoother and a little quicker (but not fast).
Edit: Cleared my cache and it seems to have fixed the squished pictures.
Here are a few more pictures of Nick's latest project and a little backstory. It's a 1934 Ford 5 Window Coupe. I bought it as a rolling, stock, unrestored project in 1998 for $4000. It didn't have fenders or an interior, but it had the stock drivetrain, tires, etc.. Amazingly, it was cheap because it wasn't a 3 window and people were more picky back then. I had a friend who thought he needed it more than me, so I sold it, then it sat. When he lost interest and was going to put it on eBay, I bought it back. And then it sat because I was starting Eclectic and my kids were small. About three years ago, Nick was looking for a project and I knew he'd do it proud, so he took ownership. He chopped it at Eclectic and did some other structural work, then took it home. Nick has lettered hundreds of racecars and is the king of patina. A fair amount of the patina is real, he just matched it where he welded and patched it. The lettering is fresh but distressed to match the patina.

Nick and I have a difference of opinion about wide whites...but those are real magnesium Halibrands.

It's funny that he calls it the muffler shop special because it's got three open pipes on each side. It's not as loud as you'd think and sounds great.

The engine is pretty stock with a high rise dual intake. Nick found these head covers that make the flathead look like an overhead valve engine--he's always finding cool accessory parts and his cars always evolve.

I've made a few successful test drives, so I guess I'm in the sorting phase. First up, I took off the red hoses and got something more appropriate installed. I also changed the billet dual carb lever arm on the front carb to a cast piece. I probably should get rid of the rod linkage and to to something more vintage, but for now it's not bothering me too much.

I don't like open hoods, so I put the hood tops back on. I'll probably run the sides again after a little more sorting. It's pretty handy to run it with open sides so I can watch everything and check temperatures when I get out.

I made some straps that hold the hood down and latch to the regular latches. I'm not wild about them, but they were fast and easy. If I leave the sides off, I'll make some hidden latches on the ends of the hood tops. It's very easy to do that with some 1/4" rod, a spring, and a split pin.

Finally, I finished up the throttle and choke linkages.

We're supposed to have some nice weather this week, so I'm glad I've got it ready for some more drives.
You'll need to log in to post.


