1 2 3 ... 15
Rufledt
Rufledt Dork
2/3/13 8:07 p.m.

A while back someone said they'd like me to do an archery build thread, and I said ok and then did nothing for months. It just so happens I am making another bow so I figured now was the time to do this.

Some basics: The world of archery shares MUCH with the world of cars. There are many ways to measure a bow, many different designs, many different uses, etc... There is also a wealth of misinformation, and no shortage of people who will argue that you are wrong, because that one bow they made (which they can't produce) proved it. Just like that Civic with the D16 that made 400whp on stock internals that someone's cousin has, ya know, the one that beat that corvette going through the drive through at BK?

Step 1: tools. There are many ways to make a bow, and as long as your method works, I won't argue. You'll want some hand tools, though power tools will make things faster (read: wreck things faster). If you have no tools, you'll probably want a rasp (i suggest a surform rasp), some small round files, maybe a block plane. It's surprisingly cheap and easy to make a bow, it's arrows that cost you. There are a few specific tools you will need to buy/make, and i'll tell you how when we get to that. the main one is a tillering board/stick, which is just a board with some notches in it. If you can make anything, you can make one of these.

Step 2: wood. You can make a bow out of most hardwoods. Standard lore says you need yew or osage, but that is wrong. Don't listen to anyone who says that. Yew and osage can make great bows, but a maple one can shoot just as well. different woods have different properties, and the design must change accordingly, but in the end most of them work.

What you should do (for a first bow) is head to a home improvement store and get a 1"x2"x6' (in reality 3/4" x 1.5") maple or red oak board, S4S (surfaced on 4 sides). On S4S wood you can inspect the grain, and you should get the straightest, most flawless grained one you can find. No knots, no run off, no figure (if looking at maple). If the grain is a few degrees off of parallel, it's probably fine. The most important thing is that the fibers that make up the wood run from one end to the other, and not at some skew angle to the surface. The fibers do not match the rings perfectly, but if the ring lines are straight on all sides, you're probably safe.

If you are heading to an actual lumberyard and have a wealth of hardwoods, the same wood selection rules apply. Don't go for wood with V's in the grain, no knots, etc... You can branch out from maple and oak. Look at hickory in particular and hard maple (they have it separated from soft maple). White oak is a good bet, too, as it is nearly unbreakable. Avoid the others for now. Ones like cherry can make some fantastic bows, but are more likely to blow up on you.

Old lore also says you can't use kiln dried lumber. This is also total B.S. The books that once said this have been updated. Trust me. Most of the top authors in the field have since collaborated on a series of 4 'bibles' of bow making, and those say kiln dried wood works just fine. I have made quite a few from kiln dried wood and they still work.

Step 3: design. There have been as many bow designs as there are cultures who used them, which is almost all of them. Most cultures with longstanding archery traditions settle on a bow design that is almost invariably the best for their situation, taking into consideration the climate, intended uses, materials available, etc... The following design is intended to make a bow for a beginning bow maker and user. It is intended to be easy to make, and have a basic level of safety built in. You can modify it after you make it for more speed if you like, and i'll tell you about that later.

Take your 1x2x6' board and figure out with side will be the back and which will be the belly. When an archer is shooting, the back of the bow faces away from the archer, and he will be looking at the belly. observe:

(accidentally hit add post, will continue in a bit)

Rufledt
Rufledt Dork
2/3/13 8:26 p.m.

That is a bow I made in high school. It has 2 colors of wood, one dark (purpleheart) and one light (hickory). The light part is the back, the dark is the belly. The bow will be wider than it is thick, so the back and belly will be 1.5" wide at the widest (remember a 2" wide board is actually 1.5". Don't ask, it's stupid, I know.)

Make the side with the best looking grain the back, as it will be under tension.

take a pencil and divide the bow into 3, 2' sections. On the ends of the board, take a ruler and mark the middle. Now, mark 1/4" on either side, so you have a marked section 1/2" wide right in the middle. Leave the middle third the full width, and draw lines tapering from the middle third to the half inch tips. Make it look like this in pencil lines.

How you cut it out is up to you. Band saw, hack saw, jig saw, scrub plane, your teeth, whatever works.

At this point I usually rough out a narrower handle, but there are a few considerations. A bow can bend through the handle section, or have a stiff section. If it bends through, don't make it narrower than the limbs. If it is to stay stiff, you can narrow a bit. In the past, I have glued up some additional wood to strengthen that part before narrowing. Here's a pic: The handle is half an inch thicker, making it very stiff and unbending. This means I could narrow it, like this: That bow is one I made for my wife, but a friend of mine made one for himself that is full board width at the handle. Make your own choice.

Toyman01
Toyman01 GRM+ Memberand PowerDork
2/3/13 8:45 p.m.

Cool, my youngest son asked me today if we could make a bow. Thanks for posting this.

Rufledt
Rufledt Dork
2/3/13 8:50 p.m.

On to the bow I'm making for this build along! Where I stopped above is exactly where I am with this one. It is the same length, but a bit wider. It is also made of walnut, and will not be a single piece for reasons that will become clear. Here's a shot of what I'm talking about for the handle: Notice how I have not glued up extra handle wood. This board is actually 1" thick, and another piece of wood will be glued along the back (more on that later) so there is already ample thickness. When it comes to wood bending: if you double the width, the bend resistance doubles. If you double the thickness, the resistance goes up 8 times. The extra 1/4" of thickness will make up for the narrower handle.

How you do the handle is really personal preference. Here's another one I did that I thought was a great idea at the time: Grooves where my fingers went. Felt comfy. Don't mind the dowels, that was a strange kind of bow, just look at the handle.

You should also decide where you want the arrow to rest. Most mass production bows have an arrow shelf on them, but most old school archers used their hand. I've shot both, and it takes a good quality fletching job (feathers) on the arrow so that they don't remove your skin when you shoot. Both work, and hand-shelf bows are slightly faster to make. you can glue on something to use as a shelf, and then wrap over it or whatever works. There's no single way to do it.

For this bow, I'm making it like a shoot off the hand bow, but I may add a bit of leather or fabric or something as an arrow rest later. I haven't decided.

I said this will be made from more than one piece of wood, and this is the reason: I didn't see this until I had the wood home and planed it nice and smooth. A death knot right in the middle of the limb. The wood fibers around it go in various directions which means it could let go when its under the great tension stress of shooting.

The solution is the same as the dark and light bow above, which also had imperfect grain. I'm gluing a strip of hickory (a wood very strong in tension) to the back right over the knot. The surface of the back is under the most stress, meaning that a thin 1/8" strip of hickory will take the vast majority of the stress, resulting in a safe bow.

That's where I am at the moment, and there is more to come. No bending yet, nothing about a string, just roughing it out. If you want to build along I would be more than happy to help out. There are a few forums, too, but beware of misinformation. i would say paleoplanet is a decent bet, but some of the most experienced were run off by idiots. luckily the die-hard bowyers ran off many of the idiots, too, so I guess it's not a total loss.

More to come!

Rufledt
Rufledt Dork
2/3/13 9:01 p.m.

I totally forgot to include a photo of what the final result might be! Here's the first bow I ever made (that still works, It was actually my 2nd bow. The first was pine which, uh, didn't work well) Home depot maple board special. It pulls about 40# @29" (my draw length) which makes it barely legal for hunting in some states. It still works. I made it in high school and I could shoot it now. This is the exact design listed above, with no narrowing in the handle at all. It's a single piece. It's not the most comfortable, but it works.

Here are 2 bows recently made from 1x2 red oak boards: Ok, it's only one picture, but they both look the same. One I made for my wife, while a friend of mine made the other for himself (I was teaching him). His was around 30-35# @28, which is a good starting weight for a grown man who is beginning with archery. That one is tillered (the making it bend part, i'll get to that in probobly a couple weeks) differently. It has long, stiff tips and has a stiff handle. Also from home depot wood.

My wife's has been modified a bit (i can talk about that later if anyone is interested) to shoot faster at a lower weight, and my friend's has gone through thousands of shots. The last time we shot it was last wednesday, and it works just as well as new. well enough to embed an arrow in a 2x4 at 20 yards deep enough that we had trouble removing it. It's not record setter, but it's certainly good enough. It was his very first bow, and yours can be just as good.

I should probobly describe the 30# @ 28" thing. This is a general measurement for bows, the first one is peak draw weight, and the second is draw length. Think of it like peak hp @ RPM. The weight goes up as the bow is pulled back and forms a curve (think power curve). The shape of that curve determines available power, but effeciency and other considerations with the arrow determine speed. Think of it like how a car loses power between flywheel and tires, and how heavy the car is determines how much actual acceleration you get. It's a rough metaphor, but I think it works. any quesitons?

I also forgot to mention what "on the cheap" is. I think the ones above cost $4 to $6 in wood. The string cost some more because I purchased one, but it only has about $1 in materials, and I'll probably go over that when I get there. In a large test once done with a plethora of bows, the one that was fastest (considering arrow weight, bow weight, etc...) was a simple wooden longbow made from a $6 pecan board. It beat fiberglass laminate recurves, osage and yew bows, etc... It was 50# @ 28", around average for most regular shooters.

Rufledt
Rufledt Dork
2/3/13 9:08 p.m.
Toyman01 wrote: Cool, my youngest son asked me today if we could make a bow. Thanks for posting this.

It's just getting started! I can help answer questions if you like, but I would also suggest the 4 bowyers bible books. If you don't want all of them, go for #1 at minimum, then maybe 2 and 4, #3 isn't as important. That's where I learned, and also from many of the writers who used to frequent bow making forums some years back.

bearmtnmartin
bearmtnmartin GRM+ Memberand HalfDork
2/3/13 9:38 p.m.

When I was in high school the grade 10 woodwork project was a crossbow. I counted the days in grade 9 but then over the summer break a student used his to shoot a teachers dog and that was that. Some of the kids were making them with car springs.

Rufledt
Rufledt Dork
2/4/13 9:43 a.m.
bearmtnmartin wrote: When I was in high school the grade 10 woodwork project was a crossbow. I counted the days in grade 9 but then over the summer break a student used his to shoot a teachers dog and that was that. Some of the kids were making them with car springs.

In reply to bearmtnmartin:

yikes, there's always one idiot to ruin it for everybody, right? In middle school art class we had a metals project. You could make a keychain, a book mark, or a letter opener. All the guys made letter openers because those are just a little filing away from knives. When I got there, we were told no letter openers. Dang.

Back to bows. You guys have an engineerey type way of thinking, so here's some info on how a bow works. Wood obeys Hooke's law of spring constant. If you bend it an inch, the resistance goes up a set amount, just like the spring on a car. Just before the breaking point, it starts to fatigue, like a spring. Old bow lore talks about wood "stacking", meaning the closer it gets to breaking, the faster the spring rate goes up. That is not true. Many bows "stack" if you look at the force/draw curve (looks like a dyno chart) but that is because the shape changes as you pull it back. The angle that the string pulls on the wood changes, decreasing leverage and increasing draw weight increase per inch.

Many things change the bow's draw curve, and all of them relate to bow shape. Some longbows have a nearly straight line.

Sorry it's in German. The 2 bows here are both 45# @ 28", but the blue line shows far more power under the curve. All else being equal, that one shoots faster. All else is never equal, however.

That one is "with reflex." Ever see a bow sitting on a table, unstrung? Probably, if you seen a bow at all, since they are stored unstrung to prevent damage. If it bends slightly in the opposite direction as when it's strung, that's called reflex. If it looks like it never straightened out fully and still bends towards when it was strung, that's called deflex. If the tips curve a lot forward, that's recurve. Generally, more reflex means the limbs have to bend more to be strung, meaning that curve rises more in the early parts of the graph, storing more power. The materials have limits, however.

That curve for a compound bow looks like a hill. It rises sharply at first, flattens out, then drop when full draw is reached. This makes it easier to hold back, while keeping the power under the curve high. They also don't have much additional mass in the moving parts of the bow, so all the energy can go into the arrow. Never expect a longbow to shoot faster than a good compound, but never expect to make a hunting-capable compound bow yourself for under $10. Also never expect to need professional maintenance on a longbow. There are no bearings or cams, and you can theoretically make a string yourself out of flax flowers you grow in your own backyard.

On that note, some people in each camp (compound vs. traditional) can be confrontational toward the other. Haters gonna hate. It's all for entertainment anyway, and one isn't more fun. Heck, do both. While you're at it, make an atlatl and take them all skeet shooting. Just don't shoot someone's dog.

Do people want to know more about how they work, or just a build along?

jere
jere Reader
2/4/13 10:53 a.m.

Build first how it works later

I am really surprised you can make a bow from off the shelf Homedepot wood. I always thought bows were made from saplings or something.

What do you use for the string? Will para-cord work how about deer hamstrings?

fritzsch
fritzsch HalfDork
2/4/13 11:00 a.m.
Rufledt wrote: Do people want to know more about how they work, or just a build along?

Both!

RossD
RossD UberDork
2/4/13 11:05 a.m.

Oh Fred Bear, walk with me down the trail again.

I like it. Very Cool.

Rufledt
Rufledt Dork
2/4/13 11:05 a.m.

Saplings are common for people making old-school arrows, but they aren't substantial enough for actual bows. For the string, Para-cord will probably work. The general rule is make sure the breaking strength is 4 times maximum draw weight of the bow or more, for safety. People made the string from deer leg sinew for centuries, but modern materials are often better. Sinew is subject to changes in humidity, it stretches terribly, and takes a long time to process into a string. If you have extra deer hamstrings, hang on to them. If you have too many, send them to me . They are used for many things in bow making, not just strings.

I use a material called D-50 Dacron. I think it's polyester string? Not sure, but it's common for bows and not too pricey. It has a little stretch (which can be easier on the bow) but it is quite strong. Some people use linen (flax), hemp, many things work. Nylon string can also work, but it usually ends up being extra heavy to resist stretching. If you don't care about speed, it works. I can talk all about how to twist a string when I get to the bending part of the bow making process, since you'll need a string at that point..

Those bow making bible books have a chapter somewhere that is all you'll ever need to know about strings, in case you want to read up. It's like a 50 page chapter, so there's no way I can say all that's in there. Just know a spool of dacron will be perfect if you want to make your own string.

I don't have any personal experience with para-cord, though.

In reply to fritzsch:

Now about this, I'll do the build along part as I can, and sprinkle the how it works and theory stuff in between or where it becomes relevant?

Karl La Follette
Karl La Follette SuperDork
2/4/13 11:13 a.m.

Add string reel for fishing

N Sperlo
N Sperlo UltimaDork
2/4/13 11:31 a.m.

I've tagged for a good read with Wifey. Thank you, Sir. You are a gentleman and a scholar of the finest breed.

Keith Tanner
Keith Tanner GRM+ Memberand MegaDork
2/4/13 11:34 a.m.

My wife did target shooting when she was in high school, and we still have her old bow in the garage. Now I know it's a recurve I'm going to have to get a new string with it and play with it, this thread has me itching to give it a go.

Rufledt
Rufledt Dork
2/4/13 3:10 p.m.
Keith Tanner wrote: My wife did target shooting when she was in high school, and we still have her old bow in the garage. Now I know it's a recurve I'm going to have to get a new string with it and play with it, this thread has me itching to give it a go.

Do it! What kind of material is it? There are some considerations for re-breaking in a bow that has been sitting for a long time, but it is definitely possible. I have an old bear recurve from the 60's that still works. If it is all wood, you need to work it back into motion slowly, over the course of a number of days, and make sure it isn't too dry. If it is completely fiberglass, then there probably isn't a problem just shooting it. If it is laminated wood with fiberglass on top (like most recurves) then I don't know. Maybe string it and let it sit for a couple hours, then try that again the next day, then try half drawing a few times, then try that the next day, then try full draw? I'm trying to remember what one book said about working it back into functionality. I could be wrong, but you're likely better off taking it slow

I used to use my old bear recurve in the highland games in the Milwaukee area. We did a clout shoot to 175 yards and that old bow could still shoot the arrows out there. My accuracy was, uh, sketchy? at best. It was fun watching the arrow change direction two or 3 times depending on the wind! I have a picture of one of my arrows in the normal sized target at that range. If you look carefully at it, you can see 3 of my other arrows in the ground 5-10 yards away, but I ignore those.

Also check the draw length, usually written on the handle somewhere. If it says @25", don't pull it back all the way. The average man has a 28" draw (to their mouth) and it will likely damage the bow.

Keith Tanner
Keith Tanner GRM+ Memberand MegaDork
2/4/13 3:29 p.m.

I'll pull it down and have a look. I seem to recall white with visible wood grain, so I suspect you're right about it being laminated wood/glass. It'll date from the late 80's or early 90's probably. Thanks for the tips, especially on the draw.

Timeormoney
Timeormoney Reader
2/5/13 7:02 p.m.

I love this board

Rufledt
Rufledt Dork
2/5/13 9:24 p.m.

More! how to!

I said earlier it's not important how you cut out the shape, and that is mostly true. If it works, nobody can argue. It just so happens my friend and I had a chance to do some bow work today, and I took some photos of various tools/methods we use to cut out the shape.

First, the tools we use:

This is a wooden scrub plane. It's designed to remove a lot of wood quickly, usually from the side of a board, but many people use them for thinning lumber as well. Like most hand tools, the ones that are good enough to actually work well are expensive. I made this one to save on cash from maple. The blade, however, is extremely nice. Since very few people use scrub planes, the high end after market blades don't sell much, and are subject to go on sale from time to time. Price to me was $20. The same for a jack plane (pictured later) is almost 4 times that, but those sell.
Here's a shot of the bottom:-

Dang, I keep adding post by accident. Hang tight for more in minutes.

Rufledt
Rufledt Dork
2/5/13 9:45 p.m.

Most planes have a flat blade and the opening (mouth) is very small to prevent tear out. Not scrub planes. These have a very curved blade and the mouth is huge to allow for the giant chips to come out the top. You also tend to use this at a 30 degree angle to the wood, and not straight along it like normal planes. Here's a shot of what the surface looks like after some work with this plane: Notice the grooves from the curved blade. With this plane, you should stop before getting to your marker line. Then you can switch to something else, like the following: Block plane: Block planes aren't really meant for this, but they work and tend to be cheaper than: A jack plane, or #5 plane, which is what we used. On the "cheaper than" note, you really get what you pay for with hand tools. The cheap buck bros hand plane at the depot will work like a cheap tool. It WONT work as well as the one pictured, which isn't cheap. The top of the line ones run more than many of you pay for cars, but a good mid range brand is woodriver, sold by woodcraft. I usually don't like to pimp products, but they perform GREAT for the price. They aren't real cheap eaither, but sometimes they are less than half of what some other brands cost. The planes usually come very flat, and with some initial set up and blade honing, they work beautifully.

Here are some alternative tools. 
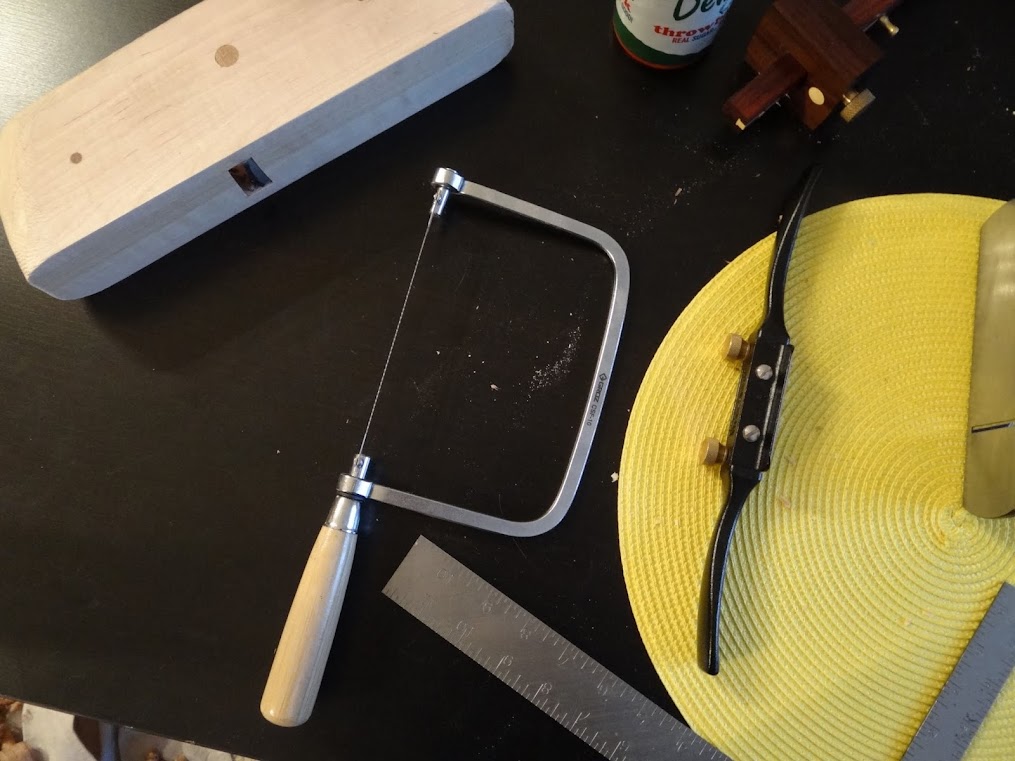
A coping saw and a spokeshave. These work, and often come cheaper than the planes. The drawknife won't get a surface as flat (sometimes concave surfaces are desired, and the spokeshave works there). Drawknives work as well, but mine is in my garage and not pictured here.

If you saw off the extra wood, you'll end up with soemthing like this: Hang on to it. More on that later.

The last tool in that photo is a marker, often used when marking dovetails/mortices, but I used it to do the following: Remember how my board was a full inch thick? Well, it won't bend. Most of the bows i have made run around a half inch thick in the end. To speed the process along, I set the marker at 5/8" and made a groove along the bending portions of the bow. I will glue the 1/8" backing on at some point, and that will make it a full 3/4" thick, like the boards available at home depot or wherever. That will be a much better starting point to begin tillering. Remember, don't bend anything at this point. Not yet. If you are following along, don't thin the limbs either, I'm just trying to get to the same thinness.

To thin the limbs to 5/8", the same tools work, except the saw. Rasps also help, but I don't have those pictured. Look them up, they're on google and most likely somewhere in the hotlink thread. cabinet maker's rasps, surform rasps, those 'microplane' rasps that they also sell in cooking stores, they will work. There's actually a cool trick to using a surform rasp that i'll show you later.

Rufledt
Rufledt Dork
2/5/13 9:59 p.m.

My favorite thing about planes is that they don't make dust. They produce thin shavings that clean up easily, especially handy when using a living room to make a bow. I always lay a drop cloth to keep the shavings off the carpet.

Be warned: Some wood dust causes health problems. Yew, for example, is toxic. Don't snort yew dust, and don't suck on it for long periods of time. I think oak and maple are fairly safe, but if you are using power tools, you best wear a dust mask. You may be alergic, you never know. I personally get welts around areas where splintery poplar wood jabs me. When splinterey maple jabs me, I just get jab marks. No welts.

Tip: if you are getting wood chunks tearing off of the surface, try going the other direction. Running the wrong way against the grain can cause tearing.

deutschman
deutschman New Reader
2/5/13 10:08 p.m.

Weren't traditional English long bows made with a piece of wood cut so that it had sap wood on one side and hart wood on the other because one is better at compression and the other at expansion? This is super interesting to me! I am at a traditional wooden boat building school right now and have been thinking about making a bow during some spare time.

Rufledt
Rufledt Dork
2/6/13 10:38 a.m.

I've heard the same thing about english long bows (ELB's). I also somewhat remember reading that an all heartwood yew (the wood they favored) ELB works just as well. There are likely more factors at work.

The traditional way of making bows is from split staves. Cut a long section of a straight, knot free log, and split it into 2" wide sections. Remove the bark, and viola! You have a single growth ring, with continuous fibers from tip to tip. There's a bit more to it, especially when it comes to drying, but the English (and everybody else who needed these bows for food/war) had that part down pat. The main reason i said you should get a board with straight grain lines and all 4 faces is because that is the best way to approximate the same strength as a single growth ring. most people shave that bark free surface down a couple of rings and get another single growth ring. With Yew bows, they generally get to 5 or 6 growth things of sapwood on the back, and the rest of the bow is heartwood. Yew sapwood is white, the heartwood is yellow-orange. It looks AWESOME. That's reason enough to do it. It just so happens that's what you get when making a bow from a split stave the traditional way.

To cut the wood any other way would make for more work, and/or likely a weaker bow. The English needed thousands of these things, and they needed them not to break. That is also why they tend to be so long. They needed really REALLY strong bows (over 100#) and a way to make that safer is to make them longer. Longer bows (and bows from Yew in general) can be narrower, meaning more can be made from the same tree. Narrower limbed bows are quicker and easier to make. They weren't strangers to efficiency. The bows could have been improved efficiency wise, but the production process couldn't. In a war, 10,000 really good bows beat 2,500 fantastically efficient bows.

Not all wood works this way. Osage orange heartwood makes for fantastic bows, while the sapwood is worthless. Hickory, on the other hand, is strong any way you pull it. Even the low density spring growth is strong in tension.

tuna55
tuna55 UberDork
2/6/13 11:33 a.m.

This sounds like a fantastic plan for the kids and I over the summer. Thanks!

Rufledt
Rufledt Dork
2/6/13 11:55 a.m.

Here's a tip for kid's bow for ya. Don't make them for kids. Make full size long bows. Kid's bows are smaller, and the margin for error is much smaller. They can be difficult. Kids also grow, and can outgrow a bow. They also tend to break stuff. if you make a full size adult sized longbow at, say, 25# draw, the kids can use it, too. They may only be big enough to pull it back 20", but at that draw length, the bow might only pull 18#. As the kids grow, they will be large enough to pull it back farther, and the draw weight will increase as they do. Since kids get stronger as they grow, this will be perfect. The extra draw length will be great when the kid's friend inevitably tries overdrawing it to get more power. The bow won't be damaged. Plus, you'll be able to 'play' with it, too!

Also, keep your neighborhood in mind. if you live in a city, obviously you can't shoot outside. IF you live in the woods, enjoy. You can shoot indoors if you have high enough ceilings, but an archery range is almost always close enough for an afternoon shoot. A kid in my parent's neck of the mid-west recently shot a neighbor girl by accident. He was aiming for squirrels, missed, and the arrow flew over the fence, through some trees, and into the girl's shoulder. She recovered, but that may not have been the case if he hit her in the eye, or the kidney. Safety is #1, make sure kids know that, even if you are shooting at an archery range. If you can't be absolutely certain of it, don't shoot. Treat it like a gun. Luckily, adult weight bows for hunting are often too strong for kid's to string and pull back. It's like an automatic lock out for kids. They don't have the strength to use them.

1 2 3 ... 15

You'll need to log in to post.

Our Preferred Partners
oY0rHftM2WArQdOkFoqBy07u2n7VCN8JLr4EJx79x6PNjkUh05NBLLiFaQA52lUc