In reply to HalfFast :
What does your truck weigh? The Willwood A's for my application are about $178 a set at Summit. That's a much better price. They are a little thinner than the Hawks and the friction coefficient isn't quite as good as the Hawk DTC-70.
EDIT: A whole world opens up if I search by "D52 brake pad". There are more pads for this application than the three that Howe or Willwood recommend.
jimgood said:
In reply to HalfFast :
What does your truck weigh? The Willwood A's for my application are about $178 a set at Summit. That's a much better price. They are a little thinner than the Hawks and the friction coefficient isn't quite as good as the Hawk DTC-80.
EDIT: A whole world opens up if I search by "D52 brake pad". There are more pads for this application than the three that Howe or Willwood recommend.
3100 with a fat a$$ driver.
In reply to HalfFast :
Well if they work for you they should work for me. For the first event or two of the season, I'm going to swap front and rear pads and send it. It will be interesting to see just how different our stopping distances are.
*****************
Yesterday I completely rewired the brake lights. They were a nonsensical mess. Wiring was the only area on this car where the PO didn't seem to care much. I like things neat and easily serviceable. I also checked the circuit to see how many amps it draws so I can correctly size the fuse. It was a paltry 1.8A. I'll be doing that with a few of the circuits. I know all of the gauges are 3A, except for the tach, which is 4.
If I combine two 3A circuits on one fuse, should the fuse size increase? Or is the assumption that it's unlikely both circuits would fail at the same time and should share a 3A fuse?
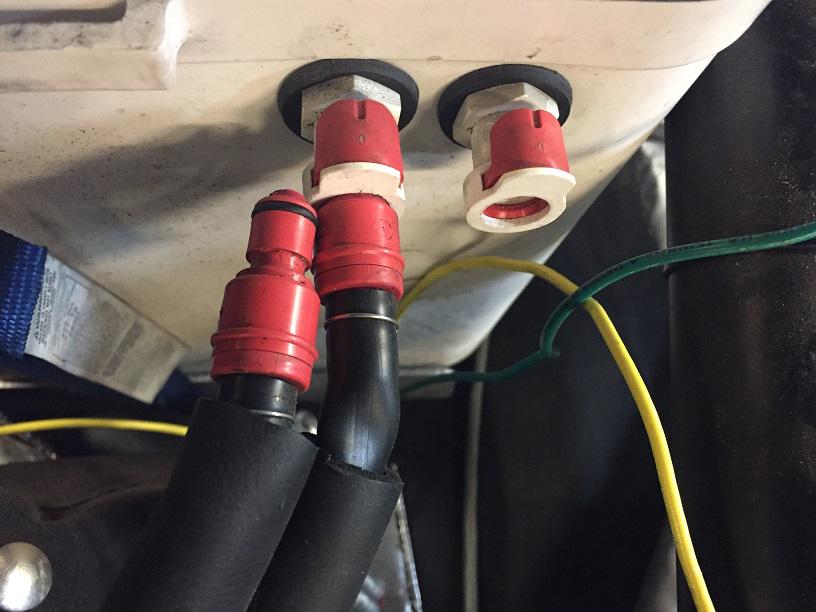
Can anyone here help me understand these cool suit hose connectors? I want to disconnect this hose but I don't want to be hamfisted about it. One of them was already disconnected when I bought the car. The connected hose is kinked so I might need to replace the hose if I decide to use a cool shirt.
Do I just pull straight out? Is there any kind of locking mechanism I need to release?
In reply to jimgood :
Push in on the red tab on the cooler side, and the hose should pop out.
grafmiata said:
In reply to jimgood :
Push in on the red tab on the cooler side, and the hose should pop out.
Ah! Didn't even occur to me to push. Duh. Worked perfect. Thanks!
You'd think the manufacturer would see fit to put that in their instructions.
jimgood said:
grafmiata said:
In reply to jimgood :
Push in on the red tab on the cooler side, and the hose should pop out.
Ah! Didn't even occur to me to push. Duh. Worked perfect. Thanks!
You'd think the manufacturer would see fit to put that in their instructions.
We're men, we don't read instructions. The hoses can be kinda finicky when plugging back in. They can look connected, but then pop back out, so give them a slight tug after you plug them back in. Also, it doesn't matter which one plugs in where, so one less thing to worry about when you roll out to grid.
grafmiata said:
jimgood said:
grafmiata said:
In reply to jimgood :
Push in on the red tab on the cooler side, and the hose should pop out.
Ah! Didn't even occur to me to push. Duh. Worked perfect. Thanks!
You'd think the manufacturer would see fit to put that in their instructions.
We're men, we don't read instructions. The hoses can be kinda finicky when plugging back in. They can look connected, but then pop back out, so give them a slight tug after you plug them back in. Also, it doesn't matter which one plugs in where, so one less thing to worry about when you roll out to grid.
Thanks for the info. I'm not even sure I'm going to use them yet but best not to destroy them before I do.
Highly recommend keeping spare o rings for the connections to the ice box and shirt. They do tear occasionally. Plus the o rings on the shirt often fall off in the wash

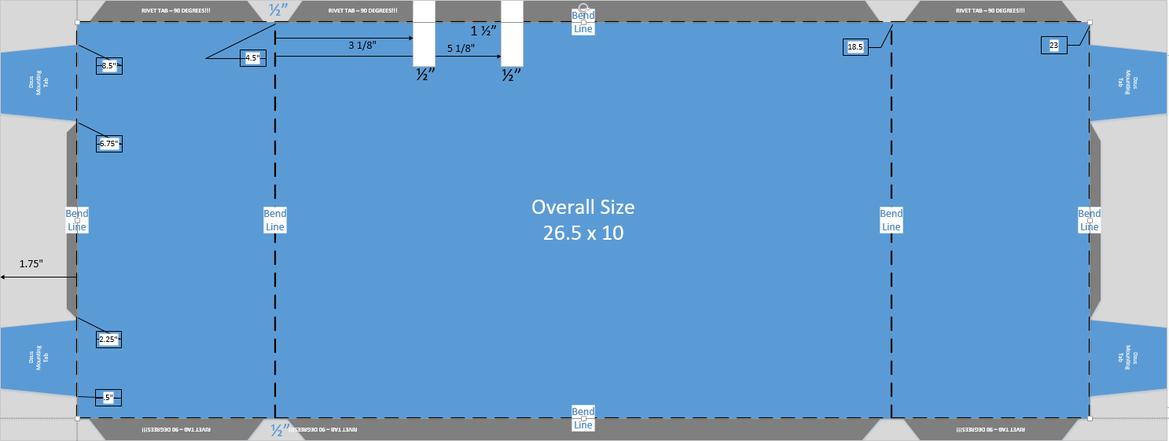
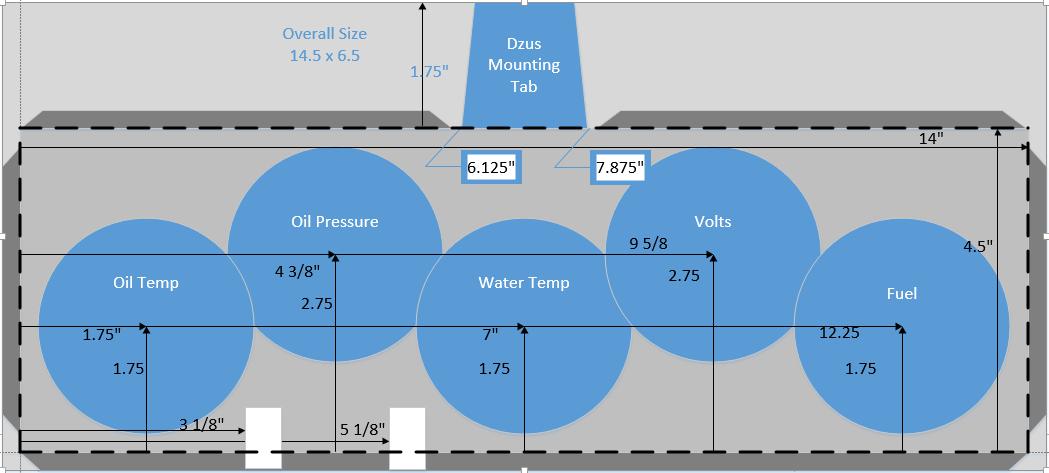
My first attempt at laying out my gauge panel was...well...let's call it a learning experience. I laid this out in Visio before I received my punch/dimple dies. So I put the gauges too close together. The dimple die needs some room around the edges otherwise it crushes the edge of the adjacent hole.
I also neglected to add tabs to fold over so that the edges of the panel are stiffened. So here's version 2.0 of the layout:
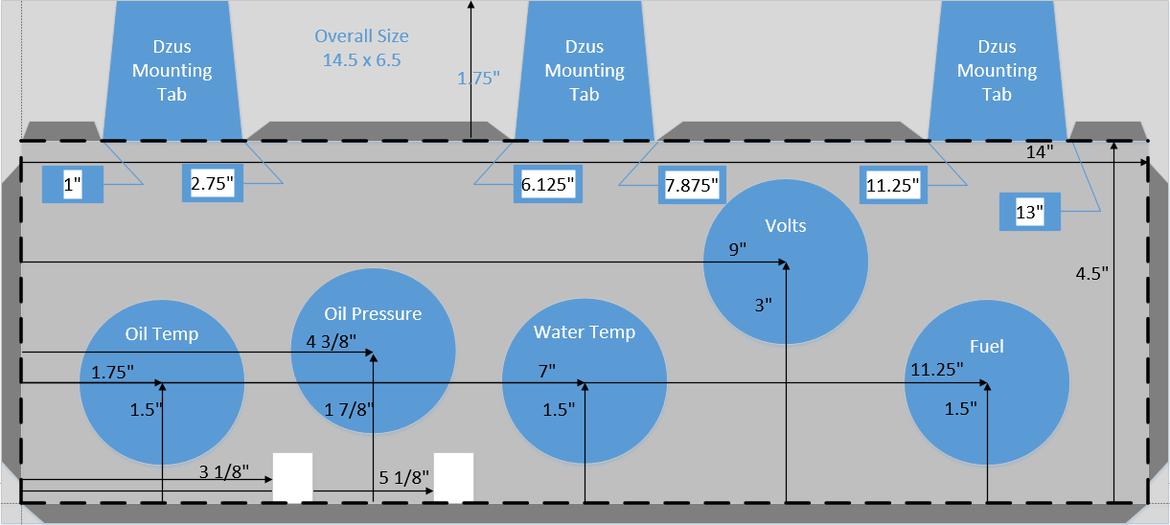
I found that laying out the thing on paper it helps to have a perfect X and Y reference point and offset everything from that. The same holds true for marking the aluminum sheet. This is probably common knowledge to anyone that knows drafting but it wasn't to me. So that's why this layout is so busy. Unfortunately, my fold-over/stiffening tabs (dark gray) were an afterthought because I started with the main panel (inside the dashed lines) and that's why my Y axis is the vertical dashed line on the left. Everything is referenced off of that or the bottom X axis dashed line.
The reason that's important is that it makes it easier to then use the factory edge of a sheet of aluminum as the reference edge. Since my reference point is really 1/4" from the edge of the sheet, it's still easy to compensate for that when marking out the location of the gauge centers and the cut and bend lines.
So that's the front face of the panel. That will be riveted permanently to the box bottom, which will really be one sheet comprising the left, bottom and right sides (see below). The white rectangles are going to be cutouts to clear the steering wheel mounts on the dash bar. The fold-over tabs on the bottom and sides will be bent as far as my HF brake will take them and then will be hammered flat by hand. This provides a nicer edge and stiffens the panel.
The Dzus mounting tabs will be bent to 90 degrees. These will each hold the bottom of part of a Dzus fastener so that the lid can be taken off easily to access fuses and gauge wiring if needed. The adjacent fold-over tabs will be hammered flat. The side tabs will be bent and flattened first, then the top and bottom. Hopefully, I'll have enough room to do the gauge cut outs with the dies after that.
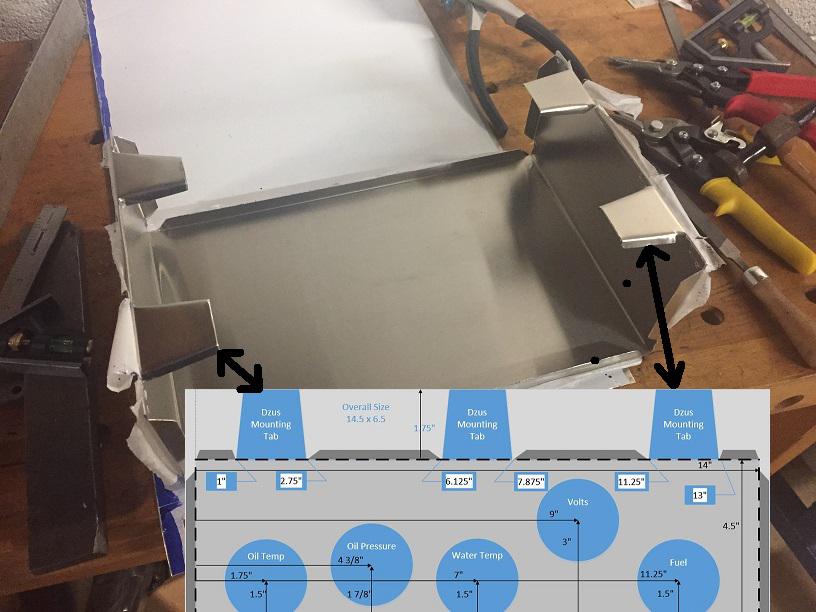
Below is the bottom of the box (left, bottom and right sides). I'm hoping the brake will let me bend top and bottom tabs first (these are 90 degree tabs that will allow the front and back panels to be riveted on) and then bend each end, working my way in. I may have to trim the top and bottom tabs some more for clearance to make the bends for the sides. The back panel will be just like the front gauge panel just without the gauge holes. BTW, I'm using 22 ga. aluminum (.025") so this will be very light; probably a few ounces.
Edit: added detail for the cutouts for the steering column mount (white blocks)
We'll see how this one turns out. I was in the process of marking up the sheet for this bottom piece when I found some errors in my drawing and had to revise it. So I'll have to erase some of what I marked up and start over.
I just noticed a minor problem. The tabs for the Dzus fasteners for the front panel are going to be competing with space with the tabs on the sides. This is where being able to do 3D CAD would have found this problem sooner (or at least having a bigger brain). But, it also shows I don't really need the two outer Dzus tabs on the front panel anyway. So I'll just delete those. In case anyone on is wondering, the rear panel will be the same as the front just without the gauge holes.
So here's the revised gauge panel layout v2.1:
Love what you're doing, I don't have that burn like you do. I would have just gotten one of these... https://www.summitracing.com/parts/dom-910-rd
In reply to HalfFast :
Yeah. Then I would have had to get all new gauges too! LOL! Believe me, I looked for ready made consoles but couldn't find any that would work with what I have and for where I wanted things in my view area.
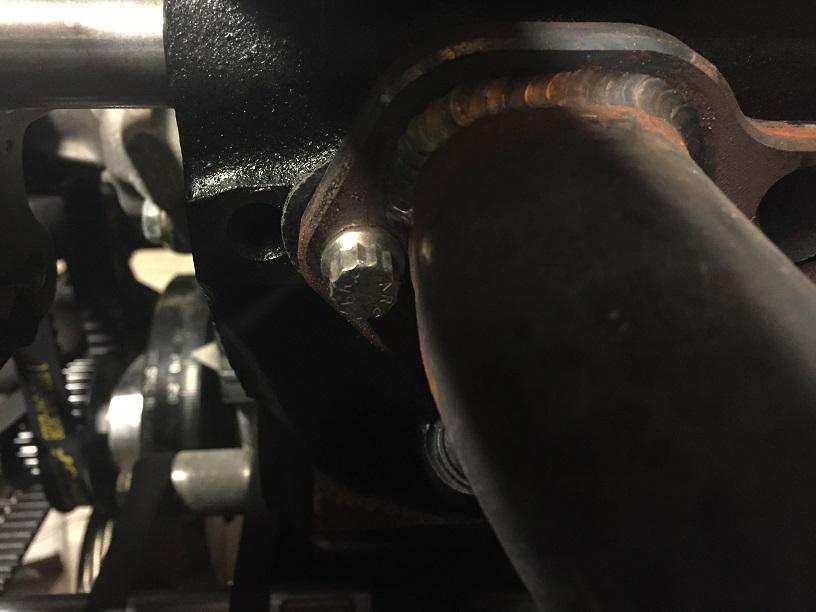
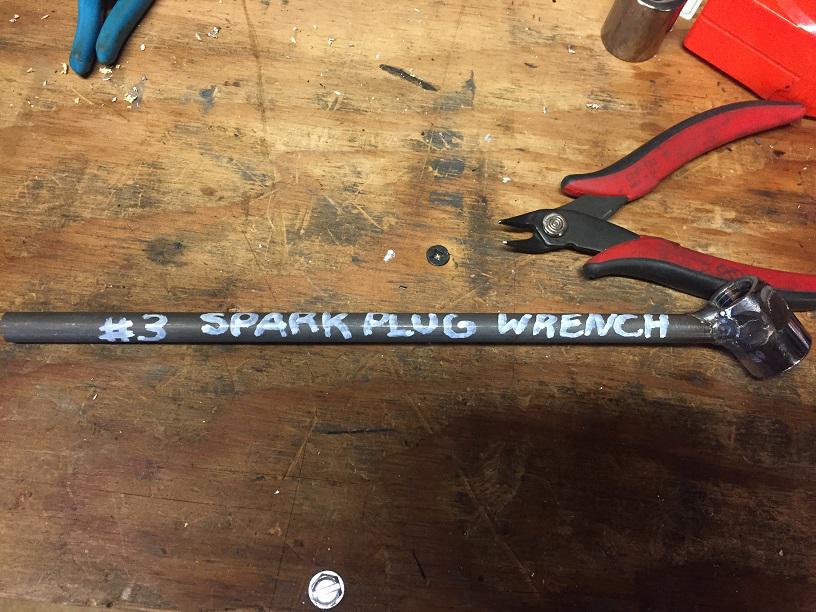
Can anyone tell me if "normal" 12-point sockets are applicable for this type of bolt or should I be looking for a specific type? I'm searching for 12-point Torx but getting normal 12-point sockets or 6-point Torx. I think it will also have to be thin walled because it's very close to the header pipe.
I'm asking because I noticed a missing header bolt and wanted to pull one of the others to get the size for replacements.
In reply to jimgood :
1/4 drive 12pt sockets fit, but I replaced mine with 6 point as I had to use a uber tiny/thin wrench on one. It sucked trying to get the 12 pt version off.
Thanks. I'll dig around and see if I have one the right size. Damn this is annoying.
Looks like a 3/8" 12-point box end will fit but I don't have any thin walled sockets that will work. And even at that, the box end still won't go on two of the 8 header bolts on the driver side. Anyway, that was enough for me to pull one and get the size; 3/8-16 x 3/4". Kind of short. I should probably pull a couple more because it's clear the PO used at least two different kinds of bolts (the one in the pic looks like SS vs. the others which have some rust on them).
Finally welded a handle on it. Works great! 
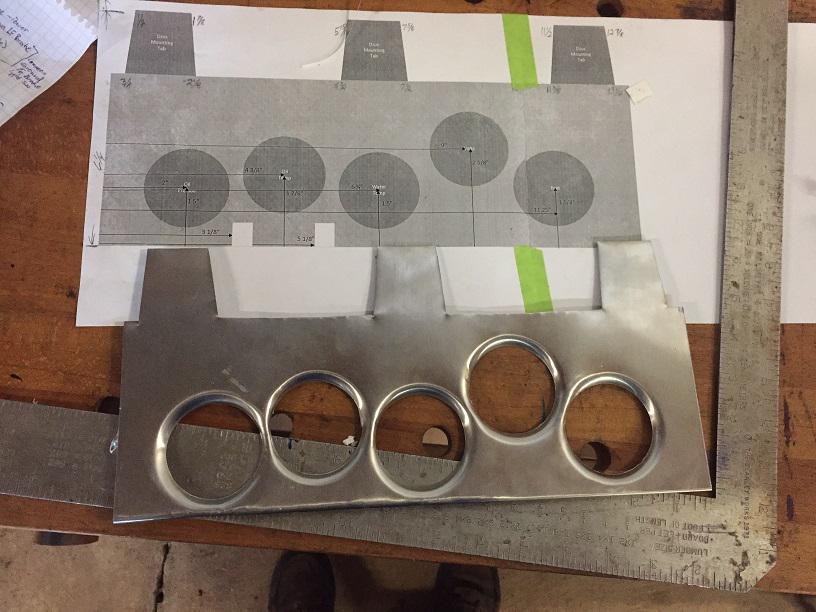
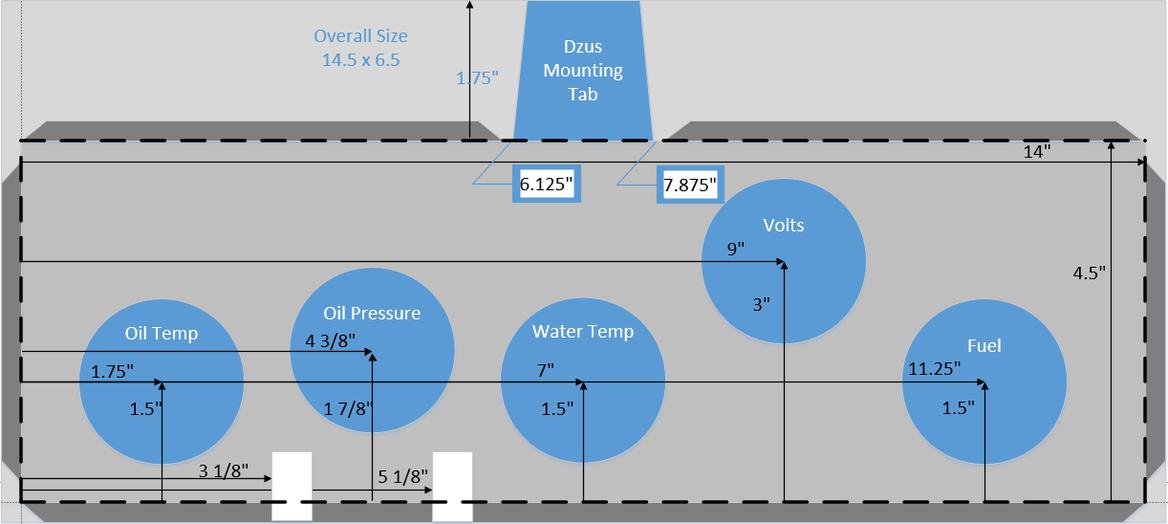
After my second failure for the gauge panel, I measured the dimple/punching die and found that there can't be more than 1/4" of overlap between the die and an adjacent feature. So I rejiggered the diagram and set the gauge size to 3" to match the size of the die and moved everything around. I still need to see if I'll be able to see the three gauges on the left through the steering wheel without tilting my head down. Now we're at V3:
I have 12 point header bolts on a few cars. Theyre annoying, but less annoying than 6 point heads. I have a few bolts only accessible by ground down stubby box ends.
Unfortunately, custom tools seem to be part of hot rodding maintenance.
V3 is good enough. It still took some massaging to get the panel flat again after the punching and dimpling. The holes aren't quite as ovoid as they were before. It's a shame I over-cut the lines for the Dzus tab (the little slits at top/center). But this will get covered over by felt anyway. It fits nice with the bottom as well. Now I need one more panel like this one without the holes that will go on the back and another panel for the top. Once those are done, I'll start riveting it together and installing the Dzus fasteners. It will need at least one hole in the side for wiring. Then I'll need to weld some tabs on the cage for mounts.
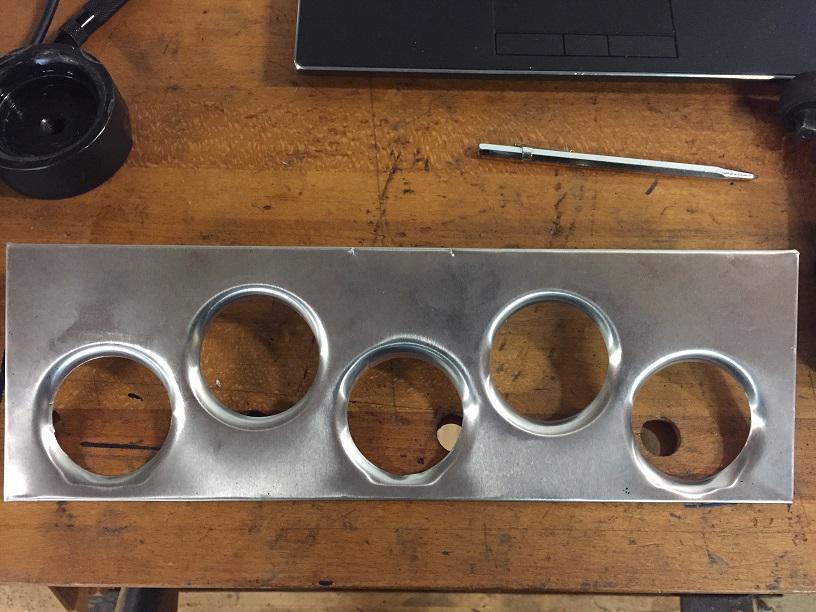
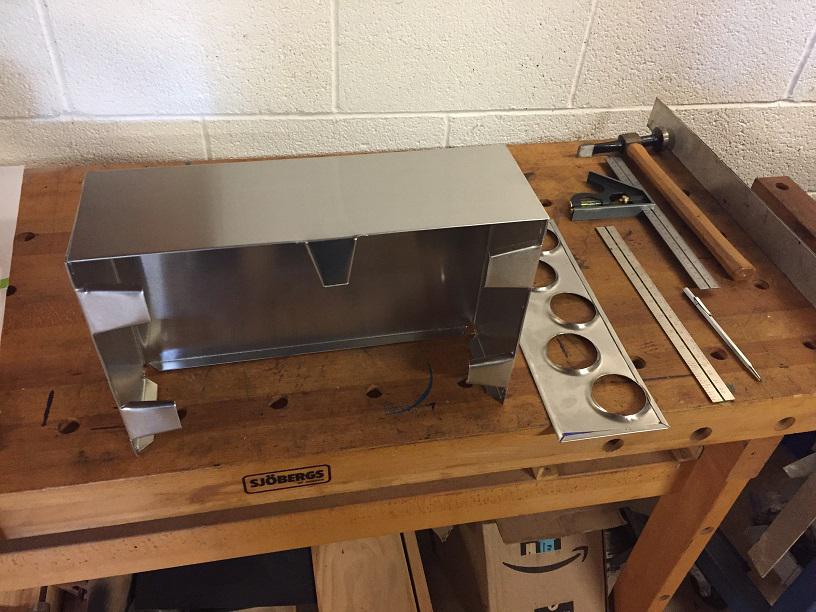
After a bit of rest because my hands were cramping up, I finished the remaining panels (top panel is behind the box). Now I have to wait for rivets, which are on order; apparently on a slow boat from China. I didn't have anything that would work with this thin sheet. There is another problem. I didn't make the Dzus tabs wide enough for the damn dimple die. 
Dusterbd13-michael said:
I have 12 point header bolts on a few cars. Theyre annoying, but less annoying than 6 point heads. I have a few bolts only accessible by ground down stubby box ends.
Unfortunately, custom tools seem to be part of hot rodding maintenance.
I guess I need to make peace with that. 
A man makes a tin box and he starts to thinking he can make anything.