


As the title suggests, I make things out of wood from time to time. I've done a build thread before on one kind of woodworking which i hope to return to at some point in life, but since that is so specific I decided to make a separate one for all the less complicated stuff. I do not claim to know what i'm doing, i very much figure it out as i go with the few tools to which i have access, so be prepared for numerous screw ups, blunders, and wrong choices. The goal very much isn't to do things right or build anything awesome anyway, but to spend time in my garage screwing around with stuff. With that in mind, let's screw around with some wood! that came out wrong...
Project One is a Tool. I am trying to get into metal fabrication (more stuff to screw around with in the garage), but the tools certainly aren't free. I'm hoping I can make some of the tools to free up some funds for a few quality purchases. This is very much what i did with wood working tools. I purchased a few quality tools, made some (less quality but very inexpensive) tools, and focused on versatility. To that end i want to make a teardrop mallet, the kind that is used with a sandbag. I purchased the sandbag, because I have neither leather or leather working skills. I'll tackle that later.
Material choice for this will be hickory. Why? Because it's as tough as Ron Swanson. More importantly, however, I have some hickory boards taking up space. I like to use what i have.
Step one, look up a bunch of mallets that are available. Then make a reasonable guess of a design on sketchup:

The design is for 2 1/2" diameter using 3/4" thick boards. 3 of them come out to 2 1/4", though. The design thus uses a 1/8" piece glued onto the sides. I have 1/8" thick pieces of cherry... but i decided to skip that as you'll see later. I can always go back to it. Maybe.
Transfer to paper:

Transfer to wood:

This will require 3 boards, so 3 pieces. I'm using 2 of them from the board pictured, and another pieces from another hickory board that looks a little different. Hickory is like Oak in that it isn't a species, it's a group of many species. Wood will look different from tree to tree of the same species, and vary considerable from species to species even though they are all 'hickory'. It's also possible someone mislabeled it. I don't know.
Start shaping:

I just chiseled out this one corner, sawed out the rest with a coping saw. One fun thing about hickory, it's super tough. By fun thing i of course mean exhausting. Stuff is HARD to work. And yet, i got to use my fun chisel square trick i learned on the youtubes:

Use a square board as a reference to keep your chisel straight. You could also just develop some wood working skills, but remember what I said earlier about me not knowing what i'm doing? The result looks nice with this method, though:

Fast forward to having 3 done (some wood for handles in the background):

Here's how I glue it:

General practice is to coat both surfaces to be glued with a thin coat and clamp together. I learned a different method. I used to watch a lot of instructional videos by an old master furniture maker named Charles Neil:

His website is on his shirt. Check it out. He seems like a really nice guy, and he makes a blotch control product that works almost like magic. i used it on a desk i made for my wife out of poplar (poplar tends to blotch like CRAZY) and his stuff allowed for a cherry dye to not blotch, but also not look like i smeared dye on a sealed surface like you get with other 'pre-stain conditioner' products. I think it's witchcraft. Anyway, that's all off topic...
Charles Neil said in some video that he smears lots of the glue over one of the surfaces and clamps it up. He's never had a glue joint failure that way. Good enough for me.

Another Charles Neil sourced trick, don't wipe off the excess glue with water and a rag. That will make the glue thin, and it will run into the pores on this hickory. Instead, just let it dry. BUT, don't let it dry super solid. I use Titebond glues (titebond II in this case i think), which claims to reach full strength in 24 hours. Within a few days, the stuff turns to freakin adamantium. After it looks pretty dry (less than 24 hours certainly) it will still be slightly pliable. At that point, break out the chisel and cut off the excess:

Much easier, cleaner looking, and i don't have glue in the surface of the wood. That Neil guy knows a thing or two about wood working. Every tip he gives (and he gives plenty) has proven to be extremely useful.
Anyway, now onto the blunders! I need to drill a hole for the handle. Doing so will be easiest in this early stage before the head becomes all round shaped. I have a drill, but not a drill press. I have to free hand the stuff and eyeball it. Consequently, i missed:

Oh well. I'm going to be bashing metal with it, it's not going to be perfect looking even if i make it flawlessly.
Test fitting the handle:
notice the black line and different coloring. That's called spalting. Basically fungus makes the different colors. It looks cool in my opinion, and simply for that reason i am using this 3/4" dowel instead of the 7/8" or 1" dowel that feels more comfortable in my hands in the other mallets i've made (wood working ones). Spalting can weaken the wood, and it has done so here, but i used it anyway. I like to live dangerously.
I used that pattern again to trace the shape onto the top sorta:

I made a weird clamp and clamp set up because i hadn't set up my vice yet, and chiseled out the general shape:

I was trying to hold the stuff with my left hand while taking a picture with my right. It didn't work. That was actually the first wooden mallet i made in that picture, which is why it looks all screwy and crummy. I might have used it to pound in a few nails which is NOT what you should use those for, but it's red oak and that stuff isn't suited for hammers anyway.
I later set up the vice and got to work with general shaping using a cabinet maker's rasp (on the right of pic):
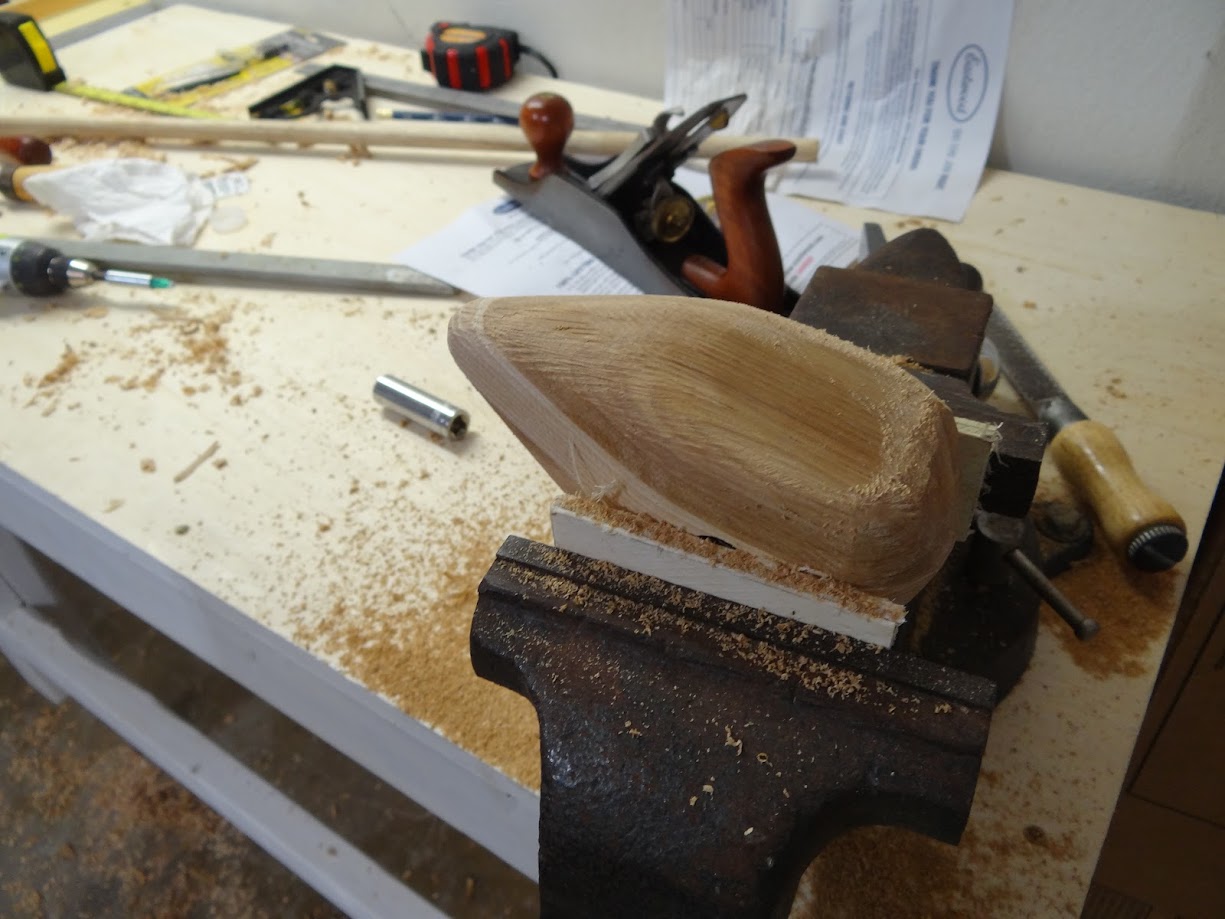
Notice the small pieces of 1/4" ply between the vice jaws and the hickory. That's to prevent marks on the hickory. Hickory is tough, but not metal tough.
Break out one of my few power tools-a random orbit sander-for smoothing:

And behold!

Repeat to the front:


And then i broke into my wood finishing stuff:

Straight to the wax. I didn't want to put any finish with a film on this hammer for obvious reasons, but i want to protect the wood. I just use straight furniture paste wax on a lot of things (tools, bench tops) because it can protect, but also it won't scratch off because it isn't hard. It also doesn't wreck whatever it touches like some finishes. It's just good stuff. It even makes some woods look good:

The dark spots are a result of sanding. Things get stuck in open pores of ring porous woods like oak and hickory. I didn't bother trying to prevent it. This is a hammer, not a bombay chest.
This is how i ended up gluing it onto the handle:

The other mallet shown had the handle sticking out of the top as well. I will trim it later once i decide how long to make it or whatever.
You may notice that the sketchup model showed it more as a cylinder with a cone and rounded ends, while the actual mallet it more like a hemisphere shape on the end of a rounded square. The contact surface is the same, but i didn't want to remove tons of wood from the body for two reasons. The first is weight. Wood isn't real heavy and i'm not adding any weight to the body, so i left wood on there. The second and most important reason is that i could NEVER get it perfect, so I didn't bother trying.
I did this over a few days, chipping away a little at a time. I'm going to wait for the glue to dry and then cut the handle to length and put some wax on that, but the main part is now complete. The next project is already planned out, i just have to get making it!


