
T.J.
MegaDork
3/23/20 8:12 p.m.
So, since I came home from work related travel on Friday the 13th with a runny nose and a cough, I've been in quarantine in my bedroom and office. I typically work from home, so there hasn't been any real issue with work while I've been stuck, but with all the extra time I've been working on plans to build a small N scale model railroad layout. This thread is about the structures I've built for it.
Last week I started out small. Ok, everything in N scale is small (1:160 scale), but the first thing I put together was a little wooded kit for a coal shed.
That worked out ok. Not great, but ok. The kit had an optional step to cut and install the ends of the rafters. I cut the pieces, but they are too small to glue and put in place, so I skipped that step. One of the rafter ends can be seen laying next to the shed. For scale, this thing is about 3/4" on each side.

T.J.
MegaDork
3/23/20 8:19 p.m.
The coal shed was Tuesday of last week's project. Since that was fairly fun, I next decided to build another wood kit. Something called Dill's Market. I am planning on using it as a small house, although it is only about 450 sqft, so I guess in my fictional world, they had tiny houses in the mid 1960's.
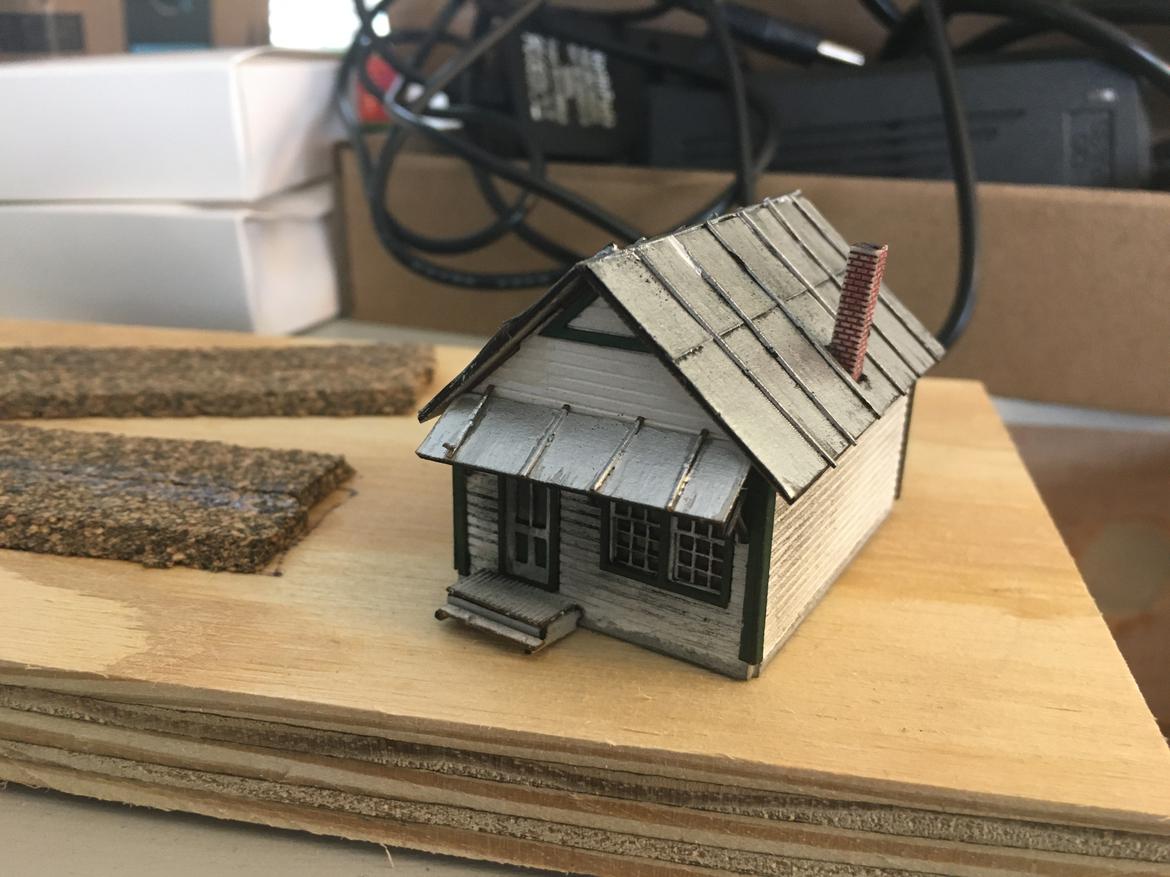
This thing, although also pretty small is way bigger than the shed. It measures 1.5" wide and 1.75" long. The roof was a bit shiny since I painted it with silver paint in an effort to make it appear like it was aluminum or some sort of silver colored metal roofing. I used some black pastel chalk to weather it and take the shine off the roof a bit.
T.J.
MegaDork
3/23/20 8:23 p.m.
Here is the house in my hand for a sense of scale.

It is apparent that I got the bricks backward since my bricks are white/gray and the mortar holding them together is red, but to my eyes in real life it looks ok and I can't really tell that it is backwards.
T.J.
MegaDork
3/23/20 8:44 p.m.
I worked on the little house over Friday and Saturday.
Sunday, I was thinking that putting these together was a good way to spend my time in isolation, so I wanted to build another.
I don't have a whole lot of kits here since I am planning on scratchbuilding most of the important buildings to match actual buildings for the place I am modeling, but I did have a plastic kit from Walters called the Sunrise Feed Mill. I mostly bought this to build as practice since I've never been much of a model builder. When I was a kid, model building consisted of me sitting next to my dad as he built my models and I watched.
This one also made me wonder what they were thinking when I noticed that the roof over the loading dock was designed to be glued to the wall and hang down at a 45 degree angle with no supports. Seriously? I know this is N scale and things just have to give the idea of a building, but that seemed really dumb. I first thought my kit was missing parts, then I noticed that the instructions also didn't mention anything other than gluing the roof to the wall. I searched the internet looking for pictures of the completed model, since the only picture on the box is of the opposite side of the building.

It turns out the HO scale version of this kit has 7 corbels supporting the angled roof over the dock. They must be proud of them, because the webpage for the HO kit shows the building from the loading dock side at a low angle so we can see the corbels.
Here is the picture of the HO version:

T.J.
MegaDork
3/23/20 8:45 p.m.
Anyhow, the Sunrise Feed Mill, sort of fits into the theme of what I am planning and I figured I could use it somewhere on the layout. When I opened the box and looked at the parts, I didn't really like it and came up with a plan to build the main building, leaving off the attached shed, the cupola and the dust separator on the roof.
To make the missing corbels, I messed around trying to cut some scrap styrene into the shape that I needed, but that was harder than it seemed. After a while of struggling and getting 80% completed with making them, it dawned on me to print them out on my 3D printer. That took about 5 minutes to draw since I already had the dimensions I wanted, then about 6 minutes to print 8 of them. I printed them in yellow PLA because that is what I had in the printer. It turns out acrylic paint doesn't stick that well to PLA and plastic cement (model glue) does not dissolve PLA, so superglue was called for.
Anyway, I got them installed. The next hurdle was with the roof since I was not going to install the cupola. The roof for the main building had spots for the cupola that needed to be addressed. I first filed and sanded the two pieces down to remove the little ridges they provided to attach the cupola. The roof pieces were molded with some horizontal lines that I decided were supposed to represent tar paper, and the cupola area was smooth. I thought about coming up with some sort of patch, to make it look like the roof had been repaired, but didn't like that idea since what were the odds that both sides of the roof would have the exact same repair in the exact same place?
T.J.
MegaDork
3/23/20 8:46 p.m.
I decided to make my own version of a tar paper roof that I could apply over the provided styrene roof panels.
Not having any black construction paper, I was stumped for a bit. I thought about using a cereal box cut into strips, but thought the material would be too thick on top of the styrene and not strong enough to be used by itself without building some sort of rafters to support it.
Then I remembered that I had the left overs of a roll of red rosin paper in the workshop. I sprayed a piece of it with gray primer, then some flat black (both from rattle cans). (Had to put on a mask and gloves to travel to the garage, and I did it last night when everyone was sleeping.)
Armed with the knowledge geaned from a YouTube video by some guy who knows what he is doing, I proceeded to try my hand at making a tar paper roof. I figured, I would try to make it heavily weathered like it had seen better days, sort of like 60 year old bulding in a small town in Idaho might have looked like in the mid 60's.
Anyway, here is the finished product:


I may hit the roof with a black wash to darken it up a little bit. I don't want it to look too ramshackle. Basically, I took my red rosin paper that was painted gray then black and cut it into strips, then sanded them to expose the gray and in some places the red paper underneath. Glued the strips onto the styrene roof panels leaving overhangs on each end. After the glue dried, I cut the excess off the ends. I made a strip to be a cap for the top, but haven't put it on yet. Then I weathered the roof with some pastel chalks, but most of it is just the paint, paper and the sanding I did before gluing the strips to the roof.
T.J.
MegaDork
3/23/20 8:52 p.m.
I printed out some scaled down pictures and put them inside just in case anyone with a microscope ever looks in the windows. The smaller, single story part is the office, and the big area is a feed mill. You could tell that if you had microscope eyes.
I may put some LED lights inside this one, but doing a rough test with just shining a flashlight from the bottom of, I'm not so sure that the walls are not a little too translucent. Maybe some not so bright LED will work out ok.
I have three walls of the shed structure that was supposed to be attached plus to cupola and dust collector. I am thinking I will just make the 4th wall out of a sheet of styrene and then have a nice shed/warehouse looking building.
T.J.
MegaDork
3/23/20 9:13 p.m.
I got some stuff in the mail today that I have been waiting for, so structure building is going on a hiatus for a bit while I play with arduino and servos.
I have been working on 3d printed servo mounting brackets to use tiny SG51R servos to operate my turnouts. End goal is to automate a good bit of the layout and let a raspberry Pi and arduinos run things.
In reply to T.J. :
Slather a thick layer of black paint on the interior. If you care about the interior color, you can always paint over the black with whatever color you actually want on the inside. This usually solves 99% of light "bleed through" problems as long as the fit of the kit is decent. Woodland Scenic has a kit to "seal" cracks and foundations for light bleed through, but like all WS stuff, it's pricey for what it is.
You do nice work, T.J..... :) Great touch on the weathering.
T.J. said:
...I am planning on using it as a small house, although it is only about 450 sqft, so I guess in my fictional world, they had tiny houses in the mid 1960's.
Those were called "Houses".
This looks like fun. Your corbels look good. I assume the answer is "it varies with cost" but I'm curious.. How small of a scale can 3D printers really print with accuracy? I presume it is something akin to "dots per inch".
This also reminds me that around 1998, an architect that I worked for hired a company to build models. They used some kind of laser cutter. I was astounded when they were able to model guard rail balusters individually cut at 1/8" per foot scale (1:96). It was vastly superior to my balsa and spaghetti models from design school.
T.J.
MegaDork
3/25/20 9:12 a.m.
In reply to OHSCrifle :
My printer is a cheap one using all open source hardware/software made with low quality parts. I typically print with 0.2mm layer heights. The corbels I printed were composed of members 1mm square and they came out just fine. Not sure how much smaller I could go before the part lost its shape. Also anything smaller/finer may be hard to remove from the print bed without breaking the piece. There are also many different types of filament that can be used. I mostly print in PLA because I have several colors and it is fairly easy to work with. I have a spool of ABS, but it is more finicky, smells a bit and requires hotter temperatures to print. I haven't tried any of the other types of filaments.
It seems that the resin printers might be the best for making small detailed parts, but I try to not look into them and what they can do to save me from buying one.
I really want to get a laser cutter to make my own 'kits'. I don't think I want to mess around with the K40 variants because the lifetime of the lasers and the size of them, but many of the lower powered diode laser don't seem powerful enough to cut without multiple passes.
T.J.
MegaDork
3/25/20 9:14 a.m.
In reply to kazoospec :
Yeah, the black paint makes sense. Next structure I build I will paint the inside of the exterior walls black before assembly. Trying to get the inside walls painted after the fact would be tough and I figure I'd end up painting some of my windows black. I have also heard of people using black electrical tape on the inside as a light blocker.
In reply to T.J. :
Another option is to do exterior lighting rather than interior. Not pushing WS stuff because it's pretty pricey, but these are pretty cool, and probably more period correct for what you're building than for our project. 
I want to rampage my Warhammer army through your train town.
T.J.
MegaDork
3/25/20 11:07 p.m.
In reply to kazoospec :
Those would fit nicely. WS is certainly proud of their products
I was looking for grade crossings and NJ International makes just what I want, but not cheap. I'll have 3 road crossings, but just want gates at one. Just flashing crossbucks at the other 2.
T.J.
MegaDork
3/25/20 11:12 p.m.
Tonight I started working on the leftover shed from the feed mill kit. The issue is that it was made to attach to the mill, so only has 3 walls.
 Here is a pic of the two end walls. One of them is not so useful for a standalone structure.
T.J.
MegaDork
3/25/20 11:15 p.m.
I have a sheet of styrene representing clapboard siding. So I figure I could use the kit 'hole' walk for the bottom foundation portion and cut out a new clapboard sided wall.
 New wall on the left. Kit wall on the right.
T.J.
MegaDork
3/25/20 11:19 p.m.
That worked out pretty good. This time I painted the insides if all wall black, then later went over it with some brownish color.

Picked a random color that would be different than other buildings so far. Ended up with a yellowish color. Looks a little green in the pic, but it looks more yellow in real life. Going to just use the roof from the kit on this one.
Still have to glue in the window glass, then attach roof and roof vent. Will do that tomorrow.
T.J.
MegaDork
3/29/20 3:20 p.m.
I added the windows and roof a few days ago. Then I started wondering about adding some details to this building. I drew up an electric meter and electric panel and 3 printed them. I was asking a bit too much, so I had to dumb down my design a bit and make something easier to print. Ended up not too bad at least from a distance. I added a paper clip for the conduit up to the roof.
Today, I decided to build a tiny kit I bought for an oil tank. I bought it with one of the other kits I bought since it was $5.00 and I was already paying shipping. Turns out that kit is dumb. The tank is made up of 9 tiny wood pieces that you have to glue together just right, then the tank gets wrapped with a tiny piece of paper that is supposed to tuck into a little slot along the bottom of the tank. Of course the slot is only viable if the stack of tank parts are perfectly aligned. Mine were not. From there, things got worse. The legs to support the tank were essentially made from nearly microscopically thin paper. I couldn't glue them to the bottom of the tank for the life of me. Even if I could I don't see how they would hold it up.
https://www.gclaser.com/n-scale-fuel-tank/ here is what the completed fuel tank kit is supposed to look like.
T.J.
MegaDork
3/29/20 3:20 p.m.
I decided I needed stronger legs, so I drew some up and printed them out.
Those came out better than I thought and certainly more useful than the fragile little things that came with the kit.
Since that worked out so well, I figured why not just print out the tank itself and rid myself of the paper covered wood thing.

I had to clean up the legs and tanks a little bit to get rid of some extra plastic that the printer left me. A little sanding and filing and things were looking ok.
T.J.
MegaDork
3/29/20 3:27 p.m.
I decided to re-create the oil pipe with paper clip wire. Used a smaller paper clip than I used for my conduit, so it is a little smaller in diameter. Not quite as small as the brass wire included with the kit, but good enough.
I added small pieces to the paper clip to the top of each tank to simulate the vent. I decided to ignore the valve on the pipe and the two other things on top of the tank. I assume one is supposed to be a level indicator and the other is supposed to be a fill hole.
So, I ended up with this:
T.J.
MegaDork
3/29/20 3:28 p.m.
I hit those with a little Rust-oleum gray paint/primer that supposedly sticks to plastics.

T.J.
MegaDork
3/29/20 3:31 p.m.
Here is one of the oil tanks sitting next to my warehouse shed building along with my electical service.

I need to paint the tank some more. It just has a bit of the rattle can paint on the top for now. I'm hoping that once it is all rattle canned, I can then go at with some acrylic paints. The acrylic paints don't really stick to the PLA.


