


Maybe thermal cycle it in the oven to make sure no more show up?

Maybe thermal cycle it in the oven to make sure no more show up?

Can you adjust the AC balance for better cleaning action on your TIG? I've had to turn my cleaning balance up pretty high and just run the arc over the weld area on dirty 4L80 bell housings before to pull crap out of the base metal before I can seal it up with a pretty bead.

I sympathize on the tank welding thing. Took me a while to get all the pinholes sealed up when I welded the Molvo fuel tank.
Word of advice is to let it sit for a good long time before you put fuel in it. Like a week, full of water. Once you put fuel in, you don't ever want to put a torch to it. Not only is it almost impossible to get the weld clean once fuel had seeped into it, the blowing up part is noisy and inconvenient.
Coating the tank is a good idea but do some homework on prep and compatibility with modern fuels. Here is a thread on a similar tank build that might help.
https://www.mgexp.com/forum/mgb-and-gt-forum.1/bill-hirsch-gas-tank-sealer-review-rant.3059237/
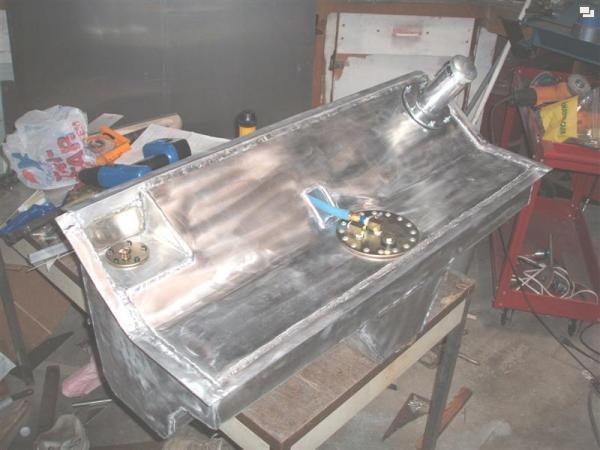

18 hours, no leaks:


As in, it took 18 hours of work to get to no leaks?
In reply to Robbie (Forum Supporter) :
Zing!
no, I mean I filled it to the brim with water 18 hours before that pic was taken. Better to be a smart ass than a dumb ass, so you got that goin' for you.
I'd make fun of the booger welds, but its a bout a zillion times better than I could do!!! Great work.

Did you put food coloring in the water? That way you can see the leaks, even when they evaporate....
with the gas tank out on long-term leak test, i turned my attention back to the transmission mount attachment brackets. I threw the first design together quickly and just wanted to move on from it at the time, but after banging my elbows on them a couple times while doing the shift mechanism, i knew they had to go:

i could have just done some simple tabs off the inboard frame surface, but that would not be the best way to react the forces.

the diagonals coming up from the trans mount will impart some vertical and some horizontal force into the frame. the vertical force would be reacted in-plane, but the horizontal would be reacted out-of-plane and would cause bowing or buckling of the inboard surface. short-term, probably OK. long-term, could crack and tear out. the solution is to design the tabs so they tie in to the vertical *and* the horizontal surface, which is what i showed via CAD above. so, i drilled 1-1/8" holes with step bit to match radius of frame corners, cut, and scribed for bends:
then clamped them to a piece of 1" square tube and tacked them together:

I need to remove the old ones and burn the new ones into the old locations. here's a side-by-side:

in addition to the more efficient force paths, the new design gets rid of projections above top surface and allows the diagonals to be shorter/lighter.
next up: out with the old.
In reply to Dusterbd13-michael (Forum Supporter) :

AK1 was home from college for a few days, so last Wed thru Sun were family time.

And just like that, she's headed back to campus until the semester ends at Thanksgiving.
And that means: Back to car stuff! I trimmed the trans mount plate to clear the rear bar, and cut / bent / welded a couple strips to the bottom of the mount, to prevent bending of the mount plate:

Tonight I finished drilling all the bolt holes in the mount and brackets, hit the frame rails with the flap disc, and tacked the brackets in place. I'm much happier with this design, and the execution came out pretty decent as well:


Next up is to weld mounts to gas tank, which has been leak-free for 10 days now. I kinda feel like I should pressurize it a little just to be sure, so thinking about how to do that. I've got a pretty good idea, just need to make a plate with a Shrader in the center, to bolt in place of the pump assembly.
Also of note: the C4 continues to give. While I was cutting the flanges and pipes from the cats, I figured I'd throw them on eBay.

Another $182 in my pocket! Probably gonna spend every penny of it on a fancy dinner one night next week for our 20th anniversary. Then again, might spend it on the tiny green wire-feed welder at The Future Hammer Store.

"I kinda feel like I should pressurize it a little just to be sure, so thinking about how to do that. I've got a pretty good idea, just need to make a plate with a Shrader in the center, to bolt in place of the pump assembly. "
I kept thinking about this ^^ while catching up and was glad to see you thought of it. I'm not an engineer so no I can't calculate it but I could see hitting hard bumps or sloshing above your baffles increasing the pressure slightly, perhaps just enough to cause a leak.
AngryCorvair (Forum Supporter) said:Then again, might spend it on the tiny green wire-feed welder at The Future Hammer Store.
The hammer store green welders are better than they should be. I have a Titanium MIG140 that has really impressed me, it's way smoother than my old Lincoln Weldpak 100, and it's what I used to stich together the entire floor and firewall on the truck this spring. I have just ran .030" flux core through it, I've never hooked it up to a bottle.
Hey, anyone remember this project? Yeah, I didn't think so. Finally getting back to it after almost 2 months with no activity. First up: gas tank mounts. I came up with a pretty simple and robust design that will attach to the engine mount pads on the C4 front crossmember. I ripped one side of 1.5x1.5x1/8" 6061 angle down to 3/4":

then clamped up and welded to make offset feet 1" tall x 2" long:

and welded them to the bottom of the tank:

Then I measured and marked and drilled through the isolators and loosely bolted the tank in place:

yes, that's a regulation hockey puck. :-)
With the front of the tank supported, I measured the gap from bottom of tank to top of crossmember, marked the mount location on tank, trimmed another piece of angle to fit, welded it to the tank, and drilled the bolt hole:

that bolt will connect the aluminum upper mount to the steel (rectangle tube scrap) lower mount I will weld to the crossmember. I will weld a nut to the steel part so installing the bolt is a one-tool affair. And with that, the tank mounts will be complete. It will be nice to cross something off the list. Next up will be fuel lines from pump to engine, then coolant tubes from engine to radiator.
Gas tank forward mount: I knew I needed 2.25" from bottom of tank to top of crossmember. the bolt hole in the Al tab is 1" from bottom of tank. So I grabbed a scrap of 2x3x14ga steel tubing, drilled a hole 1.25" from the end, marked the shape, and cut it on the bandsaw. Bolted it to the tab on the tank, and welded the nut to the backside:

then, with that bolt slightly loose (to allow the flat bottom to find its happy place on the crossmember) I set the tank in place and marked where the bracket touches:

a little flap disc, a little flux core, a little wire brush, et voila:

gas tank mounts are complete.
In reply to AngryCorvair (Forum Supporter) :
You keep taking these two month vacations you won't make your goal of 2025.
In reply to Stampie (FS) :
2027?
I need to start thinking about nader again. Especially if i want to get there before monzora....
Hell, need to get it done in the next five years!!!

Good to see you back at it, despite winter setting in!
In reply to dherr (Forum Supporter) :

In reply to AngryCorvair (Forum Supporter) :
That's cute how y'all put up your windshield wipers so they don't freeze to the windshield. Yeah we don't do that down here in FL.
Stampie (FS) said:In reply to AngryCorvair (Forum Supporter) :
That's cute how y'all don't have lizards falling from the trees when the temperature drops below 50F.
like Molly Hatchet says in Flirtin' With Disaster, "it ain't for everybody."
Worked late a bunch last week, then did a bunch of honey-do's yesterday and today. Did knock out one task that was concerning me, and that was flipping the throttle cam to greatly simplify cable routing.
on the stock LT1 it looks like this:

which pulls the cable up and to the rear. That's fine in a front-engine configuration but not so fine for a mid-mount. So I ground off the peened end of throttle shaft:

then pried the cam free:

center-punched, drilled, and tapped the shaft to take a 10-32 screw (note to self: get a small tap handle):

flipped the cam, and ran the screw home. and here's how it works:
now I need to modify the OE Corvair pedal rod and bellcrank to give full cable pull with available pedal travel. No sweat.
I also ordered a 10' stick of 1.5" aluminized exhaust pipe, which will be combined with some bends from a crap set of 1.5" headers, to make the undercar coolant pipes. The theme here is "finish all the undercar stuff so I can do brake lines, fuel lines, and wiring."
I like the cam flip idea! Good job!
You'll need to log in to post.


