Yesterday I pulled the trigger on this rear axle. It's the factory 3-link, 8.8, 3.55:1 Posi out of a 97 Aerostar.

I turned the 944 around in the shop and let the two of them get used to each other.

I'm 90% certain that I will end up shaving the 4 bump stops off the axle - but just in case they line up with something I'm going to wait and get the axle under the car. I've also got to swap the disc brakes off the 7.5 axle (hoping this is possible).
Here's an odd feature of the unit - these cast iron counterweights are on the short side of the axle - which is counter-intuitive to me. So that makes them counter-intuitive counterweights.

Sparkydog said:
Here's an odd feature of the unit - these cast iron counterweights are on the short side of the axle - which is counter-intuitive to me. So that makes them counter-intuitive counterweights.
I would think it's some kind of vibration dampener, i wanna say i've seen them on some axles before
edizzle89 said:
Sparkydog said:
Here's an odd feature of the unit - these cast iron counterweights are on the short side of the axle - which is counter-intuitive to me. So that makes them counter-intuitive counterweights.
I would think it's some kind of vibration dampener, i wanna say i've seen them on some axles before
Yep, those are late-in-the-program NVH bandaids.

I re-filmed my car running and updated the link back in my previous post in case anyone wants to see it in decent resolution.
Faked 1st start video link.
So next up with the newly acquired 8.8 rear end was to get it under the car.

At this point I was happy to learn that the geometry for the Aerostar trailing arms and the Mustang are the same. (Aerostar arms are the longer ones with the spring perches at the back of the axle.) However the Aerostar bushings are 1/4" wider than the Mustang, the arms themselves are about 1" longer and the mounting bolts are bigger diameter. But for mockup purposes I shaved the bushing width down and stuffed them into the 944 using the Mustang bolts for now.

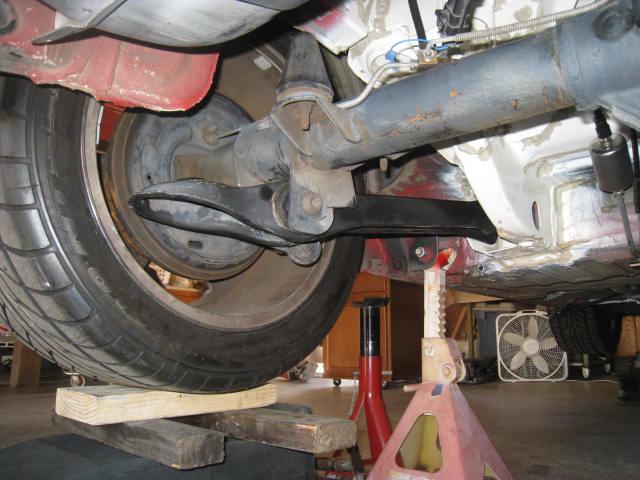
So with the pinion angle at approximately the correct angle the axle sits too far back in the wheel well if I were to use the stock Aerostar trailing arms.

Next up is to decide which arms to use/modify and then get the axle hung up in there so I can fab away at 3rd link stuff, coilover stuff and panhard bar stuff. If I use the factory 3rd link bushing on the axle then I think I'm going to have to move my battery again. It's hard to see in this picture but the bushing is on the left of the frame and the 3rd link would need to run directly into the back of the battery tray - just to the left of the now abandoned Mustang 4 link bracket.

Meanwhile exhaust parts appeared.

I switched back to my 96 Mustang trailing arms, set the pinion angle to approximately where it needs to be and then fabbed up a couple of quick, temporary BRACKETS to hold the rear axle at ride position.


Now the 944 is ready to start rigging up the 3rd link, shocks and panhard bar equipment.


Once I started checking out the prices for panhard bar kits at places like Summit, I quickly skedaddled back to the wrecking yard and grabbed a PH bar and 3rd link off an 06 Mustang. While I was under the rear seat of it I stumbled across 2 really nice fuel pump access port covers. Somehow these made it out of the yard for free, but the PH bar and 3rd link were about $60 with tax (which would be $20 anywhere else but metro SoCal).

Once I had the rear axle assembly hung under the car at ride height I was able to slink around on my creeper while staring, holding various parts up in the air and drawing an occasional sketch. At first I was freaking out that there was no way to stuff all the gear into the small pockets of space surrounding the axle.


But eventually I started to hatch a plan or two.
Regrettably, Plan A involves cutting out a large chunk of structure I grafted 2 years ago.

But that's the way I seem to work on this stuff - iterate and re-do. Hopefully I will be able to package the 3rd link anchor points, route the exhaust and muffler, relo the battery and fuse block and not melt the nylon fuel lines in the highlighted area. If I can't - then Plan B is to delete the spare tire and storage cavity and put the muffler in that area of the car.
In reply to wheelsmithy :
Thanks! (I think?) 
Good news! I finished with pre-cat exhaust 1.0 and also did a quick mockup of the muffler in order to hear how it sounds. This allowed me to run the motor for a long enough time that I discovered...
Bad news! I've got exhaust bubbles in my coolant and coolant in my exhaust. So the motor is coming back out of the car. Yay!


I also noticed that I have a weird leak on my T5. Looks like it's leaking at the splits in the case rather than out of a lip seal or something easy to repair. So - more reasons to pull the motor out again.
Back at the rear of the car (heh!) I created an inspection window! Actually the real purpose is to start designing/packaging the 3rd link and BRACKETS, the muffler and the shock/possible coilover mounts.
Before.

After.

There goes about 40hrs of fab work and here comes at least another 40!
I'm still not sure why you didnt go with the 8.8 from a sn95 v8 mustang that should have been a direct replacement for the 7.5 that was in the car? would have prevented a lot of the major changes you're having to do.
regardless this thing is still awesome.
In reply to edizzle89 :
Mostly because I talked myself out of 4 link and into 3 link/PH bar.
Edit: And I needed more room to package the muffler. So either the area I cut out had to go or the spare tire and storage well.
That is amazing work. I am in the process of doing a similar project with a TR-7 and Miata. The plan is to swap the entire drivetrain and suspension of the Miata into the TR-7. I am about to install the front clip from the Miata into the TR-7.
I'm curious about how you mated the Ford front clip into the 944. How did you reinforce the frame rails? It looks like you fabricated a lot of sheet metal in the engine bay to make it connect. I assume all the white parts are what you cropped into the 944.
I have to cut out the TR-7 front frame rails and install the Miata front clip. Just worried about making it strong enough
Any help is appreciated.
Rob
In reply to SeriousRob :
Hi Rob, you're basically right about how I did it. Here is a link to another blog where I took more pictures. It's a tedious read but full of a lot of detail:
Page 3 or 4 is where I started cutting up vehicles.
Link
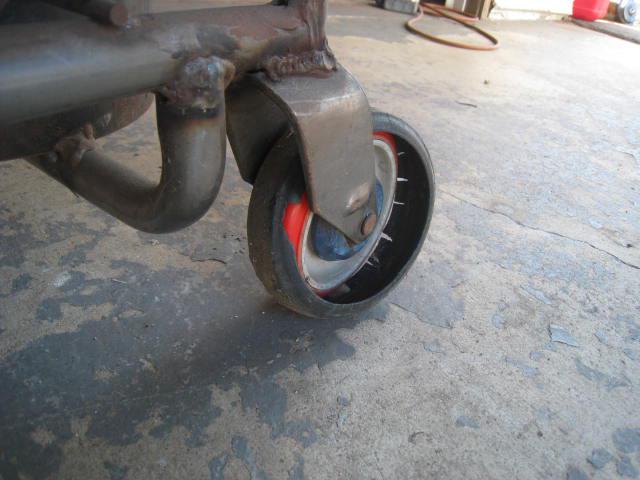
My welding cart has a flat tire. The way things work with me is that this probably means I will build another welding cart sometime soon.
I'm having "fun" dealing with consequences of decisions! Now that I have the Areostar edition of 8.8 I get to play a series of 2 steps forward, 1 step back. Mustang trailing arm bushings are 1/4" narrower than Aerostar and run 1/2" dia bolts. Aerostar uses 9/16 dia bolts. But the bushing OD's looked identical - at least to my old eyes wearing glasses under the car with a carpenters tape measure. But in reality the bushing OD is 0.1" bigger on the Aerostar. So my brilliant plan to just swap out bushings on the axle end of the Mustang trailing arm went kaput.
Next up was plan B. Use Aerostar trailing arms, shorten their length by 7/8", drill out mounting flanges on the 944 so they will accept 9/16" bolts, shave 1/4" off width of forward bushings on the arms. Ready, aim, fire! Shaving - check. Shortening - check. Drilling out holes to 9/16? Oh, yeah I did myself a favor back when I grafted the Mustang frame into the 944 and "improved" the mounting flanges by welding in some washers so the flanges were beefier around the holes and wouldn't oval out over time. And just for the sake of overkill at that time, I used grade 8 washers. Which are hardened. Especially after welding + "air quench". So now those kick ass washers like to eat drill bits.
Action shot of trailing arms getting shortened. Oh and now coil overs will be mandatory.

So I had to halt progress on the trailing arms while I figure out how to get myself out of the hard washer mess.
Meanwhile I'm prepping to slice the tunnel down the middle to widen it for the offset 8.8 pinion location. I'm also going to cut through a central piece of 944 frame so I added in some temporary bracing before I cut.

Can you weld perches onto the modified arms? Either modifying the ones you cut off or new ones?
And since you’re shortening them, can you cut the front mount off of the mustang arms and weld that onto the Aerostar arms?
In reply to jfryjfry :
Why yes! Yes I can! Action shot of my ad hoc forest-based welding jig.

This stuff has happened:
Another chunk of virginal Porsche metal was removed.

In order to widen the tunnel to make room for offset 8.8 pinion and eventual snaking of exhaust pipe. And until the side of the tunnel was removed I could not proceed with getting a drive shaft made.

Now I have a drive shaft.

Except I did not understand that my later-model 8.8 has a bigger pinion flange than most of the historic Ford fleet. So I can't bolt things together until I rectify yet another oopsie.

And speaking of oopsies - I am famous for cutting through stuff when it is on the opposite side of where I'm cutting. So in spite of being careful not to cut through the fuel lines and in spite of stopping to check under the car a couple of times during the tunnel surgery, this happened!

Face palm.
After 2 different plans for LCA's on the 8.8 I decided plan C was going to be the new plan: aftermarket LCA's so that I can replace bushings as/if they wear out. So these red guys have arrived and I've mocked them up. They are red only by coincidence - for some reason the red versions were $10+ cheaper than black versions. The next step is to drop the 8.8 back out and trim off some of the Aerostar specific brackets that are in my way.


There's some irony in removing Porsche suspension in favor of Aerostar suspension, but I can't quite put my finger on it. 
I'm glad you're not afraid to remove metal to make things easier. Excellent progress.
I have widened the driveline tunnel 2-1/18 inches and started fitting the sheet metal back into the car.


The passenger seat will still fit and slide, but there's very little free space left on that side.

More shaving. This time was different tho - the metal wasn't virgin Porsche it was mostly Mustang. I'm clearing the way for a 3rd link bracket, the muffler and another attempt at a battery tray.


Also shaved were a couple of bump stop brackets off the Aerostar 8.8.

Then it was time for an unexpected ass-kicking. My Aerostar 8.8 had drum brakes while the 7.5 Mustang axle had discs. So I needed to swap the mounting brackets for the discs from the 7.5 to the 8.8. This meant removing all the axles. I randomly picked the 8.8 to start on and thanks to YouTube I understood the basics of getting the C-clips out. I even learned to be wary of the locking bolt that holds the big retaining pin in the spider gear cage that keeps the axles from barfing out the C-clips. This locking bolt can be difficult to remove and if you strip the head of the bolt things get serious real quick. However on my 8.8 things went well and within a short time I had the axles out and the drum brake backing plates were off.
Next up was the 7.5 and the start of my ass kicking. The 7.5 locking bolt (which is slightly smaller than the 8.8) promptly rounded off the head. Next was splitting no less than 3 sockets. Then some time surfing the internet for recovery plans. I tried using a punch with no success. So then came what turned out to be one of the nicest looking plug welds I have ever created. With the larger bolt/nut head welded on I was able to turn the locking bolt!!!
Success!!
Except... nope the locking bolt broke off at about the halfway mark. That's it sitting on the side of the diff housing.

Isn't that plug weld beautiful?!
At this point I broke out the whizzwheel of death and sliced down the side of the retaining pin to sever the remains of the locking bolt. This meant I was sacrificing the guts of the differential out of the 7.5 but I was OK with that. After doing the slice, the next thing that should have happened was the retaining pin should slide easily out of the spider gears - just like what had happened with the 8.8. Except no, it wouldn't budge. Several hours later I gave up and just cut the friggin spider gear cage entirely in half and yanked the middle out. Finally the axles would move and the C-clips came out. I never did figure out why the retaining pin was trapped but I got my precious disc brake mounting brackets! There's some washers on the backs of the spider gears that must have worn such that they blocked the retaining pin.. heck I don't know.
Here's the carnage.


Obviously the guts of this 7.5 open diff with 2.73 gears will never see action again - except at the smelter.
Starting to "design" where stuff is going to live using hi-tech 3D software. The muffler ends up at a weird orientation but I think its going to work out OK.


Then I added the battery, which I'm trying to tuck between the airspace for the 3rd link and the 944 frame rail (or what is left of it after all my "mods".)


I've been getting a lot of free help lately. I think he's getting old enough that the noise from sawzalls and whizz wheels of death don't bother him any more.