1 ... 18 19 20 21 22 ... 42
JoeyM
JoeyM Mod Squad
8/29/13 7:44 a.m.
JoeyM wrote:
tuna55 wrote: Really sorry, so basically you have to make a brand new pedal box? I can't imagine that's going to be quick. Do you have any other options?
I'm hoping and praying that dad only needs an extra inch or two of room. If that's the case, I may have a pre-made part off the back side of a washing machine that could be appropriated. If he needs six more inches, I'll have to fabricate something.

Here are the parts I have on hand that might be useable as a pre-made/usable-with-slight-modification pedal box: Dad is on his way over here to so we can measure how much room he needs.

Adrian_Thompson
Adrian_Thompson UberDork
8/29/13 7:51 a.m.

I just have to say this is a simply amazing effort. Your parts sourcing ability. Your willingness to just jump in and try it, try it again and keep working until it's right. This is a project you should be massively proud of yourself for taking on. Even if it's gone beyond challenge budget, it's still a great example of low buck ingenuity.

JoeyM
JoeyM Mod Squad
8/29/13 9:28 a.m.

Thanks, Adrian. I appreciate the encouragement......sometimes I REALLY need it.

Dad just left. The back of the clothes drier (left side of picture) would give us 2". and would be easier to retrofit. The piece closest to Gertrude would give us a 2.5" of extension for the pedal box, but it would require some extra work to make it work. Dad says that he'd be fine with 2", but I'm thinking that more space is better. Either way, the pedals will need to be moved.

The method I'm leaning towards is using the drier back, but working it over with a hammer and shotbag to bulge the metal in the middle, creating more foot room. I am betting that I can get 1/4" without having significant distortion.

I'm not sure how I'm going to remount the pedals. I've toyed with replacing them with a different setup entirely. Stay tuned to see what I decide to do. In the mean time, I'll go back to working on the gear selector.

JoeyM
JoeyM Mod Squad
8/31/13 9:02 p.m.

The new steering wheel is in, but the horn button is wrong. (the spring in the kit is the wrong size.)

goal achieved: the cockpit feel is improved (i.e there's no longer a risk of hitting your wrist wrist on the door while steering)

I'll post photos later

JoeyM
JoeyM Mod Squad
9/1/13 1:13 a.m.

With the old wheel, holding it left so little clearance that you ran the risk of bashing your watch on the door. The new, smaller wheel leaves a lot more room.

Back to working on the sword-handle gear selector. Here's my ghetto-looking tsuka (handle) core Here, with the tsuba (hand guard) and some bondo to smooth the seam a little.
I'm planning to to use the hole in the hand guard as a peep hole to see what gear you are in. The hole bears a passing resemblance to the hitsu ane holes that some hand guards used to hold the ends of small utility knives . Here you can see the underside of the handguard; i.e. the surface of it that will face the top of the console, and thus be out of site. I have two screws in it to hold the hand guard to the core of the handle.

JoeyM
JoeyM Mod Squad
9/1/13 3:48 a.m.

couldn't sleep

PS - yes, I know the handle wrapping is rubbish. I'll redo it. I'm not at my best after 4am. This will still give you an idea of the handle colors, and that was the main idea.
PPS - No, I'm not going to call it tsukamaki

JoeyM
JoeyM Mod Squad
9/1/13 8:44 a.m.

Dad and Mom came over for a few minutes this morning. Gertrude showed Mom where the dog treats are while Dad tried out the new wheel. It definitely gives him more cockpit room, too. Win all around.

JoeyM
JoeyM Mod Squad
9/1/13 5:49 p.m.

I took the hand guard back off and rattle canned it brown so it will (eventually) match the fenders (....that are not fabricated yet.)

JoeyM
JoeyM Mod Squad
9/1/13 11:40 p.m.

the second handle wrapping is better....still not perfect, but probably good enough to tolerate

JoeyM
JoeyM Mod Squad
9/2/13 9:17 p.m.

tried to permanently fasten the lacings (ito) in place by stitching (that failed). Half the length came unwrapped. The 2.5nd wrapping (i.e. rewrapping the half that unwound) was accompanied by the strategic application of dabs of hot glue, and looks better.

I also started messing around with ideas for building the pommel guard/butt cap thing (kashira.) In a sword, it slips over the end of the handle core and is tied on by the lacings. In this handle, it will slide inside when depressed. (i.e. it will be the button to activate the gear selector mechanism.)

The first attempt was to use the shrinker to make the bend. The radius is too small for the shrinker. I anticipated that, but tried to compensate by using a drill to perforate the flange I was shrinking. (less material == easier shrinking) That didn't curve enough. I cut slits, and that looked horrible. Going to bed.

RossD
RossD PowerDork
9/3/13 10:44 a.m.

Great work!

JoeyM
JoeyM Mod Squad
9/3/13 11:05 p.m.

Thanks! I appreciate it. A lot of times I get frustrated with myself because I don't have any clue what I'm doing. I just try to think of what might work, give it a shot, and see if things happen the way I expect. A lot of times it does not. Hearing comments like yours, and Adrian's above, help me to feel like I'm accomplishing something.

No time to work on it today (off work @ 10:00pm) and probably too busy to make headway again until Friday. With luck, I'll get the button-thingy built this next weekend, and then be done with the gear selector.

After the gear selector is done (whenever that is) I will go back to the spare tire mount or work on riveting the passenger door. (The metal skin is bent into place around the frame, but is not riveted into place.

JoeyM
JoeyM Mod Squad
9/8/13 6:45 p.m.

third try at a "butt cap" (kashira) for the "handle"; i.e. for the button you'll press to choose gears. The first one (right) looked like absolute rubbish. The second attempt (middle) was functional but ugly. We'll focus on the third attempt (left).

JoeyM
JoeyM Mod Squad
9/8/13 8:51 p.m.

Third try at button:

I started by making a mini-buck to shape the metal around. This began with using the band saw to cut two pieces of dowel, a 1 1/8" diameter and a 1 1/4" diameter piece. (Yes, they should be identical, but I messed up the handle, and I'm building the button to match it.)

Next, cut part of each dowel away. I was going to do this with the band saw, but it made a funny noise when I put it vertically, so I decided to leave well enough alone and cut the excess off with an angle grinder. Naturally, the cuts were a little on the crude side.

I rubber banded them together, rummaged around for some screws, and used the drill press to drill some holes for the screws. Then I screwed the two pieces together 
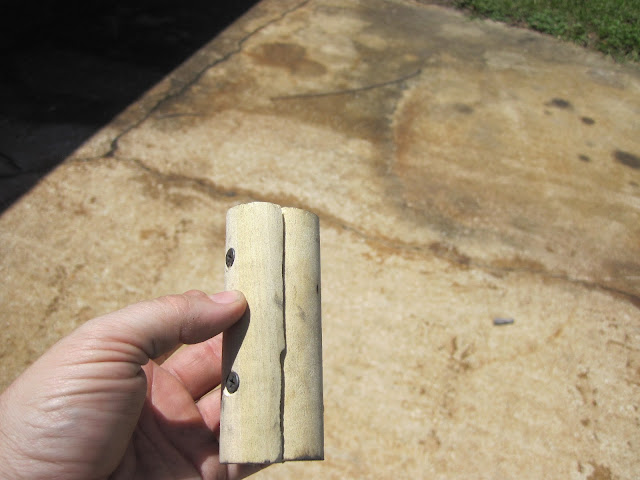
The screws were too long so I the angle grinder again to cut the tips of the screws off. Then I took JB Weld putty and filled in the cracks between the two dowels. A little sanding, and the mini-buck was complete

Next, I cut the metal and bent it around the sides of the mini-buck I made it slightly longer than needed so I could later trim it for a better fit.

I repeatedly alternated between hose clamps and tin snips as I snuck up on the exact size needed for the metal side of the button.

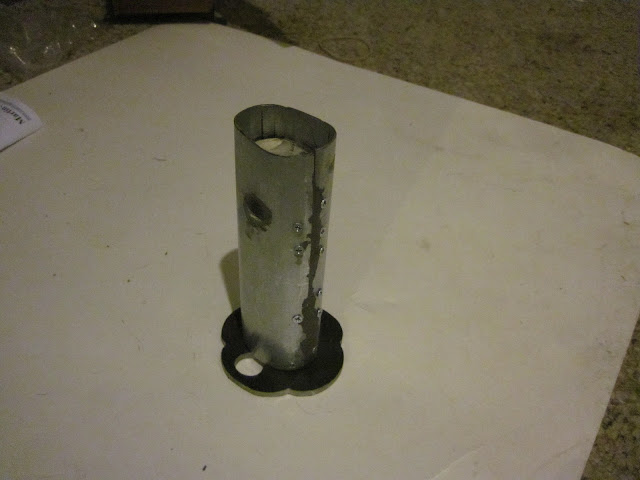
The sides were trimmed, welded together, and ground smooth on their outside surfaces. Afterwards, many small cuts were made to the top edge of the button, and that edge was bent inward with locking pliers.

The rough edges and peaks of the edge were ground down with an angle grinder. This edge provided a larger surface to weld the flat end piece to.and grinding gave a nice beveled edge.

I then put some low temp moldable PCL into water, boiled it in the microwave, and shoved it into the cap while it was malleable. I then stuck a 5/8 dowel in the middle to make room for the depressable top of the gear selector to fit into the button.
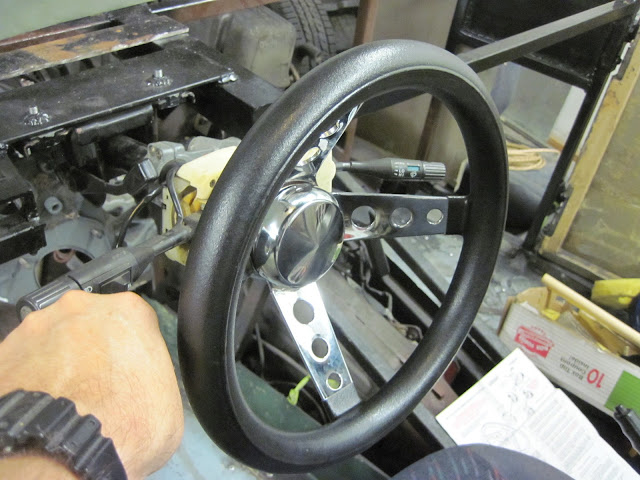
JoeyM
JoeyM Mod Squad
9/8/13 9:02 p.m.

I grabbed the dowel with a pair of vise grips and twisted it out of the plastic. The button works pretty well in the handle; i.e. I can get the desired behavior by pushing the button.....I'll admit, though, that I'm a little worried that it doesn't return with the same strength I would have expected. Still, I'm happy enough with it to have rattle canned it brown like the hand guard.

I also finished the lacings (ito.) Sword websites show two basic knots to use at the end, ura and omote. I ended up going with neither, and just tucking it underneath and then using a dab of hot glue.

It's "inspired by" swords instead of being a legitimate replica.....just like the rest of the car.

JoeyM
JoeyM Mod Squad
9/8/13 10:05 p.m.

I just put another coat of spray paint on the button.....going to bed now.
[Yes, I checked for canoes....none on the horizon.]

JoeyM
JoeyM Mod Squad
9/9/13 6:40 a.m.

The mini-buck turned out nice enough that I've toyed with the idea of starting over from scratch, making a new "sword-handle" core from wood and JB Weld. (I think I could make a better, more symmetrical one now.) I probably won't, though.

"The ideal is the enemy of the good enough"

Toyman01
Toyman01 GRM+ Memberand PowerDork
9/9/13 6:53 a.m.

Keep up the great work Joey!!

Looking good.

JoeyM
JoeyM Mod Squad
9/9/13 8:20 a.m.

Thanks. It came out OK......I could now make an even better one, but I think the handle is good enough to work.

next up is probably the sticky business of mounting the pedals so that Dad can use them. I guess that means figuring out the size of the pistons in the calipers/drums and working with Dad some more to figure out the pedal position and height. I am not looking forward to that.......getting it wrong could be very bad.

JoeyM
JoeyM Mod Squad
9/9/13 11:22 p.m.

thinking ahead about fenders.

Plan A: complete stock style fenders.

Plan B: if, for some reason, I can't do that, cycle-style fenders like this should be easy After all, I have a shrinker stretcher.....

bgkast
bgkast GRM+ Memberand HalfDork
9/10/13 9:24 a.m.

Option c: no fenders? I think it will look hot with out!

Taterhead
Taterhead
9/10/13 9:43 a.m.

Joey I signed up just now so I could maybe give a suggestion. I didn't see where you got the steering mechanism figured out 100%. I have a '97 pathfinder that the steering arm is almost completely horizontal from the firewall to the front of the engine bay. Similar to the picture you posted with just the chassis. Maybe this could be something you could look into. I think it might solve the clearance issue with the carbs. Also, in my opinion, how you do the roof would dictate how the front fenders would look. Regardless, I've read the whole build thus far and must say you've done an awesome so far. Keep it up.

JoeyM
JoeyM Mod Squad
9/10/13 10:17 a.m.
bgkast wrote: Option c: no fenders? I think it will look hot with out!

Hmmmm.......hadn't considered that, but I'll give it some thought.

I already have some metal shelving for running boards, and the ultra-narrow running boards and fenders are one of the things that distinguish the austin/datsun car from similar era fords. This deserves consideration, though....it certainly is a heck of a lot easier.

Taterhead wrote: Joey I signed up just now so I could maybe give a suggestion.

Thanks. Welcome aboard, I hope you enjoy the insanity. None of us are normal here.

Taterhead wrote: I didn't see where you got the steering mechanism figured out 100%. I have a '97 pathfinder that the steering arm is almost completely horizontal from the firewall to the front of the engine bay. Similar to the picture you posted with just the chassis.

Thanks. I think I've got it worked out, but it is good to know that professional engineers have built cars set up the way I was thinking. I'm going to go with the ultra narrow K&N filters; they give enough clearance for a straight shot from the end of the column to the rack.

I have to make at least one more filter cover (possibly two, since each one looks better than the last. Then I could have both of them fairly high quality.) The key appears to be using thicker steel where there's less danger of work hardening and cracking. I'm also going to try starting on the difficult, curved bits and save the easy long sides towards the end.

Taterhead wrote: Also, in my opinion, how you do the roof would dictate how the front fenders would look.

I'll be using a complete phaeton similar to the original car. The key datsun styling cue there is that the top must be wider than the windshield, overhanging enough on each side to cover the semiphore turn signals (...which look sort of like side mirrors)

http://www.classiczcars.com/photopost/03-sports-car-graffiti-japan/p6378-datsun-11-phaeton.html

Taterhead wrote: Regardless, I've read the whole build thus far and must say you've done an awesome so far. Keep it up.

Wow, thank you! I'm flattered.....it takes a lot of interest to wade through 20 pages.

Taterhead
Taterhead New Reader
9/10/13 12:47 p.m.

I'm a Datsun nut & this build is a pretty cool "from the ground up" endeavor. Reason I mentioned the roof is if you were to go roofless then I could see it being fenderless. Otherwise it might just look unfinished. That's just my opinion though. I will continue to follow your build and I'm excited to see the final outcome.

JoeyM
JoeyM Mod Squad
9/10/13 2:22 p.m.

I live in FL, so much of the time the convertible top will be down. I'm still leaning towards fenders, but I may register it and get it on the road without, then add them later as time permits.

One of the hard things about the top, if I want to keep it fairly accurate, will be the side curtains that can be lowered as needed. (I cannot find a picture right now, but will look for one.)

1 ... 18 19 20 21 22 ... 42

You'll need to log in to post.

Our Preferred Partners
mw7BZTEqCxMzNh6WJvbP02TpRyZvnwuhEmc7BXDr4WkTnbqYGqmimVPGMy4zQpBq